


jpage
-
Posts
3,006 -
Joined
-
Last visited
Content Type
Forums
Gallery
Events
Everything posted by jpage
-
I thought that you were installing a soft top?
-
I see complete new runningboards with the rubber moulded to the boards for sale for under $1000. US, but again, they are a good replacement but not the original configuration. As far as The Plymouth Doctor goes, I've heard rumors that he may be closed but I'm not sure, I've only dealt with him once, a couple of years ago. You may want to start a separate thread inquiring about him. Seems activity on the forum for these cars has slowed down in the past few months! As for glue for rubber to metal, I'm not sure. I've read that urethane type adhesives work well and I've heard that some have had good results with the standard contact cement. I think much of the adhesion depends on the cleanliness of the rubber and it helps if it's roughed up for a better grip. There are a few Youtube vids that cover some of this issue. Sorry that I don't have any definitive answers.
-
Using a product like fender welt, at least the real coated cloth type will not cause any issue, it's been used on almost every antique car with no issues!
-
As far as I know, there is no one making the original style boards with the metal insert and tabs. The was a fellow here in the states who could mould the mat onto the original steel plates but he has since retired and as far as I can find, the business is defunct. There are a few shops here and in Canada that will cement a new mat onto the the board itself, but they are not authentic and they are quite expensive. I've also heard some bad feedback on quality and service on a couple of these companies. I started to make a mould for my '36 Dodge mats, a replacement that would cement over the original steel plates, but have since put that on hold do to the overall expense of material. Just to make one set, the initial cost was around $3,000 just for the mould materials . They take a lot more material than I expected and who knows how many that would have to be made to get a good set! I had planned, if it came out okay, to try to sell some, but I'm not sure that there would be a strong enough market to justify the expense. The largest portion of cost is in the moulds themselves and finding a bonding agent that will work well. There have been companies that claimed to be able to machine rubber stock, but I haven't found anyone to do that, and there again, 1 set is outrageously expensive. If you are not too concerned about originality, you could possibly make a set from stock rubber running board rubber by cementing a piece of matting to a very thin piece of rubber sheet to give you a flange to wrap around the plates. There are some patterns of mat that resemble the original look. Unfortunately, today, we are losing more and more of the specialized companies that once served our hobby! Hope you find something!
-
Larry, you may want to check a parts interchange book, while the Dodges and Plymouths may look alike, there could be some differences in the part sizes. I know that the '36 Plymouth front fenders are a little shorter than the '36 Dodge fenders. Just a heads up.
-
I use the flange on the real coated fabric fender welt. I've noticed that my '36 dodge uses a buffer between many of it's parts, I assume more to quell squeaks than anything.
-
GM at that time used nailing strips which were fastened to the door panel. There are individual replacement nails that crimp onto the board available but it does require removing the fabric from the door panel edge. I don't think that there is a simple way to repair that correctly without some work. Velcro, is not the answer. Sometimes, there is no easy fix! Restoration Specialties and I'm sure the GM parts guys carry them also.
-
Like Trimacar said, do not use a plywood substrate. Best to do it correctly or you WILL have issues. You do not glue the roofing material down. Best to send some photos so that everyone is on the same page! The top bows, if missing , should be replaced. There is no quick and easy fix! There are several good Youtube videos that cover this topic and the advise given here is sound! I think that you'd be wise to do some research and check photos of that vehicle to get a better idea of how the top is configured!
-
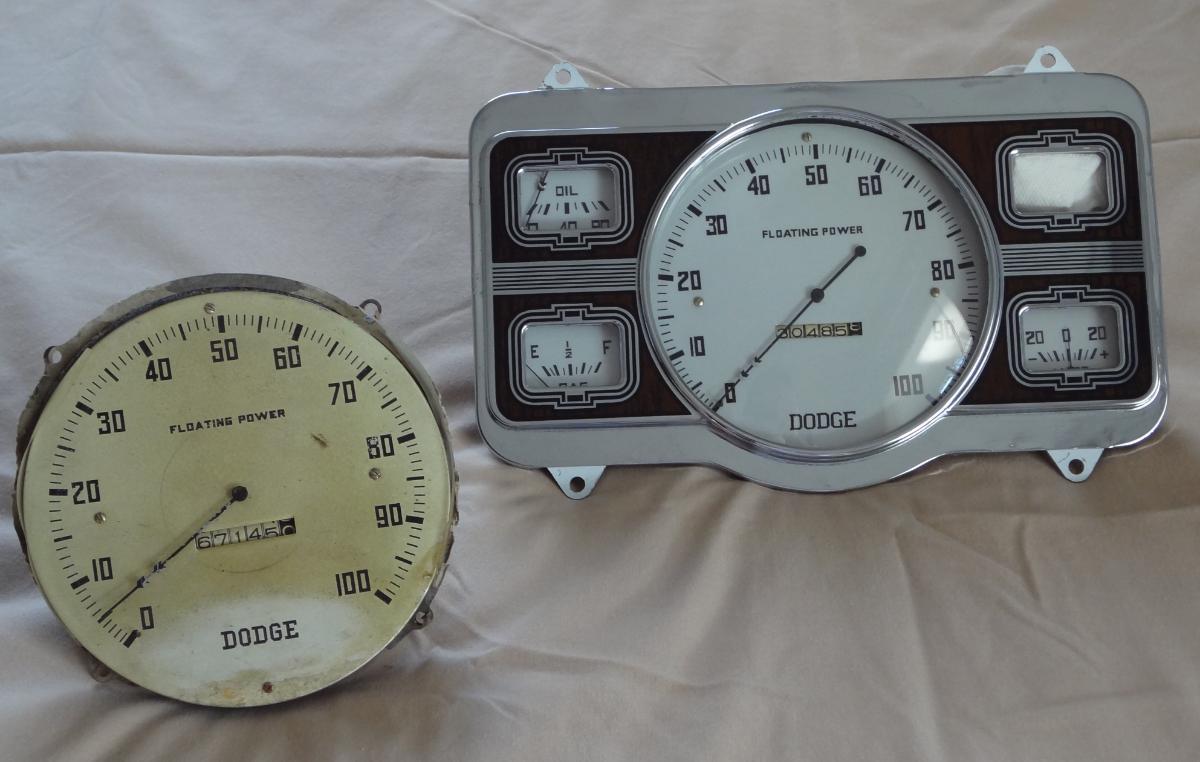
That is a silk screen decal printed on clear water transfer paper. The panels where nickel plated and the bars on the decal where see through so that the bright nickel shows through the decal. The angle of the pic and the bad lighting does make it look a little yellowish, but it's bright. I had mine chromed instead of nickel to avoid the yellowing that sometimes happens with nickel plate. The dashes and garnish mouldings were usually woodgrained with similar grain pattern. That you could probably do yourself with some practice. You would prep the dash and/or other parts then prime. Then you would topcoat the parts with a satin finish paint that will serve as the base wood color. Usually, this color is evident on the back of the dash or around the inner edges of the mouldings. It's usually a medium tan or light brown color. Then the wood grain is applied with standard wood stain in your choice of color with some old paint brushes. You'd be surprised as how you can get a realistic finish with some practice. there are a lot of vids on Youtube as to how to do this. I've tried some small parts with fair success. The actual grain pattern on the other parts my vary from the grain on the door panels, at least in my cars it does. Here's s pick of my instrument panel which shows the decal better. You'll note that I had a graphics shop make some new transfers for the instrument faces which were applied over the originals. Really brightened them up!
-
If you went to a glass shop that doesn't know how to mount the glass...I'd find another shop! At Lowes yesterday, I asked the girl in the tool department where the cut of discs are, her answer: "What are they?". I replied , "baby, if you don't know I'm not tellin' "! On your channel, to determine the thickness of the tape you need, measure the thickness of the glass and the width of the channel opening and subtract the glass thickness from the channel width, then buy the tape that is closest in thickness to your answer. A little soapy water will aid in inserting the glass and tape into the channel. Be careful, that glass can crack easier than you think!
-
The top piece mount on the door top, but I'm not exactly sure which way it faces. you'll have to test fit a piece. Looks like it gets glued on. Since you have a hot rod anything goes now. If you don't have the windlacing around the doors, you may have to get some universal type seal to seal up the sides. To me, the repro rubber doesn't look like it fits as well as the original so it may not work as well as another profile on your car. With the repro seal, don't expect a new car feel or sound. You'll probably find too, that the mounting flap isn't quite long enough to really support the rubber seal. I have to modify mine to fit correctly. As said before, in your case, you might be further ahead to find a profile to glue on the outer flange of the door's perimeter for a better seal. Check out Restoration Specialties' catalog on the web to see a variety of different profiles. They will send you free samples to try. They supply much of this rubber to other suppliers. Hope this helps.
-
The big issue is trying to get one piece to match the other decals. I had an extra ash tray decal but decided to add a period radio, so I tried to make a decal for the control head from the ash tray decal. That attempt failed, so I was forced to buy another set of decals. Somehow I ended up using both of the tray decals and now the set is no longer available. I could buy the whole kit and cabootle from the original manufacturer, as he's retired, but it would cost too much money and who knows if I'd be able to sell any now. the grain pattern on yours look very much like the Dodge but the trim ribs run horizontally. here's a photo of my dummy dash door with the decal.

-
Boy, that came out really nice! I've been trying to find a graphics company to make me a copy of a silk screened decal that I had for my '36 Dodge but to no avail! They claim that it will not photograph in enough detail. Of course, I only need one for an ash tray! Is the film wrapped the whole way around the panel or was it applied like a decal?
-
Usually, a section that has one profile will fit into a channel along the top of the door, from the front beltline to the rear top edge of the door . There should be another profile, a flat flap type, that will usually mount behind the lower edge of the door upholstery panel and run along the bottom of the door. I've looked through all my catalogs and can't find a definitive part number for the '37 Mopar upper door seal, but my books are older. The bottom seal is the same for '36-'38. Maybe you could post a profile shot of what they sent you for the top; some suppliers will substitute a universal profile that may or may not work as you did not say where you purchased the parts. I have found that in many cases, reproduction rubber parts can be close in appearance and fit but not always made the same as the original. On these cars, the original bottom seal was cast with a metal backer strip for rigidity where it fastened to the door using the upholstery retainers. The repros are all rubber. There should be a cloth windlace that is fastened around the inner perimeter from door sill to door sill that makes up the biggest part of the door sealing system.
-
You might check with your state. In some states, upholstery shops have to be licensed. Pa is one of those states. There are companies that you can purchase authentic materials from, mostly manufactures, at reasonable prices, but that will require some searching and most times minimum purchase requirements. I've tried my hand at upholstery and have found that there is more to it than meets the eye. It will take some time to learn the trade to the point where you can actually work for the public. Like any trade, almost everyone thinks they can do it, but it doesn't take long to weed out the unskilled. Working in the public realm, today at least, can be quite taxing in any of the trades. The public can be hard to work with, payment can be difficult at times, legal litigation is always lurking and local and state regs. can drive one nuts! Then there's the long hours, no paid vacations, no paid sick time, material shortages and unexpected material price increases, not to mention the capital needed to get established; I'm not saying don't try, just saying to weigh all possibilities before you make that jump. I'm not trying to paint a bleak picture, as I had my own construction business for many years and have experienced all of these issues, but am I glad I did it, yes, it was something I always had wanted to do, was it always honey and roses, no but the good outweighed the bad. If this is something you really want to do, go for it, work hard and it may pay off, but do your homework first, check out possible suppliers, check out the business needs, check out the regulations, find a good mentor if possible and know what to expect before you start! Good luck in your endeavors, no matter what they may be.
-
Nice looking car ; I thought I've seen this car before. It's May of a 2002 'Old Cars' calendar shot! Nice looking car!
-
Looks like you have your work cut out for you. My cars looked like yours when I got them. It's gonna be a long road! Looks like the front seat pan is in useable condition and the towboards look fair. You'll know more when you get them cleaned up. Looks like the left rear floor might have issues. New floor pans are available but are pretty pricy and may need some work to get them to fit. Looks like you're missing some of the door check straps. I have patterns for the firewall pad and trunk back board along with the kick pads if you're interested, or I can make those for you. The original fastening hardware for the door panels is available from Restoration Specialties in Pa. Tricky to install but worth the effort. The dash knobs are not available new and are hard to find: I had new ones made by a steering wheel caster, again they were hard to replicate. There is also a box like cover that goes over the battery hole in the floor and fits in that large hole in the seat base. I have parts for the seat adjusters if needed, trim parts and a good many small parts too. Don't forget that I have that whole roof section too. If you have questions or need help finding parts, please let me know. These are great cars but are hard to restore, not impossible, just hard! If you haven't already, try to find a copy of a Motor's manual that covers your year and a copy of the 1936 Dodge Master Maintenance Manual. These books have a lot of important information in them! I also rebuild the window channels, front and rear in the front doors. If I were you, I'd stay away from ebay for parts as much as I could. Prices are outrageous, many parts are wrong and there are several guys on the forum who can help you out at fairer prices. Good luck on your restoration!
-

Where did I get these upper interior door sweeps?
jpage replied to Ovalrace25's topic in Our Cars & Restoration Projects
You might try Restoration Specialties in Pa as they were a big supplier of these items. Their ph. 814-467-9842 -
I sold my first restoration, a 1928 Ford Model A p/u and I kick myself everyday for doing it. I had hoped to use the money to restore a family friendly car, which didn't happen. Just stupid on my part, but hindsight is 20-20! I started this at age 17 and took 10 years to complete. We enjoyed it for 16 more years. The picture were taken at time of sale, still looking good! Boy, was I stupid! I snuck in the bright headlamps and shell from a coupe that I had before the truck, just to save money!


-
Without actually seeing the extent of the damage, I would think the best way to repair would be to use a Heli-coil kit and replace the threads altogether. While it's a little expensive, these do a great job.
-
Punctuation is a lost art!
-
Unfortunately, when people go out of business or change ownership, especially small businesses, they often neglect to take down or upgrade their websites. Hope you can get hold of this guy and that he's doing well.
-
The repro parts accessibility now is way better that it was in 1976. Back then, many of the parts were made in India and were poor to fair copies, which almost always , didn't fit right. There were some sheet metal parts available, but no full bodies or fenders that I can recall. The flip side was, at that time, many of the mechanical parts were still available new from NAPA and other good parts stores!
-
Looks like one of the old J.C.Whitney knockoffs! The Model A caps said 'Bool' on them in script!
-
Here's the photo I have. These were built in Florida, I don't think the other 2 were. This should clear up some questions as one can see that this is neither a Shay or Glassic. It would be interesting to find someone who actually owned one to get more info. I was going to post on the Model A websites, but seems one has to join first. Please don't think I'm bashing the Shay or Glassic cars. To each his own! I just get upset when people try to pass of one thing for something else altogether.


