


rustyjazz1938
-
Posts
82 -
Joined
-
Last visited
Content Type
Forums
Gallery
Events
Posts posted by rustyjazz1938
-
-
@nickelroadster when I bought the car it did not have the original carburetor on it. It had an Air Friction carburetor on it which was truly terrible. Having used the BB-1 on my 27 Buick, I was more than ready to make the changeover. It did end up being really tight in the Vee of the engine, but I've always been in the habit of turning the gas off after shutting the engine down for more than say 15 minutes just to be on the safe side. The engine really liked the carb swap, and I don't really plan to go back, as it is not a show car.
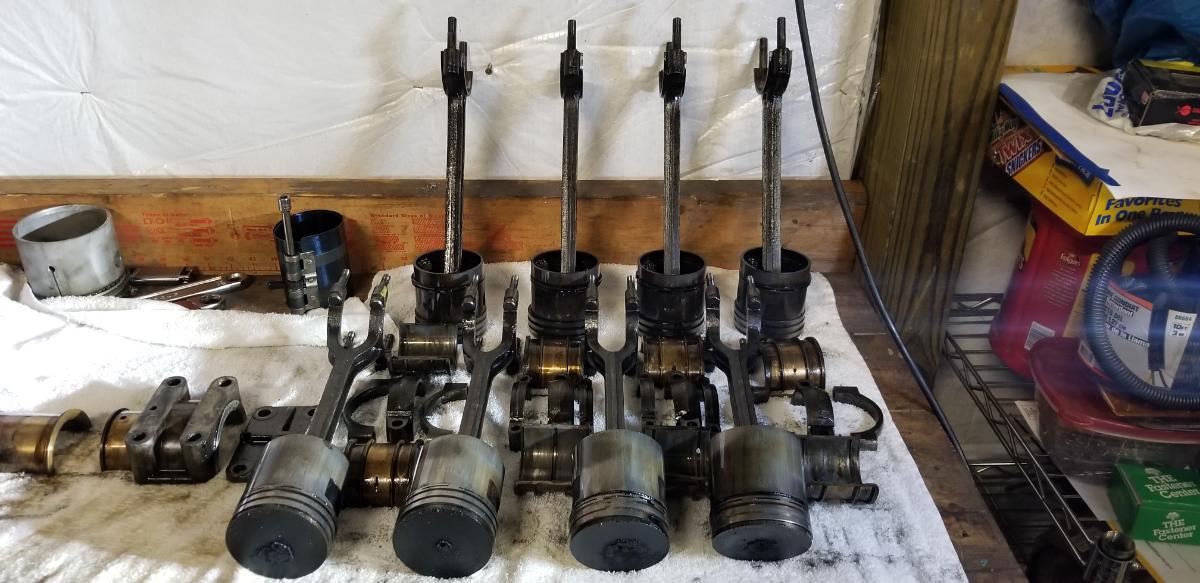
In studying the engine design and looking through the engine from New Jersey, I've become quite familiar with the design elements. Like many other Northway based engines, this one had fork and blade connecting rods. The engine from the car had issues with shims used on the shells that form the bearings; the engine from New Jersey confirmed my hunch that there should be no shims between the bronze shells that make up the bearing, since their presence would make the OD of the shell, which the blade rod rides on, not truly round. In tearing down the New Jersey engine, everything was filthy with really nasty black oil, but there were many original parts in relatively good shape. However, the bores were just past the limit of wear, and I discovered that one of the bearing shells had spun, taking out the locking pins in the fork style rod in the process.
I have a local machine shop I work with to do work on these oddball engines. He's interested in the old stuff, and does really nice work. I asked him to double check my findings on the bores, with the thought that I would have him bore it out, or perhaps sleeve it back to nominal size depending on the availability of pistons.
I dropped the parts off at his shop March 13, 2020... ☹️
The world in general and Michigan (where I'm based) decided to throw a gigantic monkey wrench in my plans...


-
 1
1
-
-
@nickelroadster Rest assured, I would never allow a fate such as that to befall the original crankcase for my car
@ericmac That particular contact has already been in the shop and has been pointing at different things he likes. We might have a plan pending... 😁
The trip to New Jersey was definitely worth the effort and time. The engine was very complete, even coming with the correct Johnson carburetor (which I have on a shelf, as folks have recommended against it's use) and an immaculate water pump impeller, which due to design tends to corrode badly in application. In the picture you can see the corroded one was from the engine I was running (and that was the best one I had). I was working with a friend to 3D model the impeller with an intent to get it printed in a heat stable material, possibly stainless, when this example fell in my lap. I'll be sure to give this one ever protection possible as I use it in the engine.
A cursory review even showed the engine had its original pistons in it, stamped with the plant build number (not the same as engine serial) and with the original stamp to indicate what cylinder it was. The engine was filthy and full of oil sludge, but it would more than suffice to be a solid base for the rebuild. It also had the dreaded fiber crankshaft gear, however, I had the steel gears from my other parts engine as a replacement. This was truly going to be a scenario of taking the best of 3 parts engines to make one good runner.


-
1
-
-
@ericmac I very much appreciate the kind regards and confidence. I hope to see you at the Gilmore some time soon if they have the Congress of the Motor Car this year.
@nickelroadster The thought had crossed my mind, however I worried a bit with the loading the bearing saddle sees, plus I think the weld would have to be cleaned back to parent metal and I'm not certain how much that would take. I also have the spare engine as a possible donor, although it was already missing parts and had an unknown history, which leads us back into the story...
The holiday season of December 2019 was upon me, giving me time to reflect on the next steps. The bearing was not the only issue. The teardown of the engine had revealed mismatched pistons and valves (thing had a bit of a shake to it when running). I had no baseline on how well or smooth this engine should run. I know the early flat plane crank V8s are not as smooth as a crossplane crank engine (1923 Cadillac being the first I believe), in my literature searches, everything seemed to indicate the engine should be pretty powerful for the era (not just advertising as I have access to some of GMs historic archives). The car never seemed to be as powerful as one would expect especially compared to my 1927 Buick with the same rated horsepower, and 2 less cylinders! Something just never seemed right to me while the engine was running.
Amongst all this planning and questions, an email appeared from @Mark Santos, the OCA and NAOC advisor for this model year:
1930 flat head V8
$xxx- ZIP CODE REMOVED
1930 flat head V8 and several others 1930 parts. My dad had the motor running many years ago, but.... best offer. Pick up in Ocean County NJ.
There was a link to a Facebook marketplace ad which has since disappeared into the ether.
For those who might be curious, Olds never made a V8 in the 1930s (not counting the Viking engine which was not Oldsmobile branded). The blurry photos were of another Model 47 engine. Opportunity was not knocking, it was two fisted pounding on my door. Having grown up in New Jersey, I was somewhat familiar with area. I had a short window of time to get from Michigan to pick up the engine due to the holidays. I called and a deal was struck. I hit the road Friday morning, driving the entire length of the Pennsylvania turnpike to meet up Saturday morning. After some final wheeling and dealing, as more parts were found as part of the deal, I picked up a very complete Model 47 engine with a casting date a month later and only a handful of engine numbers newer than mine. I turned and burned, returning to Michigan Saturday evening. The trip was definitely worth it, and I was certain I would have enough parts to make one complete running engine.


-
All,
My apologies for the radio silence, I was out with the HCCA touring after the Celebration of Brass at the Museum of the Horseless Carriage at the Gilmore Museum.
@Stude Light as you're well aware our discussions are much more entertaining than Drunk History and factually accurate 🤪
@nickelroadster the seat bottoms on my car were recovered, but the backs and door cards and trim are all original. Pictures should be attached.
When we last left off, I had mounted the engine in the stand and begun the tear down. As astute observers noticed the front main bearing saddle of the crankcase had been welded at some point in it's life. This made me extremely nervous as old aluminum like this is notoriously hard (if not impossible) to weld. My investigation unfortunately proved my fears.
If not evident in the photo, the parent material was cracking around the weld. Couple this discovery with further investigation that found issues with parts used in the previous engine rebuild (mix of valves, numbered pistons in wrong holes, mismatched piston types, etc) and the picture of the engine was not looking very good.
In the next update, there is a light at the end of the tunnel. Tune in to see if it is a train 😁.


-
Hi @nickelroadster,
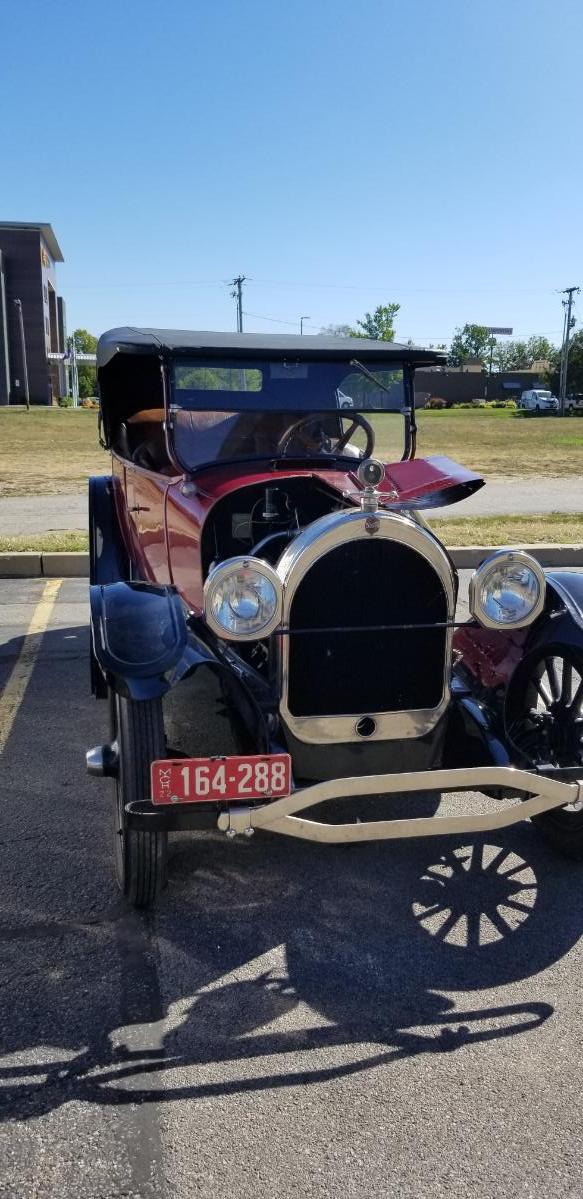
Prior to 1923, when Olds switched to the drum style headlight, the teardrop shaped headlight with the Olds logo was the normal headlight. I've found examples of headlights painted black, and what appear to be nickel plated like mine in a couple of photos. I have an advertisement (which I've seemed to misplaced; story of my life) that shows my exact car. One thing I have noticed is that the top braces for my car are different than other cars I have seen, however the ad and some other period photos I have found confirmed other cars coming with the style of top that my car has. My best guess is that the top irons were somewhat weak, and improved as a running change.


-
@Dandy Dave and @Laughing Coyote you gents both hit the nail on the head.
For some further backstory, I had big concerns when I purchased the car, as I knew with the relative rarity, finding parts for the engine would be an issue. From my studies and investigations, chassis parts are mostly common with the four cylinder Model 43 cars, but the aluminum V8 engine was an animal all to itself. What sweetened the deal, was that the previous owners had acquired a spare engine from 1923, by serial number perhaps one of the last ones built. The family had already taken parts of this engine to keep the engine in the car running, but it still had many things that could be used to keep my car running. The tale of getting the engine is best for in person with a cold beverage in hand.
Within the engine laid my replacement set of timing gears. Amazingly they were both steel! There was also an external oil line run for lubrication, that I could duplicate on my engine to source oil to these steel gears (the original setup in my engine depended on crankcase splash). Theoretically the fix for my problem would be quick.
That blob of weld sent me down a different path... An engine teardown was in order.
Thanks for reading,
Rusty Berg


-
4
-
-
@jensenracing77 I'm definitely familiar with Brazil, having driven through it. I used to like taking US40 as opposed to I70 when going to the airport in Indy for a bit of different scenery. I was at Rose 2003-2007, and at the time one of the professors there had bought the Masonic lodge in Brazil. I have vauge hazy memories of some extracurricular events there... 😁
-
1
-
-
@Grimy you hit the nail on the head.
I discovered that to get access to the timing gears the engine had to come out of the car, as the cover incorporated the front mount for the engine. So in December 2019, a couple of buddies and I during our annual holiday get together, after some delightful holiday beverages, went to the shop to pull the engine.
After the engine was pulled, it was confirmed the timing gear was the failure. In an odd twist, I found that Olds used a fiber gear on the crankshaft (I have more experience with fiber camshaft gears). Every single tooth was stripped, and it looks to be a combination of weak material and lousy oiling. The lubrication of the gears appears to have been through crankcase mist as there was no direct oil feed to the gears. I learned from a friend who has a 1924 Olds 6 cylinder Sport Touring that the fiber crankshaft gear is a known issue, and apparently it carried over from the light eight engine.
In addition to the gear issue, upon inspection of the timing gears, I noticed a more concerning issue that lead me to look more into the engine, and led me down the path that I have been on since the initial breakdown. Nothing like surprises to keep things interesting... 😁
I'm curious to see if anyone else sees what concerned me in the photo of the timing gears...
Thanks for reading,
Rusty Berg


-
1
-
-
@58L-Y8 According to "Setting the Pace - Oldsmobile's First 100 Years" by Helen Jones Early and James R. Walkinshaw, the Model 46 "heavy eight" was an older engine designed by Northway, but manufactured by the Olds Motor Works in Lansing. The Model 47 engine, the "light eight," has an aluminum crankcase, and was made in the same building as the "heavy eight," Building #21. In looking at pictures of the engines, the Northway influence is definitely present (see early Cadillac engines as well), but the Model 47 engine looks to be a derivative of the Model 46 developed by the chief engineer of Olds, a man named Robert K. Jack.
@rocketraider The Economy Trucks did not use the V8 engine. The engine in the trucks is a derivative of the 4 cylinder engine that was used in the Model 43A.
Thanks for reading,
Rusty Berg
-
2
-
-
@Shylo, I have a 1922 version of the same car. I've been going through an engine rebuild on mine and can offer, my thoughts, opinions on, and discoveries based on that experience if you're interested. The thread is over in the Our Cars and Restoration Projects section.
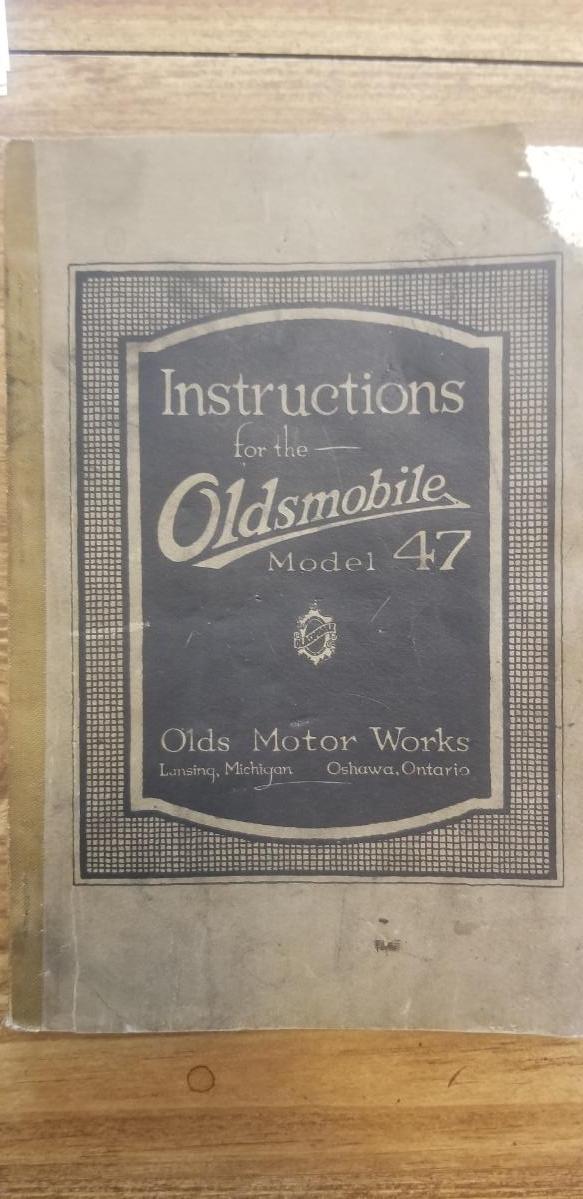
@Steve Moskowitz, I believe in 1921 the correct designation for a 5 passenger touring is a Model 47F. I have an instruction manual for my car printed in July 1921 that has a picture of the body style with the F designation.
However, I'm not certain why, Olds Motor Works changed the designation to 47T starting late in 1921 possibly in relation to other changes on the car (double water pumps, to single). My car is an early "1922" car with crankcase cast date of 7/13/21, low serial number (235) and a data plate stamped with 47T.
The two main bearing V8 is definitely not a high revving engine, however in a bit of digging that I have done in the GM R&D archives and the GM Heritage Center, I have seen advertising and reports stating no fault with the engine thought excessive driving feats. Not fast by today's scale, but a quick car in it's day, and has been pointed out one not seen very often on the road at shows.
Thanks for reading,
Rusty Berg


-
1
-
-
@J.H.Boland That's a beautiful car! There are some differences though, as in 1922 they built my car on a 4 cylinder chassis with an aluminum crankcase (in addition to many other parts) to save weight. The engine is literally shoe horned in as I was about to find out.
@jensenracing77 I have many fond memories of my time in Terre Haute (regardless of the smell from the old paper mill). I'm from New Jersey originally, so going to college in Indiana was a great experience, and the school taught me well, and I've put the lessons to good use professionally and in the antique car hobby.
To carry on with the tale, I got the car home and backed into my shop, and begun the process of tearing into the engine to find the root cause of my troubles, I had hoped it was something distributor related, but I feared it was timing gears. I have a video, but I don't think I can post it directly and it's not on YouTube. Suffice it to say, a wrench on the camshaft confirmed that the necessary mechanical link between the crank and camshaft was gone. Something was amiss in the timing gear area.


-
To continue the tale of the next morning. I keep a import (i.e. cheap) tool kit in my cars for any roadside repairs (never have been lucky enough to own a car with a complete tool kit). After the tow truck dropped me off in the parking lot of the hotel, I caught a couple of hours of shut eye, then went to the car to determine if I could get it running again (odds were very low). I had hoped to finish my homecoming, and make the trek to the Newport Hill Climb, with the intent to make a pass at the hill. For those not familiar with the event, it is worth looking up, and worth making the trek to at least once, in my opinion.
I started working on the car with what small selection of tools I had. Thankfully, pre-war cars and hand tools go together hand in hand, so I was able to diagnose the issue in the parking lot. After taking the cap off, I determined the rotor of the distributor was not spinning when the engine was cranked over. This was far beyond anything I could fix in a parking lot close to 400 miles from home, so I winched the car into the trailer, caught a cab, and went to the local watering hole (where I might have been driving to the hotel from the evening prior 😁) to continue my weekend celebrations as best as possible.
The final diagnosis and next steps to fix the car would have to be determined at my home shop. Tune in for the next posting for the details.
Thanks for reading,
Rusty Berg

-
1
-
 1
1
-
-
Perhaps it's bad form since this project has been ongoing for a while, but I thought I'd document the progress so far as I am coming close (I hope!) to wrapping up this project and getting the old gal back on the road.
For background, in late 2018, I was lucky enough to purchase my car, a 1922 Oldsmobile Model 47 Light Eight touring car, from a local Michigan collector's estate, consisting of many amazing automobiles. The other cars in the collection were auctioned off later (many high dollar and high provenance cars), but the Oldsmobiles (mine and a 1923 Model 43 AB Brougham) were sold before the auction. They had been in ownership by the family for over 50 years, and both Olds have gone to owners very respective of the mark and the cars themselves. For background, I have other pre-war cars that I work on and maintain, although I never thought I'd own something V8 powered or of such relative rarity.
Fast forward to September 2019 after sorting the car to running and driving status, I've taken the car back to my college homecoming (Rose-Hulman Institute of Technology) and as I am driving back to my hotel in the evening, the car, which had run magnificently the whole trip, died on a dark side street. With much help from Hagerty, I got it flat towed back to the hotel and my trailer and discovered it was a relatively catastrophic failure.
I'll continue the tale in the next post.
Thanks for reading,
Rusty Berg
Picture 1 - Car in front of major art piece on campus. I have equivalent pictures for other cars I own
Picture 2 - How the evening (early morning if I'm honest 😁) ended for the car and I.


-
1
-
1
-
-
Hello Harm,
I saw your comment about not being able to get through to Otto Gas Engine Works for the rings on your engine. I have been in touch with Dave Reed before on a project I am working on (1922 Oldsmobile V8), most recently in January of 2021. It did take me a couple of tries to get through via phone, but I will say that Dave has a wealth of knowledge and parts supply.
Wishing you the best of luck,
Respectfully submitted,
Rusty Berg
-
1
-
1
-
-
There are a few topics in the Buick Pre-War forum related to the motor/generator unit on the early Buick (pre 1925) cars. Perhaps these might at least provide some other places to look as you troubleshoot:
Good luck!
Rusty
-
Hello All,
I posted in the Studebaker, Erskine, Rockne forum, but I thought I would post here as well to see if there might be more luck. I am looking for king pins for my 1914 Studebaker. I know it is a long shot, but Studebaker used part number 10892 - Steering Knuckle Bolt, through 1918, so perhaps, just perhaps, there might be a slight chance of someone having a set?
Thanks for reading,
Rusty Berg
-
Hi @edinmass,
It definitely is a long shot, but with the wealth of knowledge and experience on this forum, it can't hurt to ask.
As to making new pins, I'm an engineer by trade (please don't hold it against me... 😁), So I am working up a drawing right now, and I do have a lathe in my shop that I can start roughing the pin with, although the case hardening and final grinding would have to be done by someone else as I don't have the equipment. Luckily being in SE Michigan affords me many opportunities when it comes finding shops that can do the work.
All that being said, perhaps someone here, (or someone I've reached out to outside of the forum) might have a set that I can buy. If that is the case, I'll also be running to buy a lottery ticket.
Thanks for reading,
Rusty Berg
-
Hello All,
I've been making progress on getting my `14 SC-4 back up and running again, moving through refreshing and cleaning about 100 plus years of dirt and grime away.
As I was working on the front axle, I noticed the spindles had much more play than acceptable, so I am setting up to make new bushings for them. However, as I disassembled the parts and removed what I call the king pins (Studebaker called them Steering Knuckle Bolts, Part Number 10892), I noticed that the hardened bushing surfaces are in rough shape from years of crunchy grease not providing much lubrication.
I've put a couple of calls out, but I thought I might make the Hail Mary play of posting on the forum and seeing if anyone had a set they would be willing to part with.
In doing some research with @Stude Light, we found that Studebaker used the same pins on both 4 and 6 cylinder cars starting from 1914, through the Series 18 cars, which I think means up to 1918, so there is a bit of range
I might be able to machine and salvage the pins I have, and can definitely go the route of making new ones, I just figured it couldn't hurt to see what might be out there.
Thanks for reading,
Rusty Berg


-
I sent you a private message.
-
I don't think I want to risk the needle scaler given how thing the casting is on the one side, that being said the bleach flash rust process might be a nice touch to hide the fix, especially given the rest of the engine condition. It also helps that this butts up against the fire wall of the car, so its visibility will be limited.
Hi @Bloo
As best as I can tell the pipe is a slip fit into the sleeve. It's a very tight slip fit, and I am assuming it carbons up a bit as a means of providing extra sealing capability like some Diesel engine slip fit exhaust manifolds. There is an exhaust hanger on the main pipe pretty close that I think helps to limit the relative motion of the pipe within the flange, but as evidenced by the original crack it's probably not the best setup.
Thanks for reading,
Rusty Berg
-
2
-
-
Hi Scott,
I guess I can't use that excuse anymore with the local law enforcement officers when I get zinged. 😃 I have a backup with the king pins just in case... 🤪
Thanks for reading,
Rusty Berg
-
Hi Jim,
You might get a quicker answer posting this in the Buick Pre-war Technical forum. I know there are a bunch of guys there with 1923 Buicks who will be able to answer you question (unfortunately I have a 1927 and can't really help).
Good luck,
Thanks for reading,
Rusty Berg
-
Hello All,
As I've been going through the refresh on my 1914 SC-4, there has always been a bit of a major issue with the engine that has always given me fits since I bought the car:

As you can see, besides the impressive amount of crud that was built up on the engine over the years *yuck*, the exhaust manifold flange had crack sometime in the long history of the car. From the looks of it, the crack was very old, I did not have the missing piece, and it looks like it could have been due to a very thin spot in the casting itself, which can be seen in the side of the flange closer to the block. Probably this crack happened so long ago, it might have been the reason why the car was parked for an extended period of time.
The issue of course is that this is a massive exhaust leak, and it happens to be right near the fire wall, so unless I was driving on a very windy day, I always felt a little bit groovy from the unburned hydrocarbons! 🤣 However of more concern, this leak would allow the exhaust to suck in oxygen from the air, which would mix with the unburned gas (I will be working on tuning the carb a bit as well) and cause a massive backfire in the exhaust on a throttle closing down transient. It was only a matter of time before the original muffler on the car had enough and scattered itself to kingdom come.
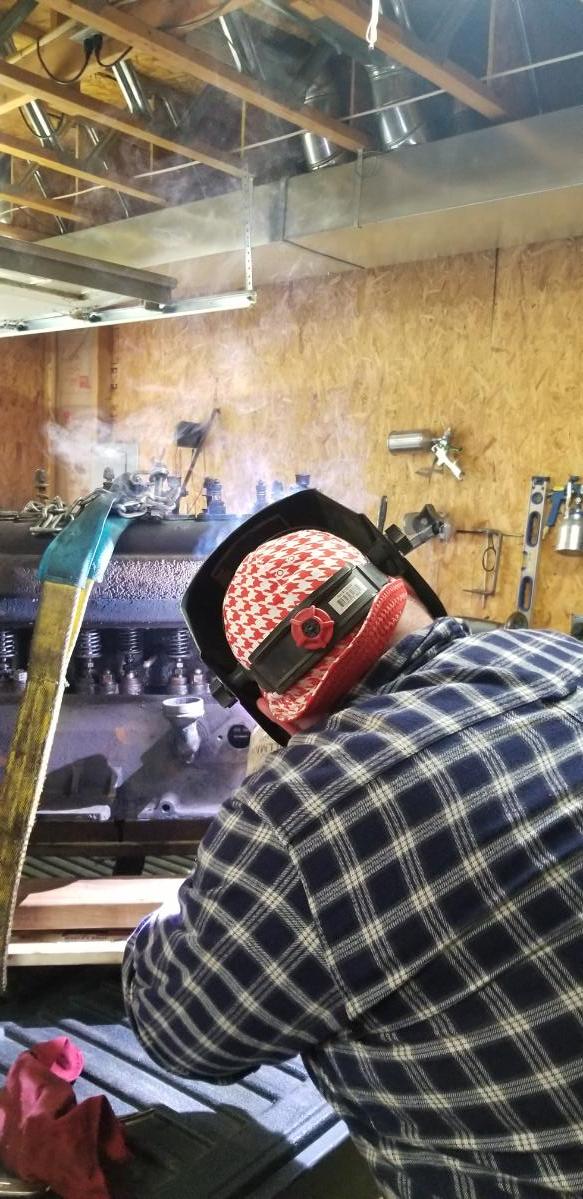
After some research and discussions with other car experts, a friend of mine and I decided to undertake a TIG brazing procedure with silicon bronze filler rod, which would be low temp enough to not force a lot of stress into the 106 year old cast iron and allow for some flexibility at the brazing joints due to the nature of the filler material. The stage was set:

I started with a piece of Schedule 40 pipe (had it easily available) which was 1/4" wall thickness and 2" ID. Amazingly this seemed to match very well in dimension with the remaining material on the exhaust flange, again making me think that the crack occurred because the casting was just a bit too thin on one side. The next major step was to take it to an experienced welder/TIG operator, of which I am most certainly not!
I have a friend in the local SE Michigan area, whom is also an antique car junkie, whom I have always jokingly said could "weld a ham sandwich to a tin can." He was gracious enough to help me through this endeavor and I loaded the engine into the back of my truck, which made it much easier to work on, and made my way over to his shop.

Here you can see the patient being prepped for surgery. We waited until the absolute last minute to clean the iron so there was relatively low risk of any flash rusting occurring. During the procedure, my friend would be manning the TIG torch, while I assisted with an oxy-acetylene torch to first preheat the iron, and then once he finished a pass with the TIG torch, provide post heat, all with the goal of trying to even the heat within the cast iron and minimize the stress from the procedure.

I managed to snap a quick photo of the process underway, a bit of a hairy thing, as I was balancing the lit oxy-acetylene torch and keeping my head turned as I only had oxy-acetylene rated goggles for the procedure. We had a piece of the original exhaust pipe to use as a guide while brazing to help with the alignment of the new piece with the old flange.
The final outcome of the procedure:

While not the prettiest (the cast iron was still pretty dirty and spitting a bit while he was working the TIG torch) the brazes look to be very clean and functional and with good penetration and alignment, with most importantly, no apparent stress cracks in the parent material from the heat cycling. We kept post heat on the iron for a while before letting it cool to room temperature and checking to see the outcome of the work. A good sign was the exhaust pipe itself was able to be removed from the flange, as intended, which indicated proper heat control, without welding the pipe in place.
All in all, I believe the work turned out very good, not too bad for two guys (engineers, always dangerous letting us work with our hands 😁) with limited experience in this field. I'll be keeping an eagle eye on the work as I get the car recommissioned and running again, but for right now, I am claiming a victory, as it should be a marked improvement over the original situation, and should allow me to not be gassed every time I take the car out!
Thanks for reading,
Rusty Berg
-
2
-
-
Hello Bomarkham,
I'm not certain of the availability of parts for the 1916. On my 1914 the parts for the generator were non-existant (Wagner EM107 if I recall correctly). If you have the original failed parts your best bet would probably be to get them rewound. I have had good luck with:
Jason redid my generator and did a great job with it.
Best of luck,
Thanks for reading,
Rusty Berg


1922 Oldsmobile Model 47 Engine Rebuild
in Our Cars & Restoration Projects
Posted · Edited by rustyjazz1938
Spelling (see edit history)
@nickelroadster You're right, it wasn't designed by Northway. My intention was to imply however that it was a Northway derivative, based on the original iron crankcase design. It has similar Northway features such as the fork and blade rods, as well as the layout of the cylinders. R.K. Jack, the chief engineer at the Olds Motor Works at the time is credited in some sources as the leader of the design.