


XframeFX
-
Posts
1,654 -
Joined
-
Last visited
Content Type
Forums
Gallery
Events
Everything posted by XframeFX
-
 So, this is the case with the country next door with a land border. We might as well be halfway around the world. Canadians pay, pay and pay. it's not just S&H Some refuse to ship outside the lower 48. Too much hassle on both ends. Some whine with that cheese?
 -
Thanks Art, I'm not a purist but I have all new vent window rubber as well. Will learn as I go. Having owned my Riviera over 40 years, there have been previous owners before me that have had the inner door panels and veneer off & on plenty of times. Those nail strips and tabs won't stand for more! I'll order-up a pair of those bronze gears, need a pivot arm as well.
-
Art, your middle image shows bolt threads protruding. I imagine access to the hex heads of those bolts will require removal of the entire vent assembly or there's room in behind for a wrench? No inner door panel removal I hope? Also, I'm not happy with my patched-up control panel now that I have it installed. Anyone have have one with the power vents?

-
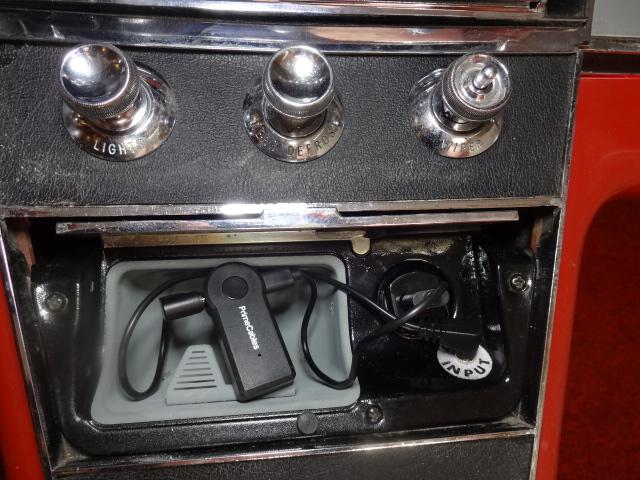
USB Port and MP3 Pigtail Access Added To Console Ashtray Area
XframeFX replied to Riviera63's topic in Buick Riviera
Rarer still, rear defog and AC. Usually one or the other. Actually, my '63 has a franken-interior. The PITA console is the 3rd one in the car and is originally from a loaded rusted out Upstate NY Riviera. That and the rear defogger were colour matched and installed in my Riv. Both speeds function but it's just a blower. Useless against heavy Canadian frost. Interestingly, the low speed resistor is a chunky thing against the cardboard glovebox. A fire hazard? Many early '63 options had separate wiring harnesses (ie, power antenna). I believe this is true with the rear defog option as well. The 1963 Shop manual shows a generic harness with inline fuse. Early dashboard harnesses had 11 circuit fuseblocks. I used the harness from that same NY car and has a 13 circuit fuseblock including a fuse for the defogger in the center like the '64s. Also, the harness has a green tab wrapped in at a branch off to the console. I assume this signifies a harness with power antenna and rear defogger. Changing out my hatched harness for the rear defog harness gave me major grief with the firewall bulkhead. DO NOT REMOVE! The NY metropolis must've had FM early on. That car had the rare 1963 Delco 980626 AM/FM radio which I sent for repair in the '80s to replace the wonderbar in my car. When it was ready for pickup, I asked what was wrong with it and the shop said "I don't know, I just swapped-out the core". I ended up with a 1964 Delco 980659 AM/FM which failed in 2015 (capacitors) and is now repaired again. Finally, I have a mint red 1964 dashpad. Colour matches perfectly. Only a Riviera nut would notice the speaker detail. Ed, you have laminate Wiring Schematics? For 1963? The wiring diagram on the last page of Section 10 in the Shop manual is not 100% of what I have. Also, I saved a copy of your white leather interior when you posted it, a looker! Just a thumbnail though. Can you post a larger image? -
USB Port and MP3 Pigtail Access Added To Console Ashtray Area
XframeFX replied to Riviera63's topic in Buick Riviera
Bill, are we on parallel projects? Very nice, your install especially when lit! Early this year I discovered my numerous cigarette lighters of which some were OK, the sockets were not. They were all NG. Only 1 socket had the 2-slots for the light, NG. Sourcing early spring-loaded CASCO style lighters for non-smokers made no sense. Replacing with those USB Jacks was more appealing but at 22mm, did not fit the .9" hole. So, I replaced both lighters with .9" dia 12V power points and wired the front to 'switched power' because of the USB charger parked there (for good) and the rear to the original 'live power' wire (no fuse). I too added a 3.5mm 'Auxiliary Input' to my Delco Radio and mounted it next to the 12V power point. It has two 330 ohm resistors to combine stereo into mono and a 3-pole switch. I shot the assembly with a 2-part clear to seal it all in. The last image shows a BT Adapter plugged into both,the USB for power and Aux-Input Also, for the original lighter light, I had just a bare white-wire with no light socket. I crimped-on a white Series 56 connector with an adhesive LED stuck under the ashtray door, out-of-sight. I blasted the rusty ashtray and shot it with a zinc spray. I noticed a series of perforated holes on the side where you routed your Input cable. Originally for illumination??


-
oooh, I don't like that! When I receive my new replacement (USPS 1st Class), I will compare with my rusted original. It appears these Fuel Tank Sending Units are manufactured by Liland in Syracuse NY. Dent the outside of the tank? John B.
-
Bill, The Driver's outboard trim placement is solved thanks to that other post. And yes, all brackets are in-place for that side. I am still scratching my head on the remaining pieces, especially #3 & 4. I sent you a PM. Thanks! John B.
-
Speedwaymotors.com

-
OK. AC Filter GF-98 for 3/8" Fuel Line Hose. Thanks Bill. Brass fittings have smaller IDs than steel tubing. It appears 1/8-27 brass fittings on the pump outlet port are spec'd at an ID of 7/32" (.219"). So, for my existing fuel pump 5/16" Fuel Line Hose it is. Thoughts: The pump outlet is 1/8-27 NPSF (straight thread - FUEL). The fittings are NPT (taper). The reason for not having restrictive 1/8-27 fittings on the pump inlet is because the line has negative pressure?

-
This is exactly what should occur, band together and justify an exact replacement. No performance polyurethane, just OEM plain & simple. I'm 'done' with experimenting even if I had kept spare control arms. No bushings from another app with added-on spacers. Please count-me-in Tom. It will be a future project following a transmission swap (OE installation). But I'll purchase the parts if they ever become available. John B.
-
Thanks Tom for the correction, I did measure an actual of 1- 36 ohms on a rusty Sending Unit and 9 - 34 Ohms on another, both 1963 with the latter flakey. I am waiting for a SS Sending in-transit from James. John B.
-
James at https://bestoffercounts.com/product/1963-1964-buick-riviera-gas-tank-fuel-tank-sending-unit-with-ac/ He has the 0-30 Ohm Unit SS Units for both, AC (dual port) and Non AC. John B.
-
I have 5 Plastic Trim Pieces for Bucket Seats I'm installing. The long outboard trim for the driver's seat is obvious. However, the remaining 4, not. Can anyone advise where the remaining 4 pieces go? Thank-You, John B.

-
I re-visited the fuel pump fittings when the outlet fittings moved. 2 each 90 deg. elbows and 1 each 5/16" nipple for the hose. All 3 threads were 1/8-27 NPT. One elbow had an ID less than 7/32"! I drilled them out to 15/64. These are existing fittings on a replacement pump from the past. I wouldn't dare to drill them past 15/64! Perhaps there are pumps out there with an outlet port larger than 1/8-27 NPT? When I do the Timing Chain, I'll revisit this with an upgrade to 3/8" to the carburetor. My thoughts, John B.
-
I could be incorrect on this as I've been involved in my project only since 2015. I believe GM Serviced the rear lower control arm as an assembly back-in-the-day and I don't believe the aftermarket ever offered individual bushings. However, Bushings for the Panhard Rod are available. There's been many threads on this. Would be nice to have repro parts on this. If so, won't be cheap in order for a mnfr to go to the trouble of doing it.
-
I did use those clamps, the jobber referred to them as FI Hose Clamps. So use those regardless of which hose, the conventional 30R7 or the FI Hose 30R9? I used the latter for all hoses, 3/8, 5/16 and the return 1/4", about 7X the price! Intimidating with markings in the bulk dispensing box saying 'FUEL INJECTION ONLY" Also the 3/8" FI Hose fit a tad less snug that the conventional hose in the chassis tubing and sending unit. I'm perplexed why those diameters are just .355" when I discovered last that there's no mistaking 3/8 on the fuel pump inlet. It's larger than 3/8" at .39" past the barb to be exact! John B.
-
OMG, Thank-You Tom! You're a walking encyclopedia! So it is indeed 5/16" between the fuel pump and carb. I will keep it that way with a future upgrade to 3/8" although I don't think an inline 3/8" fuel filter exists that has the 1/4" return port. Further to this, I too wanted to upgrade from the standard SAE J30R7 Fuel Line Hose. So, Continental Made-in-USA Fuel Injection Hose has worked in the past? Will work with regular gear clamps? Running out to buy the hose now before the stores close! Many Thanks! John B.
-
Hello, I'm bringing this back up because I'm stumped. All I want to do is replace all rubber fuel line hoses on my '63. The return line appears to be 1/4" but the main tubing along the rocker panel and fuel sending unit is .35". In-between 3/8 & 5/16"! So, which is it? The manual says nothing. In my early days, I remember big GM V8s were 3'8". The inline fuel filter I want to replace as well but they spec out at 5/16" for the Riv. and my old filter has no markings. As mentioned above, its a PITA to replace the fuel line, so I certainly want to be correct with the installation. 3/8" hose fits loose on the steel tubing. Thanks - John B.
-
Packard Series 56 connectors indicates OEM. The blue tape, not. Turbinator mentioned the dimmer switch. That and the speed minder buzzer are the only connectors on the dash harness that have that 3-contact connector. Oh, the rear defogger switch might have one but not at the bottom of the steering column. John B.
-
1963 Buick Riviera "Barn Find" car in rough shape
XframeFX replied to CLEM17's topic in Buick Riviera
So, advise to Clem17, if you keep it, DO NOT DISMANTLE YOUR RIVIERA. Instead, do what it takes to make it drive-able, The Dynaflow can be repaired and you can then decide to continue with repairs or sell with the value you have added. Of course an audit of desired work and the $$ you paid for it should fall far short of the cost of buying ready-to-drive/show-able car that's on the market. Ed (above) has the link for the Riviera Owner's Assoc. in his signature block to help in your research. John B. -
I changed out my hatched southern instrument harness with a northern harness that had only 1 problem, corroded fuse box contacts. One of the problems with the previous harness was a missing plug for the ignition switch. So, individual wires on each ignition switch terminal. Very Crude. John B.
-
David, A running car is key. A scaled down restoration could be tackled in smaller portions while keeping it drivable. I'm seeing more 'patina cars' out there. I imagine this is not new advise to you but I am re-learning from past projects myself. For me, this hobby is low priority and is the reason it's taking so long. This '64 Riviera is too nice to part out, the hobby needs more survivors! But Steve is correct, value being the sum of it's parts. In 2016, I was alarmed how many 1st Gen Rivieras were being parted-out here in western Canada. Probably no longer in existence now. John B.
-
1st gen inside door panel installation difficulty
XframeFX replied to Parccent65's topic in Buick Riviera
So, Installing the driver's door panel has like 4 horizontal mounts, the rear mounts for the armrest and the forward mounts for the power everything armrest extension. The forward mount at the very front tilts up and makes no sense when the plastic base has a horizontal surface (above wire harness in red image). Also, no way the hole will line up. Forcing this will surely crack the base. The 3 mounts to the rear are fine. The other door (in white Image) is the same deal, the bracket tilts up. I'm sure others have encountered this. The only resolution I can see id to leave the screw off. Am I missing something? This is for my '63 Riviera. Thanks Again, John B.

-
Welcome Tsumbody and nice to see your '63 Riviera! I hope you get settled-in soon and start driving your Riv. Being in NM, you get to drive it year 'round. If I were so lucky! John B.
-
Who makes the best ball joints and steering components?
XframeFX replied to 39mm's topic in Buick Riviera
I've found it is best not to rush on an order. I've had so many parts shipped to me that will never be used. After online research, ordering - pay - pay - pay. Those courier companies nail you for their hardship fees and for what? Only to be disappointed when you open the box! This forum here where we steer each other in the correct direction reduces research. Also, working with what you have or a parts car helps a lot. Last local resources may surprise you, especially if you have a core. Rockauto great for a quick online check. But,being in Canada, I'll try to source this side of the border with the pirated P/N. I'd love to have my steering box with tighter gears but it doesn't look like I stashed a core in any of my parts boxes from back-in-the-day. Magic Carpet Ride it is! John B.


