MikeJS
-
Posts
286 -
Joined
-
Last visited
Content Type
Forums
Gallery
Events
Everything posted by MikeJS
-
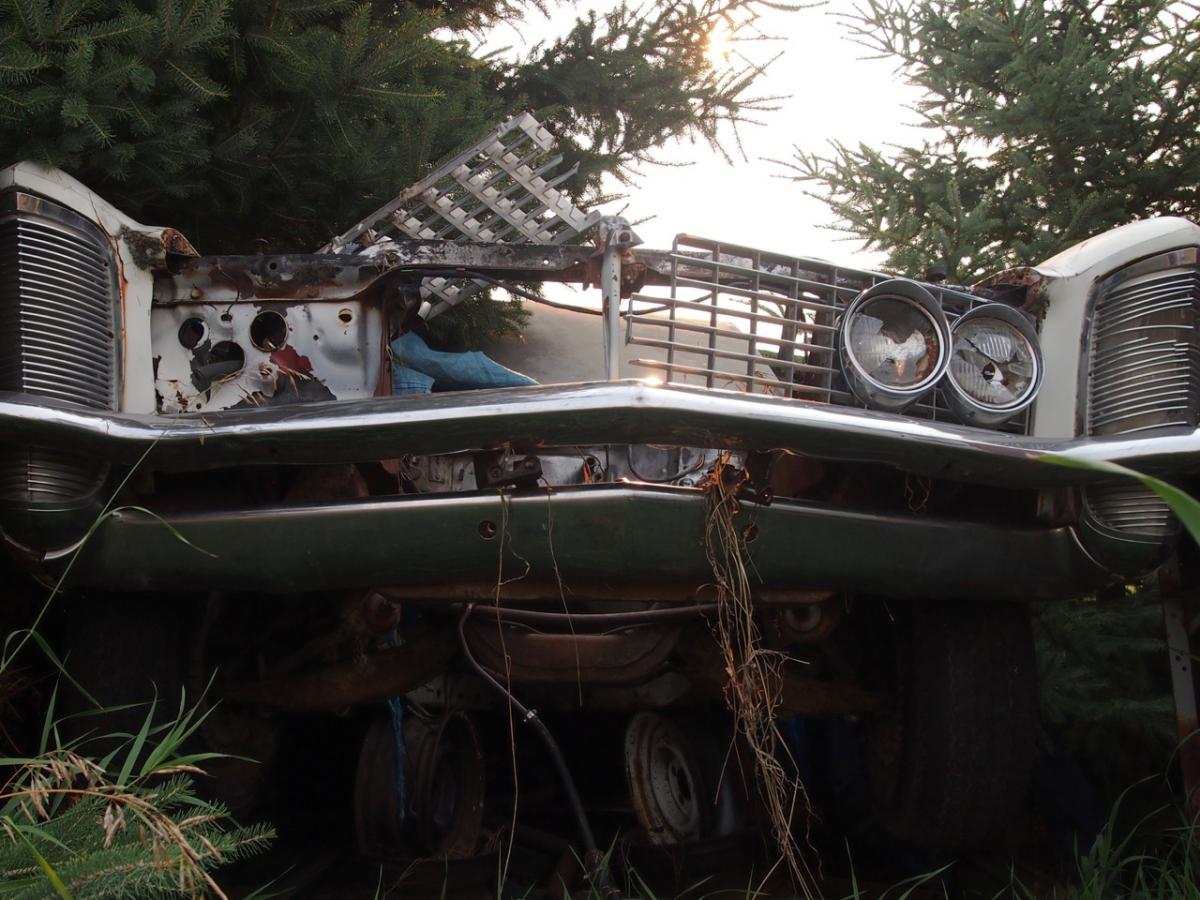
Good day... Recently I got a lead on a gentleman that apparently had a few 1st gen Riviera parts and project cars about an hour north of the city. I finally had the opportunity to go check them out. Lots of potential for parts, but access and digging through the interiors and trunks that are mainly stuffed with more parts will be a big challenge. Although it's sad to see these cars in this state, it's nice to know where parts cars exist nearby. Now that I know what's there, I'll go back with chainsaw and a tetanus shot to grab a few more spare parts... Also the owner is in the process of restoring a '65 so he was pretty Riv' knowledgable... All in all it was somewhat sad but still cool to ... Check out these Rivieras...? Later, Mike Swick Edmonton, AB ----


-
I recently did the caps on my '64 spinners, and once you get going they can come out pretty good... What I had on a couple of the caps are probably some form of stress fractures in the 'plastic'.. When you look straight on the emblem looks fine, but when viewed at an angle, the cracks appear. In a way, they kinda look cool, almost a ghost diamond effect, but not all the caps have it, and I doubt there's anything that could be done besides live with it or replace em. Hope the pictures show the effect... Later, Mike Swick Edmonton, AB ----


-
Bob, sorry, I just assumed that the 'option' price would be for the full set, seems odd that they would price things like that per each... Interestingly enough, the prices shown on the ROA site, indicate the wire wheels were cheaper in '63 than in '64.. If indeed the numbers we're talking about are a full set, it almost appears to be an each cost shown for the wire wheel in '63, then a set in '64?? -- 1963 - M7 Wire Wheel Covers - $23.65 : M9 Cast Aluminium Wheel Covers - $66.55 1964 - M7 Wire Wheel Covers - $80.63 : M9 Cast Aluminium Wheel Covers -$66.65 Source: https://rivowners.org/features/Ev_Stats/opts_prices/1964.html -- The cast aluminium is listed at ten cents more expensive in '64. Maybe that's the paint cost added?? Speaking of which, the powder coating is a great idea, should look amazing... Later, Mike Swick Edmonton, AB ----
-
Based on the US bureau of Labour Statistics, 2017 prices are 690.71% higher than 1964, so last year a set of these (NOS) would be US$527.01 (CDN$683.71). Later, Mike Swick Edmonton, AB
-
Good day... Although custom Riv's are a "dime a dozen", ( tho' guys have done some cool stuff with first gen Riv's,) this one caught me eye. Apparently the roof from a Mercury Cyclone... Later, Mike Swick Edmonton, AB ---- From: (and more pics..) https://autowise.com/stunning-1963-buick-riviera-inspired-by-ford/


-

For Sale: 1966-1973 Riviera Trunk Felt Replacement Kits
MikeJS replied to NC1968Riviera's topic in Buick Riviera
The mat looks like some form of a texture applied paint finish probably using the mat as the "pressure paint brush" for the board. It would probably take a LOT of trial and error using original mat material to find the right combination of paint and pressure to transfer the 'painted weave' to the board.. and in the large sizes needed, no less... In today's day and age of high resolution imagery and Photo-shop-tom-foolery, I suspect the board could easily be replicated by simply photographing the actual mat and then printing it on an appropriate board medium. Assuming one has a mat in great condition, taking a high resolution image and manipulating it on the computer to match the desired colour is relatively easy (for some, I know...), it's finding a print house than can print on the board material, AND in the sizes needed, that could be a bit more of a challenge, especially if one wants/needs to minimize cost. Personally, I would try the art department of a local college/university/high school to see if they had any interest/capabilities/ideas in the project. They often simply work for cost of materials. I'm sure at worst they wouldn't mind taking a decent 'professional' photograph of the mat if they didn't have the printing capabilities. For what it's worth, I'm also doing the trunk in my '64. I'm just starting to make cardboard templates of all of my original liners and cardboards. Been looking at different material to use, I'm not overly concerned with having it 100% factory correct, (shipping costs and US exchange and duties/taxes are a killer these days) but to the non-Riv lay-person, (and to me...) I want to present a look that, right, wrong, or indifferent, looks like it coulda/shoulda been factory. I'll let youz know how it goes... Anyway, Mike S. great post on your '68's trunk, well done... Later, Mike Swick Edmonton, AB ---- -
Wonder if this Riv' would be worth something today if it survived and its lineage could be proven... Apparently there is a story on-line about how Elvis came home one evening in his '63 Riv and his longtime "hired-help" wasn't around to open the main gate, so he backed it up and used the Riv to open the gate himself causing about $800 in auto repairs... (hey, it's the Internet, believe what we will... )

-
Found on the 'net...


-
Edmonton, AB...

-
Clean and detail engine compartment 63 riv (what to use and tips)
MikeJS replied to a topic in Buick Riviera
Good day... Man, it's amazing how much information is in this forum's archives... finding and searching isn't always quick and easy, but lots to find nonetheless... While searching I often get way sidetracked on other topics of interest but not necessarily the topic at hand... Anyway, not sure if this is the right thread, but onward... I too am in the process of redoing the engine bay on my '64 and for all intent and purpose, it's near a point I'm very happy with but the colour reference (right, wrong or indifferent) posted in this thread is pretty handy, thanks. A lot of my bay was done as my engine was just rebuilt, and now I am just trying to clean and touch-up the underside of the hood. Although I vacuumed the existing insulation, it was looking a tad shabby so I picked up a set of the new under hood insulation from oldbuickparts.... On my original insulation, there is a cutout in one corner of the passenger's side, (as well as a circle right above the air cleaner.... (image attached) Although a little tough to see, it appears that this cut-out is shown in the '63 noted above in post #18. I recently noticed this in Post #763 of the below noted thread, but didn't really look too close at the time, but it looks like that '65 doesn't have any insulation, but a tell tale mark ion sorts n the same location... http://forums.aaca.org/topic/283876-rivieras-for-sale-on-local-craigslist-ebay-etc/?page=31 My Riv' does not have a/c, so I'm not sure why the cutout as it appears there shouldn't be any interference below. I'll figure out if the new insulation touches the air cleaner, likely put a dab of something (vaseline?) on the top of the air cleaner and see if it touches the insulation when I close the hood. But, were these cutouts part of the original? Also do these panels need any adhesive? I was thinking of a couple small strips of two-faced tape just in case... And maybe final (stupid) question, if anyone has used these new panels, one side has a 'smooth' black side, the other is a bit 'rougher' with a grey swirl type pattern/colour. I'm assuming black side out, but I have seen at least one picture where they installed the greyish side showing. Hope this make sense... any comments would be appreciated.... Thanks. Later, Mike Swick Edmonton, AB ----=
-
Good day... Finally got my '64 out of the shop where we rebuilt the motor, transmission, suspension, brakes, re-cored the radiator, plus a handful of other minor items....interestingly enough the recent discussions related to exhaust (primarily mufflers) and steering box are two issues that I still have to deal with... The body and interior are basically still original, just over 120k miles, I've owned the car since 1980 and was a summer daily driver for nearly 25 years, (stored inside typically November to May) then it was parked in our one car shed for a number of years where I would periodically oil cylinders and crank it over until my son turned 16 and wanted to get er going... Although I considered selling it, after owning the car this long, I decided to put some long overdue money into the mechanicals (and a bit of bling under hood) Valve covers showed up too late to paint with the engine, so I'll probably paint those (polish the ribs and logo) come winter... Although the paint is old, tired and chipped here and there, I do have touch up paint that matches pretty close, and I like the idea of retaining the survivor aspect...Still has the original dealer badge. Although far from a show car, it's still a pretty nice twenty-footer... and maybe someday I'll do the body... But for now, I'm simply going to enjoy driving it... Makes me feel twenty-something again... Later, Mike Swick


-
ROA International Meet – Overland Park KS, June 25-28, 2018
MikeJS replied to Rivman's topic in Buick Riviera
Great pics, guys, thanks for sharing, but you're killing me here... I attend a number of different car shows, meets, etc both local and regional, and to be honest, I'm ecstatic to see more than a couple classics Riv's at any one of these events. To have the opportunity, to see a 'gaggle' (??) of Rivieras, and nothing but, under beautiful blues skies, I can't imagine how many packs of "Mens Depends" I would need to attend one of these ROA events...? Seriously, I tried to schedule attending this event as I was travelling to eastern Canada on business last week, and if my business had been this week, (or the ROA meet last week) I would've easily (or somehow) puddle jumped flights my way home via Kansas... but no such luck. In lieu, I rented a car from Toronto, ON to drive to London, ON, (2.5hrs+/-) and picked up four ('64) complete spinners for the cast aluminium wheel covers, and two complete headlight housing/chrome grille assemblies that I found on-line, (kijiji dot ca) but the seller wasn't keen on shipping. All in very good condition, all for CDN$300 (US$226.) I then drove to Niagara Falls, for a couple days of touristing, and one business meeting so I could write-off the rental car...? All in all, a reasonably good compromise for missing this event... Anyway, thanks again for sharing the pics, guys, great stuff... Later, Mike Swick Edmonton, AB ---- -
Rivieras and Riviera parts for sale on local Craigslist, eBay, etc.
MikeJS replied to RivNut's topic in Buick Riviera
Good day... For what it's worth, just for clarity, it's code H - Wedgewood Blue... Outta curiosity, does anyone know how many '64's were produced in this colour? Later, Mike -
Good day... Cool looking concept. I could be wrong, but I believe it was created here... http://www.auto-visuals.com/index.asp Later, Mike Edit... Found what appears to be the original image, the one in post 965 appears to be copied and manipulated from the original by auto-visual.. If so, they both did a pretty cool job...

-
Good day... Not sure if this link will work, but this website seems to have a good selection... (Link is to a '68 search...) https://www.autopaper.com/search-results.php?year=1968&make=9&model=6441 Hope this helps. Later, Mike
-
Good day, In terms of buying manuals on CD, although I have all the printed manuals for my '64, personally I would caution against buying a CD, as computer technology is evolving to where CD drives will (and mostly have) become obsolete. Most new Apple computers no longer have a CD drive. Printed books will last, and will still be fully accessible long after the CD is simply a table coaster... Later, Mike
-
Good day. Sometimes easier said than done... My '64's air cleaner decal was totally painted over but I was able to remove it from the air cleaner... To my surprise, I was able to clean it up somewhat but I didn't think it was nice enough (even without the scratches I added...?) to re-use on a new rebuild engine and re-finished air cleaner...(fwiw, the shop used POR15 Buick Green on the rebuild) I tried my hand at recreating it simply using Microsoft Excel, but same result, I knew it just wouldn't look right... In the end I ordered the after market decals from... https://classicbuicks.com/shop/decals-labels-tags/ Although my centre decal is still in reasonable shape, I did pick up one of the replacements... The original will hang in the "Wo-Man" cave...(long story..."yes, dear, that's YOUR half"...) The air cleaner has been refinished, and the centre decal was a very nice fit. (A second set of hands helped during the placement.) Once the car's out of the shop, I'll post some final pictures of the engine bay... Later, Mike


-
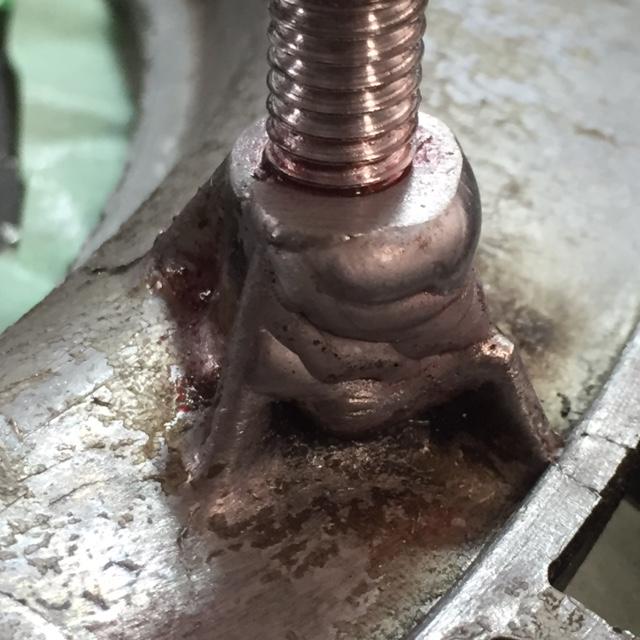
Good day. Just as a bit of a follow up on my "what-not-to-do" saga on restoring these wheel covers... As suspected, once I cracked the housing (post #64), all DIY attempts to repair with JB Weld failed miserably. Once I thought I had it repaired and tried to drill to the size needed for a heli-coil, the side of the housing where I was slightly off centre on my hole, sheared. Unfortunately, or fortunately as the case may be, I was so frustrated with myself, that I forgot to take a few photos of my (ahem) final work... Although I could've given up there and ran with three studs only, I had to see it through... I found a local shop that was able to weld the repair, and right, wrong, or indifferent he also took the initiative to make an aluminium stud. Not sure if that was the right thing to do, but I suspect if and/or when it ever breaks, it may be easier to remove... The repair cost me CDN$40... US$31. I thought about taking the Dremel to grind this weld down a bit more, but after all I've been through with this wheel cover, time to move on. The good news, he felt that the grade of aluminium was very good to work with and has agreed to take an attempt to repair my wheel cover that has the chunk busted out... For what it's worth, as of yesterday, the rebuilt engine in my '64 is purring like a kitten, just waiting on some rear/parking brake parts, and hopefully, I'll get 'er back in my garage soon enough... Later, Mike

-
Thanks again for the feedback, guys much appreciated... Rodney, I tried to source the LH bits at a couple specialty tool shops, no luck, but for all intent and purpose I think the extractors do work, I just went too big too fast and cracked the housing, again lesson learned. I have read some say that using a normal drill bit actually tightens the broken stud/bolt even more, but I'm a little sceptical on that theory. To tighten anymore, that bolt would have to move, hence it would have to break the seizure point it's currently at, which in concept should allow it to now move the other way (out). Not sure if this makes sense, but who knows. But yes, if I could have found 'the LH bits, it would've been worth the try... In terms of the wax trick, I was discussing backroom the replacement studs I intend to use, and although I bought some 1-1/2" straight studs, I then I realized that I may have a few of the originals that I may be able to re-use. This all started when I wanted to replace at least one of my originals that was completely broken.... Unfortunately, where my car is right now, I'll have to wait until next week to grab this cover, but I will look at removing the existing studs out of this cover and hopefully I can save them to make 'em work as replacements on my repair. I suspect this may not be as easy as it sounds, but I guess I won't know until I try. Any "lesson learned' pointers in getting the old studs out would be greatly appreciated, and with any luck I won't be posting any "what NOT to do" pointers in removing these studs... FWIW, I just repaired the crack with the JB weld last night, letting that set, and should be good to final drill and pop in the heli-coil... at least that's the plan... Later, Mike ,

-
Rivieras and Riviera parts for sale on local Craigslist, eBay, etc.
MikeJS replied to RivNut's topic in Buick Riviera
Don't know much about the specifics of the '63, but the shifter indicator does look unique... -
Thanks, Ed, although I have a penchant for screwing things up, I usually do my best to not give up... Once again, venturing into new waters, any advice would be helpful. Looks like a relatively straightforward process, but a couple questions.... Does the aluminium housing on the wheel cover have enough meat to drill the size needed for a heli coil to accept the same size bolt as the original, or do I need to use a smaller bolt? Or, can I somehow build-up the diameter of the housing using the JB Weld? Again, any advice would be greatly appreciated... Thanks. Mike
-
Well, good news and bad news... The bad news, my attempts to extract the bolt remnants have come to an unfortunate failure. At least for my tools and abilities... As I feared the most, I chipped the aluminium stud housing and started a crack ... It was my error in attempting to get the biggest extractor in that I felt could handle the torque. I have no idea if the wax would've worked when I was at the smaller drilled holes/smaller extractor, but from a lot of what I read on-line from not only car forums, but aviation and marine mechanics, many sang the praises of the "secret sauce" (50/50 mixture Automatic Transmission Fluid and acetone) when defusing steel from aluminium. I think I may also have been a little fearful in putting in too much heat with the propane torch... Lessons learned... There are a couple local shops that specialize in aluminum repair so for kicks and giggles, I'll see what it would cost to "fix it right". It's not totally destroyed, but, man, am I kicking myself... The good news... at least there's some comfort in knowing that continuing to run on three bolts isn't too critical, thanks, much appreciated... Obviously not quite to Buick standards, but ...it's not their car... ? For what it's worth, there are four counterweights on this particular cover that look like this... Holding the valve hole at twelve o'clock position, (and looking at the front /outside facing of the wheel cover), these are located, at about five o]clock. centre between the 14th and 15th vanes. I just assumed they were counterweights, and now thinking about 'em, and where they are on this one, most likely to offset the missing material from the valve hole (??) Anywho, thanks to all that have provided some great info, you've been very helpful... I'm not done sprucing these up, I still have two more to re-do, but for now... after the stud fiasco... "gin and tonic, bartender, make it a double and keep 'em coming"...? Later, Mike


-
Thanks, Pat, much appreciated. It's always good to know the "rules" so one knows how to bend 'em. I actually ended up using a gloss black. Based on a few samples of rattle-can satin black, I just felt that the colour didn't look right for me. Gloss black without colour sanding is almost semi-gloss black, so I'm okay. Once one gets rolling on these, they really don't take too much time to do so if and when I ever get to doing the car's body, I will likely redo these again... I stuck with using mainly vaseline for masking the shiny parts to remain but also some tape to make handling during painting less greasy... Fingernail and a paper towel cleans the painted vaseline mask off pretty quick... Once the pant cures, I do a full clean on the remaining grease film. Overall, I'm pretty happy even at two feet away... While I'm here...so my car is currently in the shop since January, (major mechanical, film at eleven...) and scheduled to be done by first week of June. Once I finished this wheel cover that I got of eBay, I took it to the shop and swapped it out for one off my car to do the process all over again. Much to my chagrin, it turns out that in nearly 40 years I've owned this Riv', I've been rolling one nut short of a full load. (aka, I only had three studs on the one I took off my car, one was broken.) Okay, no big deal I thought, good place for me to learn how to remove a broken bolt... I've got a good drill set, (no drill press, hand drill only), so I went and picked up a set of extractor bits. I was able to get a small hole drilled pretty close to centre, and eventually worked a #1 extractor in. Didn't take too long to realize this bit would snap if I tried to go past where I could feel the torque on the bit. So drilled a bigger hole, on to extractor #2, heated it a bit to a point where the mixture of ATF/acetone would ignite in the hole (like a little candle...) and same result to a point of no return... I've got to a point where I have a 7/32" hole, and #4 extractor and it still ain't budging... Again, the hole's not perfectly centre, but one would think close enough should count. It almost appeared that metal was "folded "over the top, hence the grind marks to confirm that second ring is indeed part of the aluminium I've heated it up again, (and again) and topped it off to sit overnight and give 'er one more try with the extractor tomorrow. I'm a little gun-shy on really torquing on it and risk breaking the aluminium mount. If that fails, any advice on where to take it from here would be greatly appreciated. Since I'm not dead centre, do I Incrementally increase the drill size and hope the studs starts to breaks off on the thin side of the threads? Or, drill it entirely an re-tap it? Hell-coil? Or, just say to heck with it, and keep driving it with three nuts holding 'er on... (very last option...) Later, Mike


-
Not sure if this is still available... (I'm still shopping for bikinis...?)

-
I'm wondering at this point, without specific paint codes, that the choice is one of personal preference? Once again, searching on-line , it's very difficult to determine if these are painted satin or gloss, and whether or not some of the pictures of amazing restorations used the 'correct' sheen when they restored their cars... As a bit of progress on the one I'm currently restoring. The first process was to clean the entire wheel cover and then go over it with an SOS pad... Progress half way through, the SOS pads did an amazing job at getting them pretty cleaned up and well on their way to a decent shine... For what it's worth, I used the piece of rigid insulation as a mounting pad to ensure I didn't damage the stud housings as I manhandled my way through the process... Following the SOS clean, I used sand paper ranging from 340grit to 1200 depending on the severity of the scratches and road rash. In one location I used 220, but for all intent and purpose, most of the minor pitting came out at 600+ but I didn't get too worried about perfection. Following the sanding, I tried my hand at using a rouge and a buffing wheel for the first time. For kicks and giggles, I started with red rouge, and within seconds, I was blown away at how easy it was to get the aluminium to shine. At a certain point I decided I could live with this level of shine as the shinier it got, the more the minor imperfections show up at 2-ft away while working on it. I'm sure once it's on the car, I'll be pretty happy and probably won't even find the spots that have added to my 'stress' cleaning this one up... Again, far from perfect, but from where I started to where I'm at, I'm pretty happy with the results. Although this is off of a '63 and is the not the right centre, I tried my hand a cleaning up the centre spinner and plastic emblem to see how it'll work on the ones from my '64... For the most part, the '63 centre spinner was in good shape but the plastic was dull and had minor scratches (similar to mine). After cleaning, I simply used colour sanding papers (3200 grit to 8000) on the on the plastic centre. I didn't use the rouge on the metal but used the red rouge on the plastic cap after most of the scratches were gone, and it too came out pretty decent... So now I'm back to the question of paint sheen- gloss or satin. I initially thought that I would go satin, but after cleaning up the centre cap, the black piece underneath does appear to be gloss, so I'm leaning to finishing the paint in gloss so as to "match" the centre cap... Not sure if this makes sense or not, but at some point I have to make a decision and live with the result... (or do it, then realize it doesn't look good, and do it over again... I seem to do that a lot, but I'd prefer not to do that here tho'...?) Later, Mike