Taylormade
-
Posts
2,396 -
Joined
-
Last visited
-
Days Won
1
Content Type
Forums
Gallery
Events
Everything posted by Taylormade
-
That spring is probably not strong enough. You literally need a proper tool to stretch the correct spring into place. If it wasn't a bear to get on it's not going to work.
-

1932 confederate 2 door, "the other deuce" Saga
Taylormade replied to cahartley's topic in Technical
Great work. Always nice to see another one on the road. -
Correct, black with silver head, same as 29 Plymouth.
-
This has to be every restorer's worst nightmare - just when you think you have everything sorted out, you're suddenly back to square one. I hope a solution finally arrives. As to the wife situation - been there, done that. ?
-
Ray, You mentioned in your first post that the knock goes away if you short the plug on number one cylinder. Is it completely gone or just greatly reduced? If it's completely gone, then the only thing producing the knock is the detonation in the cylinder and the downward force produced on the piston when the plug is firing. Have you ever taken the number one plug out and turned the motor over to see if any unusual noise is coming out of the plug hole? Like you, I'm grasping at straws here. You've done everything I would have thought of if this were my problem. At this point could you take the crank out and test it for straightness, or has that already been done? A depressing suggestion, but it may be the only way to see if the crank is the problem.
-
The Ressurection of Daphne - a 1932 DL
Taylormade replied to Taylormade's topic in Dodge & Dodge Brothers
That would be a godsend! Sending a PM. -
The Ressurection of Daphne - a 1932 DL
Taylormade replied to Taylormade's topic in Dodge & Dodge Brothers
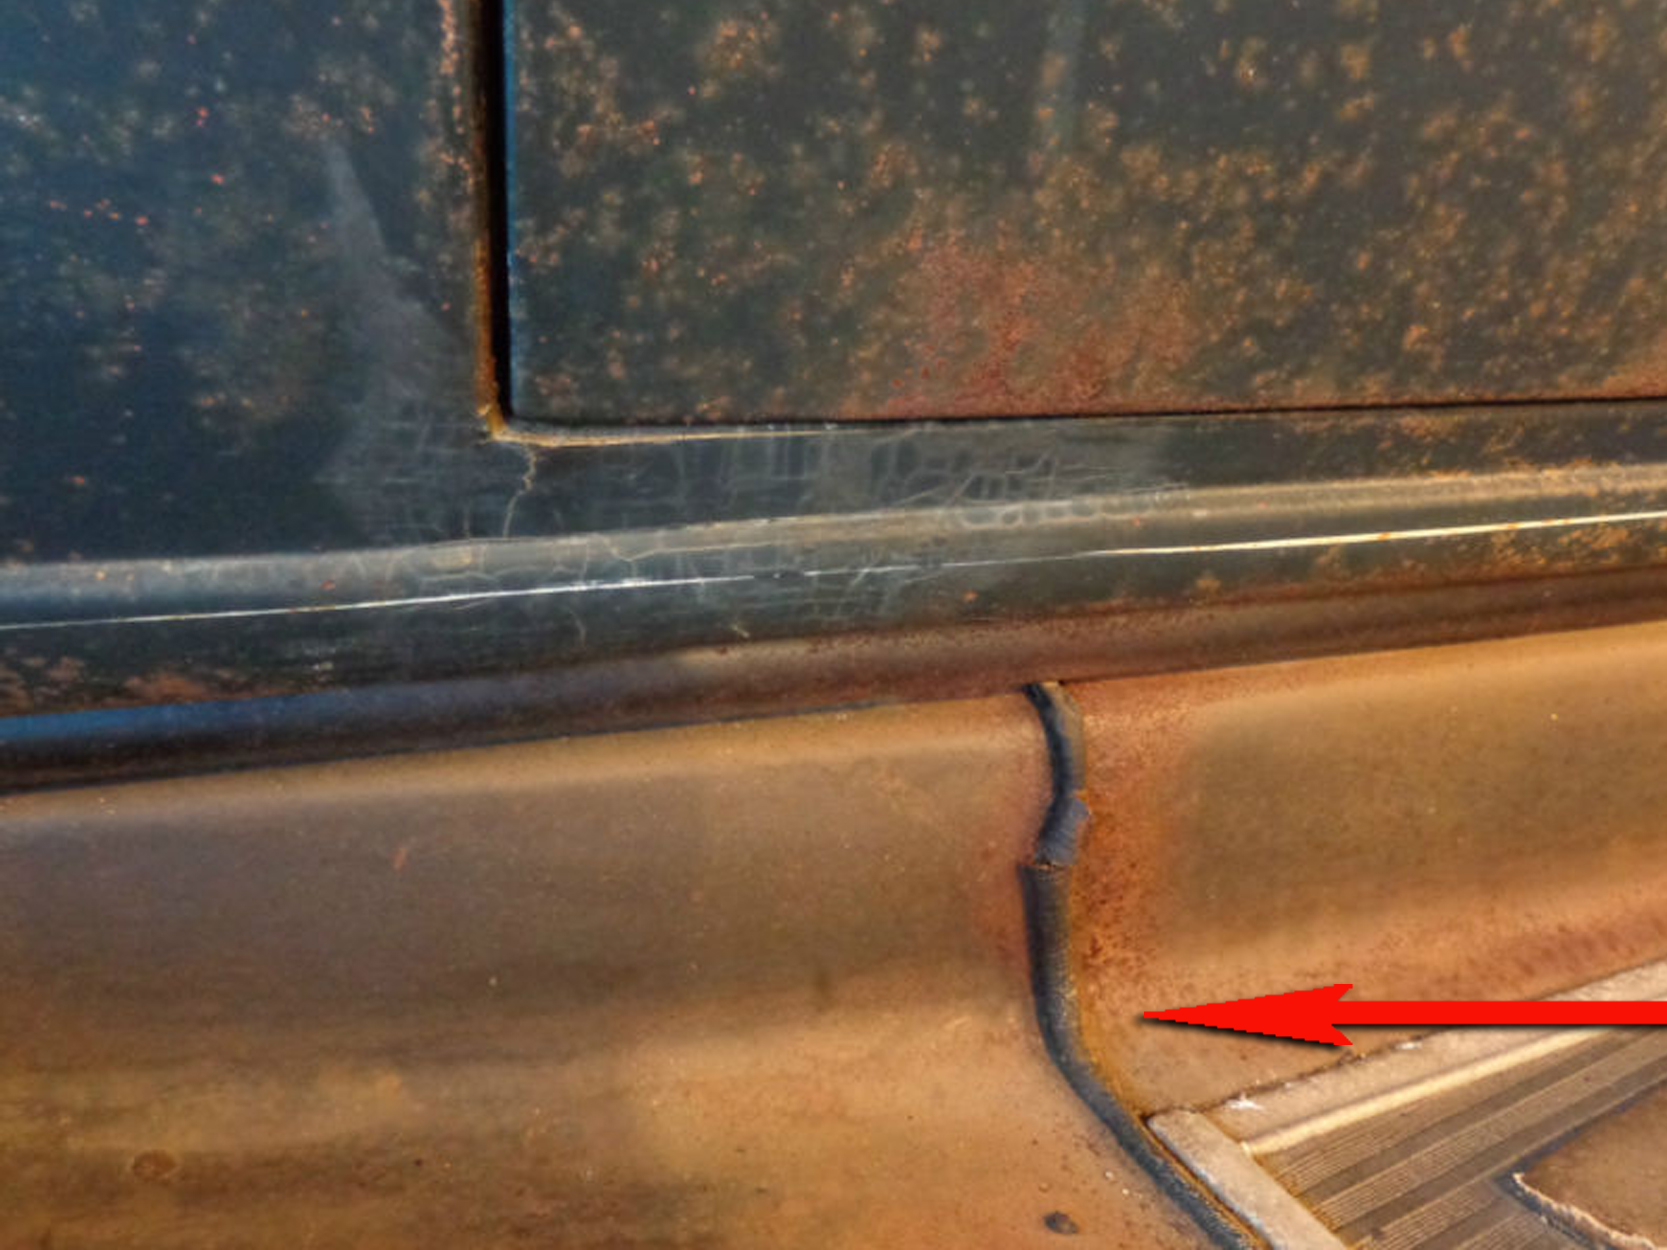
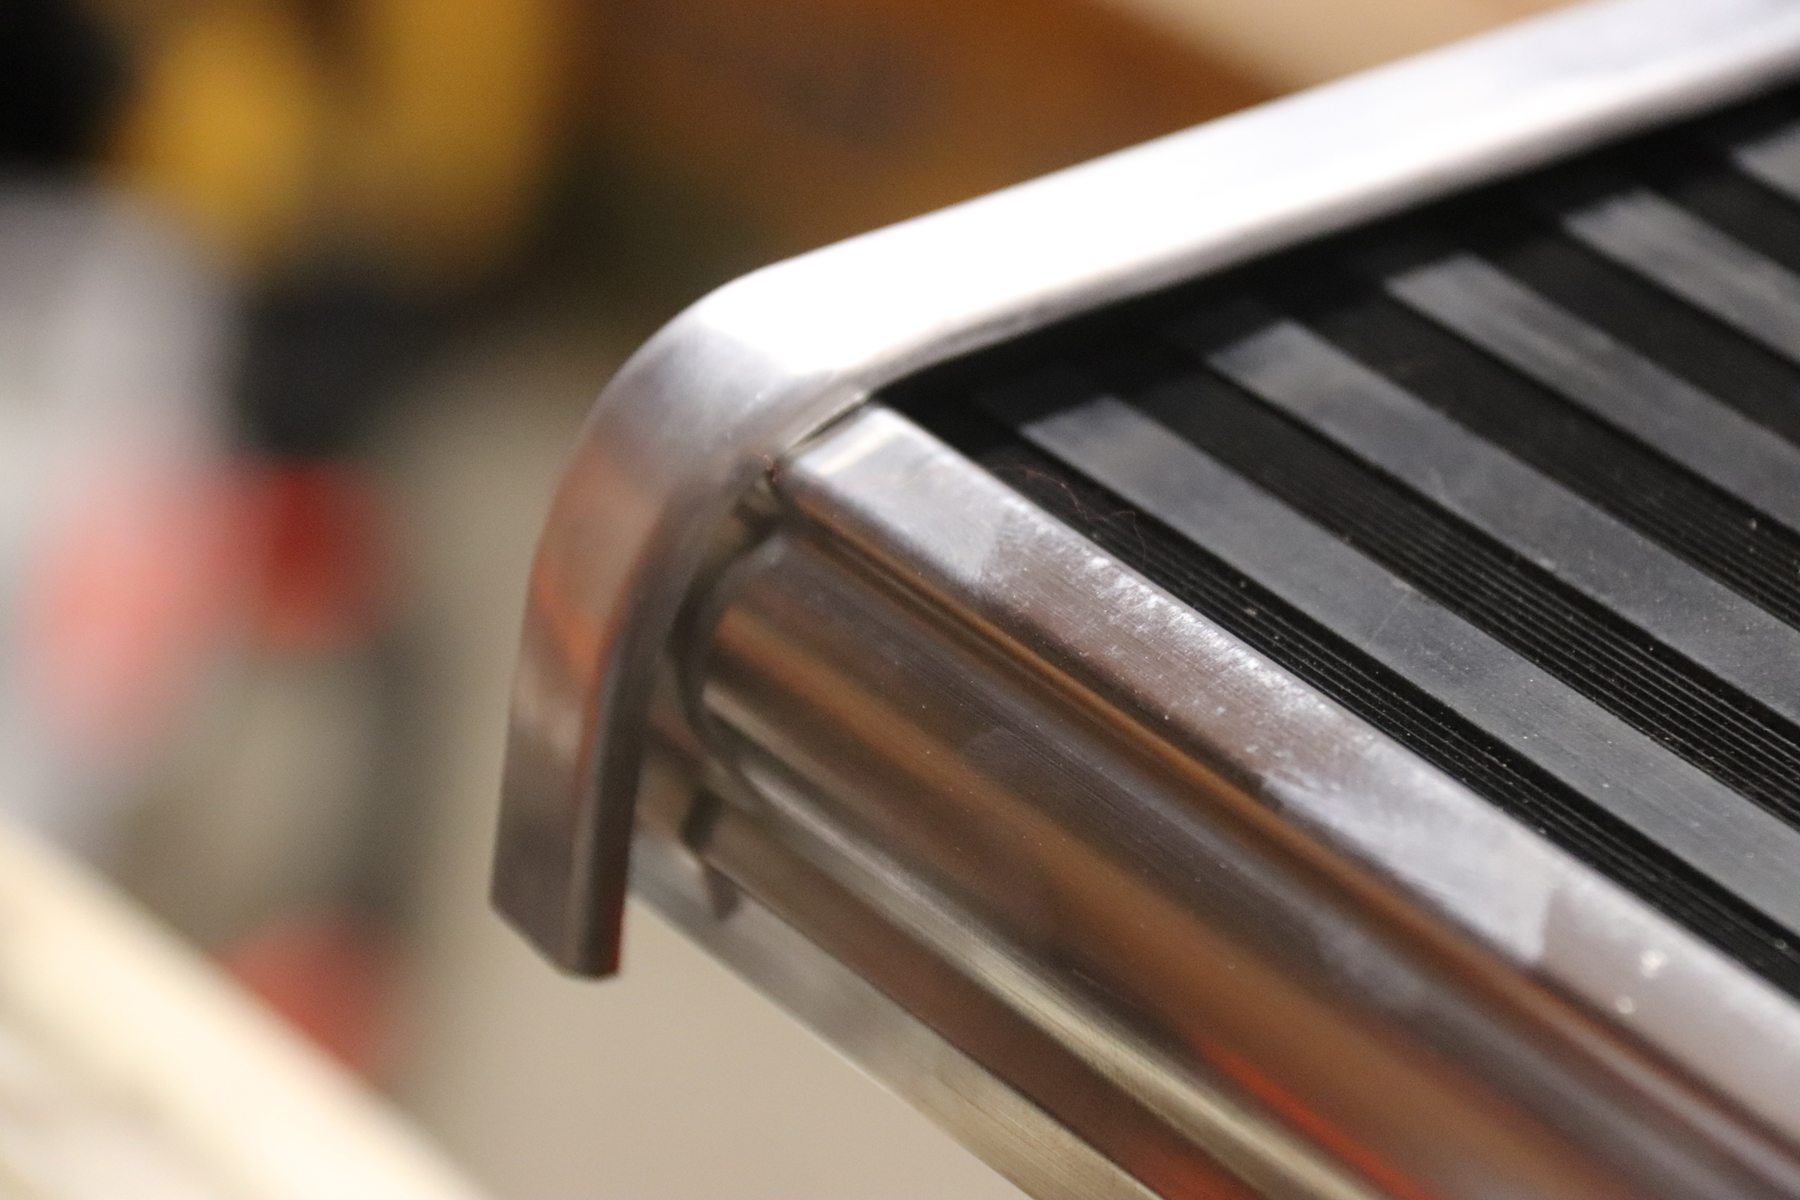
Good news and bad news today. First the good - I got all the bolts, nuts and washers for the running board assembly painted. They're black, but look gray in the photos. i painted them first as they are easier to touch up after assembly. I really wanted to use the original DB bolts, but 90 percent of them broke during disassembly. I used grade 8 with the markings ground off. It was amazing to see the running boards drop into place. All 24 bolt holes lined up perfectly. Considering the amount of damage to all four fenders, it was wonderful to see everything fit like a glove with no problems at all. it's also amazing how much more it looks like a car with the running boards in place. The bad new came as it tried to install the fender welt. The stuff I bought - through a recommended vendor, highly praised on the site - turned out to be junk. it may work for routine fender curves, but not for the application on my car. it was stiff, barely attached together with a cheap plastic "rope" in the middle. Any attempt to bend it resulted in the fabric bunching up in a wadded mess. This creates a real problem as the welting separating the running boards from the fenders has to be curved at almost a 90 degree angle to work correctly. These two shots of welting on an original Dodge Brothers DL illustrate the situation. The welting I have simply won't make those bends without wrinkling up, despite cutting slots. v shapes and everything else that's supposed to do the trick. My welting is supposed to be lacquered cloth, but it looks like cheap vinyl to me. Looks like I'll have to try and find the correct stuff or go with rubber welt from Steele.


-
The Ressurection of Daphne - a 1932 DL
Taylormade replied to Taylormade's topic in Dodge & Dodge Brothers
Thanks, just chugging alone trying to get her done. -
Then feel free to pass on them. I thought we were not supposed to comment on for sale prices. Let the guy dream.
-
The Ressurection of Daphne - a 1932 DL
Taylormade replied to Taylormade's topic in Dodge & Dodge Brothers
Next came the trim pieces. L and L provided these clips to attach the front trim piece. They fit in slots in the running board. Luckily, Ed Thomas, who made new boards for me included the slots! Next I slipped the front trim piece on. Now came the most difficult part of the job - bending the tab on the bottom of the trim piece over the bottom of the running board and the clips. I got it started with a few careful blows with a hammer. After I got it started, I was able to carefully fold it tight with a pair of vise-grips and a wood block to protect the outer surface of the trim. Then I fitted the side pieces. They come flat and don't fit the contour of the front trim piece at all. So I had to carefully file the correct contour into them. It still needs the bottom edge to be bent under and some polishing and smoothing before final assembly.


-
The Ressurection of Daphne - a 1932 DL
Taylormade replied to Taylormade's topic in Dodge & Dodge Brothers
Not exactly rocket science and pretty boring, but here is how I finished my running boards. after I cut the rubber mat to size. I clamped half of the rubber in place, making sure everything was lined up. Then I folded the free rubber back. Brushed on high strength contact cement after i roughed the surface of the powder coat with sandpaper. I let the cement dry for 20 minutes, then rolled it down with a rubber roller. After the cement dried for a few hours with a piece of wood clamping down the rubber... ...I reversed the process. I let everything dry for a few days and it came out great.


-
Any ticking time bombs on these old Dodges?
Taylormade replied to David_Leech's topic in Dodge & Dodge Brothers
I have a 32, so this is not my area of expertise. I'm sure 28 owners will chime in and chastise my suggestion (if incorrect) but I believe the distributors on these cars had a pot metal base that trends to self-destruct over time. Dodge Brothers were solid, well engineered automobiles that have few weak spots. -
It sure looks straight. I wonder about the paint - it almost looks like black primer. With the chrome looking that good, it's hard to believe the paint would have oxidized that much. I'd love to know a bit more about the history of this car. Distance and my current project prevent anything more than just drooling, but someone is going to get a really neat car.
-
Oh man, do I love this car. I hope they have the seats.
-
1930 Marquette Phaeton phoenix AZ craigslist
Taylormade replied to Oregon Desert model 45's topic in Buick - Buy/Sell
I'm sure if someone decides to cough up 18 large for this car, they will feel it was worth it and enjoy their new purchase. I just won't be that person. -
Your fuel pump diaphragm may be dried out. Disconnect the gas line, rig up a container to gravity feed gas to the carb with a clean hose. Then put the end of the disconnected fuel line into a container. Start the engine using the gravity fed gas. See if the fuel pump is pumping gas into the container. No gas pumping - bad fuel pump or clogged line or filter.
-
The Ressurection of Daphne - a 1932 DL
Taylormade replied to Taylormade's topic in Dodge & Dodge Brothers
I used contact cement and a rubber roller. It seemed to work pretty well. -
The Ressurection of Daphne - a 1932 DL
Taylormade replied to Taylormade's topic in Dodge & Dodge Brothers
Finished up my running boards. All new steel made by Thomas Restorations, trim from L and L, rubber from Restoration Supply. It was a bit fiddly getting everything together - lots of grinding and fitting on the end peices, but everything came out pretty good. Still needs lots of polishing to get rid of the assembly fingerprints, and the rubber needs cleaning, but they are about ready to be installed.


-
MASSIVE FIRE Country Classic Cars Staunton Il.
Taylormade replied to Roadhog1951's topic in General Discussion
Looks like the main building is fully engulfed. The structure to the far right is where the best cars were always stored - perhaps it survived, but there are flames in that area, too. Hundreds of cars there, many on consignment, all jammed in tight, bumper to bumper. It really looks bad. -
Help needed to look at car in Trona death valley
Taylormade replied to viv w's topic in General Discussion
It appears the Nash's wheels have been widened with extensions and the tires stretched onto them. We used to do this trick to our "dunescooters" up at Silver Lake in western Michigan. This area between Lake Michigan and Silver Lake (about two miles apart) features some of the largest shifting sand dunes in existence. It was once a dense forest of massive first growth trees that were cut down to rebuild Chicago after the great fire. With the trees gone, sand from the lakebed of Lake Michigan moved across the denuded areas, covering them with fine white sand. Back in the fifties, before four wheelers and the like, we locals stripped down old cars, widened the wheel rims by cutting them in half and welding in a six inch strip, then stretched old tires on the rims and ran them at about five pounds air pressure. They allowed us to roar across the sand and were great fun. We had a green 38 Ford flathead, sans doors and a 48 Mercury station wagon, minus all the wood except for the tailgate. The Mercury had three old bus seats so all the kids could get a ride. Fifty miles an hour, no seat belts, diving down steep dunes in a true roller coaster thrill ride - one of my best childhood memories. I think this old Nash was set up in the same way to navigate the sand out west. -
1930 Marquette Phaeton phoenix AZ craigslist
Taylormade replied to Oregon Desert model 45's topic in Buick - Buy/Sell
I think I'd top out at nine or ten grand, but I really love late twenties, early thirties touring cars. I'm three years into the restoration of my 32 Dodge Brothers sedan, and I know how much work would be involved in restoring this old beauty. And is it just me, or does the car seem to be sitting awfully high? Almost like the motor is out, but the rear end looks high, too. -
I always used to stay signed in, but now I have to sign back in every time I return to the site even if I leave it open in the browser.
-
Trust me, it's not worth $15,000 unless you can find someone whose great-grandfather drove one and the guy just has to have a 1920 Case. Parts won't be easy, as opposed to, say, a 1920 Dodge Brothers touring. They go for between seven and twelve grand all day, and that's for a running, driving car. I love these old tourers, but they top out at 45 with a good tailwind, so you're limited to very back roads, around a small town or parades. There is a cool 1920 Cleveland touring on this site, running and driv9ng, that's been for sale for $8500 for a long time. If that car was closer, I might be tempted if I could talk the guy down a bit. Does your Case run? If not, does the motor turn over? Do you have all the parts? If you really want to sell it, I'd bolt it back together, make sure the engine spins and all parts are there, and then sell it for five grand - if you're lucky.
-
Use a pressure washer to clean out the block. It worked like a charm on my 48 Plymouth. With the casting plugs out, you have easy access to the inside of the block.
-
Not sure if the 30 will fit. Your car has the "ribbon" radiator shell that Chrysler Corporation made a styling icon in the late 20s. The 30 had a wider radiator shell and that could cause problems.