
.jpg.8649e28d7606cf17c290a9eef6b2f163.jpg)

kingrudy
-
Posts
711 -
Joined
-
Last visited
Content Type
Forums
Gallery
Events
Everything posted by kingrudy
-

October issues of the Buick Bugle wanted
kingrudy replied to Pete Phillips's topic in Buick - Buy/Sell
Hello Pete, Sorry for the delay, I sent my copy of the October Bugle out yesterday morning. Post Office said it should arrive on Tuesday. Mike -
I have not started my '40 Buick in a year, as I have been working on the wiring, interior and various other items. Can anyone provide me with a checklist to perform before starting this car. It was delivered to North Carolina from California last December where I had in in a mechanics shop. The car had to be able to run and drive to load it on the truck to ship it to North Carolina. I drove it off the truck and 2 miles to my house last December with no issues. Thank you
-
I agree Greg, the cost to restore this car would be quite high. Also the time involved would be quite a feat.
-
1940 Resto Rod Buick Special Tourning Sedan
kingrudy replied to Gary Best's topic in Buick - Performance and Modified
I normally don't care for a modified version of this dash, but what you have done has changed my mind. This is really going to look sleek and very tasteful. -
I would say, it kind of depends what your goal is. If you just want to harvest some parts, sure forge ahead. If you would like to restore this car, there are a few things to be aware of. First of all determine if it is Special, or Century (all had running boards so you can tell from a distance), or if it is a Super, Roadmaster (no running boards). Either way some of the parts are getting difficult to find for these cars and if you do find the parts the sellers will treat them like gold. If the car is a sedan, they have a limit to their value as a driver (hope this doesn't hurt anyone's feelings). I know from experience that you can pour a ton of money in these cars and not be able to get your money out. I would recommend that you be a little cautious and do some homework. But I could be wrong, about the market in Australia. Best of Luck,
-
Thank you very much.
-
I have rewired my car including everything behind the dash and at the time I noticed that the speedometer cable is missing, so I bought one through CARS. I should have take care of this when the dash was apart, but that ship has sailed. Could some one tell me where the cable connects to the transmission? I have a 1940 Buick. Thanks, Mike
-
October issues of the Buick Bugle wanted
kingrudy replied to Pete Phillips's topic in Buick - Buy/Sell
Hello Pete, Do you still need an copy of the October Bugle? Thanks, Mike -
I think that this was a high production car, so I you come across a spare lock mechanism, it might come in handy later.
-
If this is the same as the "40 (and I'm sure they are similar), the handle is held in place by a brass retainer with the 1/8" tapered screw holding the handle in place. Because the retainer is brass (soft metal) you should be able to remove this with a generous amount of WD-40 and patience muscling the handle out. The wrecking yard sold me a mechanism where they torched the handle off to remove the mechanism, this distorted the brass retainer that is pressed in and the whole thing was junk. If you are going to replace the handles, you could cut the handles off with a sawzall, remove the mechanism and then soak this in WD-40 on your work bench.
.jpg.e16db72a7f28325c39accc2b132d35e8.jpg)
-
Also looking for the wiring harness for a 1940 Buick Borg clock, one reveal clip and one stainless clip for the rear window.
-
Looking for the gravel guard for a 1940 56S. This is the sheet metal that fits in between the rear bumper and the trunk.
-
I have sold cars in the past where I had developed a history with the car. This is difficult, as you have the connection with your father and the car. Several people have given you some good advice and I think that if you take a step back and look at the car objectively you will see the merits in their comments. Best of luck selling the car Mike
-
It might take a little while, but she will get over it. My wife is hard headed and it took her a year. Give her some space for a while. Mike
-
Thanks Neil, I held off for as long as I could, but it was worth the time and effort. Mike
-
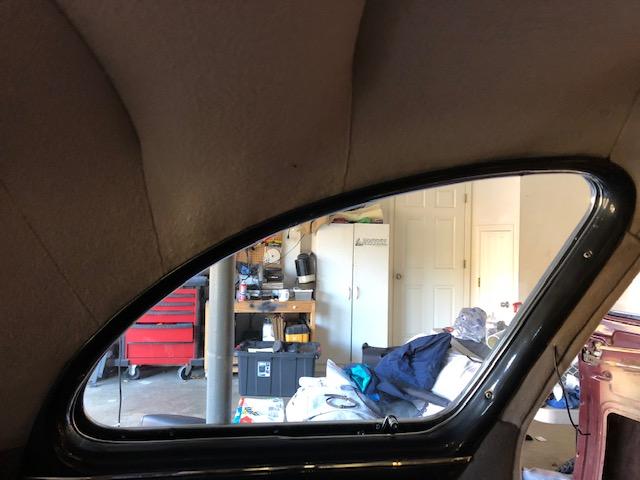
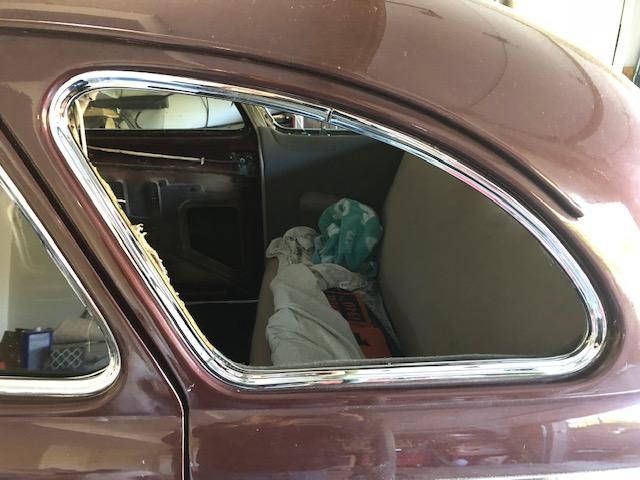
Well, I had to take a few days off to do my civic duty (jury duty). Yesterday I finished up the drivers side quarter window with the installation of the flexible pile lining (fuzzy the seals the window). This is the first time that I wish that I had a four door as this process take a lot of patience. I purchased the flexible pile lining from Restoration Specialties for $17 for a length of 72 inches. They offered to cut this to save postage, but as you will see that was not a good option. The material is shown in image one, this has a stainless steel bead on top and black on the bottom. The plan is to make three bends (two over 90 degrees and one at about 35 degrees using one 72" piece of material and joining the piece at the top behind the section of reveal that is covered by a small clip. In order to bend this material, lay this on a flat surface holding one section in place and working the section slowly as to avoid kinking the stainless. I started with the bend in the lower right hand corner allowing about 4 inches of material to run out past the point where the reveal joins together (later I would cut this material to the exact length. As you bent the piece the stainless will grow in length so in is necessary to leave a little extra to make the exact cut later. I checked the accuracy of my bends by using some painters tape and taping this to the reveal. When the three bends were done and pretty close I moved on to fastening the piece to the inside of the window. To fasten this to the car I chose to use #6 sheet metal screws 3/8" long (no longer), you can use pop rivets, but if you need to make an adjustment then the pop rivet will need to be drilled out. If you use a longer screw than the 3/8" there is a chance that you will put a dent in the reveal. I started by drilling through the material with an 1/8" bit then attaching the material with the #6 screw at the lower right hand corner. If you put one screw before the curve and one after, this obtained the best results for me. I used three screws on the bottom run and three on the "B" pillar. The top has a gentle arch and can be done in place. when complete I cut the two ends that came together and made a small clip to join the two ends that were joined right behind the reveal clip. To install the window with the sliding mechanism, insert the bottom section first with the window slid back to the first notch and gently tip the window in place. I next put a length of thin rubber on the "B" pillar and installed the inside window garnish. The window garnish need to be installed with the bottom edge pressed in first along with the leading edge of the "B" pillar. I fought this for a while until I got the sequence right. If you choose to do this, take your time and make certain that your bends are done on a flat surface (the piece should lay flat when you are done. When you fasten the piece to the car, check the gap between the reveal and the lining to make sure this is correct as well as the gap. When complete I noticed that sliding the window is pretty tight, but I am sure that this will not leak. Thanks for looking, Mike
.jpg.dde44a19c79c16b368e5b8c35ff864d7.jpg)


.jpg.c63436f836fb33200c1d9c80c1f642dc.jpg)
-
1940 Resto Rod Buick Special Tourning Sedan
kingrudy replied to Gary Best's topic in Buick - Performance and Modified
Gary, this really look fantastic. Can't wait to see the finished product. Do you still have some of the old parts available? -
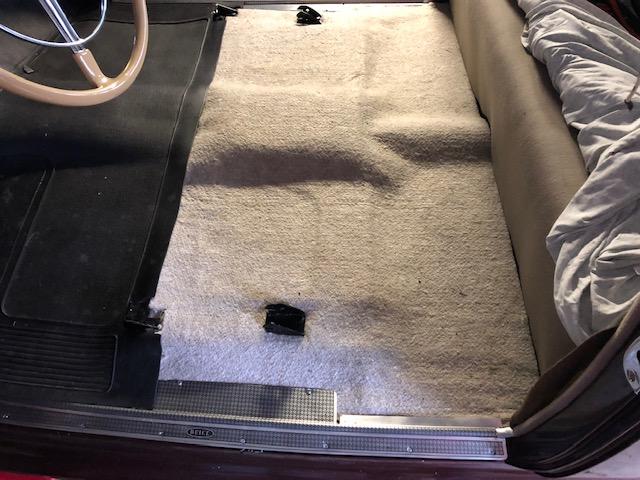
Today I installed the mat for the back seat. I was not able to find an exact match for the front floor mat, but I think that this one is close. Restoration Specialties has several patterns and they are willing to send as many samples as needed. The next project is the installation of the flexible pile lining for the rear quarter windows that seals the window and provides a stainless steel bead around the window reveal. I have removed the inside window garnish removed the three screws that hold the sliding window in place and removed the window (window tips inward at the top and removes from the inside.

-
Today I installed the sill plates and jute padding for under the seat and the back seat floor. I used a spray adhesive to smooth out the padding and make it conform to the hump in the middle.Tomorrow I will put the mat down after cutting the material around the seat brackets. I am hoping to start work in the rear quarter windows to install the flexible pile lining with the stainless steel bead by the end of the week.

-
Can't go wrong with the price.
-
What did you buy at Hershey this year?
kingrudy replied to Laughing Coyote's topic in General Discussion
Struck out this year, but I was looking for some small items to finish my car and Skip Boyer said the send him a list and he might be able to help me out. -
1939-49 opera 1/4 window weatherstripping
kingrudy replied to 39BuickEight's topic in Buick - Pre War
Hello, I have been struggling the same issue. I originally purchased the two strips from Steele Rubber for my '40 Buick 56S. I had my car at a restoration shop that went out of business, so all of the window seals were gone and this section of the sliding quarter window really has me stumped. It does not appear as though your car has the chrome reveal on this quarter window. Not sure if this makes a difference. Chev's of the 40's makes a kit for these windows and that may be some help to you. Mike -
'41 Super Coupe on Ebay -- not mine
kingrudy replied to neil morse's topic in Automobiles and Parts - Buy/Sell
Nice looking car, I'm partial to this color. -
Matt, really sorry to see what happened to your car, but glad that you are well. I agree with Lamar, my wife got rear ended 30 years ago and her neck still gives her problems. You really should go see a doctor.
-
Sorry for the late reply, have been bust moving my son from Michigan to North Carolina. Thanks for the information, the metal strips are gone, but I think that I will be able to make something very similar. I just finished the front doors, so I'm ready to tackle the quarter windows.


.jpg.e16db72a7f28325c39accc2b132d35e8.jpg)
.jpg.dde44a19c79c16b368e5b8c35ff864d7.jpg)


.jpg.c63436f836fb33200c1d9c80c1f642dc.jpg)


