
.jpg.8649e28d7606cf17c290a9eef6b2f163.jpg)

kingrudy
-
Posts
711 -
Joined
-
Last visited
Content Type
Forums
Gallery
Events
Everything posted by kingrudy
-
I will be attending Hershey for the first time this year. I am looking for a few small parts for my '40 Buick 56S and am interested in some manuals that I do not have. Mike Nelson 1940 Buick 56S
-
The rollers that I acquired from CARS came with a 1/4" rivet. The holes in the window regulators are 5/16" so I did some additional research and found that Chevs of the 40s stock the correct 5/16" rivet. The part #3847282 Window Regulator Roller will make the job easier and no need to weld the smaller part. The first thing I did was place the rivet in the vise and cross cut with a hack saw (I have been told that this can be done with a chisel, but I did not want to take any chances). Next place the rivet on the anvil part of the vise and gently hammer with two ball pein hammers (If you have a large vise you can place the regulator and a small ball pein hammer in the vise and press to spread the rivet). Afterwards hammer the end flat as in the last photo being careful to not damage the roller. To install the window regulator I would advise looking at Youtube, there is a great site of the installation on a 56 Chevy Sedan Delivery EP 11. They recommend buying a new regulator, but that isn't possible that I know of. The rest of the install was very helpful.


-
Received some parts today for work on the quarter windows and back seat flooring. I received some valuable information from Tom regarding installation of new rollers for the drivers side window. Parts are on order for those rollers and hope to receive them tomorrow. Today I pulled the plate that covers the brake and clutch pedal to check the insulation and found that some was loose and needed to be tightened up a bit. I used some high temp spray adhesive to secure this. I also purchased the two boots for the brake and clutch pedals and installed those. I was able to stretch those over the pedals and no need to do any more dismantling. Next I laid that jute padding out to see how this was going to fit. The padding and the front mat were purchased from Bob's Automobilia some years ago. The mat was a pretty good fit, but there was no cut out for the dimmer switch. Brake, clutch and throttle all had proper holes provided, but nothing for the dimmer switch. The mat was the same (nothing for the dimmer switch. I have seen videos that recommend using spray adhesive on i the padding, but I would say first check the fit, as the three holes for the gas pedal are very close to the exact dimensions of the two screws and the rod at the top of the pedal. I ended up enlarging them slightly in order to provide play and being able to install the two screws under the gas pedal. I still have some clean up to do, but overall I'm happy with this product.


.jpg.2b741cb801489c0715e8004eea7ca738.jpg)
-
When installing the seals for the rear quarter window, I believe that the belt strip on the outside reveal and the inside window garnish act like a sandwich to seal the window and keep it from moving side to side. My question is how is it sealed on the front portion of the glass when closed?
-
Now if you have any pics of a sliding rear quarter window for this coup, I would be forever in your debt.
-
Really appreciate the advice and the pics. I will go ahead and purchase the item from Chevs of the 40s with the 5/16" pin. I did not want to start with a complete regulator if these guides will work.
-
https://www.ebay.com/itm/NOS-GM-Side-DoorQuarter-Plastic-Window-Glass-Regualtor-Wheel-Roller-1pc-B/122799386176?ssPageName=STRK%3AMEBIDX%3AIT&_trksid=p2060353.m-Rear-1438.l2649 I also found this part on ebay which does have a roller that does not look like a pulley and would fit in the guides.
-
So the stock roller looks like a doughnut and is in the guides (top and bottom). This roller will not fit in the guide but will travel on the rail?
-
Window Regulator Roller & Rivet 5/16'' - Part #3847282 from Chevs of the 40's Well I have my window regulator out of the car and removed the pins, but I am not sure if the parts mentioned above are correct as the rollers were completely gone when I removed the regulator. If these are not correct can someone give me a lead as to where I can get the right ones. Thanks, Mike '40 Buick Super
.jpg.48e4ea4a21fd6e3c8af80618a7143660.jpg)

-
I happened to see this car when I attended the Cool April Nights car show in Redding three years ago. As I remember it does show a bit of wear on an older restoration, but there should be no rust as it is very dry in that area. I agree with Ken that if someone were to think about buying, you have to see this in person.
-
Continued work on the drivers side regulator yesterday. First thing that I did is drill out the old roller guides. I used a 1/2" drill bit to drill the backside of the roller guide making sure that I wasn't too aggressive to remove metal from the regulator itself. The first picture is after drilling thee guide, then I took a pair of channel locks and twisted the piece to free it from the regulator body. Picture two shows the regulator without the roller guide. I used a little primer so I wouldn't have to think which side of the metal the new roller goes on. Picture three shows the inside of the roller channel after I used paint thinner to remove all of the grease and gunk that had built up after 79 years. I have attached a link from YouTube that I found most helpful. I ordered the rollers and guides from Old Buick Parts for $2.50 each times three, I am not advertising for this company, but I couldn't find them anywhere else. As soon as they arrive I will post the install and results. https://www.youtube.com/watch?v=xF1rok1yN9s
.jpg.8f76c4cc645987796f50c362857fcd80.jpg)

.jpg.60a017ecb60ebab3af48605ff7f16e05.jpg)
-
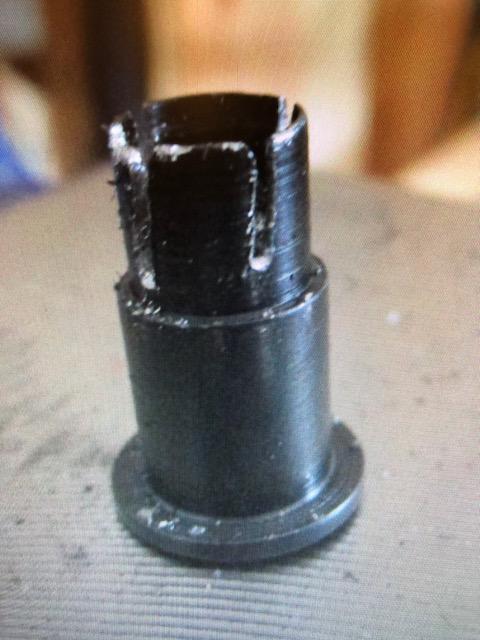
Waiting on a couple of parts for the front windshield and the rear quarter window windows, so I thought I would pull the window regulator and give it some love. I spent some time lubricating the spring and loosing up all the working parts and then I noticed that the nylon washers that should be in picture #1 are gone. I'm not sure how to tackle this one, do I drill out the carriers for the nylon rollers? Is there any other option? Also, do they still make the black insulation/ noise reduction material that is found on the trunk lid and the floors?
.jpg.d257eb62c9fb80be4af2346c658e3bca.jpg)
.jpg.e5fecf9941bcd66be0138e370755272f.jpg)
-
I have mixed results with Windy Hill. First let me say that the people that I have spoken to could not have been nicer. The problem that I had with them came about when I purchased a door lock mechanism that I had been looking for over a year for my "40 Super. This mechanism was only produced for the Super and Roadmaster, so it is difficult to find. The guy in the yard cut the door handle off with a cutting torch, which distorted the brass latch piece that the handle fits into. The part was not usable, but they did refund my payment. I would have rather had the part. On hindsight maybe I should have offered $25 extra to remove it gently, it would have been worth it. Nice people though.
-
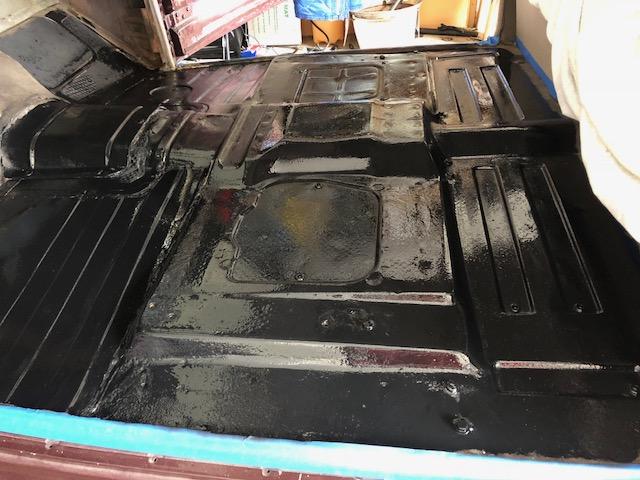
Yesterday and today worked on the floor. On the drivers side and passengers side there were four u bolts that secured the seat belts. The two easy ones closest to the door were taken out long ago. The two nearest to the center of the car needed to be removed (new seat belts will be added later). One side of the u bolt was three inches long??? The other side was only one inch as it ended right above a cross member. Both were a mother to get out with a sawzall and a box ratchet. I put bolts in place of the u bolts as a temporary measure until the new seat belts are purchased. Took a wire brush to the floors to get them as clean as possible, washed them with soap and hot water (probably not done in 79 years). There was a little surface rust near the back seat, so I used a rust reformer (Rustoleum) on these spots, sheet metal was solid, as the car spent it's whole life in Southern California. The last picture shows the final product after rolling on the Rustoleum gloss black enamel. I will let this set up for two days and then see what can be done on the cowl.


-
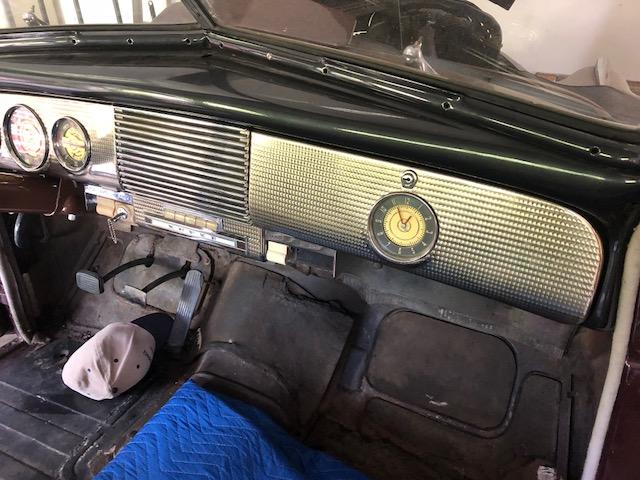
Today I got the dash completed (sort of) and got the two most important things, the lights and the ignition switch. The first illustration shows the key position (start) to the lock and remove the cylinder. On the second picture (taken while lying on my back under the ignition switch) notice the blue circle.The screw is located at about the 4:30 position when you are facing the dash. This screw holds the switch in place, it also makes sure that when you put the key and the face plate together, that the key will correspond to the positions in the first illustration. I took some extra time on this to make sure that the switch turned freely (if it doesn't, the car won't start). Place the plastic piece on next and secure this with the small screw on the bottom is the switch. The light switch is held in place by a male screw on the outside of the face plate and an Allen screw that secures the plastic pull to the shaft of the light switch. I know that when this is complete that I will have to go back and replace the plastic pieces, but that is not my priority. Right now I am trying to knock down the large projects and I'll do a punch list at the end. The dash is complete for the most part, I still have to put the windshield wiper switch in, no big deal. I went to pick up all of the material for sealing the floor, will start on this in the morning.


-
I'm hoping so.
-
It was a good day, the left side of the steering column is complete and all wiring is done. On the right side the enclosure for the ignition switch, light switch and choke was installed and the dash should be finished off. The two screws that secure engine turned portion to the dash were quite a challenge, one hand behind the dash and completely by feel alone. I still have to put the light in the glove box and the light for the clock. When I get the proper light sockets for this hopefully I will have a solution for the switch that makes the light come on when the glove box door is opened. The picture to the far right is of the seat brackets. I put them in some Evap-o-Rust over night and gave them a wire wheel treatment. Then I gave them a coat of primer and will add a coat of gloss black tomorrow. Looking ahead, after the dash is complete, I will give the floor the same treatment that I did in the trunk with a coat of primer and a coat of gloss black.
.jpg.2081d001a0509dee422aa21348a783d9.jpg)


-
I was studying Gary W's post on finishing off his clock and lamp install on his glove box and it gave me some ideas and more questions. If you go to his post "37 model 48 restoration on page 26 he describes the mechanism for making the light come on when the glove box is open. I am a bit confused by this, it seems as though it is part of the lamp, I have to read this again and maybe it will sink in.
-
Hello Ken, Thanks for the information, I do not have this clip. It appears as thought it is part of the the wiring harness that connects to the instrument switch on one end and the clock on the other. My original thought was that this clip attaches to the glove box door hinge on the left hand side. It appears as though this not only makes the installation neater, but also serves as a ground. I very well may be looking for an aftermarket clip that at least finishes off the install. There is a ground wire that attaches to the clock.
-
 Beautiful car, someone will be very fortunate have her. Mike
 -
63 buick riviera for sale $10,000.00 OBO
kingrudy replied to brandon davis's topic in Automobiles and Parts - Buy/Sell
Hello Brandon, Try taking some pictures of your car and sending them to your email address, then saving them to documents. This has worked for me. Good luck with the Riv. Mike -
Today I decided to put on the glove box door and to install the glove box. I really thought that I was going to have an easy day, well I was wrong again. I started by putting the glove box in first, that seemed logical. I carefully put the u clips on the box taping the material with masking tape so when I put the clips on it wouldn't shred the cloth liner. The right side of the box went smoothly, but the left side took some massaging to get everything tucked in right. Next I tried to put the door on, you can't make any adjustments to the hinges once the glove box is in. So, take the door off, pull the box out and start over. Put the door on and line everything up (make sure it closes and latches). This was a bit of a challenge, but most of the car has been. I tried using the bumpers that I bought at Bob's, but the door would not latch even after several adjustment to the latch. Now put the glove box in and fasten all trim screws. Small hole on the left side of the box is just large enough to bring the braided loom for the clock and the light for the glove compartment. Tomorrow I will wire the clock and connect the wires on the other end to the instrument switch. When I work on the clock, I will refer the the third image below.


-
After my study day, I worked on the instrument switch and light switch. If I had worked on this from the start (seven years ago). This would have been much easier, as the wiring was all numbered real well and everything matched with the wiring diagram in the Buick manual plus the hand drawn diagrams really helped. The problem came in when the numbers were removed from the wires, or were worn to a point where they could no longer be read. At times a wire would exit a loom without a number and I used a wire tracer to tone it out to locate the other end of the wire. At other times I used a wiggy to test for continuity (such as the #12 wire that exited the loom in the trunk next to the tail light). The instrument has six connections and two fuses. I thought it would be a good idea to make notes stating what the wire colors were and where they were going, as some of the numbers were missing. Two connections come from the light switch, one to each end of the fuse. One connection goes to the dash lights and one to the map light above the ignition switch. Two wires go the the clock and light for the clock with a split for the switch that operated the glove box light ( still working on what the switch looks like and how to mount it. Any suggestions). Another wire goes to the light for the ash tray. I would love to do three or four more of these to get more comfortable with this (just kidding). Working as a volunteer at the hospital today, so I will be back on this tomorrow.


-
Please see my post regarding the bayonet terminal located behind the cigar lighter. Does this car still have that part? Thanks, Mike
-
The bayonet terminal was made to attach to the rear of the cigar lighter fuse on Buick's from 1938 through 1953. I have looked at several sites with no success. Any help would be appreciated. Thanks, Mike


.jpg.2b741cb801489c0715e8004eea7ca738.jpg)
.jpg.48e4ea4a21fd6e3c8af80618a7143660.jpg)

.jpg.8f76c4cc645987796f50c362857fcd80.jpg)

.jpg.60a017ecb60ebab3af48605ff7f16e05.jpg)
.jpg.d257eb62c9fb80be4af2346c658e3bca.jpg)
.jpg.e5fecf9941bcd66be0138e370755272f.jpg)


.jpg.2081d001a0509dee422aa21348a783d9.jpg)


