idrjoe_sandiego
-
Posts
550 -
Joined
-
Last visited
Content Type
Forums
Gallery
Events
Everything posted by idrjoe_sandiego
-
1930 Dodge Marathon Car pictures wanted
idrjoe_sandiego replied to 35cz8's topic in Dodge & Dodge Brothers
yes! even more if one of them turned up this week at a car wash -
1930 Dodge Marathon Car pictures wanted
idrjoe_sandiego replied to 35cz8's topic in Dodge & Dodge Brothers
Dave, on behalf of all the blind idiots of the world, we’ll give you 10% credit for your suggestion that the lying media, for appearance sake, “doctored” the image of the one and only “real” marathon car. Next, you'll be saying there is only one Santa Claus. Why 10% credit? After closer scrutiny, there may be a faint ghost image of the original graphics seen below Dodge 8. Or maybe it’s just my imagination. Photoshop does go way back; then they called it “Photo Retouching.” Now on to the other 90% of the argument… 1) Why do practically all the other pictures depict a very "dirty" Marathon car? 2) Why take the time to Photoshop the image to make the car look "cleaner"? 3) Doesn’t it make more sense to keep the car appear like it has been ridden hard and put away wet? 4) Why bother with photo-doctoring when a CAR WASH would take one-fourth the time? 5) If they wanted to “clean-up” the car, why bother adding in pinstripes that the “real” car didn’t have? 6) Why would Dodge approve of a “doctored” photo if it might hint at the possibility that more than ONE “real” marathon car exists? Dave, we welcome your scholarly and insightful answers the above questions. Chop-chop! It is not nice to keep a blind idiot waiting. -
1930 Dodge Marathon Car pictures wanted
idrjoe_sandiego replied to 35cz8's topic in Dodge & Dodge Brothers


-
1930 Dodge Marathon Car pictures wanted
idrjoe_sandiego replied to 35cz8's topic in Dodge & Dodge Brothers
-
Dodge brother and sister visit
idrjoe_sandiego replied to keiser31's topic in Dodge & Dodge Brothers
John and Cherie are the Best! They roll out the red carpet for their guests. Hang out long enough and John will take you to the local watering hole and beat you at pool. Barrel of monkeys, guaranteed. Thanks guys! -
1930 Dodge Marathon Car pictures wanted
idrjoe_sandiego replied to 35cz8's topic in Dodge & Dodge Brothers
It's the one with most bugs in the honeycomb radiator. The daily mileage log shows they maintained their average speed of almost exactly 30mph every day. (Newark, NJ on August 12 =23mph, damn NJ traffic.) It obviously wasn't an Indy race, slow and steady gets you there. All told, this is a pretty good clip back in 1930, even for an 8 cylinder. Anyone know if they ever duplicated this with a six cylinder car? Who were the drivers and what were they paid? -
My Romar's Dodge experience
idrjoe_sandiego replied to idrjoe_sandiego's topic in Dodge & Dodge Brothers
Agreed. And the more folks that know about him, the more likely he will stay in business. Like an endangered species. Good question. Now, what did he say? I forgot. LOL Just kidding, I was paying attention. It was interesting because his point was, that you could probably get away with 0.165 in end play on this pump without any problem. He said the idea here is because of the pump design, when the impeller is spinning, it tends to suck itself up towards the pump body. End play, within reason, is not a problem. He added, "but if it makes you feel better, use some fiber washers leaving 3-5 thou gap". If that gap turns out to leave too little end play, the fiber washer will just wear itself down and won't cause any problem either. In my case, it did make me feel better to use fiber thrust washers. It felt even better when I found the perfect fiber washers already in my parts drawers. -
1929 Dodge DA Phaeton Fan Disaster
idrjoe_sandiego replied to idrjoe_sandiego's topic in Dodge & Dodge Brothers
Wow Ken - good find! No magnaflux needed here. Better to find the cracks now, rather than finding new louvers in your hood. When checking fan blades, don't just give them a casual glance. Some of the cracks are hard to see. Best to pull them off and examine them on the bench with a good magnifier. Better yet, sandblast or wire wheel the paint off before checking. Your fan probably could use fresh coat of paint, anyway. If it still looks good after stripping the paint, do a magnaflux test as Ken suggested. If it passes ALL the tests, congratulations, you have a hen's tooth. I will post my "new" fan replacement for the '29. It is likely to work for any model DB 28-31. If anyone has done some kind of replacement, post the photos and save a Dodge (or even a Pontiac) That reminds me, I also have a '29 Pontiac I need to check. Thanks Tinindian! -
1929 Dodge DA Phaeton Fan Disaster
idrjoe_sandiego replied to idrjoe_sandiego's topic in Dodge & Dodge Brothers
I think this is exactly what happens. For those unfamiliar with this setup, the fan consists of a set of two identical individual pieces of stamped steel that are mounted 90º apart on the water pump hub with 4 bolts . Close examination of several sets of these blades reveals the small gap left between the two blades (maybe 60 thou). This gap leaves each blade essentially unsupported at this point. (Warning...pure speculation ahead!) For every mile driven, the gap allows thousands of micro-flexures along this junction and eventually the metal fails. Of course, using the fan blades to turn over the engine by hand doesn't help either. -
I need a pair of 1920-1923 Dodge Touring Top Rest Saddles
idrjoe_sandiego replied to 23Baby's topic in Dodge & Dodge Brothers
Stuart, Do they look like the rests pictured below? If so, you may be in luck because I purchased them from a great guy right there in NZ. He made several pairs of these rests. They were cast in silicon-bronze from an original set . They came out great. And the bloke personally delivered them to me in San Diego! That's service. His name here on the forum is DBNZ (Phillip).


-
When was the last time you purchased a product or service and the business just knocks it out of the park? Sadly, it doesn’t happen very often anymore. But when it does, it is only fair to pass it along, right? Besides, maybe some other service business might decide to raise the bar or perhaps some manufacturer might decide to stop using Chinesium. Now to the story… My Dad and I needed a rebuilt water pump following the “Great 1929 Dodge DA Phaeton Fan Disaster” (That story is the subject of another thread As this was Dad’s first experience with Romar, he conducted his usual mini-interview, testing the water, so to speak. Apparently George passed- he got the job. George located a core water pump as a candidate for the rebuild. He stripped and sand blasted the core, pressed in new bushings, re-packed the gland, polished the brass gland nut to a mirror finish, and painted it like new. As a big plus, the new pump arrived well-packed and ahead of schedule. It was a work of art! Only one thing left to do: mount the pulley on the shaft and re-pin it. The measured pump shaft end-play seemed excessive at 0.165 in. With the old pump destroyed, no thrust bushings existed for comparison. Information on the issue is scant. JB-ed’s Victory Six manual states 0.005 to 0.0025 in. recommended end-play, but he provides no additional info on the thrust bushings. As a last resort, I called Romar’s for the first time seeking help with the pump. I hesitated to call because they rebuilt the pump was over six months ago. My bad- due to the time difference, I called close to closing time in New York, but George Farrell still answered the phone. Surprisingly, he recalled the details of the rebuild from six months prior. Next, he explained the end-play situation. He even took the time to answer a couple of questions not related to the water pump. He is extremely knowledgeable about the pump and Dodge engine rebuilding in general. All told, he spent 30+ minutes on the phone with me. This is unheard of today. Talk about service after the sale! Romar’s is an “old-school” workshop run by one who takes pride in his work. George Farrell is one of a kind. I would highly recommend him to anyone needing Dodge Brothers engine related work. As a bonus, George will answer your questions. I am blown away! To George: thanks a million for your expertise and best of luck to you in your new enterprise.
-
The Great 1929 Dodge DA Phaeton Fan Disaster Here's a vacation ender for you... My Dad took our ’29 Dodge Phaeton on a car tour near Los Angeles (110 miles each-way). He was on the return leg of a fun 2 day tour when suddenly he heard a loud bang coming from under the hood. With the engine still running, he pulls over and lifts the hood. Holy Sxxx!! There’s a gaping hole in the side of the hood and the left fender! One of the radiator fan blades launched through the hood of the car and penetrated through about 80% of the fender. The blade sliced through that tough Dodge steel like a hot knife through butter. Of course, once the first blade flew off, the three remaining blades went spinning wildly out of balance. The chain reaction snapped off the water pump housing, while burying the fan blades into what was a nearly perfect original honeycomb radiator. The pump, the fan, and the radiator: All destroyed. The hood and fender required major body work. The body shop removed the entire front clip and refinished it. The hood and fender look good. The color was well matched. The Brass Works reproduced the new honeycomb radiator. They do some pretty awesome radiator work! The water pump was rebuilt at Romar’s in New York. (See my other thread RE: My Romar experience). See the pics. If anyone was standing near that car when that blade let loose, it would have cut them in half. Fortunately no one was injured. All told, this disaster amounted to over $12K in damages! Moral: Dodge Brothers Radiator Fan Blades from this era should be discarded and substituted with a safer version. Every fan blade from this era that I have checked has cracks in it. I was aware of this and had my fan blades reinforced, but they still broke. The cracks may be subtle and hard to see, but I promise you, they are there. I modified a fan blade from a 1950 Chrysler. It looks like a 98% perfect match and 3000 times safer. Don’t let it happen! It’s not a matter of “if” it will break; it is a matter of “when”. Getting cut in half with a fan blade is guaranteed to be a bad day.


-
Towing a trailer with an antique Dodge
idrjoe_sandiego replied to David_Leech's topic in Dodge & Dodge Brothers

-
Who knew there were so many kinds of wheel and tire locks? Let's muddy the waters a bit more: The manufacturer of the lock did not always manufacture the lock cylinder! For some examples, see this interesting site for an array of locks: http://www.exwisehe.com/accessory_locks_tire_8.html A couple of them have some similarities to dneivandt's lock. In row 2 column 4, the lock body looks a lot like yours. In row 1 column 3, look at the cylinder cover of the "T&A nut lock" (no I did not make that name up).
-
I believe you are correct when you said the locks were not specific to Plymouth. In 1929, the Dodge DA sidemount locks were the same as used on a Hudson. Briggs and Stratton made them. Here's a page from their catalog.

-
Absolutely YES Dodge Brothers used yellow! As an example, in 1927-28, the Dodge Victory line included an entire spectrum of colors and color combinations. In John Bittence’s excellent treatise on Late 20’s Dodges includes an April 1928 announcement entitled “Color Program Victory Line” wherein Dodge Brothers dealers were advised that each color scheme would run in production for about three weeks. The result would be that every dealer would have at least two to three different colors on hand at all times. “For the dealers who want to paint still further variations, we can furnish any car ...with surfacer finish (primer), with a $17.50 allowance net (i.e., a refund back to the dealer).” It appears that one could purchase a 1928-29 DB in ANY available color if you found a cooperative dealer. John offers a host of pictures of these very pretty Victories in his book (highly recommended reading). Hopefully John will allow me to share one picture below featuring an original 1928 Dodge Brothers paint job. Also I include for reference some paint chips from the Chrysler Corp in 1931. I have some from 1929 also, but I need to locate them. The paint chips come from a fantastic treasure trove of paint info at http://paintref.com.

001541.thumb.jpg.a8b92bf2b588320f0d6bc427d30daad1.jpg)

000281.thumb.jpg.6f4ca572354b4428921a7995a8bd5435.jpg)
-
Actually it is easy if you use a valve stem puller. Not endorsing any product here, but this is an example from Amazon: http://www.amazon.com/Kastar-Valve-Stem-Fishing-408A/dp/B0022UPHHM/ref=cm_cr_arp_d_product_top?ie=UTF8 I have one that has a little chain instead of a cable. The t -handle swivels to an I-shape to get thru narrow openings. Easy-peazy.
-
Gary, if the threads weren't buggered before, they are now! Also, I'm not sure what changes Dave made, but rigid exhaust mounts transfer noise and vibration inside the cab. It is hard on the exhaust system, as well (more prone to weld cracks,etc...). Consider non-authentic but vastly improved flexible mounts.
-
bmg1959, sorry if this TMI (too much information!): Let me expand on what Bob said above. First, your distributor has two distinct advance mechanisms: 1) The first type is a Mechanical Advance system, of which there are two common sub-types. The first sub-type of mechanical advance is the “manual” style consisting of a lever or cable on the dash or steering wheel. When manually pushed/pulled, the cable/lever advances or retards timing. If there is no mechanical dash to distributor linkage, then the distributor employs an “automatic” or centrifugal mechanical advance system (using weights and springs under the breaker plate). 2) The second type of distributor advance is the Vacuum Advance system. The vacuum canister hanging on the side of the distributor is a give-away for a vacuum advance system. Do you have a dash “octane selector”? I don’t see any linkage in your photos. Bob’s advice on testing the advance would apply if you have a dash selector type of mechanical advance. If your distributor has weights (also known as a centrifugal advance), there is a little more to the story. Just to clarify, since I don’t see any mechanical dash to distributor linkage in the pictures, I will assume that you have a centrifugal mechanical advance. If you are inquiring about how to tell if the VACUUM ADVANCE is working on your distributor, you need to check it independently of the MECHANICAL (centrifugal) ADVANCE. One way to do this is to disconnect the steel vacuum line going to your distributor. Plug the line with a rubber vacuum cap. Now you are testing MECHANICAL (centrifugal) ADVANCE only. Follow Bob’s advice with the timing light to see that the chalk line moves with engine rpm. Note the chalk mark position at idle. Now slowly increase rpm watching for the chalk mark to move. At some rpm, the chalk mark will stop moving (maxing out, for instance, @ 7 degrees advanced, if that is what the manual calls for). At that point, the mechanical advance has reached its limit. Now, lower the rpm back to idle and watch for the chalk mark to return to its original position. By the way, if you had one, you can test a manual (dash-lever) mechanical advance system in the same fashion. Simply move the dash lever and watch the chalk mark move up and down. Now, on to testing if the VACUUM advance is actually working. For this test, you will need a hand-held vacuum pump (available at any parts store for $29.00). Using a length of vacuum hose, connect the distributor vacuum can to the pump. Don’t touch the accelerator. Start pumping the vacuum pump. You should check to see if the chalk mark starts to move as the vacuum level is slowly increased. If Bob is correct about the 12 degrees vacuum advance specification, you should see the chalk mark advance about 12 degrees and then stop moving at a certain vacuum level. Also, the vacuum can should be able to maintain that level of vacuum for some extended period of time, (i.e., that the can doesn’t leak.) This now is only checking basic functions; Does the advance system(s) work or not? The actual advance curve is specified in factory manuals. On my Sun machine, I would actually graph a series of data points (the vacuum advance curve) indicating how many degrees of vacuum advance occurs at what vacuum level. One can match the factory curve, or “re-curve” it to accomplish various performance changes. Likewise, the Sun machine can plot the mechanical advance curve. Here I would plot engine rpm vs. distributor advance in degrees. To learn more about what the two types of advance systems do and what effects each one has on engine performance, you will find plenty of forum discussions on those topics. Nice Buick, by the way! Merry Christmas, Joe
-
Not so fast. The fenders pictured are from a DA Phaeton, not a sedan. Check the parts book. Dodge made at least three different rear fenders. Dneivandt, the single mounting hole you refer to is the most obvious visual key to distinguishing a Phaeton fender from a sedan fender. There are actually several differences. Unfortunately, most of these are discovered when attempting to mount a mismatched fender/body combination. You soon discover how looks can be deceiving. Ask me how I know.
-
'29 DA vacuum tank fittings
idrjoe_sandiego replied to Bob Zetnick's topic in Dodge & Dodge Brothers
OK sorry guys. Back again with some more info. WAY TOO MUCH INFO! First, Stakeside is correct, there are many Stewart-Warner tanks. Tom Turner, in an article in the DB news (April-May 1998), enlightens us with the following data: At car #A308122 (April 10, 1925) a change was made to a larger capacity vacuum tank, Model 216-H (Stewart) . A larger capacity tank, mounted on the firewall, was specified for the earliest six-cylinder cars, Senior, Standard, and Victory. According to Stewart literature this was the Model 216-AF. All parts are identical and interchangeable with 216-H except for the outer tank—or shell—which is 2-inches longer. Late 1928, the venerable Stewart tank was replaced with a Kingston unit with a cork float. At last in 1930, all Dodge Brothers models switched to the camshaft-driven diaphragm fuel pump, developed by AC Spark Plug Co. (note: earlier posts I said 1931- wrong- it was in 1930). **** I am still looking for a definitive model # used on 1929 Dodges and trucks. **** To answer your question about amplifiers as an option… Yes, apparently you could use the Kingston amplifier on other brands of vacuum tanks. Read on: Dodge Service Bulletins discuss Kingston tanks and amplifiers (bulletins signed by H. M. Wiegand, Director of Service at Dodge Brothers). Kingston replaced Stewart vacuum tanks late in 1928 on the Victory. Quoting from one of Wiegand’s Dodge Brothers Service Bulletin: According to the Kingston manual, “The booster may be used on any vacuum tank which is operated by suction from the intake manifold to increase its efficiency on long, steel hills. Under no condition should the hole in the vacuum unit booster be made larger or smaller as it is very accurately calibrated to regulate the vacuum necessary to effectively operate the equipment on our cars.” Next question was about a manual. I have not found the “Kingston manual” referred to in the Service Bulletin. I have some Stewart manuals, however. One example is attached here in PDF. When I reviewed my photo archive back from 2008 of the restoration of my 1929 DA Phaeton, I realized I gave you some bad info. Actually, I had two tanks from two 1929 DA’s. I remember now trying to sort out the details. I ran into the same problems Stakeside and Bob discovered. There apparently are original DA’s with Stewart tanks and there are some with Kingston. I believe that they probably used both, depending on availability. I have seen so many DA’s with either tank. See photos of examples and a reproduction top for a Victory. To add more confusion, the cars made for export (like mine) had even more variation. My 1929 DA engine # in the low H-60000’s had a mechanical fuel pump! As I now recall, both my tanks were in rough shape. I decided to fix both up until I found a definitive answer. That answer never came, so I picked the better looking one, which I now see was a Stewart tank. Some Stewarts came with a cast top cover and some, like mine, came with a tin cover with fillister screws. The Stewart just looked nicer and was shorter, which fit better. I used the only amplifier I had, which was a Kingston. Stewart had their own version of the amplifier, seen in the attached pics. At first, I thought I made a Frankenstein, but now, according to the Service Brochure, you can use the Kingston amplifier on any brand of tank. See photos of my two tanks. The model #’s are in the photos. Yes Doug… no two are alike. Stewart-Warner Vacuum Tank MANUAL 2-11-27.pdf


-
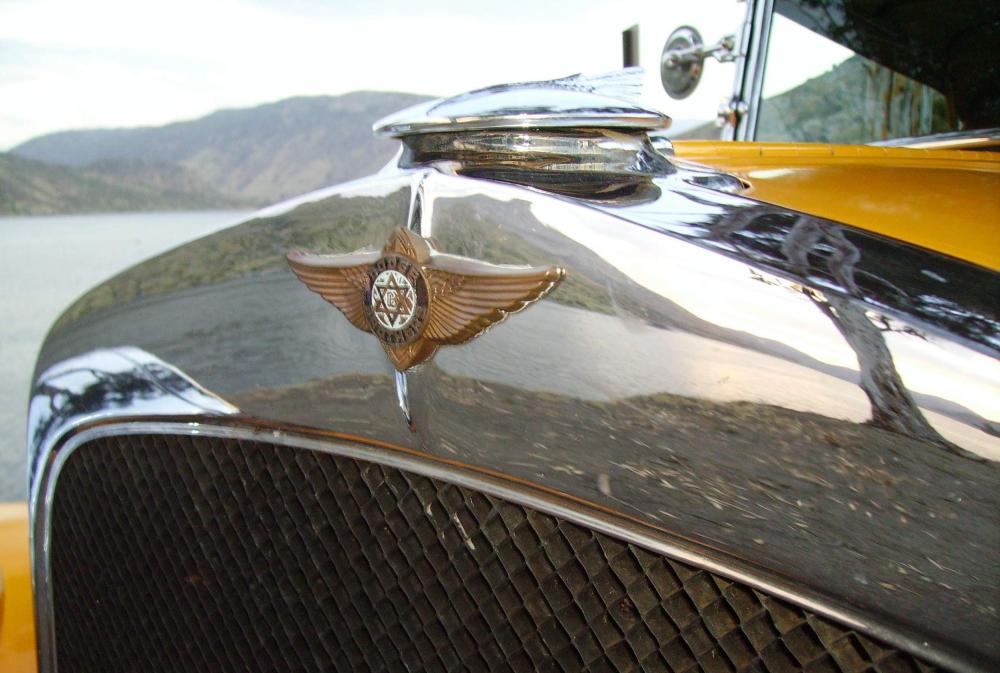
A "Dodge 6" with chromed/Nickel wings with Blue Glass"...Are you referring to your item labeled Photo 9 - which IS pictured ? If so, I think you are correct, it is from a 1929-30 DA. I believe originally it was copper with the blue/black Cloisonne (see the beat up one on my car). So what you have pictured there is a highly unoriginal "hotrodded" version of a 1929-30 DA emblem. Essentially this has been ruined and is virtually worthless. That said, actually I love it, you did some amazing work and any time you are ready to part with it, let me know. (I hope you know I am kidding you about ruining it!) EDIT- Sorry, I get it now. You actually have two 1929 DA badges: 1) Photo 9 restored (no mount) pictured and 2) "Photo 8" (not shown) of an unrestored badge with a mount. Can you show the unrestored one-front and back? On second thought, the one without mounts may not be worth much. Try mounting that to the radiator without the posts- tough action. (epoxy, maybe?). Better yet, try adding posts after the cloisonne is done. No way to solder new posts on now without ruining the chrome and all your fine work. This may be an item best suited to someone collecting badges rather than installing them on a car.

-
Hey John- How about a definite maybe? So, trailer up to your place, then take an old car the rest of the way. How far are you from the meet? Will an 80 yr old car loaded with old farts make it up there? BTW > I have nothing but praise for the NW DB group. Anyone sitting on the fence should definitely hook up with this fun, energetic group. Good folks-Good times!
-
'29 DA vacuum tank fittings
idrjoe_sandiego replied to Bob Zetnick's topic in Dodge & Dodge Brothers
Hi Bob - I agree with your plan- go with what you have. $400 is crazy-money for a tin can. I am sure you have bigger fish to fry! If the purist in you can't live with it, have patience. Another Kingston will come along at a much lower price. I also found some fittings that might serve as a substitute replacement for a broken amplifier (only in form, not in function). See photos. One other comment re: more exceptions than rules. I mentioned above that Chrysler switched over to mechanical pumps in 1931 (John, correct me if this is wrong). However, on another thread long ago, I posted pics of a major exception...a 1929 DA engine with a mechanical fuel pump! I have seen two of these, and both were for export. As Doug always says, "no two are alike."

-
'29 DA vacuum tank fittings
idrjoe_sandiego replied to Bob Zetnick's topic in Dodge & Dodge Brothers
Bob- Sorry for a late reply, but others may be interested in these magical, mystical devices they called "vacuum tank amplifiers". 1929 DA's came with the Kingston style of vacuum tank. But as we all know, there are more exceptions than rules. Sometime late in 1928, in the Victory Six line, Chrysler switched from the Stewart-Warner to the Kingston brand. The Kingston carried on into the Dodge DA line and beyond. Ultimately, they switched over to mechanical pumps (in 1931, I think). Here are a couple of photos I found in the archives re: Kingston vacuum tank amplifiers. The last photo is my tank and has mostly original fittings and some non original fittings. I have the originals, but the threads were buggered. In my book, anything fuel or vacuum related must not leak! Credits for the remaining photos are non-existant; the added captions are mine. If anyone recognizes these photos, please speak up so I can give you proper credit. The advertising brochure is obviously from the manufacturer! Now, if you really want to go into depth on these vacuum tank amplifiers, check out John Bittence’s VICTORY SIX manual: See Section I of Book 5 for information on Vacuum tanks in general. See Pages I-15 and I-16 for specific details about the “vacuum amplifier”. Bittence, as usual, includes lots of juicy tidbits and plenty of close-up photos. Many of the photos include precise dimensions. If you haven’t already done so, purchase this “must-have” 5-Star CD-ROM. You will learn a ton about late 20’s-early 30’s Dodges, guaranteed. I don’t have John’s permission to reprint these pages, so just buy his CD! BTW, I have no commercial interest in John's CD-- I am just an enthusiastic reader. Joe


001541.jpg.71db1c549247311d1c5298a1b03e6ae6.jpg)

000281.jpg.d77db7f711a7c1a940505bac2d1ef513.jpg)