


CheezeMan
-
Posts
337 -
Joined
-
Last visited
Content Type
Forums
Gallery
Events
Everything posted by CheezeMan
-
I use K&N HP 2003 on mine... yes a little pricey and prob quality-wise similar to WIX. Just avoid FRAM with whatever you choose.
-
I snugged up my shifter linkage with a cheap grommet assortment kit you can prob get anywhere. Found what I needed and it is working so much better now. Before either Park or Reverse wouldn't engage. Now, all quadrants work as they should. Of course had to adjust the shifter rod connection. Do so from Park, according to the manual. In my case, it was 125-Piece RAMPRO #2390. UPC 815518023904. You can search for that UPC number and find it.
-
Friends, My speedometer seems to stop working... runs smoothly for a while and then drops to 0 while I am moving (any speed). Sometimes the next day, it works for a mile or 2 and then stops again. I have replaced the cable and put in a new driven gear (19 tooth). So, when it works, it is really smooth The gear came from james kehr and is one of those Chinese made ones. Anyone have a good experience with those? Anyway, I am thinking that the teeth are not meshing like they should. Can anyone provide me details on the driver gear specs? I wonder if that has worn or otherwise is not functioning as it should. I have removed the new driven gear several times to check, and there is no wear on it. Again, it is brand new. Properly seated in the bullet with the new O-ring and seal. Looking for any guidance on what to do next? A donor tranny for parts? I am thinking I may have to open the bearing retainer housing and check it out. BTW... this tranny has a history of "eating" driven gears. This is the 3rd one I have had since I acquired 11 years ago. The first gear was DOA, then 2nd gear lasted 15,000 miles, and the 3rd is new and only used 20 miles. Pictures below are after about 20 miles of use. nothing seems wrong with the bullet or driven gear Thanks, Cheezeman (Chuck)


-
There are several Dynaflow videos on YouTube where fellow Buick enthusiast "Mudbone" rebuilt his '55 dynaflow. Search for 1955 Buick Dynaflow. They are great to watch. He did a wonderful job at documenting the process and rebuild.
-
Awesome! I've seen this process done before on Wheeler Dealers (Mike Brewer and Edd China). Just replace the panels that need replacing, and paint to color match. Put some high quality leather conditioner on all of it, and it becomes new again. This video below is similar. I couldn't find the exact one I was thinking of.
-

Where to get a replace shifter indicator insert for 65 Riv?
CheezeMan replied to Schmiddy's topic in Buick Riviera
You may also find a place that can refurbish the original part. Some of those gauge and clock guys will restore the face and number plates by repainting/silkscreening/etc them. I think you just have to google that. I can't say these guys will do it, but a few I would ask. http://www.american-classic.com/ http://www.bobsspeedometer.com/ https://www.clocksandgauges.com/ http://www.clockwks.com/ -
What I did on my Winter Vacation - 63 Door rebuild
CheezeMan replied to CheezeMan's topic in Buick Riviera
Hi Bill, There were many details on this build and some processes that I probably had to make up as I went along. Not sure if I can recall of them. The door "pan" or what Buick calls the inner door panel, was not re-painted, I had it powder coated. I suck at painting. Needed pro help there. Taking lots of photos along the way was key. I have over 580... When I laid out all of the parts for one door, oh my! My dad basically said "I hope you remember where all those go!" I replaced all felts and rubber materials, gaskets etc. Some I had to cut/fabricate myself. Getting the new felts put back on was challenging as they didn't seem to be the same as original, so some finesse was in order. One common problem I had was cross-threading a couple of the door hinge bolts. I had to drill and re-thread them with a Heli-coil insert. I found some used '63 Cadillac door bolts on eBay to replace the ones I messed up. The door trim panel (aka door panels -or- door cards for the Brits among us) was probably the most challenging part of the rebuild. With everything glued and stapled and that the door panel is basically paper with trimmings, it was very difficult to take apart without ruining it, and then put it back together and still have it look somewhat decent. I can get repo panels made for my trim level, and might do that in the future. (about $700 for a set of 4 from SMS). I needed new door lock rod covers (the white/black braided cloth) and OPGI has them. But after waiting 2 months for the backorder, I cancelled and found some different material use. I found some braided speaker wire covers to do the job. They are green in the photo in my previous post.


-
What I did on my Winter Vacation - 63 Door rebuild
CheezeMan replied to CheezeMan's topic in Buick Riviera
Ed, I found a local welder who really knows his stuff. He is amazing with pot metal, and very reasonable. I think he only charged me $20. Once I got it welded back together, I was able to save the original rivet (pic #1) and reuse it to put it back together. To do this, I drilled a hole into the shaft of the rivet, and threaded it (pic #2). Then cut and shaved a bolt to the exact size I needed (pic #3 & #4) From there, it was re-assembled (pic #5). I used some blue thread-locker on the bolt so it won't come back off. I think after I assembled it, replaced the bolt with another that wasn't shaved, only shortened. I was originally worried about interference but found the size of the head did not matter.


-
Adam, I had my '63 AM radio redone by an old radio guy from Farmington Hills area of Detroit. He removed all the old stuff and replaced with modern solid state electronics, which also "upgraded" the AM to AM/FM, MP3 4-way stereo (front/back) and sub-woofer connectors. He also upgraded my speaker (the only one in the car) to have stereo in the stock location. However, it is bone stock on the outside. All of the controls and push buttons work as before. Someone could stare at it all day and not realize it was a fully modern radio. Still looks and functions the same as original. You gotta see his train set in his basement. Awesome! Here is his business card info: Donald Mustunis donstrain@comcast.net 48617 Declaration Dr. Macomb, MI 48044 248-247-6280
-
Long story short... I finally decided to investigate that little annoying rattle in the passenger door. Found the window arm was broken. Just because I can't let an opportunity slip by, I decided to refurbish both doors on my '63, complete with new carpet on the interior trim panel. Every piece and part was touched and refurbished. The long story is that this took all winter. I'll let the pictures tell the story.


-
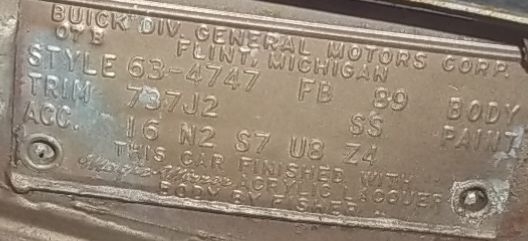
Hi Tom, I have those. I think I shared them with Jim originally. None of these have any date codes on them, but assuming FB89 is correct, the FB25 & FB43 were on or before 07B.


-
I found a tag that does have a date code of 07B for FB89. However the "font" of the date code is a little smaller than normal. Hopefully that is factory stamped that way. We know that Silver Arrow I was modified from FB43. I am not sure if they had "pilot" runs or not. I wouldn't think that pilots were sold, however in the '60s we can't really know for sure what they did with their early test builds. So, presuming the 07B is authentic, then the first 200 were built in July & August (which I would call pilots).
-
Hello Frank, According to the 1963 Parts Master Catalog, this is the switch for a 1963 Riviera: Group 4.054 Neutral Safety and Back-up Switch GM 1178137 I think I found that listing you are asking about. The picture appears to be correct to me (assuming that is the real pic of the item). The write-up states it is for the '63 Riv. A searchable PDF copy of the entire 1963 Master Parts Catalog is available from Jim Cannon. I believe he only charges are very reasonable amount ($15-- I think is still the price). If you are an ROA member, you can find Jim's contact information in the Riview under 1963 Technical Advisor. Thank you, Chuck
-
You can could use a vacuum pump at the slave side to draw fresh fluid down. This way you wouldn't have to press the brake pedal. Makes a good one-man bleader system. Several types available. This is one example. http://www.eastwood.com/eastwood-brake-bleeder.html?fee=7&fep=49482&SRCCODE=GA220010&adpos=1o8&creative=83580269820&device=c&matchtype=&network=g&gclid=CKysmteF9soCFQ6LaQod_3gH3g
-


-
Hi Kendall, Most Buick's (and other GM makes) used mercury tilt switches up through 2003. You can find them in the Reatta and other cars of that era too. it is usually located just below the lamp. Removing the lamp, the switch may just fall out. Without the switch, the lamp will not light. On my '63, it was glass and I could see the mercury. I was able to replace mine with a ball bearing model and had the mercury safely sent to a hazardous materials recycling center. I don't have a pic showing my original, but the attached is similar to my replacement. Why on Earth do we want such a poisonous material moving around at 70 MPH in millions of vehicles? Thanks, Chuck

-
Hi Adrian, I got the same "small" heater core from CARS. I was able to make it fit by "padding" the extra space with some wood. While I had the unit apart, I took advantage and rebuilt the entire air box. That was about 2-3 years ago, and still working fine today.
-
Revised Tri-Shield Insignia Introduces New Face of Buick
CheezeMan posted a topic in Buick - General
If you haven't visited Buick.com lately, you probably haven't seen the new official logo. Check it out (to the left) or visit http://media.buick.com/media/us/en/buick/news.detail.html/content/Pages/news/us/en/2015/nov/laas/buick/1118-logo.html for the formal announcement. Nice to see that the color is back! -
Make one... I took my broken one, and fixed it up by using some JB Weld and a reinforcement plate. This is all just to have a good example to copy. Then I made detailed drawings of the part, and sent that to a friend who has the tools to cut steel. After cutting the blanks, I applied the proper bends and fasteners. It worked well. Pic 1: broken part Pic 2: fixing part to measure Pic 3: drawing of part Pic 4: Blank on left, applied bends in middle, original on right Pic 5: My attempt at the fasteners Pic 6: Blank compared to drawing


-
On my no option 63, the green wire is dangling while the blue wire is attached to the back of the speedo. I do not have the cruise control option. My parking brake light and switch, and speedo buzzer are all functional, so this green wire is not that one. The green wires going to the parking brake switch is a double wire connector, while this dangling one is a single connector. Could this green wire be related to the optional cornering lamps, and connect to the directional signal switch?


-
I replaced my transmission speedometer gear (driven gear) after replacing my tires. I was able to get a 21 tooth gear from Northwest Transmission Parts (item #1164317), which perfectly matched my new tires (P225/75R15). http://nwtparts.com/
-
All, I purchased the original '63 steel wheels for my car to replace the Rallye's and go back to original. However, when test fitting them, they fit very tightly on the rear hubs. Is this normal? The hole should be 3.5", but thinking these are just a couple thousanths off. Has anyone every needed to bore these to 3.5", and how did you do that? The wheels were media blasted and powdered coated. I removed the coating from the center hub ring and sanded with sand paper. No rust. I also wire-wheeled the hub on the axle to remove any rust, so I believe this is now a dimensional issue. The wheels will bolt on, but takes the lug nuts to push them down to the hub. Getting the wheel back off took a rubber mallet. Thanks, Chuck
-
Raise your hand if you drove at least one old Buick this weekend
CheezeMan replied to JohnD1956's topic in Buick - General
Just drove the '63 Riv today. Gave her a bath. Filled her tummy with yummy gasoline. Put her blanket on and then in bed for the winter. Sweet dreams (for both of us). -
A LISTING OF BUICK'S THAT ARE GONE FOREVER?
CheezeMan replied to smithbrother's topic in Buick - General
that's funny and sad at the same time. more funny, though. -
Sounds like a job for the new Discovery Channel show, Lords of the Car hoards... from Wiki: The show documents Chuck Palumbo, a former WWE wrestler and mechanic, and Rick Dore, a custom car and hot rod builder, as they attempt to clean up car hoarders' collections of cars, Joe The Hat (Joe Petralia), A.K.A. The Money', is challenged with the task of selling off the cars to raise the capital for Rick and Chuck to finish the builds.[1] They sell the car collections, some as collectibles, some for parts and scrap metal, to raise money to rebuild and renovate the car hoarders' favorite.[2] The show is also shown on Discovery UK a week later than the US, renamed Extreme Car Hoarders for the overseas market.[3]


