

JanZverina
-
Posts
785 -
Joined
-
Last visited
Content Type
Forums
Gallery
Events
Everything posted by JanZverina
-
Hi Ed, if you're asking me in particular, I'd say that for me, quality is more important than price. So what I care more about are customer review and experiences. If someone says, yes it's 20% more but its dead-on accurate, or much higher quality, or was easier to install and the fit is great, then I'll go with that vendor or supplier regardless of price. As I think you've said elsewhere, you get what you pay for, and I think that in this day and age, every vendor knows that a good customer reputation is critical to their livelihood. I also welcome Jeff from CARS Inc. to this forum, but it should certainly not stop anyone from posting a comment if one of CARS' parts could use some improvement. I too have been waiting for a '63 hood emblem forever from them, to the point that last week I photo-shopped a tri-shield emblem down to a 1-inch (quarter-sized) diameter, printed it out on some cardstock paper on a high-end Xerox Docucolor printer at work, and then used some clear plastic sheeting that's found on loose-leaf binders to cut a similarly sized clear plastic shield to go on top. I'll send a pix when it's all done, but it's good enough for now! And it cost me squat.
-
I see you are now referring to the rear spear, listed in the Body Service manual as a 'rear fender lower rear molding.' Same thing - no size listed but they call it a 'bath-tub type' clip. Under the 'Tools and Care' section it says "Bath-tub type clip removal: Insert sharp edge of flat-bladed tool, such as a putty knife, under edge of clip and hammer tool until base of clip is approximately half-way through, then disengage clip. Note: in some cases it may be necessary to cut clip at opposite end of base also. No special tool is required to install a new plastic bath-tub type clip." -Jan
-
Hi Dale, I looked in my '63 Body Service Manual this evening and unfortunately the size of what they call the stud retaining clip is not listed. On Page 10-2C under 'Exterior Moldings' it refers to the horseshoe trim as 'upper and lower rear fender ornament grille' and then on Page 10-4C, under a trim attachment chart, lists them as being attached by 'snap-on clips or retainers on panel.' The manual also recommends protecting surrounding paint with masking tape, but no specific starting point for removal. I know the tips of these ornaments are very fragile so you may want to ask if anyone has experience in how best to remove them without damaging them or the paint. -Jan
-
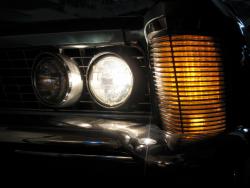
I'm doing some engine compartment refurbishment on my '63 (I refinished the underside of the hood and installed new insulation pads last evening), and in looking at all sorts of pictures of a '63 with the Wildcat 445 in the Riview, Buick Bugle, and online, my question is: Was there a specific recommendation from the factory as to which way the air cleaner snorkel points? (This is the large red-crinkle painted one.) I see it positioned all sorts of ways, but I've always thought it was supposed to be generally pointed toward the space between the battery and radiator. Not sure if AC or no AC makes a difference. Any guidance appreciated.
-

65 buick riviera gran sport transmission rebuild
JanZverina replied to coast's topic in Buick Riviera
Dave Edwards at http://www.autotran.us/. I've bought two overhaul kits from him and have no complaints. -
Does anyone know what the small cutout is for on the inside leading edge of the triangular-shaped, passenger-side hood pad? The pad looks to be original and mine is a non-AC car. Sorry I don't have a picture handy at this time.
-
I've had pretty good results ordering directly from Steele Rubber for doing full rubber kits on a '60 Electra and '60 Impala, including the vent windows which are probably the most labor-intensive area. But I'm not sure of the supply chain, i.e. which other vendors use Steele or if in some cases Steele sources from other makers.
-
Will do, lowered65. I'm currently refinishing the underside of the hood and putting in new insulation pads, as well as refinishing the air cleaner, which calls for that red crinkle-finish paint. As soon as that paint dries (no, my wife is NOT thrilled about me heat-curing it in the kitchen oven) I'll get on to cleaning the carb linkages and see what I have there.
-
Thanks, Steve. I think I get the picture and I'll have to do a little investigating when I get home this evening. Sounds like you pull down enough to release both latches.
-
Thanks for the idea, Steve. I'll look into it. So is it just a pull handle or is it hard-mounted at some point? And do you still have the secondary safety catch function?
-
Thanks John and Jim, I'll definitely check out the grime situation, and I still suspect a small vacuum leak somewhere although my mechanic claims the vacuum reading is good, and after replacing one slightly kinked hose from the booster to the vacuum tank, the brakes feel a lot better. We also checked the linings, etc. and he said they were in good shape. But I'm still kind of puzzled as to why the engine idle will noticeably increase when I step on the brake pedal. I'm told that a little gain in rpm is normal but to me this seems more than it should be. The brake pedal also seems harder with less assist when I back up the car.
-
As I'm refurbishing my Wildcat 445 "air cleaner" assembly in nice red crinkle paint, I've was thinking about installing a hood lock on my '63. I still remember Chapman hood locks, which I had on several cars back in the day but I see they're no longer around and people said they were always malfunctioning (although mine never had any trouble.) So what's the latest gizmo if one wants to keep their hood secure? I don't need a kill switch but has anyone installed a hood lock that's worthwhile security-wise?
-
Need light lenses for center console on a 63
JanZverina replied to Healeybob's topic in Buick Riviera
The rear lens is a lot of fun to replace. I did mine through the rear ashtray a few weeks ago and you need small fingers and a lot of patience to turn those small screws a nano-inch at a time with an assortment of sockets, etc. I know most of the repros don't have the lens curve like the original but my original one was turning to flakes, so anything's an improvement! -
Thanks PRL and John D. A simple spring screw at the front left of the carb. The choke seems to be releasing all the way but sometimes the idle creeps up at a stoplight while in D and I have to blip the throttle slightly to get it back down. Not too serious but maybe the dashpot? I'll give everything a good Gumout cleaning and then see what I have, which is probably a carb that's slightly worn out in all the key places and ripe for a rebuilt at some point.
-
Any tips for lowering the warm idle speed on a '63 401 w/ a 4GC? I read in the chassis manual about turning in/out the needles but I don't see a diagram showing the specific location of the throttle stop screw. Thanks
-
Hi Chuck, Good idea. My '63 has a custom interior (white leather seats). The rear shelf, which appears to be original, is cardboard or hardboard covered in black vinyl. CARS Inc. offers the cardboard shelf that's die-cut to size but it has the Madrid grain texture directly applied to the board surface. That's why I started this thread; while it looks good I don't think it's factory correct.
-
I was getting rid of an ancient electronic ignition kit that must have been installed decades ago on my '63 (does anyone remember a Sorensen ignition module?), when I noticed that the metal tube from the carb choke to the rear of the passenger-side exhaust manifold was broken near the manifold. I didn't spot it at first because the metal tube is covered in a braided heatproof wrap. My question is, would that break be a source of manifold vacuum loss, or is it not related to intake vacuum and just a pre-heat function to release the choke faster? Thanks!
-
Ed helped me on that with my '63, in fact he found a part# for a mount for an '83 Riv that I simply installed upside down and drilled one center hole in the trans cross-member for the lower bolt. Ed may be able to elaborate, but I still have a Dynaflow in my '63.
-
Totally agree with DualQuadDave on the color. In a previous career I was with Chrysler (and DaimlerChrysler) and I had a chance to see the Gaffoglio Bros. at Metalcrafters in Fountain Valley CA work their magic creating our concept vehicles for the various major annual auto shows. And yes, color was a major consideration as far as design execution was concerned. So yellow doesn't work here at all, but I love the rear window boattail mix with a first-gen style. I also like the exhaust outlets, but the taillights leave the rear view unresolved, so I'm with 63 Rivi on that. Looks like great execution but they could have used some better design expertise to go the rest of the distance, which wasn't very far, IMO!
-
I have a set of 1960 Buick service manuals for sale, all of them original and complete (not reprints) with some typical cover wear but pages in very good condition. Chassis Manual: $30 Body Manual: $25 Preliminary Chassis Manual: $20 Shipping extra, and depending on distance. Feel free to send me a PM if you're interested. Thanks!
-
That's exactly what mine has - a thin rim stainless surround with several inches at the top center of the frame shaped so one can use it as a handle to pull down the plate before refueling. I can't say for sure that it's original to the car, but overall my car is in pretty original shape and from one-family ownership. In fact I was just repositioning this frame last weekend because if the license plate screws are too high in their oblong slots, the plate frame doesn't clear the license plate lamp housing when upright - at least it didn't on my car! This was part of a larger project after I scored some very nice reverse light housings on eBay and spent some time installing them.
-
Just curious, Dick - did they mention who JS is interviewing? The San Diego Jaguar Club, of which I'm a member, supplied the blue E-Type roadster used in the Sarah Silverman episode.
-
Thanks for the response and including those photos, DrP. Yours matches what I have although mine is not in such good shape. But my interior looks to be 100% original save for the front seats. In other words, mildly worn carpet, pedals, and door panel armrests, some minor staining on the headliner, and creased white leather seats in the rear that could use a color wash from UK's Gliptone. In other words, it has patina! I ordered the shelf board from CARS Inc. so I'll see what it looks like. But your input and others tells me the vinyl covering is factory correct on a '63.
-
Hi Steele, Yes, that's how mine is finished (although mine appears to be in better shape!) It has the edge trim at the rearward end as in your photo. Once I remove it I'll see what lurks beneath. Maybe there were two styles for '63. Can anyone shed some light on this, or point us to an existing thread that covers this?
-
Dash lights or fuel gauge - either or on my '63
JanZverina replied to JanZverina's topic in Buick Riviera
I just needed a good image to determine where the ground circuit was in that area of the cluster, so once I had that it was a quick soldering op and I was on my way. Much appreciated! My next challenge is to figure out why I have brake boost at low speeds but no boost at higher speeds. I replaced all the vacuum lines, which needed doing since the hoses were pretty brittle. Now I need to do a vacuum gauge test, and see if the brake linings are glazed or hardened. Slowly but surely...
