

JanZverina
-
Posts
785 -
Joined
-
Last visited
Content Type
Forums
Gallery
Events
Everything posted by JanZverina
-
Yes, those small plastic harness holders (one in the lower left of your pix; one on each side of rad support) are correct, as is a small "hook" (not really a clamp) in the center by the hood latch support bracket. So three across.
-
Hey Darren, Don't worry when you don't get it right the first time. There are plenty of times when I slept on a problem, and was glad I did! I had a good friend who helped me through a long but rewarding Jag XKE refurbishment (yes, I still have that beautiful '67 coupe) and the best lessons he taught me were (a) have patience - it may not go as well as you hoped the first time, and ( always quit a repair session early enough to clean up your tools and restore order in the shop. That way you'll be glad to return and solve the problem with a fresh set of eyes. Oh, and © take plenty of notes and pictures!
-

ROA Regional Meet 2014 - Bathurst NSW Downunder
JanZverina replied to fatbuick's topic in Buick Riviera
Hi Tony - thanks for the pix - so cool to see those sleek Rivs in front of that beautiful old building in the early pix. And I noticed 'Maine' on the rear plate surround - Maine USA or is there a Maine down under? Keep the great pix coming! Much appreciated from San Diego CA/USA. -
Steal? Hardly. That's what a forum such as this one is for - to share knowledge, ideas, successes, and how to correct/avoid failures. All I can say is, how did we survive w/o the Internet? Well we obviously did, but the answers were slower in coming and the collective knowledge base much narrower. For instance, that tip above on using some light shoe polish - now I'm just upset that a small tin of shoe polish, at least here, goes for $7.69! I guess that shows the last time I bought some!
-
Both OPGI and CARS have been out of stock on this for months and months; I'm assuming its from the same supplier. I too got tired of waiting so I found a high-res image of the logo, resized it to exactly the size of a quarter (25-cent coin, that is), printed it out on high quality laminated paper, and then made a clear plastic cover ever so slightly larger in diameter than the image but just the right size to fir snugly into the hood spear circle. It looks absolutely fine to me until they are back in production, and even then I may stick with what I have.
-
Thanks, Paul. Yes, Sure Coat is from SEM's Aerospace unit, primarily to refinish private/corporate jet seats and interiors, with custom color matching, etc. and quite expensive for the scope of my little project. I did check with SEM and they said that while Classic Coat is slightly better for treating leather because it penetrates the hide instead of sealing the surface, it doesn't come in any white shades. They said that for my particular project, Color Coat would work well. It's a tad brighter white than I wanted, but here's a good tip - I used a small amount of tan Kiwi shoe polish to "yellow" the white very slightly, and that really worked well!
-
Hi Dale, Actually I used a combo to see which worked best. And I should also mentioned that I used a cleaner first, especially this being white seats. I used Gliptone cleaner and conditioner. It's a UK product but available on Amazon. It worked very well when I reconditioned the Connolly leather in my Jag several years ago. I also tried Zymol and Lexol cleaners and conditioners, but the Lexol is in a spray bottle and not as 'goopy.' IMO the Gliptone seemed to soften up the hide the best. To be clear, I'd leave an application on for 24-36 hours and then rub off the excess before applying more to soak in. This was done over the course of two weeks or so.
-
I think you meant Jan, not Drew, but no matter. Darrel Ingold, who has a fine looking '63 in NY, remembers as a kid that it was blue, and what I have found via online research so far is that generally, blue was used first, then green, and then OptiKleen went back to blue in later years. This is just what I've been able to ascertain on Google, so it's not the gospel by any means. And just to complicate things, there may have even been a red fluid! Maybe some true experts can weigh in on this, but green or blue, I'm not going to lose any sleep on it! Just fun trying to uncover the answer from 51 years ago!
-
Thanks, CS! Jan (yon)
-
Sorry, I should have said so -- my seats are the custom leather option offered in '63, but the SEM coating will work even better on vinyl - if you do the right prep. Basic prep steps I took: Feed hides with conditioner for many moons (couple weeks) if you have leather. For both leather and vinyl: Use isopropol alcohol on clean white lint-free cloth to clean off excess conditioner on surface. Light sand (600 grit or higher) any imperfections Use a stiff bristle brush to clean out seams, stitching, etc. Wipe down with SEM Vinyl Prep and rinse lightly with clear water. Let dry completely. Mask off anything you don't want painted (including wife's washer and dryer in garage). Spray light guide coat. Go slightly heavier in the seams. Apply 4-5 coats 10 minutes apart. I used a hair dryer while applying. Let dry 24-48 hours before handling/reinstalling. There are some good SEM videos on YouTube. That's what I did, but anyone else, please chime in. Hope this helps!
-
I know everyone likes photos so here's my rear seat refurbishment project before and after, following my package shelf renovation. Thanks for everyone's help on that one. I used SEM's Sailcloth White coating after feeding the hides for several weeks, and am very happy with the results. I don't expect the rear seats will get much use (hey, now!) but I'll keep my eye on how they wear. On to the trunk lining and taillight bezels!


-
Thanks, Darren. I have not seen a correct-for-63 Buick KleerView sticker that's vinyl or has a waterproof coating, but maybe they're out there. I'll see if my clear-tape covering does the trick! Cheers and say hi to MI for me - We miss it in the summer/fall but not too much in the winter! Lived in Farmington and Bloomfield Twp for 19 years.
-
Thanks Drew - I thought of the paper deterioration due to heat as well. What I'm trying is covering the label with high-quality clear packing tape. I know it's not "100% factory correct" but I'll see how it holds up. Thanks for the info on fluid color. I've seen pix of green fluid in the later OptiKleen bottles, but not in the earlier KleerView-labeled ones.
-
I second that - congratulations, Dick!
-
The decals I received are paper but they do have a very thin layer of glue on the back, which I activated with a slightly damp sponge.
-
I just picked up the proper decal for the glass washer fluid bottle on eBay, see http://www.ebay.com/itm/61-67-BUICK-KLEER-VIEW-WINDSHIELD-WASHER-BOTTLE-DECAL-1967-1966-1965-1964-1963-/380889671373?pt=Vintage_Car_Truck_Parts_Accessories&hash=item58aecb26cd&vxp=mtr OPGI sells an OptiKleen decal that they say is correct for 1963, but it's for later model years. My question is, what was the color of fluid used for 1963? Some say blue, others green. Or both? The following website pertains to Corvairs, but is likely useful as an informational guide across other GM nameplates and divisions. http://www.corvairkid.com/refill.htm Thanks!
-
5005! You're well on your way to 6K, Ed! That's what happens when you're a veritable font (or fount, if you will) of knowledge. My congrats to you as well for being so dedicated to this forum and sharing what you've learned about one of the most beautiful American cars of all time.
-
So I guess a '63 is different than a '64? Here's mine, and I'm 99.9% sure it's original to my car. Note the Day/Night tab.


-
An update if anyone's interested. Here's a pix of my leather seat restoration on my '63 using SEM Color Coat finishes. I first used SEM CC on my everyday ride (can I say Audi on this site?) when I noticed that my leather gearshift knob (I special-ordered one with a 6-speed manual) was looking like crap after just two years and less than 20K. I SEM'd it and it's been fine ever since. So here's a pix of the leather seatbacks done, with the cushions next. Awesome paint, but I did email SEM this evening and ask if I can still "feed the hide" after refinishing them, or if the paint acts as a barrier to the leather. Anyone in the ROA family know? I see you guys recently said on another thread that a white interior is a b*tch to keep clean, but to me, it just makes a Riv look so inviting!

-
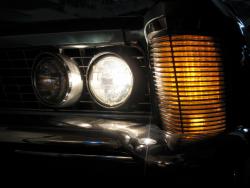
Goldie's looking very good! Nice headlights! Wait - seriously, nice headlights.
-
Hi Steve, Unlike the original vinyl, the new material has a slightly waffled cloth-like backing, which I was told would help with the sticking. Pix attached of the material as well as the shelf now installed.


-
Hi Rivnik, That was the same problem with my shelf - the vinyl started lifting off the bend on the trailing edge of the board. What I did was to buy some very thin cotton "batting" at a fabric store and glue that to the board first using Permatex Headliner and Carpet adhesive spray (the yellow stuff). I then sprayed the batting to glue the vinyl in place after using the old piece as a template. My theory is that the vinyl should adhere to the batting better than the board itself. The batting also helps smooth out any surface imperfections in the board, especially where the vinyl wraps around it. I think a syringe would clog with adhesive, but maybe you can gain access via the three small screw holes across the board at the trailing edge?
-
Next on the to-do list, after taking a break from the engine compartment, was to investigate the rear parcel shelf condition. The black vinyl on mine was coming loose just below the lower edge of the rear window, where the shelf bends up to meet the window. After removing the rear seats (easy if you follow the body manual), I pulled the shelf and found that the formed, thick, stippled hardboard base, almost like Masonite, was in really good condition and even showing a date of 10-15-62. Unfortunately the vinyl covering was pretty brittle (We'll all take sun damage over water damage, I guess) so I'm using the old skin as a template for a new one. Here's a pix of the dated shelf, as well as one showing the original hardboard panel behind the rear seat. I do wonder, however, if the PO removed or had someone remove the seats to undercoat the floorpan from the inside? Has anyone else with an original first-gen Riv seen this type of shiny black undercoating?


-
Hi DrP, I just completed the fill yesterday - I did it in stages until I noticed a small leak from where the water crossover manifold connects to the top of the timing chain cover. So I had to drain again and replace the o-ring and end gaskets. No leak now, and as far as I can tell it took almost another 4 quarts vs. the old three-core. Some pix below of this high-efficiency fattie four-core. Right now it's less than 1 inch above the core but I'll check after a few short drives. And yes, I drilled a 1/8 hole in the thermostat ring before installing it. I don't have an overflow tank installed but I've seen some early Rivs with a tank rigged on the pass side where the OptiKleen bottle would go.


-
I for one appreciate the fact that Mitchell's/Nickle's design of first-gen Rivs was so outstanding and timeless that it's perfectly natural for many enthusiasts to enhance its shape or presence. There are some outstanding and very tastefully done (and extremely well fabricated) mild customs out there, and there's no doubt that some "current" colors make the 63-65 Riv shape pop even more. To me a high quality custom is always appreciated, even if we have different opinions on "taste." Blowing a car over with a quickie "Resale Red" paint job and hoping to cash in on someone else's lack of knowledge is quite another matter.


