


alsfarms
-
Posts
6,168 -
Joined
-
Last visited
Content Type
Forums
Gallery
Events
Everything posted by alsfarms
-
This picture shows the threaded end of the shackle pin showing the ID threads into which I will install a modern grease zerk. This picture is also indicative of the other grease fitting ports that I built for use to grease other linkages, cross shafts and steering parts. I have not Emory cloth sanded any of these pieces to finish them and remove machining burrs. Al

-
Here is a picture of the new machined spring shackle pin. I needed two for the back side of the front springs and two for the front of the rear springs. The picture shows a partly finished brass grease cap installed on the threaded end of the shackle pin. Al

-
While I am not able to be outside due to winter weather, I will show a few pieces I have machined out in the past to make assembly easier when I get to that point. Here is part of the spring shackle machining process, the left one is the outside face and the right one is the inside face. I decided that it was easier to machine out new spring shackles that to mess around restoring the wallered out originals. This picture shows one set. I built a total of four sets of these, two sets for the back side of the front springs and two pair for the front of the rear springs. They will need to be finished and prepped for paint. They fit nicely.

-
I was in the shop today, staying out of the rain, and decided to dig out the new springs I had built for the Locomobile. I am very happy with the secondary springs, proper round end shape and nice smooth tapers. They will look nice. I have already rebuilt or built new all the spring shackles for both the front axle and rear axle. I have even built new grease fittings for all of the frame grease points with the screw on brass caps. I am not yet finished with the caps, but when I set down and focus on the caps it will probably only take me a day or two to finish them. The shackle bolts and grease fittings look like exactly the originals I have, but internally I built them to take a modern grease zerk for ease of lubrication and cleanliness. All of these parts, less the brass caps, are made from 4140 steel. I will have them all heat treated to "toughen" them before I put them on my car. I will try to get a few pictures of these items shortly. Al
-

My 1910 Mitchell "parts car" project
alsfarms replied to JV Puleo's topic in Our Cars & Restoration Projects
Nice looking three blade fan. I bet you really appreciate that everyone has been hoping for snow and boy did you get the reward! Al -
Hello Mike, Might be out of a baby car but I would think that a car out of the 20's would more likely be cast iron and not nickle plated. I kinda like this "little baby" sediment catcher. This unit has about the same bowl size as typical for any system. Anything new in NY besides snow and more snow? Al
-
A fellow old car friend, from NY, was good enough to provide me with a pair of lighter gauge springs to try in my fuel delivery pressure system check valves. Here is a picture to compare the black original spring on the right with the lighter gauge gray spring on the left. It does make a difference but at this time I am not sure that it is light duty enough to allow cycling at 2 PSI without sticking. This project is actually fun to work out the dynamics, that I need, to end up with a working solution to my fuel delivery needs and function at 2 PSI. Al

-
Looks like every time our Military boys got stuck, they really did it well! When I was a kid, my dad would have a real issue with me if I didn't use my head and stop before I was buried like this truck. He said it was easier to get out if your not dragging the whole bottom of the truck to high ground! Does anyone here know of a Locomobile or Riker truck here in the US? It would be nice if someone would post pictures here if Locomobile built trucks that have survived, restored, unrestored or just derelicts. Al
-
Here is a picture of an early all brass sediment bowl for the fuel delivery system. Has anyone seen a similar unit to this one? This one was originally Nickle plated. For my use, I will strip it and polish up to a nice brass luster. The Locomobile is earlier than the nickle era. Al

-
PM sent
-
New to me 1924 DB, going to need a little help!
alsfarms replied to DazedinDayton's topic in Dodge & Dodge Brothers
Nice Dodge...... -
REPORTS ON A 1914 HUMBERETTE RESTORATION
alsfarms replied to Mike Macartney's topic in Our Cars & Restoration Projects
Yup, I could sense your serious intent in your statement, but I, for some reason, saw a glimmer of humor! I have been thinking about your steering arrangement and do not have a valid worthwhile comment, I am still on my Learning curve. Al -
If you have any spare rear roadster fender irons, please drop a note. I am held up until I can locate the proper missing fender iron. Thanks, Al
-
REPORTS ON A 1914 HUMBERETTE RESTORATION
alsfarms replied to Mike Macartney's topic in Our Cars & Restoration Projects
Mike, I can't help but have a bit of fun with your use of words. You mentioned 8" - 9" radius and it will be a learning "Curve". I smile with your learning curve being only 8 or 9 inches! My gosh! my learning curves are MUCH larger than that! 🙂 Al -
My 1910 Mitchell "parts car" project
alsfarms replied to JV Puleo's topic in Our Cars & Restoration Projects
Hello Joe, What is the latest on your trip to England? Have you had any time to think over your next step in the evolution of your Mitchell? Al -
REPORTS ON A 1914 HUMBERETTE RESTORATION
alsfarms replied to Mike Macartney's topic in Our Cars & Restoration Projects
Mike, per your learning , does Chestnut behave nicely while it is in the actual act of bending? How tight are your corner bends going to be? Al -
Hello Bob, Does your Locomobile run on a gravity fed fuel system or do you have a pressure fed system similar to what I am building? Thanks for the spring sourcing reference. Al
-
I see in the Automobiles For Sale section, in the AACA forums, that a decent cousin to the Locomobile Junior 8 is for sale. The car is a later series Durant three window coupe. Someone should take a serious look at that car and bring it back to life. If you know and are interested in Durant era Locomobiles and the other offerings from the Durant automobile conglomerate. Take a moment and share your thoughts on this coupe. Al
-
Hello Mike, I had given a thought to winding a spring on my Southbend, but decided it simply was not worth my effort to set up and mess around with it. Does Rochdale Springs do retail or wholesale? They do look like a good source for springs if they will deal with we small time "onesy- twosy" buyers. Thanks for your post. (What does you daughter do that requires springs?) I have had a couple of other possible remedies for my check valve dilemma suggested. Al
-
REPORTS ON A 1914 HUMBERETTE RESTORATION
alsfarms replied to Mike Macartney's topic in Our Cars & Restoration Projects
Do you fellows have your steam system plans in mind now to facilitate your bending process? If you do, share your thoughts with us. I need to attempt a few Wood Bending projects myself. Al -
Here is another picture of the check valve spring. I need to locate a lighter duty spring to replace this one with. Al

-
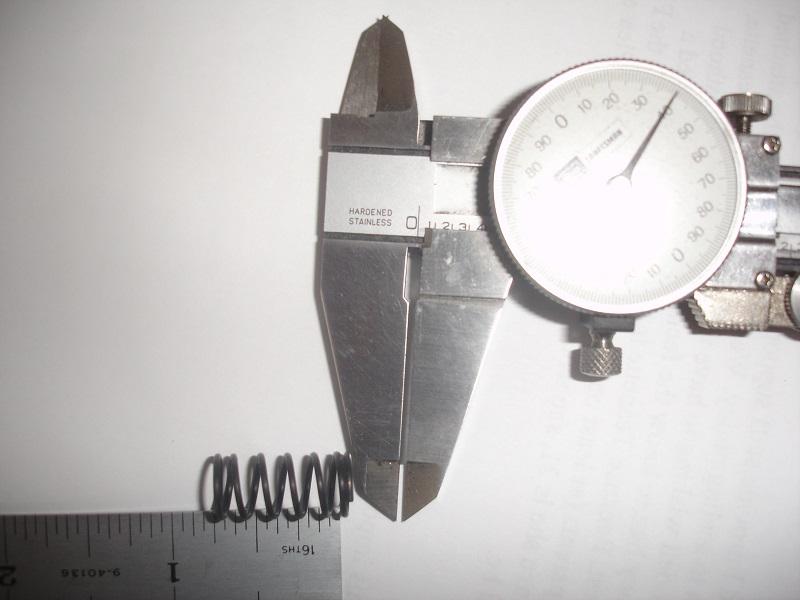
Here are the specifications for the spring that came in the check valve. I will attach a couple of images. Number of coils: 6 Height: 3/4" Wire OD: .040 Coil OD: 3/8" Al
-
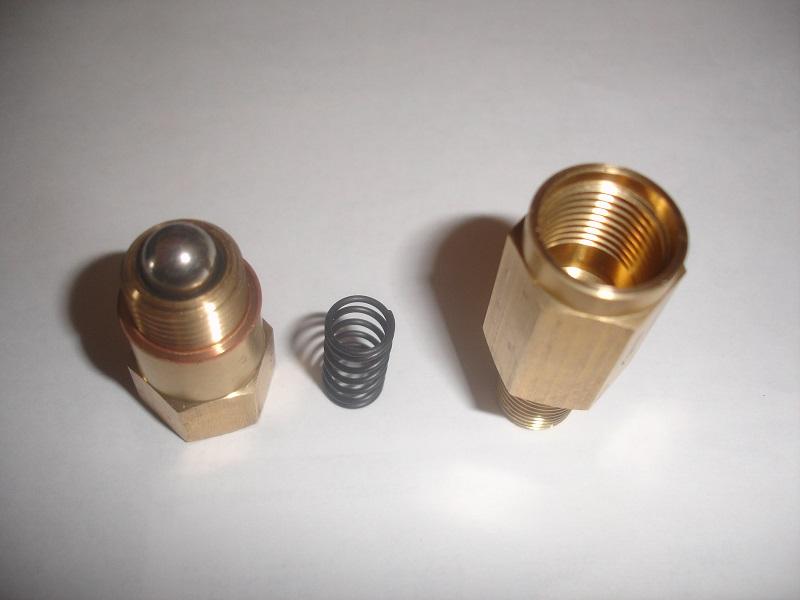
I did some exploratory surgery on one of these brass check valves. The attached image shows what I found. These are very simple check valves and are well suited for my intended low operating pressure use. I just need both of these valves to cycle at a lower, than the 90 PSI that the current spring allows. More later on my resolution. Al
-
The pressurized fuel delivery system, used on the Locomobile, requires the use of two 1/4" brass check valves. The first one is used to allow the manual pump to pull outside air into the pump barrel, that check valve #1 is to open when the pump handle is pulled loading the pump barrel. The second check valve #2 is used to close and stop the pressure flow from the fuel tank while the manual pump is pulling in fresh air. Then when the pump handle is pushed down the #1 check valve closes and stops the air flow back to atmosphere and the second check valve #2 is pushed open to allow the pressure to be pumped into the tank. This will work nicely, but, I need to open up the check valves and replace the stiff springs with ones that will cycle in at a much lower working PSI. More on that later. Here is an image of the check valves, nice and tidy. Al

-
I will let you know what I can find...... Al


