

NTX5467
-
Posts
9,805 -
Joined
-
Last visited
-
Days Won
2
Content Type
Forums
Gallery
Events
Everything posted by NTX5467
-

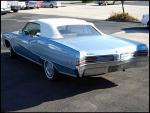
Disc brakes on 1968 Wildcat
NTX5467 replied to 68CatLowRider's topic in Buick - Performance and Modified
Howdy and welcome! In the later 1960s, disc brakes were transitioning from "high performance" to "mainstream" equipment on North American vehicles. EACH GM division had their own engineering and design areas too (unlike the "combined" way things are done now) so that what was on a Buick was not what was on any other GM vehicle, in many cases. Therefore, what fits a 1968 Impala will not usually fit a 1968 full size Buick. Back then, Buick was using a particular aluminum brake drum. Many customizers polished them for looks on their open wheel hot rods. Seems like somebody in Australia is reproducing them? Maybe somebody near Grapevine, TX too? Perhaps somebody at V8Buick.com or in the Buick Street Rod group has some additional information? Basically, it doesn't require a "disc brake" to stop a vehicle, so long as the drum system is adequately sized and has some "better" brake linings. Fade resistance is one reason the disc brakes became popular, plus probably lighter weight too (as things progressed). If you desire to add disc brakes to your vehicle, finding a donor vehicle in the salvage yard would be the best way to do it. NO Internet Shopping there, typically. NOR a "kit" either. The "kit" will be the parts from the donor vehicle in the salvage yard (spindles, calipers, metal lines, master cylinder, power brake vacuum boosters and brake pedal linkage, proportioning valve, etc.) that will then become the basis for converting your existing vehicle. There might be other years of Buicks that might fit, which the salvage yard people's Hollander Interchange Manual will specify. Once you have the parts from the donor vehicle, you can then use many of them for "cores" for the reman parts you'll replace them with. Plus then you'll also know about how everything goes together and should be reinstalled on your vehicle. If you haven't done one of these "conversions" before, you might be well advised to just rebuild what you have. MANY of those magazine or television show build-ups are NOT completely as comprehensive as they might appear--by observation and my own experiences!!! They'll show you the major stuff, but not all of the support activities that have to be done too, with all due respect, Brad54. ALSO, most of the aftermarket items might not be quite as strong for day-in-day-out street driving as the OEM parts are. Many are more racing oriented than street oriented, by observation. It might be a noted name brand, but that doesn't mean it'll work on a street-driven vehicle, although many have expanded their product lines for street-driven/track-raced vehicles in more recent years. Just changing the brake items at the wheel is a very small part of the whole situation as you'll end up changing the whole brake system in many respects. By the way, I think that body style will look really nice with the lowered ride height or air bags (so you can raise it and not drag the rear bumper off) and possibly some 16" or 17" wheels. LOTS of neat lines on that car! Just some thoughts and observations, NTX5467 -
3800 SeriesII Supercharger + aftercooler?
NTX5467 replied to scourge's topic in Buick - Performance and Modified
With all due respects, this might not be the best place to pose that question. There are TONS of posts regarding "upgraded" Buick 3800 V-6s on several other websites. ZZPerformance and 3800Performance are just the tip of the iceberg! Most of the performance items are listed for the Pontiac Grand Prix vehicles, but there's also a LOT of information at Regal GS.org. Several magazine build-ups too, typically on the Pontiac side of things or in GMHighTechPerformance magazine. Regarding an "aftercooler", those typically are not used in automotive functions. As I understand it, they are mainly "heavy truck/industrial" items, where a turbo and intercooler supply the highly packed induction charge, which builds more heat for the turbo to work better and the "aftercooler" cools the exhaust so that it is not quite so hot upon exit. In such a OTR truck or industrial application, installation space is not nearly as much of an issue as it would be in a modern car vehicle (full size trucks might be a little easier). The "intercooler" is used to cool the intake charge before it enters the combustion chamber. Compressed gasses are "hot", hence the need to cool them back down before the mixture is fired in the combustion chamber. Is easier to plumb with a turbo rather than an engine-mounted supercharger, typically. Just some thoughts, NTX5467 -
I'm not sure which compressor might be on that particular vehicle, but you might find it in the ACDelco.com website parts lookup for your vehicle. The cycling switch is typically on the accumulator, but might be on one of the metal lines. Some people have said it does not need to be changed when going to R134a, as if there's enough heat load on the system, it'll keep the compressor running anyway. Yet the low side pressure that R134a apparently needs to cool as R12 did is 26psi. The switch I mentioned fits something like a 1995 Chevy pickup, listed as "R134a Retrofit". LOTS of those switches look alike, but have color stripes on them (plus a laser etched GM parts number on the metal band, if it's an OEM supplied part) AND there are some locating tangs on the switch where the electric plug goes into the switch, which are highly specific regarding where the index tang is positioned. "POA" valve is what controlled the evaporator pressure on the earlier "non-cycling" GM and Ford a/c systems. Allegedly "non-adjustable", but has a calibration screw internally, which requires it to be removed from the vehicle for a quick 1/2 turn ccw from the R12 adjustment. Ford also had a special tool (using a shop air supply) to check and calibrate the valves! The VIR system also has a smaller version POA located in it, also adjustable. It sounds like you did well with your conversion activities. On the dual fan GM vehicles, there can be various strategies to control the fans via the ECM (or similar). Some run the fans at full speed and then vary the number of fans running while others might even run them an appropriate speed for the heat load on the radiator. Varies with vehicle and model year. Just some thoughts, NTX5467
-
I got mine in today's mail. Having the address "page" as a separate sheet (inside the wrapper) works well. The "less color" cover looks good too, but I feel that if there is a special need for traditional color (as in a special year or similar, that is being made note of), then color could be used as it used to. Looking inside, I noticed many different pages of older content, which is fine, but some of them seem to look better on the "other" paper than the current paper, be that as it may. To me, the significant issue is the font and font size used in the member listing--PLUS the other listings in the back of the publication. At first glance, I thought I might need to invest in an elecron microscope. In looking at the regular state-by-state member listings, I found some email addresses that would need a magnifing class to read correctly. They were typed in a mixed capital/small letter style (as in normal writing) and it made things just too small to be easily read (in many cases), yet if they were in "all caps", it was readable. Therefore, rather than using the default font for these smaller print areas of the Roster, investigating to find one that is readable at the smaller scales being used might be advisable. It also might make the publication look more "professional" if it was all in the same font, rather using pre-existing document files "as is". In some cases, the fonts used in these files might work better than the default font. Perhaps these could be items to consider when it's time to bid the next one? The quality of construction looks good and durable. I think it'll work fine for many people. Getting the print version each time is good, but I think it might also be good to have the option of also ordering it as a CD set or on a DVD for an extra charge. Print version would be "free", yet the CDs or DVD would be "pay for". Having it on CD or DVD in an Acrobat Reader pdf file would make the font size much less of an issue, even "insignificant", as the end user could vary the font sizing themselves. Just some thoughts, NTX5467
-
One important issue with any R-12 is WHERE it was produced. Or, at least that was one thing many mentioned back when the "ban" took place. If it's genuine USA, then it's like we've always bought before that time, but if it was not, it could be suspect for many things (kind of like buying medication not approved by our FDA?). Remember how Ms. Reno made smuggling R12 into this country just like smuggling assault rifles? Anyway . . . Not really sure how the "made in the USA" orientation has played out over the years, though. It seems (from reading several a/c message boards) that some people have better luck with R134a conversions than others. LOTS of great information on that subject on the (what used to be) www.ackits.com forums. Look under FAQ for "POA Valve Not Cooling Well", for example. My research has revealed, at least on GM CCOT (cycling compressor) systems, that the orifice is the same for R12 and R13a (as in the hole size "in" the orifice unit). Of all of the orifices listed in the ACDelco A/C Parts catalog, there's not that much difference in the hole diameter, but some applications do have a very slight variation in hole size. This somewhat insignificant item IS somewhat important in that it determines the load the compressor sees and the resultant affect it can have on EPA fuel economy numbers. It's generally accepted (by users) that hoses "seasoned" with mineral oil from years of R12 use will work fine with R134a--as long as they don't leak with R12. The reason for the "barrier" type hose needing beadlock fittings is so that the prior "barb" fittings will not puncture the barrier (rendering it useless in that area). So, existing hoses can be used if they are in good shape, it appears. The GM A-6 compressor is plenty stout for R134a use, from what my associates in the business told me many years ago. GM has quietly upsized the R-4 compressor to a displacement roughly equal to what the A-6 has, many years ago (why if you get a "new" one, it's larger than the orig equip compressor). The V-5 (variable displacement) compressor just needs a new control valve to change it from R-12 to R134a (from the forum posts). If you get a new accumulator (where the dessicant is located), it's set up for R134a already. This part is seemingly a "replacement part" of sorts now, going by the years of use (age) of the part. In the case of cycling switches, GM Parts has one for middle 1990s C/K trucks for "R134a Retrofit), but it'll probably take a new wiring lead to make it work. Key thing for any R134a retrofit to work "as with R-12", from the "POA Valve" post, is to have the low side pressure (which can be found by unplugging the evaporator fan with the system turned on) at 26psi, rather than 29.5psi (which is the optimum R-12 low side pressure). R134a charge level will ususally approach 90% of R-12 when the pressure differentials become what they are with R-12 -- AND 40 degree vent temperatures as with R-12. There are several POE oils that some shops like, even synthetic versions. Key thing is to get ALL of the old oil out of the system, before it congeals and settles to (typically) the low part of the condensor (decreasing it's capacity in the process). In many respects, keeping an existing AND working R-12 system with R-12 can be better than retrofitting to R134a. But if you end up having to replace the compressor (from wear), the condensor and/or evaporator core (from leaks), which will also include the requisite accumulator/drier (which will already be set up for either refrigerant, typically), then doing a conversion to R134a and using the existing hoses can be a choice to consider. Check out those forums at ackits.com (of where it redirects you to, automatically) and see what all is there. Just some thoughts, NTX5467
-
74 LeSabre convertible window beltline moldings
NTX5467 replied to 74455's topic in Buick - Post War
Thanks for the additional information. From my 1974 vintage Mitchell Crash Manual: Moulding, Belt Reveal 2dr R/L PN 9609740-1 Labor time to replace: Glass removed .3hrs Glass not removed .8hrs each side Now, in the next section past that "Mouldings and Trim" listing, is the "Door Glass and Parts" listing, where it lists the rubber items. This, according to the illustration, is what we'd also call "seal strips @ belt". Strip, Glass Run at Belt Outer w/Belt Mldgs 2dr HT 9611814-5 Inner w/Belt Mldgs 2dr HT 9829753 (there were also listings for "w/o Belt Mldgs" too) With respect to Steele, it might be possible to get into the section they list these seal strips in and then look for "roll goods" that closely match or approximate what's on your vehicle. As I recall, they have many pictures with cross-section views of these items, so it could be possible that something might (key word) be found that would be similar. Most GM cars could very well be similar, even if the physical shape might be different, so long as the top to bottom dimension might be something that could be used. The outer rubber seals (9611814-5) also appear in the 1971-72 Cadillac DeVille 2dr listing. The similar Eldorados have a different number, plus most probably a longer door length (in which the seal strip could be shortened, possibly). Hope this helps, NTX5467 -
74 LeSabre convertible window beltline moldings
NTX5467 replied to 74455's topic in Buick - Post War
Are you needing the actual stainless brightwork molding or just the rubber "window felt" (as some call it)? In some cases, they came as one piece, with the rubber attached to the molding itself, or had a stainless "bead" made into the rubber itself (could depend on trim level of the particular vehicle whether it was just the bead or the molding was made with the rubber). These would usually be attached to the inner part of the door skin by small, phillips head countersunk screws. "Why" would they not fit? Just curious. Were what you got NOS parts or replacement items from another vendor? One of the main suppliers of these rubber items would be Steele Rubber Products. It IS also possible, as many of the other LeSabre rubber items over the years are similar or the same as Catalina, Delta 88, or Impala items, that those items might "work" although not specifically listed for "Buick" vehicles--by research on my '68 LeSabre. Just some thoughts, NTX5467 -
What about "classy" rather than "cheap"? After all, it's Buick vehicles we're talking about here! Seems that GM was the only manufacturer that had "Speed Alert". I suspect the popularity of modern style cruise controls -- plus the famous 55 mph speed limit, which having a cruise control helped us comply with -- was the most probable reason for the demise of the speed-controlled buzzer. In some cases, you didn't need the buzzer as the right hand front seat passenger had some kind of built-in speed sensing device, much less any rear seat passengers (remember when that was common?) who had a better view of things. Then the driver had to explain that their vantage point did not show the "correct" speed the pointer was pointing to. Enjoy! NTX5467
-
I was looking around for some current 2005 GM information and ended up at http://media.gm.com/division/buick On that webpage, on the right hand side, there IS a link to the Buick Centennial Celebration "Press Kit". It's just under the picture link to the new Lucerne (which leads to a full press release and specs for the car). When I found that link to the Centennial Celebration (at this "late date"), I had to check it out. There are LOTS of neat links from that one media.gm.com Buick webpage! At the bottom of each page, the GM contacts for the particular articles are listed. Some of that information might be a little dated at this time, as the recently-retired Mr. Gustin's name is on many of them, as the author and contact. Still LOTS of GREAT information is "hidden" away in there! Further investigation of the media.gm.com website, with respect to Buick products, I found an "archive" of information on the prior five years of Buicks and their related press release information. Pretty neat! Going into the main www.gm.com website, in the "Corporate" area, there are many press releases and tech papers on things like the GM Oil Life System and other environmental activities that GM aids and is involved in. Very informative! Check it out when you get a chance! Enjoy! NTX5467
-
There are many factors which can affect a particular engine's tolerance of unleaded (or what used to be called "white gas"). These design features would include, but not be limited to: intake/exhast valve material, valve seat inserts (OEM or added in later), and the presence of valve "rotators". I also highly suspect that further research on lead additives or "replacements" can reveal that even name brand, currently available, TetraEthylLead "additives" you can find at the auto supplies have just enough TEL in them to claim it's there (i.e., not nearly as much per tank as even "low lead" fuel of the 1970s). But I guess some is better than none, even if it's a "trace amount". One place I found a highly informative article on the types of lead replacement additives was in a mainstream trailer/motorhome magazine about 15 years ago. It detailed the types of additives and how they could affect ultimate durability in those heavy duty/high load/higher rpm applications. As noted, a search of the prior posts can reveal some wide-ranging orientations and user experiences. The other side of things is that even if you do use unleaded fuel in an engine basically designed for leaded fuel, the usually light loads and lower rpm levels that collector vehicles typically see (as in tours and not racing activities) might well take several YEARS of use before anything might be "harmed", if that soon. Personally, I think I'd be more concerned about keeping the oil changed regularly, a good state of tune, and the tires in good condition (including "age") than worrying about unleaded fuel issues. Even if valve seat recession "strikes", over a long period of time, it is a generally repairable situation by a competent automotive machine shop. Putting hardened valve seat inserts in places they might not have been originally is not a new process by any means. When the valve seat wears, it can make the valves take some "unusual" adjustment procedures and possibly have a "miss" on a particular cylinder (similar to a "burned valve", which can also be a byproduct of valve seat erosion). If it was mine and something of this nature happened, the cylinder head would come off for inspection (after appropriate gaskets and such were obtained). The valve guides would be fully reconditioned/replaced (they are what "center" the valve in the valve seat, so guide wear can be a contributing factor to things other than oil consumption), as would any valve springs that would not be in spec. Then the seats would be inspected, with the ultimate "repair" being a full set of hardened valve seats and appropriate material valves, with new OEM-spec valve seals too. If valve rotators were on the engine, they could be removed and compensated for, possibly, as needed. When all of that was done, it should not need anything for a great long while, other than normal maintenance and driving. Lack of lead would not be an issue, per se. The OTHER thing is that modern fuels have compounds in them that basically took the place of TEL as a "lubricant" of the valve train the fuel/air mixture would come in contact with. Others might have other orientations and observations, which I respect. Hope this might help . . . NTX5467
-
From what I've seen in earlier articles on the GM HEI system, the spark output drops somewhat over 5000rpm, which could be of concern to some -- BUT it seems that all it takes to cure that is an MSD replacement module/circuit board (which requires a little internal rewiring) and a "better" coil. Remember that the HEI was originally designed in the pre-computer emissions era so it was designed to fire a spark plug gap over .080" reliably, although (again, from what I read years ago) spark plug wire condition became an issue with those larger gaps. Davis Unified Ignition (DUI) has a set-up to externally mount and wire an HEI module (outside of the distributor housing, usually on the back side) on non-GM distributors. I've seen some on A-block Chryslers, in magazine articles. Depending upon energy loss issues, you could probably do a remote mount pretty much anywhere and then finesse and hide the wiring in a number of ways (i.e., rewinding the taped "conduit" with the additional wires inside, inside convoluted tubing when appropriate). Just depends on what you what to do and how you want to do it. Most of the aftermarket HEI modules will be for the pre-knock-sensor (approx 1981?) HEI setups (which have fewer pins). If you want to go to the trouble, it's pretty easy to add the knock sensor module to an existing HEI. Find a Chevy or GMC C/K pickup with the "ESC" nameplate on the rear tail gate, for example or look down on the right hand side of the V-8 engine block (first debuted on the higher compression 305 V-8s and was also on similar 350s) where the block drain plug normally would be located. The "box" is located up behind the glove box inside the cab. Then you'll need the appropriate HEI module to run the situation. This would be a reasonably easy thing to do (for some reason, 305s and 350s take a different sensor and control box), if you can extend or rebuild the wiring harness for the system and the distributor. This way, a somewhat incognito upgrade that would allow a more normal base ignition timing yet would retard the timing when detonation rattle is sensed. If an engine has a main bearing knock, after it starts, it'll usually retard the spark enough to kill the motor--by observation. I suspect the rh block drain plug hole was a convenience location as later knock sensors are mounted in the lifter valley area, so location in an "add-on" situation could be variable. Most current V-8s have two sensors mounted in the valley, for example. Enjoy! NTX5467
-
Thanks for the additional pictures! NTX5467
-
Dual points were a "high performance" addition in the earlier days, which resulted in 40 degree dwell periods rather than the 30 degree dwell periods for a normal "single-point" ignition. The longer dwell time resulted in greater coil "satration" for a more reliable spark in the higher rpm ranges (which at that time would extend to about 6000rpm or so, just depends on the engine). They worked on the same distributor cam lobes and the single point sets did, so NO advantage to decreasing "point bounce" unless they had a stronger tension spring in them (which some "higher performance" single points could also have. It was mainly about getting the coil more fully charged before the "trigger" fired the spark plugs. Some GM divisions went "dual points" on their high performance engines, while others did not. Some dyno tests reported higher power with them than others, but it probably had more to do with a stronger tension spring than not, OR it was compensating for a coil that should have been a little stronger to start with (especially for 7000rpm engine speeds back then). Ford and Chrysler typically had more dual point distributor models than the GM divisions did, as I recall. A properly maintained ignition point system can work very well, provided the lobes on the distributor cam are not worn such that the dwell spec AND the point gap spec can both be achieved at the same time. We used to get reliable use for over 12K miles out of them back then too! How many "collector" cars are now driven that much now? Of course, we all know that electronic systems are much more "maintenance free" with no points to adjust or degrade. Add in a spark plug upgrade and ignition maintenance can pretty much vanish from what we used to know of it. The little vial of "point grease" (which USED to be in the package with each new set of points!) is highly important too. GM still catalogs it in their Standard Parts Catalog, plus Mallory used to sell it too. I suspect the extra .004" of gap had no real bearing on the situation as that's still close to the (generally) normal gap of .035" that most GM and other vehicles used back then. Regarding a coil's "power rating", it's only going to produce what it has to to get the spark to jump the gap at the spark plug. IF it's "rated" at 50KV, it's not going to produce that unless it absolutely has to in order to fire the spark plug. Therefore, unless there is an "extraordinary" need for higher spark energy, such coils are not really needed. Many manufactuers will recommend them as the "suspected/intended use" of their product might include racing or other activities that would place greater demands on their product, hence the "bigger might be advisable" orientation. By observation, many coil/cap combinations are not quite as "substantial" as they were in prior times. I suspect most of them come from a common supplier, yet sold in various packaging for particular end-sellers. Unless you upgrade to Accel or similar, they'll probably be all the same. Of course, these upgrades to Accel and such could also result in a change of cap color (something that would not reallly matter for the rotor, though) from black to tan. One thing that's seemed to surface in recent years is more efficient spark plug designs and materials, even for resistor plugs. If the spark plugs don't "absorb" quite as many KVs to fire, more of that electrical energy can reach the plug gap. Similar with using magnetic suppression wire than normal resistance plug wires too. Of course, it would take an ignition scope to really see these things (how many shops still have these things now???). By observation, different people can have different "luck" with the same or similar products. What ever works best in the individual "environment" can vary. Finding the comfortable "sweet spot" for each vehicle can be somewhat elusive, sometimes, though. Just some thoughts and observations. Glad you made it back ok, Willie! Enjoy! NTX5467
-
Depending on how "original" you want things to be, remember that many Ford factory a/c systems were "underdash" units, as were Chrysler factory a/c systems for the Valiant/Dart cars. In each case, they were "cycling compressor" systems, rather than being self-regulated with in-line valves and such. In the middle 1960s, the add-on a/c industry in Texas was virtually exploding with new models and more upscale looks and performance (all cycling compressor models). Mark IV was one of the premier brands back then. Clardy was an older brand that was based in Fort Worth, TX too. Most of these add-on systems used the larger York compressor with crude-but-stout mounting systems, but did they work great. The reason I mention the Ford connection is that they could be reasonably easy to adapt to most anything. Getting around the "Ford cosmetics" might be an issue, but you can always take the nameplate off. Plus they are probably reasonably available in the repro side of things (i.e., Mustang and Galaxie500 models). Adding a "compressor of choice" and getting the appropriate lines and switches hooked up would be the next item to deal with. Most of the add-on systems were "universal fit" at that point in time, so finding an experienced intaller for your vehicle made for a better installation (cutting holes in the firewall and such, plus routing the hoses and wires). So, with the appropriate "mount and drive kit" for a particular application and compressor, the passenger compartment evaporator unit and controls, it gets to be just a "connect the dots" routine of sorts. You might also look at some of the street rod magazines or street machine magazines as they will have the vendor/supplier adds for a/c in those applications (which will include a modern compressor and pre-configured kits). It's possible that some of those vendors could supply you with what you need at a reasonably reasonable price--turn key. I know there are some "complete" under-dash systems available in the street rod/street machine areas of the hobby, by companies which have been around for a while. You might "shop" some of their websites for information on these "universal" systems. There's no magic in getting a system to work with R134a (from my research), as long as the system is "sized" correctly (just as in a home unit!) and the evaporator pressure is "calibrated" to 26psi rather than 29.5psi for R-12 (low side pressure), and appropriate hoses and oil are used. POA valves ARE easily adjustable to this level, once you know where the calibration screw is located. Ref: www.ackits.com FORUMS>Automotive Air Conditioning Procedures, Tips and FAQ Topic title: POA Not Cooliing Well? Created On Wed June 25, 2003 2:04PM First post by "Big V" in ref to a 1971 Buick Riviera GS I also noted that some of the earlier "cycling switches" (with the widely separated terminals, as I suspect my '77 Camaro has) also have an "adjustment screw" that can be similarly adjusted. I have found a great deal of useful information at this website, which is run by people in the a/c industry (sales and service). Many online catalog resources too! In the middle 1960s and prior, Texas was on of the premier industry centers for add-on a/c. You might find some "embedded" a/c repair shops in the Houston area, run by the people that were around then too. Might be able to find what you need in some of the salvage yards too, then refurbish it and set it up for R134a. Hope this helps, NTX5467
-
Many people do not fully understand or comprehend the physical and emotional relationship between Flint, MI and Buick and many aspects of the automobile industry, nor how highly intertwined these things are! Similar relatioships also exist with other brands too (i.e., Dearborn and Ford). As younger generations (including some of us!) enter the scene, many of these "understandings" will continue to diminish (They'd wonder "What's the BIG deal" in many of their forum posts, most probably), unfortunately. Even more unfortnate, many of them would not take the time to find out what the "Really BIG Deal" is all about and why it is so important in the total scheme of things. Thanks for sharing the picture and related items, Norb!!!! Great things!!! NTX5467
-
Howdy and welcome! For a full list of "options" and equipment, you'd have to find the "Build Sheet" for the car, rather than a "data plate" as such. Build sheets typically are between the seat springs and the burlap (typically) backing of the seat cushion build-up; possibly on top of the fuel tank too. Perhaps the ROA operatives have some additional information in this regard? The cowl tag would relate to paint and trim codes, plus possibly the assembly plant (as other GM vehicles did back then) and "sequence" number. One of the numbers will relate to outer paint color(s) and the other one will relate to interior trim (cloth/vinyl/leather combinations, plus color). These things should be in the Buick parts books for that year, plus possibly in the similar Buick Factory Service Manual. It plate on the core support seems to have some option codes on it, though, which might relate to what would need to be attached to the "rolling chassis" as the vehicle is assembled. In later years (which could well be the same codes as the earlier vehicles): C60 was factory a/c, K30 might be cruise control, A31 is either power windows or power front seat, 628s looks like a trim code for the seats (leather interiors had a three number code whereas cloth/vinly was two numbers followed by a letter), not sure about U69 (radio related?). It would be necessary to verify those codes against a year model specific option list, though. In many cases, the trip odometer reset knobs were on the bottom edge of the instrument panel (unlike later vehicles with button in the instrument cluster per se. They were either turned a particular direction (clockwise or conterclockwise) or pushed--just depends on which manufacturer and such. This was common practice back then. By modern standards, it might look "added on", but would require a particular speedometer head to accomodate that feature. On many GM cars, they also had the "Speed Minder" buzzer/alarm, which would also have a knob somewhere on the instrument panel that would move the additional needle on the speedometer to the desired speed. I don't recall if you could have Speed Minder with a Trip Odometer in the same vehicle, though. Back then, the only instrument that had a knob sticking through the "lens" was the clock. When digital clocks came around, no more reset knob, which could have let the odometer reset function now be done with a pushbutton "through the lens". Modern vehicles are also "more tight" in the lower instrument panel area too, with much less room to reach down and punch/turn the trip odometer knob. Hope this helps (even if my option code memory hasn't been accessed in a while), NTX5467
-
Some wheels seem to be more prone to "wheel flex" than others. Has NOTHING, per se, to do specifically with bias ply, bias-belted ply, or radial tires--by observation. My first experiences with this issue were with a '66 Chrysler Newport Town Sedan we have. We bought it when it had about 7100 miles on it in late '66. It has the normal 14x5.5" steel wheels with factory wheel covers. It came with Goodyear Power Cushion 8.55x14 whitewalls (bias ply) from the factory. What I first noticed was that the valve steem being "cocked" in it's hole by the wheel cover rotating in the wheel. It was still securely knocked in, but just rotated. I noticed two bumps on the rim, adjacent to the valve stem which also related to two pressed-out tangs on either side of the valve stem (travel limiters). Obviously, the "issue" was known, I suspected. I got some pliers and bent the biting tangs on the outer edge of the cover "out" to better "bite" against the wheel. Didn't work! I ended up taking the valve stem extension off the valve stem and putting the wheel cover back on such that the valve stem hole was not near the valve stem. I'd rather take the cover off to check the pressure than have a stem fail from being pushed sideways for extended periods of time! The only wheel it happened on was the rh front, even when the tires were rotated. Over the time we've owned it, tires went from the OEM Goodyears to 4-ply nylon to BFG Silvertown bias-belted tires. No real difference in the wheel cover issue, but by the time the issue was discovered, I had already started putting them on with the access hole "away" from the valve stem--on that one wheel. I have a '67 Chrysler Newport 2-dr hardtop that did not have the problem, even with the same wheel size. I later put 14x6.5" '66 Chrysler station wagon wheels on it with fabric-ply P245/70R-14 BFG Advantage T/A radials with no wheel cover issues either. On our '72 Chrysler with 15x6" steel wheels, I don't recall any wheel cover rotation issues. Nor on my '70 Monaco with the W23 Class II 16-slot Road Wheels. This leads me to suspect it's more related to a particular wheel configuration (rim diameter and rim width) than tire issues as ALL wheels will flex to a certain degree as it rolls down the road. Seems that "disc brake rated" wheels might be of a little heavier gauge metal in some cases? In the design of GM wire wheel covers, there were some in the later '70s that had rubber isolation in the outer edge. These were some HEAVY wheel covers too! I suspect the "retention tangs/spikes" are not totally stiff, but will have a little "spring" flex in them so they'll work correctly. I also suspect that unless the spikes fit into a groove of sorts on the wheel rim, adding any "lube" to them could possibly make them more prone to "leaving". Perhaps keeping the accumulation of dirt and such from the wheel rim area (including any residue from the "fretting" of the tangs against the rim) might help? Maybe it was the wheel paint that was the "anti-squeak compound"? It might be possible to find a factory steel wheel with a 1/2" wider rim width or a later model wheel for disc brakes that might be a little stiffer in nature, which might keep the wheel covers retained and quiet. The wire wheel cover locks (that were so popular) were more for anti-theft issues than retention. The later ones, with the "center bolt under the medallion" retention had to have a metal bracket that was loosely retained to the wheel by special lug nuts. If the wire wheel cover was not on the wheel, or the retainer was not fully tight, they clanged/rattled around big time. I don't think there's enough room around the outside of the inside of those wire wheel covers to install them with the valve stem hole away from the stem (with a med length valve stem) as I did on our car. Perhaps the wheel flex/wheel cover squeak on the Buicks was one reason the factory chrome wheels were as popular as they were? Highly possible that if a dealer had lots of customer complaints on "wheel squeak", they would have ordered more cars with the "classy chrome wheels" than with wheel covers (where factory available). Just some thoughts relating to my past experiences, NTX5467
-
Main issue with used turbos (as in the GM Turbo V-6s back then) is the condition of the seals (which could also relate to the turbo shaft's bearing clearances and such, in the same situation as a driveshaft slip yoke and the rear tailhousing bushing interface). When the cars were newer, in several cases we saw, when one of the turbo's oil seals went away (heat, time, condition, etc.) and the owner did not check the oil regularly, it would basically vacuum oil from the crankcase via the engine's oil supply to the turbo. No real "notice" until it was too late. Sold many short blocks on that deal alone. In another situation, a Turbo Riviera came in with a failed turbo. A new center section was installed and it came back several months later with THAT turbo "failed". Very poor maintenance on the engine (as evidenced by internal deposits) was the culprit. Owner was not happy! There are many heavy truck turbo repair shops that could probably check it out for you, as they all work on the same principles. If you have not had the turbo housing separated before, the main "wear" portion is the center section, which is replaceable as a unit (very probably with "reman" parts). There should be lots of information in the Turbo Regal areas on the web. A few things I found in a Ford service publication (on the Turbo T-bird and Mustang 4 cylinder engines of the 1980s). Keep in mind that these engines were fuel injected rather than carbureted. When starting, remember that it takes a little while for full lubrication to get "everywhere" in the engine. Therefore, don't race the motor past fast idle when first starting the engine in the morning. Any issue with "non-fully-lubricated" bearings in the engine will be multiplied somewhat at a turbo that is remote from the engine's main lube system. When shutting down the engine, remember to let it idle for about a minute or so for the turbo to spool-down--while there is still pressure lubrication from the engine. When you turn off the engine, the engine stops, but the turbo (being free-spinning) will continue to spin for a while past when the engine stops. In prior times, there were "turbo approved" engine oils. Many of the later engine oil specs include turbo applications as a matter of course. Reading the back of the bottle should mention these things. The turbo shaft would possibly be close to exhaust gas temperature (500+ degrees) so having an oil that would not "coke up" behind the seals was necessary. You probably will not see "parts of the turbo" coming apart, typically--unless some foreign objects have "impacted" with the impeller blades to loosen them or have accumulated on them with time. If you have any doubts about the condition of the turbo--get it (the center section) fixed/replaced, period. Finances might be "tight", but can you afford to spend more when something craters? Having the restraint to "keep you foot out of it" for a while yet (and requests by associates to "see what it'll do") can be side issues also. During "normal" unboosted engine operation, the turbo impeller will be spinning. It might not be making boost as such, but it'll be "spinning in the breeze"--both from incoming mixture action and exhaust gas action. Not like taking the belt off of a supercharger and having it not turn! Just some thoughts, NTX5467
-
Many earlier cars DID have idle rpm levels that would make a newer engine (with "more" cam) stumble and be rough. The carbs were set up to tolerate that action whereas later ones are not. With a "points" system, the dwell is set before the base ignition timing is set. MUST be done in that order! You can set the point gap (carefully!) and let it go at that, or use the dwell tach (which can be a more accurate way of doing things). If you want to get really technical AND check the lobe-to-lobe variations, you can remove the distributor and chuck it up to use a dial indicator. If, after all of this to get the points set correctly, the dwell is not in specs, it can be either the particular meter or indications of a worn distributor cam. It's always rewarding when you get things fine tuned and the engine runs perfectly! Enjoy! NTX5467
-
**PICS** All GM Car Show - Woodley Park in SoCal!!
NTX5467 replied to 96roadmaster's topic in Buick - General
Great pictures of some neat cars! I really appreciate what it took to get those "ground level" shots! Thanks, NTX5467 -
IF you haven't already done so, DO add a fresh fuel filter to the system too! IF the current filter is clogged somewhat, it can still seem to be fine but will "kill" the new pump and possibly harm the wiring in the sending unit too (if it's not a complete module). Pump works harder, wires get warmer, insulation melts somewhat = failed pump over time. Plus try to not let the fuel level stay below about 1/4 tank if you can help it. The fuel surrounding the pump helps cool it plus the pump running "dry" is another "kill" contributor. When the "Low Fuel" light triggers, there's only like 2-3 gallons in the tank (sloshing around). On most any late model GM port injection system, it takes a minimum fuel pressure to fire the injectors. If the pressure is not "there", even if it's only a few psi lower, it'll crank and crank and not start . . . until the pressure reaches the min spec pressure . . . if at all. Glad you discovered the problem and got it fixed. NTX5467
-
Is that shaking from bad joints in the torquetube, or a wheel about to fall off (from the excitement)? Great pics! Thanks! NTX5467
-
Some good GM news today, especially for BUICK!
NTX5467 replied to BUICK RACER's topic in Buick - General
The Cadillac SRX and the Lexus RX300/330 are BOTH "crossover" vehicles (i.e., "car" chassis, not truck-based, "utility" vehicles)--and might dang NICE ones too. Same with the BMW X5. The Lexus "profiles" and the SRX and X5 haul (things), turn corners, and stop, plus don't hesitate to explore the upper reaches of the rpm band when "provoked". Enjoy! NTX5467 -
Don't forget that Chrysler rocked the industry in 1963 with their 5/50 warranty. It WAS a selling point to many, just as the Hyundai warranty is. I haven't seen the fine print of the Hyundai warranty to see if there aren't some loopholes in it somewhere, though. Also be aware that Chrysler is currently scaling back their existing warranties to all end up at 3/36 on the basic car. Somewhat quietly, it seems. On the OTHER side of things, it's hard to sell an extended warranty, it would seem, when the total car has a 100K warranty on it. I haven't seen repair parts costs (dealership level) for a Hyundai, but the vehicles look pretty basic and (by this time) pretty well sorted out. Just what the factory warranty did not cover would be key in this whole issue. Yet for the typical American owner, the 100K warranty is high overkill, even though more are keeping their vehicles longer in more recent times. The key to that deal would be the transfer costs and such, for the second owner--if they get transferred at all. Yet if Hyundai ranks below the median level in the surveys in long term repairs, you just might need that 100K warranty where you would not in a Buick. Enjoy! NTX5467
-
For a perspective on why the China issue can be such a significant one, check out Ed Wallace's "Price of China" column, printed in the Fort Worth Star-Telegram. You can access it via his website, www.insideautomotive.com. Click on the icon to take you to his current article, and prior ones too. Just some thoughts, NTX5467
