.jpeg.d8dde1ea34fe3ced20d1c5fb643b2899.jpeg)
195354
-
Posts
299 -
Joined
-
Last visited
Content Type
Forums
Gallery
Events
Everything posted by 195354
-
I am still looking for the cooler anyone have this in your spare parts? Steve
-
WTB Harrison cooler part# on unit 8520994 here are a few pictures mine has rust holes from sitting on the ground. Steve


-
If you want, a Cyl head post a picture of the casting number and I will look in my treasure trove. I have a few 53 engines’ I also just purchased another one that I need to retrieve in the next few weeks. The blocks are 53 for sure, I am unsure on the Cyl heads at this point. I am in Oregon and I have used Fastenal freight service not the fastest but it will save money. These are cores and will need reworked, I can have them tanked and magnafluxed if they are correct, if you want one. I have not thought about price yet. Steve
-
I added to my thread 1953 Convertibles project last night and I cannot find it, looks like it vanished from Me and My Buick. I added some text and a picture then hit submit reply and moved on. My internet can be slow but it looked like it worked on my end. Can you let me know what happened and if my thread still exists. Thanks for the help Steve
-
I would like everyone to know that I had a great time in Denver this is my third meet. Portland Oregon for a look then traveled to Brookfield Wisconsin signed up and tried judging it was fun. Then the Denver meet, a yellow vest was usually in sight if you had any questions this is a big help when you are not familiar with an area. Then the 1908 Buick running around full of people this will bring some enthusiasm for the next generation. I also judged with a great group had a blast I am hooked now. To everyone that was in Denver it was great to meet you and enjoy the Buicks. I want to be sure that the Denver group knows that they did a great job! Steve
-
Another thought l have is check voltage to ballast resistor running also output voltage to coil. I am traveling and cannot check needed input and outputs in a manual. If you have required input voltage unhook it and put a load on the wire. I have seen voltage and no amp capacity. A led test light can and does send you down the wrong road. I have a head light with alligator clips to test a circuit and confirm it will carry a load this might be to large of a load for this circuit. Using a1157 bulb if you test it might be a better option.
-
Run tests old tank recommends and report results. Also follow recomend routing for the plug wires they could be cross firing. Have you ran the engine in the dark you might see spark jumping around. Please let us know what you find Steve
-
Sounds like a miss fire, try to canceling out the cylinders one at a time with someone at the tail pipe when they say no change in the noise you have located that problem. After that, I would pull the plugs and see if they have, any tell tail signs that help with the diagnostics. I would run a compression test next and before I started pulling anything apart, I would check the lift on each rocker, easier when the plugs are out. Dial indicator is best but I have used a ruler, bar the engine over by hand check lift as you go also look for a loose rocker on the other cylinders, once you have done this it will confirm the cam is ok and the lifter is filled with oil. Let us know what you find. Steve
-
Tim Here are a few ideas on the noise you are trying to pin down. I would remove the fuel pump add a cover and see if the noise changes. With the pump removed, the lever that actuates the pump will be out of the picture, I have seen weak return springs or loose pins in the body make a noise and they are hard to locate. If the noise does not change and I do not think it will change try canceling out the cylinders. Use plastic or insulated pliers remove a spark plug wire for a second and see if you have any change. When I do this, I have the wires loose so they are easy to pull, this will prevent damage to the wires. If any of one these reduce the noise, you at least have one place to look not eight. I have listened to the recording and it sure sounds like the valve train. Another idea is try to hold the rocker arm down with a bar just a little load not enough that the push rod can fall out while it is running this will possibly change the noise or you might feel it. Tim since this is a fresh rebuild has it been driven and heated up under load. Does the noise change when hot? If you can, try heating the engine up remove the valve covers and push down on each valve while hot. I had a valve train noise a few years back and it turned out a valve was sticking in the guide when warm. It would not return timely and the rocker would slap the valve. If you have extra valve covers cut the top so you can see what is going on, reduces the oil going all over the place. I have done the valve cover trick and it helps prevent burnt fingers just make sure you don't have any sharp edges on the cover . One other thought, contact a CAT dealer if you have one close and purchase an engine oil sample kit they are usually under $20 take a sample this is another tool that can help tell you what is going on. Iet us know what you find. Good luck Steve
-
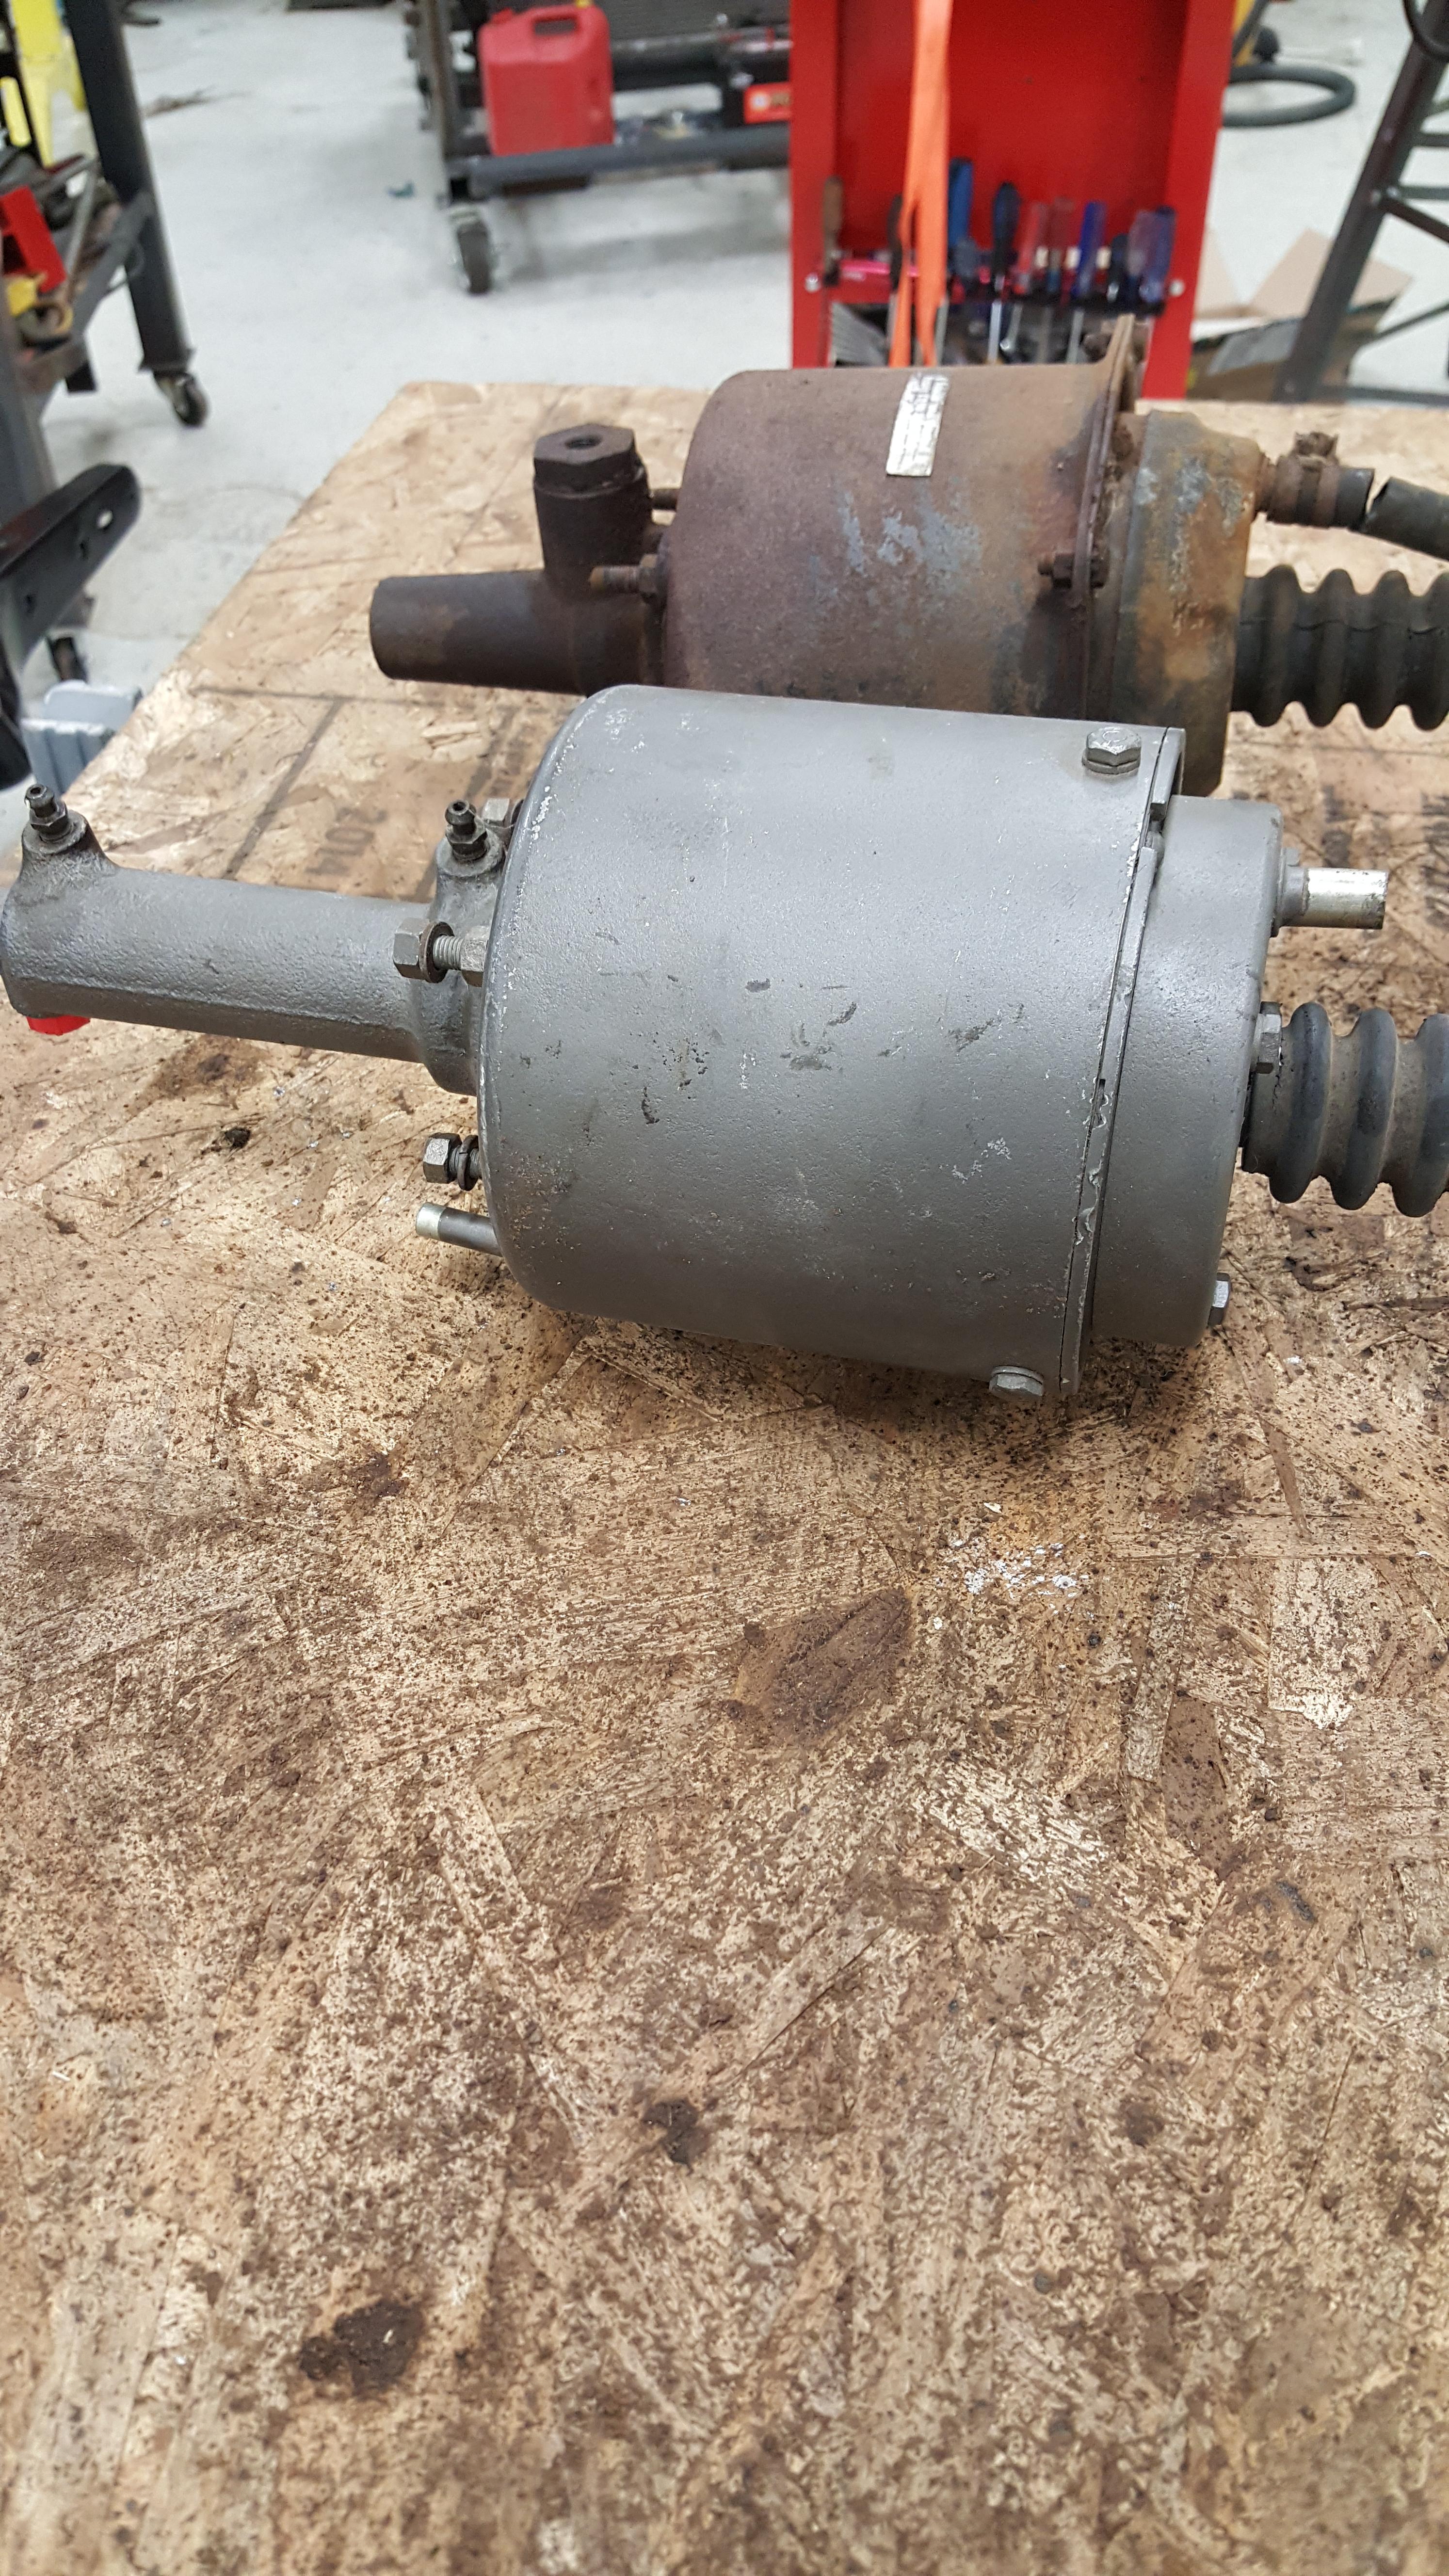
Tom Thanks for the picture this is what I have been looking for on the Kelsey Hays unit. I still am looking for info on the Moraine power brake unit. If anyone has a picture of a Moraine before repair, it would be a good witness part. I have two and they have stickers from a rebuilder, and they are rusty very little if any paint no hope of locating what they had for color. Al thanks for the picture also. I have a few questions on fasteners that hold the chassis together. I would think the fasteners would be a black Oxide. I have cleaned a number of the bolts from my project and that looks to be what is used. I hope to paint these again and start assembly; I plan to use a DruCoat process this should duplicate the sheen on the bolts. Thanks for the help. Steve
-
I am sending one of these power brake boosters out for repair. I have yet to decide if will be the Kelsey Hays or the Moraine unit. The vendor has asked me what finish I want. I have never seen a color photo of a new or low mileage unit. Does anyone have any photos of a power brake booster new or a very low mileage car before any repair? Any factory photos that could confirm the finish or some info from Buick. I want to duplicate factory finish on this so when it returns it is ready for install. Thanks Steve


-
Thanks to all for the information, I am going to try to locate the pancake type filter. Steve
-
I don’t have access to my parts book but I recall one part number for the fuel filter. The information I have is this had a Delco Moraine filter that has no glass bowl. Is the glass bowl a field modification? Steve
-
1953 V 8 fuel filter Roadmaster - Skylark I need some help on the fuel line inlet at the carburetor; it looks like it has a filter that attaches at the inlet to the carburetor. I have only seen one picture on the net it is hard to see; it is not a glass bowl. I have tried all the usual sources, Local parts stores and Bob’s no luck so far. If anyone has a picture of the fuel lines and inlet of carburetor it would be a great help. Thanks for the help Steve
-
Mike Good job on the hood l like your strap idea on the hood did you remove the hood springs or cage them before you pulled the bolts for the hinges? The doors are straight forward, hammer impact driver with a Philips will loosen the 3 screws per hinge on the A pillar. I recall one screw head on top and bottom hinge being covered by a weather seal that is held in place with a metal retainer, has small Philip's screws. Then the wires and hydraulic hoses will need pulled through one way or another. Next the door stop needs attention Philips also but the spring loaded door stop will bite you be careful. I use a hydraulic table for lifting doors, roll it under the door take the weight of just a tad remove the screws and roll the door away. Steve
-
Thanks for the advice from everyone I soaked the cylinders with penetrating oil through the spark plug holes for a few days. Then removed the valve cover and push rods still would not budge. I then removed the oil pan, loosed the rods, and shoved the few pistons that would move to the top of their stroke. I let it soak some more still stuck. I was able to move the crank just enough that I could use my air hammer with a long blunt point, this convinced the pistons to move. I now have a 53-flex plate and a core Dynaflow for my project. Steve
-
Thanks for the reply’s I was expecting the teardown. I now have discovered another issue with my other Dynaflow I was going to repair and use. My library only goes up to 1953 I am unsure about interchanges and using later units. The Dynaflow that came with my car in a box has a 1956 Dynaflow from what I can surmise. I don’t know if it every was in the car, it has a P stamp on the aluminum reaction flange indicates 56 the center casting has (1342992-2) almost matches my core 53 unit (1342992-3) it has J stamp on aluminum flange indicates 53 but the tail housing are not the same length. 53 is 10-¼” long the 56 is 9 -¾” long. If the 56 was installed and used in the car the rear wheels moved was this a common interchange. I know I need the cast bellhousing, what else will I need to look for. I found the letter codes in the forum and they helped me before repair and install this is good info before the dollars go in the wrong unit. Thanks for the help Steve
-
I am looking for a little help on a Dynaflow transmission removal. I am removing the Dynaflow from a 1953 322 part’s engine and it is stuck. The engine will not turn over for anything. I want the flex plate from this engine and a few other parts. I am wondering if the transmission can be removed and leave the torque converter on the flex plate, then have better access to the flywheel bolts or flex plate bolts. I am pretty sure where this will end, I need to remove the pan and deal with the stuck engine; I am trying to leave it assembled easier to keep track of spare parts it's hard to misplace an engine. Thanks Steve

-
.thumb.jpeg.5bb2a2cd984a38f05a902b199c149cc5.jpeg)
53 convertible Flexing chassis ,cause for concern?
195354 replied to Pilgrim65's topic in Buick - Post War
All convertibles flex to some degree in fact every car will flex on a lift. I have personally used a lift on my 53 Buick Convertible and 53 Chevrolet convertible, they flex, and gaps change, doors will still open and close, never had one just open. I just talked with an owner of a 55 Chevrolet convertible, he had a transmission removed for repair the shop used a lift, gaps changed but returned to normal on the ground. Follow Al’s advice and confirm the frame has the stiffeners, then check your body mounts are they tight, then check for any rust in the rockers. The floor and rockers are a big part of the structure any loose body mounts or rusted areas will contribute to flex. The convertible rocker on the inside panel just below the door latch area has an additional stiffer that is about 18” long it is sandwiched between the inner and outer rocker panel look closely in this area. Let us know what you find; I would bet the frame is correct and the body is loose on the frame. I am very close to completing a complete floor replacement from the A pillars to the trunk and replacing rockers on my Buick. It will surprise everyone how much the frame flex is reduced when everything is tight and working as one big structure. It has taught me a few lessons for sure. Steve -
Thanks to all for the suggestions, I believe the nut in my picture is the correct height, found an old rusty version in a box of parts and it is the same height. Did Buick have a different height on this nut for different years; are you modifying just to fit your needs? I like the idea of shorting the nut some with the correct look retained. The seal that came in the gasket kit does not fit in the top of the valve cover correctly. I can make something work is a seal needed, I was told not that a seal is not a big deal. I hate oil leaks so I am building a test stand for the engine now, test run and check for leaks. Then pickle the engine, and then continue with the project. Steve
-
I am ready for paint on my 53 engine, few little details that concern me. The valve cover top nut just does not fit as I think it should. I have checked the parts book and it does not call out a seal washer under the nut, Centerville Auto in California advised that no gasket under this nut, not enough oil up top to worry about it leaking. The gasket kit has a seal for this area but it does not fit in the recess it has a larger OD. As you can see the nut will just dig in the cover. I am thinking of making a small gasket for this area. I have looked for pictures of the spark plug shields installed, but detail on the nut and stud is not easy to see. One thought is the new nuts are just a bit taller, what is the acceptable protrusion on these studs; I plan on making new studs and having a few threads exposed. Thanks for suggestions Steve


-
Disconnect the battery and check solenoid and starter relay, low amperage can cause the disc in starter solenoid to warp or fuse at the contact. The relay can stick or fuse also, sounds like a good time to break out a volt ohmmeter and start tracking down the cause of cranking with no signal. Does the switch (S) terminal on starter solenoid have continuity from the relay; if it does, the relay might have failed? Use meter on switch terminal on solenoid to battery lug on solenoid should be open circuit, if not it has fused or stuck. I just confirmed this on my rebuilt unit the (R) terminal would have continuity to starter windings. I would just use the tone on the meter for now and make it easy. You will need to unhook a few wires for testing each component. You have repaired the low amperage, now you get to deal with the progressive damage. I always explain wiring and switch problems as a pluming problem, are you getting enough flow, is a valve left open or closed makes it easier at times. I love troubleshooting it is like the game of hid and seek Steve
-
You are getting good advice on this, I would like to add a few and easy things to look for, confirm you have a battery that has amperage not just voltage. Use a carbon pile if you can access one, if not one quick and easy test is turn on your head lights, are they bright and stay bright for a few minutes heater fan will add load also. Once you confirm you have amperage and voltage trace the circuit: power and ground, seen way too many hours spent chasing the positive side and the ground is over looked. Use your meter on each cable check for resistance, I have seen cables that look OK but are incapable of carrying amperage. As you go test operation after each small repair, cleaning a ground or replacing a cable, this way you know you are ruling things out and making progress. Check connections for heat, after putting a load on the system, have seen many a repair made this way by locating a bad ground or other connection it can be warm some to the point they can burn you. Keep notes if you are like me you never get a whole day with a project helps knowing where you ended on troubleshooting. Good luck Steve
-
I have been following this thread with much interest. I did not see any information if the engine was used on the road or just ran with no load since rebuild. If this has ran on the road and it performed as expected, for a few miles then the valves are most likely sticking in the head. I have personally experienced this on a rebuild; the machine shop set the clearance tight on the valve stems. After about a thousand miles, it would run but hard start and rough idle. The result was bent push rods; the valve would be free when I did get cover removed. I would install a used push rod and it would be fine until it heated up. I used a spare valve cover, cut the top out, and proved that the valve would stick at times when warm. NOTE this was on another engine 235 Chevy it looks like similar symptom. I pulled head and the machine shop repaired the problem. Look in the Buick manual, valve stem clearance is .0025 inlet and .0030 Exhaust, also check valve stem height. I have a 322 from 1953 on an engine stand ready for paint and the machine shop used this information on my heads. Steve
-
Original books for me, when using them it can take you back to simpler times with the wear and aroma they bring when opened. Steve
.thumb.jpeg.5bb2a2cd984a38f05a902b199c149cc5.jpeg)