


MikeC5
-
Posts
2,508 -
Joined
-
Last visited
Content Type
Forums
Gallery
Events
Everything posted by MikeC5
-
 I agree that it is overkill in antique engines and, depending on viscosity, may be more prone to leaking out. As for extreme conditions, yes, that is where synthetics have a clear advantage. If you use your car in cold temps, the viscosity of synthetics at low temps mean a lot less strain on the starting system and the oil will more readily flow to lubricate things when engine is cold. At the other extreme, it takes higher temp to start oxidizing synthetic motor oils and so may provide more of a cushion against engine seizure if engine is overheated. Is it worth it? We have to decide for ourselves on that.
 -
The fuel gauge bezel is nickel plated. I'm not sure about the gas cap. The straps come unpainted from Myers but it was easy enough to paint them black. How much gas is in the tank? If there isn't too much bad gas in there, it might be easier to fill it up with some good gas and then drive it to near empty. I agree it's probably pipe thread on the plug but I didn't measure mine when I had it removed. In the off season, siphon out what's left and pull the tank (if it's as easy as on a touring car). Then with it on the bench you can deal with the plug. Maybe Myers will know what the plug specs are. FWIW, even though my tank wasn't leaking, I could see some rust in there and so a couple of winters ago, I pulled it out, and coated it with a sealer inside (be sure it is impervious to alcohol). I also did the vacuum tank, which had some fairly advanced rust on the out tank (on the inside). Just preemptive maintenance to combat the alcohol-laden fuel which seems to cause more corrosion issues. Nice looking sedan, by the way!
-
I've always read that distilled is best because minerals in other water can shorten battery life (I don't know the exact mechanism).
-
I'm finally trying to get back to this. As David noted, I clearly didn't do the step with the cording properly and I'm pretty sure this is why I'm having this problem. You can see the puckering at two locations since there is excess material there. I'm not sure I should try and stretch the whole thing more (I don't want the straps to slacken). Not sure what else I can do but to cut the thread and try to sew it up again.

.jpg.ed27b321fcf7548fe9ccc057a6660eb0.jpg)
.jpg.57fc31e6f609ee488fbe0364de21256f.jpg)
.jpg.4fba66a882b98fe8935563a27b933d39.jpg)
-
Yea that's great! I did have to get a new float for mine. The old one was like yours and cracked beyond repair. I think I got it from Myers.
-
How about Marine-Tex? It looks like it may hold up to gasoline better. https://www.v8buick.com/index.php?threads/fuel-resistant-epoxy-immersion-test-very-interesting-results.307765/
-
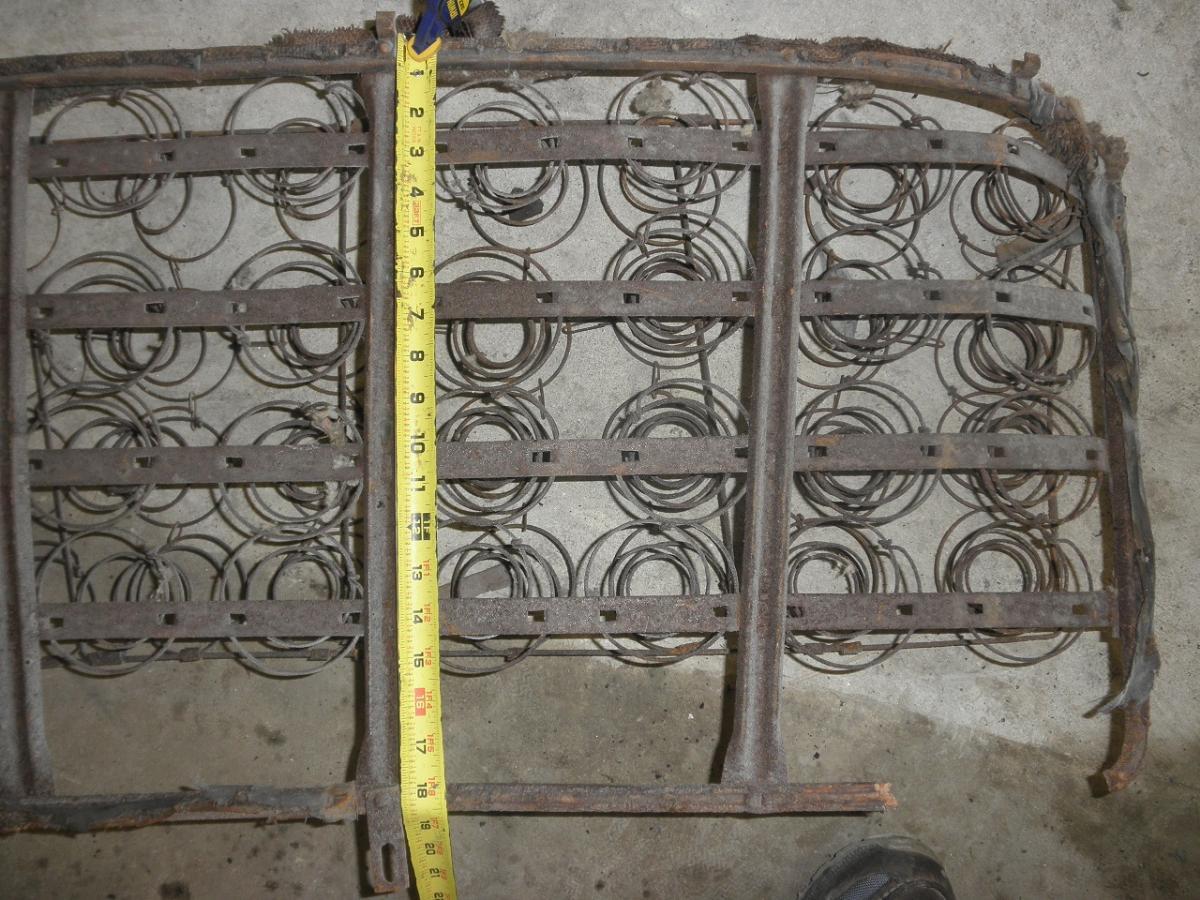
Thanks David, I am following the original seat spring wire pattern as closely as possible. The diagonal wire makes sense. I'll have to see if I can fit something like that in. I did find another source for the edge wire and am hoping it is the same diameter as what I have now (which measured 0.148" OD). It comes back to what is 9 gauge? It depends on what standard they are using... The springs to tie together the tops of the coils may work. I'll have to see what I can find.
-
Progress has slowed. I'm waiting on back order for more spring edge wire...


-
That is quite a find. I found an old Exide battery sign that was used to patch up my Dodge's front fender. Not porcelain tho....

-
What's really amazing is that he keeps finding a quarter in there! Ha ha... I use the stocking filter too and it has gradually caught less crud over the years.
-
Got a little further along. I was able to do a pretty decent job bending up the edge wire for the top edge of front seat bottom. I ended up welding the ends where they meet and it seems it should hold up well. The one thing I can't find anywhere (on-line) are these paper clip-looking links that tie spring to spring in several areas. I may have to make my own....
.jpg.a4a0aa5283c2f7d00122d9b1825a9e49.jpg)
.jpg.d7c342421017c62bc242cbd14c3c1531.jpg)


-
Hi Dereck, I should have taken more photos of my original seat back springs before sending them out to be reproduced but I can get you measurements from the new ones that seem to fit pretty well (a little tweaking will be needed in a couple spots). Here is a test fit I did. I'll be removing them today and will take more photos and measurements when they are back off the car.

.jpg.d3c886a963e5de0c6efb5a8d6d6906c0.jpg)
.jpg.3c8545bb389460cb1960b06fd73c411d.jpg)
.jpg.4f6ff6926955bf62ea251efbadc924e6.jpg)
-
I don't think I'll be going into business doing this.... It is very labor intensive. 😰
-
Hi Dereck, When I looked up the Lyonide Moose Black, I see it is sold from New Zealand, so I'm assuming you are from that part of the world. Do you know if your Dodge was built locally? If so, my understanding is that these were built on knock-down chassis kits from the US but the bodies were made locally. I would think that means the springs/upholstery were also made locally and thus, could be different than US models. It would probably be helpful if one of the members in the Australia/New Zealand area can post some photos of their similar vintage spring assemblies and how they are attached. Your seat base looks like very similar construction to mine so there is also a possibility that the seat back wash trashed some time ago and what you have now was an attempt to get a seat back from some other car to fit (or is a homemade one).
-
I looked and it doesn't appear the Lyonide Moose Black is available in the USA. I made a little more progress; attaching springs to the perimeter frame. I then added a little weld where the crimped sides of the u-channel meet.
.jpg.09d3e50821d2eaee21cfb1d53234849e.jpg)
.jpg.cf2af6c6ff1a33ad3f49e9e9faac69b2.jpg)
.jpg.5ac0db82a502d2c9624bdd87f82cbd50.jpg)
-
Hi Dereck, Here are some more.


-
I do agree that over exposure, especially to the '57 and Mustangs/Camaros are the last things I'll look at at a show. I'm still drawn to the '55 because I find them the 'purest' of the Tri-Fives (hard to beat that simple Ferrari egg crate grill) and you don't see nearly as many of them at shows.
-
Hi Johnny, It's pretty easy to pull the top off the gearbox on these and take a look inside. I'm really not sure what differences there might be between a '15 and '21 gearbox tho. Does he have the Mechanics Instruction Manual for the car? At least pulling the top off might reveal if the problem is with the gears not sliding easily on the main shaft or a problem in the shifter mechanism itself (shift forks or the sliding rods in the top that move the forks).
-
Right, it doesn't have to be an automotive shop. I had my windshield made by a local household glass shop. I used 'poster board' for the template.
-
Wow! Looks great. Gotta love the art deco-ness!
-
I could machine something with the right ID but would clamping to it be enough? It seems you have to bend a bit more to yield the metal and account for spring-back.
-
Hi Mike, I assume it's all flat glass so most glass suppliers that do custom work can cut safety glass to your template. Getting the thickness exactly the same as your original glass may not be possible though. I can't remember for sure but I think the thinnest safety glass available is 3/16" thick. Just look up glass shops in your area and give them a call.
-
Yea, that's a good idea. I was thinking maybe canvas. Would vinyl be better for practice?
-
The new coils are around 4 & 1/2 inches diameter at the top and bottom. This is what most spring vendors have (I suspect they all come from a very few sources). Unfortunately, I can't use them as is and keep the same number of coils. The originals are around 3 & 1/2 diameter and so I have been modifying the new ones bu some cutting and bending. At first I experimented with using bending only and found that by the time I got things down to the desired diameter, I had excessive overlap on the end coil. The bending was done by using a slightly modified pair of vice grips held in a bench vice allowing the coil wire to be gripped firmly as in first photo. Then using a large pair of channelocks, grabbing the springs as shown and bending slightly in the direction of a tighter radii. I then advance the spring by the width of the vice grip and repeat. This is done for about 3/4 circle until the last 5/8" is bent inward and towards the smaller diameter coil in the middle of the spring. Tedious? Oh yes... But I'm getting to where I can cut the ends, file the cut edges, do the bending a get a pretty consistent result in about 15 minutes per spring. There are 45 springs for the front cushion and 50 for the back. Phew!


-
Thanks Matt. I'm having to do some modification on the springs because the ends are too large in diameter. Will post detail later.


.jpg.ed27b321fcf7548fe9ccc057a6660eb0.jpg)
.jpg.57fc31e6f609ee488fbe0364de21256f.jpg)
.jpg.4fba66a882b98fe8935563a27b933d39.jpg)


.jpg.a4a0aa5283c2f7d00122d9b1825a9e49.jpg)
.jpg.d7c342421017c62bc242cbd14c3c1531.jpg)


.jpg.d3c886a963e5de0c6efb5a8d6d6906c0.jpg)
.jpg.3c8545bb389460cb1960b06fd73c411d.jpg)
.jpg.4f6ff6926955bf62ea251efbadc924e6.jpg)
.jpg.09d3e50821d2eaee21cfb1d53234849e.jpg)
.jpg.cf2af6c6ff1a33ad3f49e9e9faac69b2.jpg)
.jpg.5ac0db82a502d2c9624bdd87f82cbd50.jpg)


