hursst
-
Posts
1,557 -
Joined
-
Last visited
Content Type
Forums
Gallery
Events
Everything posted by hursst
-
I'll take any advice I can get, so thank you for the offers. I'm using an Eastwood 175 MIG welder with flux core wire. I have an individual wire gun that feeds through the gun, not through the welder. I have the speed setting to "A," the slowest speed, but it still seems to fast. I have the heat setting at "C" on the dial. I'm guessing I have the heat setting too low?
-
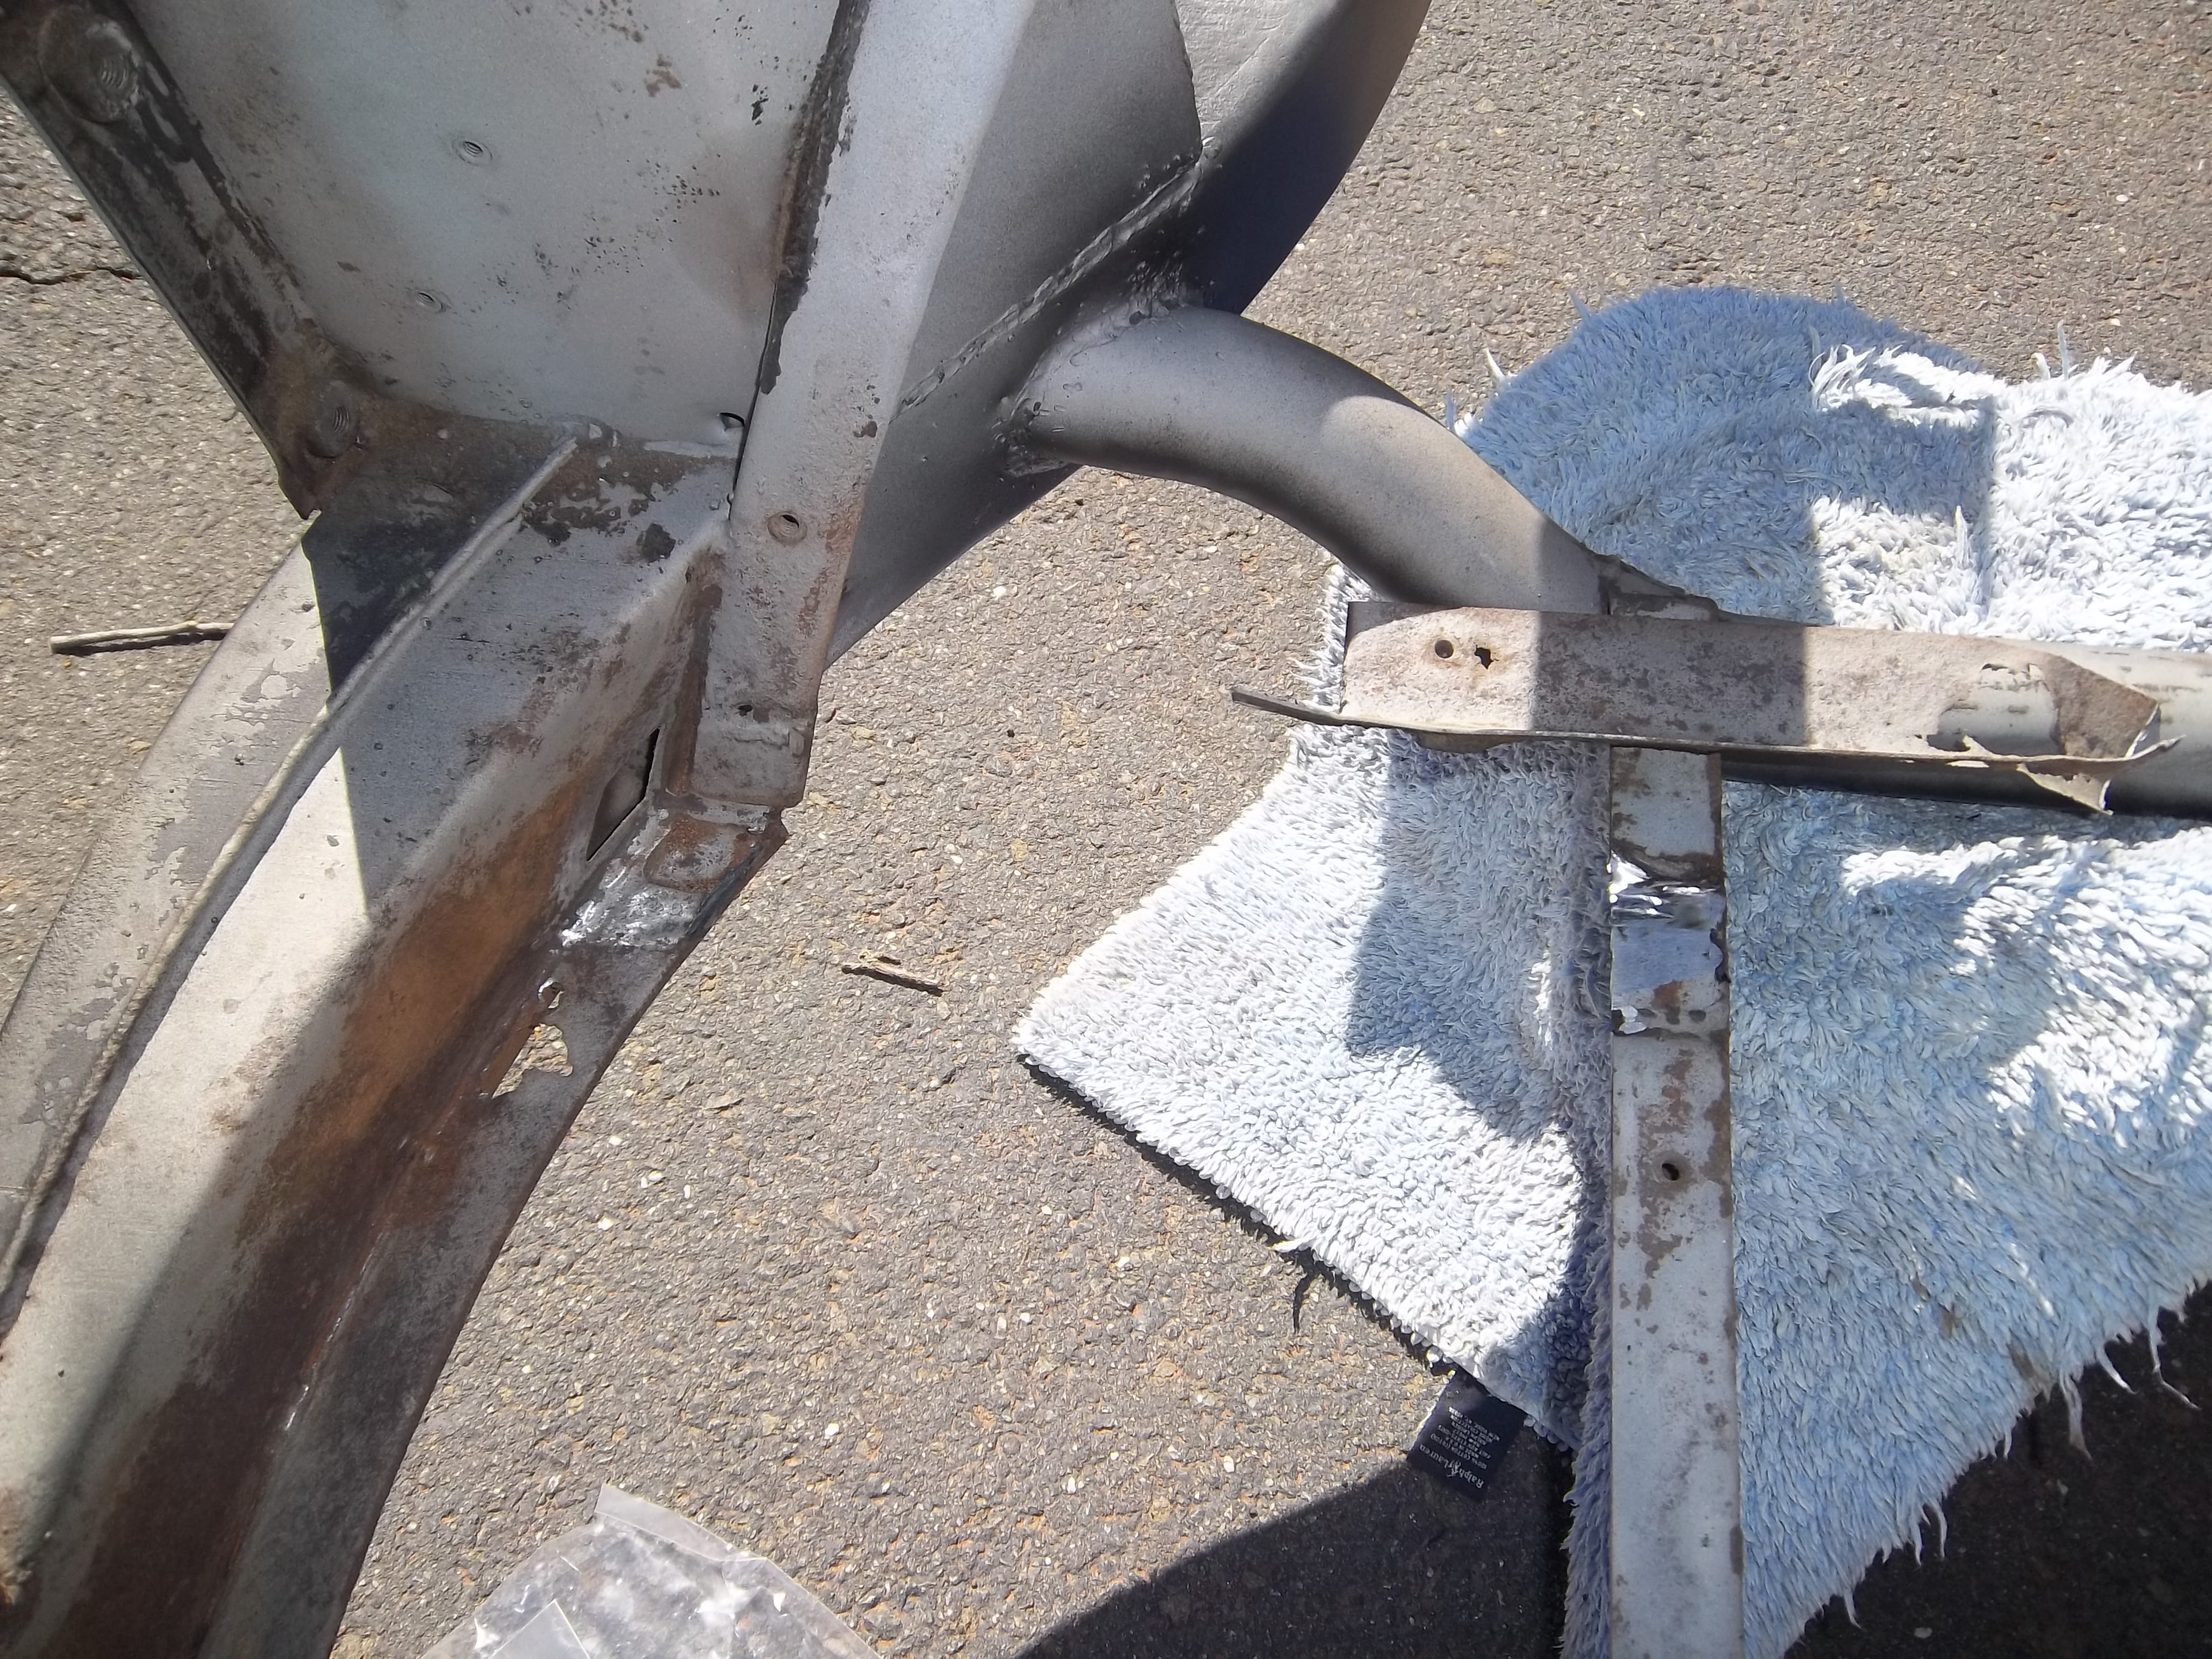
Finally was able to be home AND have warm weather, so time to get back to the MGA after a few weeks of doing very little on it. Was able to do a little painting on it and continued to do a section here and do a section there. At this point, I almost have the front of the chassis before the goal post complete, painted with Eastwood chassis black (photo 1). Doing it piecemeal like I'm doing produces over spray from primer, so I'll be top coating some sections again to cover any over spray or other errors. I also decided to start tackling the welding repairs. I cut out the rusted out driver's side toe board brace (photo 2), cut out the left over metal, cleaned it up and welded in a new piece from Moss Motors. The piece was great, but was not bent at the correct angle, so I had to do it myself with hand tools, since I don't have the correct metalworking equipment. I made it a lot uglier, but I got it to fit correctly. I used the original dry-rotted floorboard as a template for proper hole placement (photo 3). Welcome to amateur hour. My welding is ugly since I have about 3 hours of total experience, but the welds are strong (photo 4). I also cut out a few more small rusted out areas, for which I'll make small patch panels to weld in place (note the triangle hole with triangle patch where one of the fastener holes rusted to about 3x its original size). I'll have to re-drill a hole in the proper place, then weld on a captive nut, as original, to complete the repair. I have about 6 more small rust holes to repair within the floorboard framework, then I have to make new battery boxes at the rear, then the welding is complete for the chassis. The real challenge will be the body rust. Can't wait to get the chassis complete, as I feel dealing with all the smaller parts from then on will be much easier and faster until I get to the body.


-

1950 Crosley Farm O Road Restoration and more
hursst replied to dalef62's topic in Our Cars & Restoration Projects
Great progress, looking good! -
I see I now have 125MB for max file size, so adding a few photos to match the last post. The slow progress I have made is turning out quite well, better than I expected. Should have a great looking frame very soon. No progress since last post, though, too busy at work, snowstorm, tool issues, and too cold. Hope to get back to it this weekend.


-
1950 Crosley Farm O Road Restoration and more
hursst replied to dalef62's topic in Our Cars & Restoration Projects
Looking great. Hope you bring this thing out to some AACA shows so we can see it when it's finished. -
John, I can reduce the photos myself, I was just too lazy and the photos weren't particular interesting, but thank you for the offer. Don't know why the policy has changed on file size.
-
Pilgrim65, great to hear, and will be great to compare notes. I'm no expert on MGAs, but I'm learning as I go. Going for authenticity and saving as much that's original to the car as possible. Ugh, my last update was almost a month ago. Was out of town for 2 weekends in a row, then had minor surgery that kept me out of the garage for another week. Today's the first day I was able to get back to the garage after being well on the way towards recovery. Still slow but steady progress. Next weekend going up to the Simeone Museum to see the AC collection and a demo run of some race cars. Will be great, but will lose another weekend on the MG. Continuing to work piecemeal on the chassis. Not adding any photos, as it now says the limit is 2MB for Max file size. It used to be 24MB or something. Oh well. Sand blaster continues to be a problem. Getting yet another nozzle for it, as the first one broke and the second one was too light duty and the sand wore through the insides. Getting a dead-man nozzle this time. Also tried to get more blasting media from TSC, they are out of stock. Seems like everywhere I go is out of stock these days, no matter what store it is. So many nooks and crannies with the front of the chassis, I need the blaster working to get in there. Adding to the problem is that the front of the chassis was caked in grease and sand, so the blaster doesn't do too well getting through that. Lots of degreasing, brushing, sanding, trying to get to the paint/rust layer so the blaster can make it clean bare metal. Also ordered some Eastwood Chassis Paint so I can paint the areas I've primed already so I can prevent any new rust from coming back and so I can keep making some progress towards finishing the chassis. Mostly doing the front part now, but doing some easy parts in the back here and there.
-
1950 Crosley Farm O Road Restoration and more
hursst replied to dalef62's topic in Our Cars & Restoration Projects
FOR looks great. Good to see the progress being made quite quickly. -
1961 Mercury Meteor 800 restore
hursst replied to Laughing Coyote's topic in Our Cars & Restoration Projects
More perfection. Beautiful work all around. -
More slow but steady progress. Starting sand blasting, grinding, wire-wheeling, and sanding the chassis. Also went down to Moss Motors to buy the first round of parts: a replacement floorboard bracket, new floorboards, rubber kit and body packing kit (photo 1). Spent a lot, but the parts look great and saved $20 on shipping after fuel costs. Here's a photo of blasting in progress (photo 2). My blaster is Chinese, so it's a pile of junk. Trying to save money. The sand release valve at the end of the whole works broke after only 2.5 hrs of use. I replaced it with one made in Italy, so we'll see if that lasts. Blasting is slow and tedious, plus the chassis was covered in so much oil and dirt that it won't penetrate some areas, so I have to scrape, blast, scrape, blast, so it will take a while. Other areas with heavier rust required a wire wheel or media pad to get rid of most of the rust. Decided to prime the chassis piecemeal to prevent flash rust once I finish a section (photo 3). Here are photos of the main rust outs (photos 4 & 5). I have a replacement floorboard bracket for the horizontal bar, and I'll have to make a small patch for the rust out on the chassis (photo 4) There are a few other small areas on the other brackets, but they should be easily fixed. In the back, the battery gas rusted out two holes in the rear cross member. I cut out the obvious rust, then I'll cut out a little more to make it more even, as my cuts are quite sloppy. Should be fairly easy to weld in replacement patches after I roll them to the proper diameter. The battery boxes are in rough shape. The outer frames are removable and I'll be able to salvage those and most of the attaching hardware, but I'll have some fabrication to do with the main support structures (photo 5). The rest of the chassis is quite good, although I still need to do the "hammer test" to look for internal rust and finish rust/paint/grime removal. Although my method is slow, I'm quite happy with it, as I'm able to do it myself instead of paying some guy $2,000 to do a medicocre job. I also think it will turn out very well when I'm finished, considering I have about 2.5 hrs of welding experience so far. Quite rewarding building a pile of garbage into an AACA prize-winner (I hope!).


-
Thanks for the tips, Digger. I just picked up the workshop manual, and I have a tech manual from the MG club in the UK. I'll be making my first parts run to Moss later this week. I'll try the hammer test, too, once I get the frame blasted, which I hope to start today.
-
John, the body is on saw horses right behind the frame, so it will have to ride the ground for now and jack stands when it's painted. I'm going to try the blaster at home and see how it goes. I'll at least blast the rusted out areas to see what I'm left with. If it's too much work or too slow, once I get the few patches I need, I'll consider taking it to my stripping/powdercoating company. I don't have a trailer, though, so that adds complexity. We'll see how it goes.
-
Slow progress, but progress none the less. Ended up taking the chassis out in the driveway, putting it up on its side for better leverage, then getting a heavier-duty set of locking pliers than I was using before, lots of penetrating fluid and following some tips you guys have been sending me on the forum(s). Ended up getting out 80% of the rusted-in broken-off screw heads on the floor framework that have been a real pain in the neck to remove over the last couple months. I ended up with 4 than I could not remove, so I ended up drilling them out, collapsing in the remains of the hollow screws and pulling them out with needle-nose pliers. Chased all the threads with a tap. 3 additional ones rusted right through the framework, so at least I got them out. That was the last step in final disassembly. This week, I've just been waiting for sand blasting weather. Rain doesn't work for that. So, I "de-greased" the front of the chassis with a scraper (it was covered in a thick layer of caked on oil held together with sand, photo 1), removed the rubber chassis to body insulator strips on the top of the chassis, and brought in my floorboards to use as a reference for fixing the few areas of the floor framework that are rusted out (photo 2). Once dry weather rolls around, I'll be sand blasting the rusted out areas and seeing what's left. I'll then cut out the bad metal and start getting ready to weld in some patch panels. I'll need the old floorboards in order to figure exactly where the new holes need to be in the part of the floor frame that have rusted out. I'll then tack weld the nuts to these new holes to make them captive nuts, just like original. Wish me luck, since I have about 2 hours of welding experience so far! I'm sure it will take me 10 times as long as anyone else while I learn. This thing should really speed up once I get the welding complete, but still have a while to go, as there are a few other chassis rust outs (not structural) and the battery boxes are a rusty mess and will need a lot of work.


-
Had 3 days off and relatively good weather this weekend. Finally got it disassembled. Still have a fuel line and about 1/2 of the broken-off floorboard bolts in the inner chassis to remove. Removing those bolts is a nightmare, as some won't come out and may have to be drilled. Have been soaking them in penetrating oil for a while, and have been able to remove about 1/2 of them so far, but with great effort with locking pliers. I think I'll be able to get 3/4 of them out by hand, then I'll have to try drilling or heat to extract the remainder. I not sure if I'll be sand blasting the chassis myself, with my small, easy-clog blaster, or if I'll rent a trailer and haul it to the pro blaster, which will do a faster job, but will be much more money. Can't wait to get to the point where I'm putting parts back on instead of taking them off. Happy with the progress I've made, but will need to replace a lot of parts and every other part needs rebuilding or restoration work. I want to keep costs as low as possible, but may be tough...need a radiator, exhaust, new leather seat covers, engine rebuild, new fuel tank, fuel sending unit, tires, wire wheel repair/replacement, among other items, all of which are things I can't do myself.

-
Thanks for the clarification. Sounds like just simple bad circumstances to me. I will proudly support both entities equally, as we're all family. I'm just a small-time member, but I suggest we accept our differences, shake hands, and move on towards what's going to be the best AACA and AACA Museum year ever!
-
How was it that these two entities started out separately to begin with? The museum should have always been under the AACA's control from day 1. Obviously there's a lot that I don't understand about the relationship, but it seems strange to me that they would ever be separate. Once again, egos and hubris are ruining a good time for all. We're all on the same team!
-
Great find! Don't see many of these around nowadays.
-
Made a lot of progress today. Took off about 98% of the front suspension. Had lots of trouble with the cotter pins in the nut within the hub (had to remove it through an access hole in the outside of the hub. Very difficult if everything's not set up perfectly). Also had some minor problems getting the hubs off, but got some good tips from the main MG forum about using a socket inside of the hub against the axle stud nut while using the wheel spinner as a puller. It worked well in the end. (Photos 1 & 2) Slowly moving towards the rear of the car, but have a lot of small, annoying items to take off, like all the floorboard screws I had to drill out as they were so rusty I cold not get a screwdriver of any type on them.Ended up having to drill the heads out to get the floorboards out, but now left with the lower threaded part of each screw. I have about 16 to extract. Got 2 out fairly easily, but some of the others are really frozen in there. I've been hitting them with penetrating fluid to try to break them free. Luckily, there is a lot of material on the opposite side of the screw, so I can grab the lower part of the screws with locking pliers and unscrew them from below or behind. One has broken off again at the top, and I am twisting the bottom part, but the part in the frame itself isn't turning don't want to have to drill again, that was a nightmare. See the broken off lower screw parts in (photo 3). I may just do a little at a time and hit the rear end next time, then worry about the small details after the main components are off. Getting very close to the point where re-assembly starts, although I'll have some very minor chassis repairs to weld in first. Happy with the progress so far after only 6 months of ownership. Re-assembly will take about 10 times as long, I'm afraid!


-
The frame itself is very solid, just some minor surface rust. There are some minor rust outs in the floor frame brackets, the rear horizontal support member, and the battery trays, but these appear to be easy to repair and non-structural. Can't wait to get to the point of building it back up again, although that will take much longer as every part on the car needs some type of rebuilding, repair, or replacement.
-
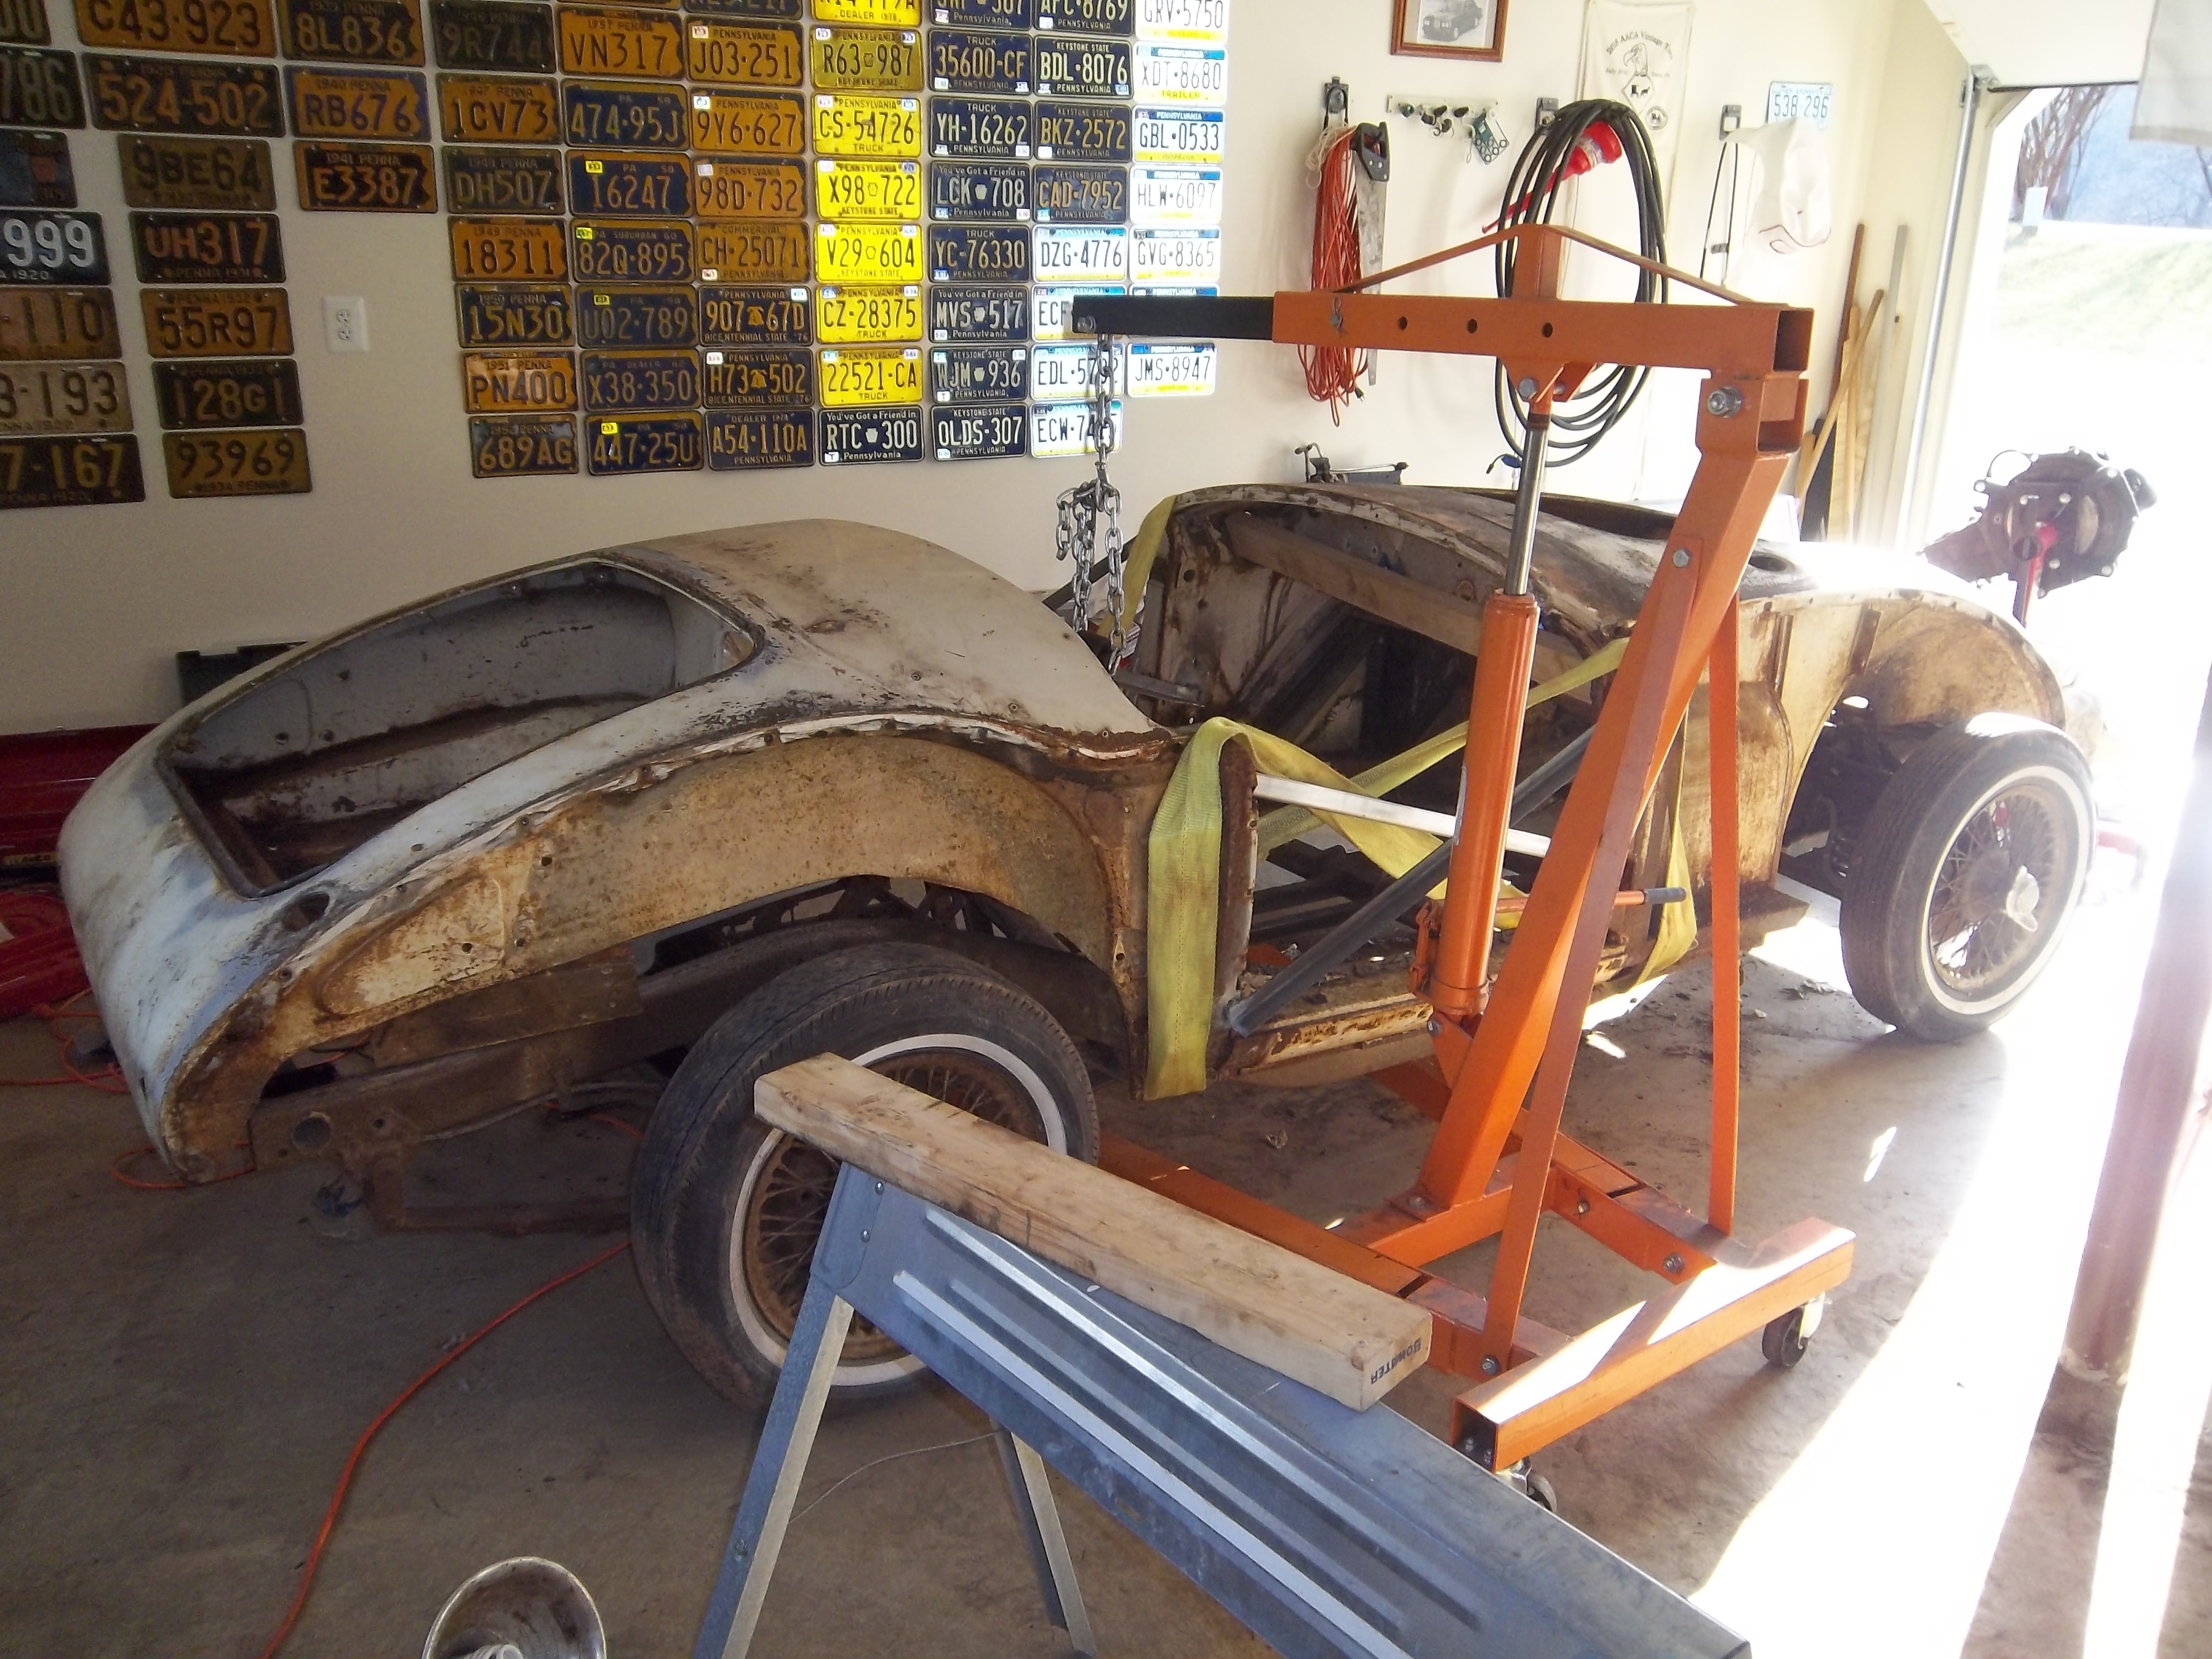
Haven't been able to work on the MG for 3 weeks now, but finally got some time today and hit a huge milestone. Body is now off of the chassis! I used an engine hoist and some tow straps and it came off fairly simply. Still can't believe how light the body is. Next step is to disassemble the front of the chassis.


-
I may be able to help. Going to a junkyard Fri that may have one. Please PM me to let me know what your price range would be, as I would have to buy it from the junkyard, if they have it.
-
Bypass, I have an update for you on PM, if you haven't seen it yet.
-
Thanks for all the tips and thoughts on this. I will proceed with safety, care, and caution when removing the body. Couldn't line up an engine hoist or help this weekend, so I'll try again in about 3 weeks when I get some time and a hoist. In the meantime, don't wont to lose any momentum, so started tearing down the engine. The exhaust manifold is broken in 3 places at the bottom, so it is junk. Everything else came off fairly smoothly so far, but can't get the head off. May let the rebuilder do this step, don't want to mar the mating surfaces. Not sure how to get the crank pulley off, since it has a captive-style washer folded up on the side of it. The coolant passages are jammed up and full of crystallized 45-year old coolant. Hope it can be boiled out. Engine turns freely, so that's a good sign. Amazed at how simple the engine is, should be pretty easy to rebuild. I lack the skill and machine tools to do the engine myself, so I'll send it out to a rebuilder and I'll tackle some of the cosmetics and extraneous parts.


-
If you're still looking in a week and a half, PM me, I may be able to get some from a junkyard that I frequent and will be visiting then.
-
The rust appears to be minor to me at this point, but I could be wrong. I had a Camaro restored that was far more rusty than this, so I'm not too worried about it. We'll see how it goes when I take the body off...slowly! The rust is in the outer rocker panels. You can kind of see it in the photo below, a little towards the top part of the rockers towards the front of the door. The chassis, from what I can see so far, has no major rust in the structural areas, just surface rust and a few issues in the non-structural areas. If I can get a hold of a rental engine hoist, I may have the body off this weekend.