


Steve Hammatt
-
Posts
145 -
Joined
-
Last visited
Content Type
Forums
Gallery
Events
Everything posted by Steve Hammatt
-
I have an early Gray & Davis Type G Generator (Dynamo) that, unfortunately, I have been unable to find the application (year and make) that used this generator. Anybody have an idea as to which marque used this generator? The only spec's I've found so far show a "Type G-1" while the nameplate on the generator shows it as "Type G". The "Type G-1" spec's list 6-1/2V, 9Amperes and 1000 RPM. So, all of this begs two questions: 1. are there substantial differences between the Type G the Type G-1? 2. which brand(s) of automobile(s) specified the use of the Gray & Davis Type G generator? Super thanks everyone.......I appreciate any assistance offered. Steve
-
 Jeff Thanks for your reply. I just pulled my AQ and took a look, unfortunately not much in the way of details regarding which units were supplied by Gray & Davis to Peerless. I also pulled two more AQs and still no details. I wish someone would make a usable indes for the last 10 years (Vol 41:1 thru Vol 51:1) of Automobile Quarterlies. It appears that my problem is that I have a Gray & Davis Type G Starter and I need a G&D Type K (awaiting verification on the correct Type) for my 1914 Overland 79. I'm wonder what G&D two piece starter type (model) was used in the Peerless application?
 -
Hi I've run across a Gray-Davis electric starter Type G. I'm thinking that it may have been used on a 1914 +/- Peerless. Would this make any sense?
-
If an Overland, it's certainly not a 1914. Immediately I noticed that the seemingly large, flat wooden firewall is too early for a '14 Overland. Also, the rear fender line at the rear portion is totally unlike my 1914 Overland 79T. I'm guess, may a 1912 Overland?
-
Carbs. for Sale for your early project
Steve Hammatt replied to alsfarms's topic in HCCA General Discussion
Al The background on the oil seepage on the '14 Overland (plus similar Overland years) engines probably belongs in a different section, other than the For Sale group....so maybe soon I'll gather my memories, check some facts and do a write up about my experiences. However, I did mean to mention a couple of other changes I made as backup to the changes in seat i.d. of the fuel inlet valve. I found a similar sized needle, but with a Viton tip, and exchanged it for the original all brass needle. The new needle had a groove around the blunt end, near the float "flapper". I found a tiny SS spring designed to snap onto the blunt end of the needle (it snapped into the groove mentioned earlier) and then the other end wrapped loosely around the float flapper. When the float dropped, the flapper pulled the needle open and fuel flowed. I considered this my backup method and not the primary means of fuel control. I was tired of occasionally having to back up a hill! Someday, when I pull the carb for cleaning I'll try to remember to photograph my changes. Steve -
Carbs. for Sale for your early project
Steve Hammatt replied to alsfarms's topic in HCCA General Discussion
Al Hope everything is going fine with you. Regarding your Carter BB-1, I have learned (in a time-consuming manner) about BB-1 carbs and their use in gravity-fed vs. pressure-fed fuel systems. The main inlet needle valve located above the bowl is in a horizontal position and comes in two basic versions, one for gravity feed and one for pressure feed. The difference is in the needle jet opening diameter, the larger opening is designed for gravity feed while the smaller diameter opening is designed for pressure (fuel pump) feed. My memory may be slightly off, but in my case the diameters were equivalent to something like "number drill size 31 vs. number drill size 38" with the larger diameter being the smaller drill size numerical number. IIRC, there was something like a 40% cross-sectional area difference between the two drill sizes. In my case, I'd been working with a gravity fed design (1914 Overland 79T) but had a Carter BB-1 with the small cross-sectional area (number drill size 38) which worked (barely) OK when on the flat and level, but with any sort of hill, my gravity fed system ran low on fuel pressure and failed to open the horizontal needle, even if the bowl float had dropped; even on the flat and level I had to run on the upper half of the fuel tank. After chucking the needle seat in a lathe and opening the diameter to the larger size we (assisted by Gary Harris, a fellow Overland 79T owner) were able to run the tank dry. One added item; it was a Saturday afternoon, trying to get the car ready to go on a tour and we were literally minutes away from swapping out the Carter BB-1 (used because it had a built-in accelerator pump) for a factory original carb when the #31 vs. #38 information was first uncovered; I didn't have a number drill index handy when all this happened so I used a fractional drill index and bracketed (using go vs. no-go drills) to quickly determine what was the actual situation with my initial set-up. I hope this information can be of use to others. Up until then we'd been fighting this problem for many tours. BTW, the oil spot (under the tappets) shown in the attach photo is no longer a problem. There is a cure that worked for us, but that's another story. Steve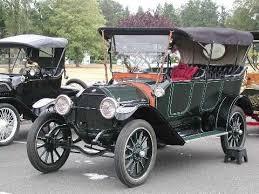
-
I have a customer (for my leather license plates) that has a Chalmers Model 30 that is believed to be a 1911 model. The i.d. information we have is: On the top of the transmission is cast into the plate "Model K", then stamped into the same plate, next to the K is "-M" I'm assuming that this is a K (1910) transmission but used in a M (1911) vehicle. Also, on the firewall is a brass plate with "333" stamped as the i.d. number. On the back of the engine block, stamped into a cast boss is "15426" (although difficult to read in photo provided). Is there any reason to doubt this being a 1911 model?? This all came about so that the license plate number to be selected will match the correct number range for the calendar "year of manufacturer". Thanks. Steve Hammatt www.leatherplates.com

-
Looking for a set of four decent 7.00x17 tires to replace the four 7.50x17 tires currently mounted on our 1932 LaSalle Town Coupe. Ideally would like to trade for my set of four 7.50 x 17 tires. Photo is one of my 7.50x17 tires. Super thanks, Steve Hammatt (360-661-6060) Mount Vernon WA USA

-
Marty, Looking forward to seeing you at Chickasha. Twenty-four years is a long time between visits. We arrive early Thursday morning (flying in from Seattle) and driving to Chickasha to be ready for Thursday late afternoon entry onto the grounds for setup. Included in my recently received vendor confirmation packet was a special notice regarding the following change in the format. 1. A windshield sticker to be placed on your vehicle's windshield prior to entering the gate (no change from last year). 2. If you're driving a trailer to be placed on your space prior to Thursday's gate opening "YOU MUST BE THERE BY 1PM" (I believe that this is the same as last year). 3. "We will be entering from the east field by the fairgrounds marquee" THIS IS A MAJOR CHANGE FROM USING THE WEST ENTRANCE TO USING THE EAST ENTRANCE 4. ....in the staging field there will be limited space for parking. (I'm unsure of any impact this will have, possibly cut down on congestion in the staging area found in prior years?) Anyway Marty, remember that typically on the full day (Friday) evening there have been open house visits to 3-4 collections in the greater OKC area. If this is still the plan, be sure to save some time on Friday for a great evening to visit some extremely interesting collections. I always stay in my space as a vendor until noon on Saturday. Also, starting last year Susie and Mike made available ATM machine(s)?? on site. Buyers mentioned to me that this was appreciated. I'm looking forward to this year's meet. Here's hoping for good weather. Also, remember the FRIDAY NOON Buick gathering at my vendor space NJ 8-9 in the North Bldg (where the weather inside is always perfect!). We're just inside the North Bldg, enter the bldg into the center lobby by the restroom, turn right, then immediate left, we're on the left. I always have the grey banner with the leather license plate logo (see logo in my posting above). Steve
-
There was a lot of interest when we posted an earlier link to this Bugatti simply driving the back roads of Northern Arizona. This time Jay drives and talks with owner Alan Travis for a full feature, 30+ minute video about this exciting car. Go HERE and click on "VIDEO" at the top of the website page. I hope you'll enjoy this expanded look at this exciting horseless carriage. Steve Hammatt Mount Vernon WA USA .

-
My booth spaces are NJ 8 & 9. North Building, as you enter from the vendor area outside (and the restrooms are directly in front of you) turn right and enter the display area, make an immediate left turn and I'm the second vendor on the left. Look for the banner on the wall "Leather LIcense Plates". Hope to see you all there on Friday, at noon!

-
There's a great video of last year's 2017 Bakersfield Swap Meet. Made by Trish and David of DnT TV, this walk around video certainly gives one the flavor of the annual Bakersfield HCCA/Model T Ford Club joint sponsored meet. Go HERE and then click on the 'VIDEO' to view the 15 minute YouTube video. Hope to see you April 13-14, 2018, I know you'll enjoy it! Steve Hammatt
-
I wrote my reply (above) without some needed detail. I'm talking about the float needle and seat. Not the adjustable (on some models) main jet. Here's what I did to make sure, once and for all that my problems would go away. Due to the low head pressure offered in my Overland, the incoming fuel pressure at the inlet needle and seat was quite low. In fact, there wasn't enough pressure to push open the HORIZONTAL needle. The key word, in my mind, is horizontal. If it was a more typical vertical needle and seat arrangement, the needle would open by the simple gravitational pull of mother nature (grin). Due to the low pressure, combined with the small cross-sectional area of the seat opening diameter, there was inadequate force to push the needle open. Here are my fixes, all made at the same time: 1. Open the seat diameter to drill size 31 (.120" dia.) vs. the original drill size 39 (.0995" dia.). 2. I also replaced the original needle with a viton tipped needle pulled out of a friend's carb junk box. 3. In addition (here we go with the belt and suspenders approach) the newer viton tipped needle had a groove machined around the o.d. at the other end of the needle, up near the end where the float tap pushes the needle closed. I found, in that same junk box, a small ss wire designed to engage into the groove and at the same time, hook over and behind the float level tab; this arrangement would literally "pull" the needle open when the float dropped. So now, I was assured of two ways to open the needle, the metal spring wire and the increased pressure offered by the larger diameter (+/- 40% increase) in cross-sectional area. Remember, the increased flow opening also allows for added flow into the carb. If you have any questions, drop me a note gsteve@hammatt.com or call 360-661-6060.
-
I was having difficulty in feeding my 1914 Overland 79T, running a later added-on Carter BB-1 Carb. Fortunately before we were about to obtain an original carb for testing, we stumbled across some Carter literature and discovered that Carter BB-1s could come with two different main inlet jet sizes (one for pressurized and the other (larger) size jet for gravity feed. I may be off slightly, but the numbers were something like drill size 31 (.120" dia.) vs. drill size 39 (.0995" dia.) for the main jet. We chucked up the main jet in a lathe and carefully enlarged the main jet to the larger size, since we were running a gravity feed system and then never looked back. IIRC, there was something like a 40% increase in cross-sectional area for the fuel flow. Suddenly no more problems running up hills or having to maintain a 3/4 full fuel tank. I could now make full use of all 13+ gallons in the under front seat fuel tank.
-
James (RansomEli) Chickasha is one of three swap meets that I attend (Bakersfield and Hershey are the others). Mike and Susie (Chickasha) are making changes that I'm sure will help with the turnout at Chickasha. First, and most importantly they've changed the format back to Friday and 1/2 day Saturday (same as Bakersfield). Next year Chickasha will be March 17-18 and Bakersfield will be April 7-8, 2017. Also, HCCA will be having their National Tour in OKC just prior to Chickasha.
-
Akstraw Glad you enjoyed your first trip to Chickasha. I've been a vendor there for the past 5-6 years and I've always been impressed with the facility and the management. I'm also very pleased that Mike and Susie Ersland are planning some changes to hopefully improve attendance. They did announce that starting next year (2017) the days will change back to Friday and Sat until noon. Like nearly all meets, the line-up day (this will be Thursday next year) will enjoy lots of action. Anyway, I'll be back again delightfully located near all the action (and indoors) in the North Building. Steve Hammatt
-
Bob I attend, as a vendor, to the three meets for early stuff, Chickasha, Bakersfield and Hershey. Chickaska has been good to me as a vendor. I have an inside space (near the Men's Room ) and so the weather is not a problem. With all the paving and other improvements, all the vendor spaces are improved over years past. Wednesday is the "search thru the trailers day" while they are in the line-up area. Thursday is the only "full day" of the swap meet, Friday is half-day. There's nothing on Saturday. If you're into early Buicks plan to stop by at my vendor space in the North Bldg, NJ-8&9 (the leather license plate booth). Hopefully this year the number of vendors will increase, the last two years seem lower in vendor counts. If you can't find a local hotel, try Norman, OK. Lot's of great rooms and good prices. Steve Hammatt
-
ANNUAL PRE-WAR BUICK MEETING AT CHICKASHA
Steve Hammatt replied to Terry Wiegand's topic in Buick - Pre War
Just to remind everyone. My booth is in the North Building, NJ 8-9 vendor spaces. Located on the east side of the building against the center block wall. Just around the corner from the Men's restroom There's a banner on the wall mentioning "Leather License Plates". See you all on Thursday at Noon. Steve -
Using a Delco distributor and returning it to it's original set-up with two sets of points. The principal set of points works off the large wet-cell 6V battery that is also the power source for the electric starter. The second set of points within the distributor is automatically retarded to help with the dry-cell to initially fire the dual-use 6V coil. The starting procedure is to run the ignition initially off the small 9V (now 8V) dry cell battery while devoting the large wet-cell 6V battery entirely to the starting motor. The original Delco battery had a wire resistor to bring the ignition voltage (only while starting) from 9V to the required 6V going to the coil. My question is: does anyone know what the value of the resistor is originally? The original resistor is missing. Second question: How to calculate the correct value of a modern resistor using the 8V to 6V value? Super thanks. Steve Hammatt
-
Need assistance to i.d. a 1908 (possibly earlier) touring car.
Steve Hammatt replied to Layden B's topic in What is it?
Thanks to you both, Layden and nzcarnerd for the i.d. It's appreciated. (I wonder why these replies weren't auto forwarded to me, as in the past?) :-) Steve -
EARLY BUICK ENTHUSIASTS at CHICKASHA
Steve Hammatt replied to Terry Wiegand's topic in Buick - Pre War
Marty I'm in NJ9. Walk into the North bldg from the vendor area, turn right into the East Room, then 2nd space on the left. Look for the "LeatherPlates.com" banner on the wall. See you there! <input id="mac_address" value="" type="hidden"> -
Are there any overseas antique guys/gals on line that have purchased or brought their vehicles into the US for touring? If so, what did you do about liability insurance? Is there some insurance company out there that will write a short-term coverage policy? 30 day or less coverage is all that's needed in this case. <input id="mac_address" value="" type="hidden">
-
Charitable Fund Raiser We received some wonderful books while at Hershey in October. They will be sold at a minimum pricing (you are encouraged to increase your donation(s)) to raise funds that will be 100% donated to McPherson College's Auto Restoration Program. The quality of these books is outstanding, other than the small reprint attribution at the rear of each book, these look just like they came off the press over 100 years ago! The web-based BrassBuicks email group is sponsoring this fund raiser. We hope you'll join in while at the same time adding to your Buick reference material. The photos shown are of said to be of 100 year originals, the books themselves are mint condition. INSTRUCTIONS FOR OPERATING BUICK TWO CYLINDER MODELS 4" x 6-3/4", 26 pages, Black & White, saddle stitched. Book is not illustrated. Rare Instruction Manual for Buick two-cylinder models. Covers the following Models: 1907 Models F and G, 1908 Models F and G, 1909 Models F and G, 1910 Models F and 14. Re-printed 1999. Minimum suggested donation is $20. (8 Available). PARTS PRICE LIST - 1905, 1906, 1907 Buick Models F, G and C 5-1/4" x 7-3/4", 31 pages, Black & White, saddle stitched. Contains two pages of illustrations. Presents service part numbers and descriptions (applications) for the 1905 Model C and the 1906 & 1907 Models F & G. Minimum suggested donation is $25. (13 Available). Price List of PARTS BUICK MODELS F & 2A (originally issued April 15, 1913) Sorry for the poor photo, 5-3/4" x 8-3/4", 98 pages, Black & White (actually a cream color). Contains one page with illustrations. Presents service part number and description (applications) for the Model F automobiles and the Model 2A trucks. Minimum suggested donation is $40. (30 available). In order to maximize the monies raised for McPherson, I'd really appreciate the mailing of your checks to me. If we tried to use PayPal (since I have a commercial account with PayPal) the charges really eat into the total monies raised. Please email me with your questions and your commitments. To make this as easy as possible, the shipping will be $3/shipment (domestic). Overseas shipping will be at cost (email to determine before sending payment). NOTE: I will deliver at n/c to Chickasha (March) and Bakersfield (April). Super thanks! Remember, first come, first served. Steve Hammatt 16593 McLean Rd Mount Vernon WA 98273 360-661-6060 gsteve@hammatt.com <input id="mac_address" value="" type="hidden">


-
FOR SALE 1915/1916 Cadillac Rear End
Steve Hammatt replied to Steve Hammatt's topic in Cadillac & LaSalle
Mike I was thinking that there was a ring gear, but it's gone. No axles nor pinion gear. I've adjusted the selling price accordingly. Thanks for your interest. Steve <input id="mac_address" value="" type="hidden"> -
SOLD! Thanks for looking. Complete single-speed rear end for 1915/16 Cadillac. Check photos for full compatibility, I do know that it's not a 1914 or earlier. It was fitted with 27" dia. rims, so that should tie it down to between 1915 and 1917. This package is stout (heavy) so best to be picked up or delivered to a mutual point (swap meet) for delivery. No axles, pinion nor ring gear. $100 or best offer. Call for any details. Thanks, Steve Hammatt, Mount Vernon WA USA. 360-661-6060. <input id="mac_address" value="" type="hidden">


