


RichBad
-
Posts
731 -
Joined
-
Last visited
-
Days Won
1
Content Type
Forums
Gallery
Events
Everything posted by RichBad
-
Surely you can just put them in the dickie seat and close it:)
-
Perfect, thanks Ron (and Matt) they look similar to what I should have. Do you have any end on photos showing the profile (cross section)? Even a rough sketch?
-
Hey Ron, I’m trying to figure out the small pieces of bodywork that go in the door gaps at the bottom. i know they are a “u” profile around the main body frame rail and the top edge has a swage running the length but wanted to check if they are straight or follow the slight curvature of the body! Also, does the “U” profile just fit around the main rail or does the lower edge drop below the rail (not sure if that makes sense). Mine are clearly wrong but I’m trying to figure out what they should be. Ta!
-
Ah, thanks Tony. That makes sense with the nails - I thought some holes had been countersunk but punched into the wood makes much more sense.
-
Anyone have good experience with the best way to attach the steel panels to the wood? I’ve got the nails but should you drill pilot holes or is that unnecessary. Also, should you use any type of sealant in the joints or is that overkill too?
-
The amount of time I spent as a kid creosoting my parents fences and barns - I hated the stuff. Nothing ever rotted though. Works even better if you throw some old engine oil in the mix.
-
Good question. I’m thinking I will probably give it a coat of sanding sealer/varnish in the areas that get covered up. For some of the visible areas (door surrounds etc) will go with body colour and the rest (Floor boards etc) I want to just varnish - seems a shame to hide that lovely wood:)
-
It will come off complete when done. Plan is to get metal work done and clean up the woodwork. Then metal work back on to the frame and nail on. Will then fit to the chassis and do final fit on doors, gluing and fitting latches etc. then should be able to take complete body off for painting. I may have to make a frame to help keep it straight - particularly the back end as there’s a lot of weight behind the rear joint.
-
1927/28 Dodge Brothers series 128/129 Tourer
RichBad replied to RichBad's topic in Our Cars & Restoration Projects
Haven’t posted an update here for a while whilst I’ve been working on the body - most of the details are in the Dodge pages. Replacing all the wood has been quite a challenge - especially as a lot of the metal work had been poorly repaired in the past and there was no original wood to use as patterns. Anyway, with a little help from a few great people I’ve pretty much got all the wood work done so here’s a few photos.


- 199 replies
-
- 10
-

-
Started pulling apart again - think It’s about ready to clean up and prime the metal work. Most of the wood work is done bar a few bits for attaching the trim (which I need to figure out). Looks quite cool as a wood skeleton. Hopefully we’ll be allowed some COVID freedom soon so I can get some more things done.


-
Yea, luckily you helped me bend most of them with a bit of heat so just a few of them damaged that I’d tried before that:). will be starting to pull it apart soon - just in time for our freedom in Melbourne:)
-
All the door stops finished and fitted now. I’ve got a 4 door car again:) Finished off the front seat support brackets. Started cleaning the door latch mechanisms. The sliders are quite worn so have repaired them. Also had to re-make a few parts - the sheet steel breaks very easily when bending the tabs. You have to heat them to disassemble (learnt that the hard way). I think I’ll get all the parts plated whilst apart that way hopefully they will never go rusty again.


-
Restoration of Victory Six sports roadster.
RichBad replied to Mattml430's topic in Dodge & Dodge Brothers
Looks good mate - very impressive! Where did you get the conduit from - I wanted to get some for my front lights. -
Congrats to our new Ozzy DB president.
RichBad replied to Mattml430's topic in Dodge & Dodge Brothers
Well done Stu! -
Just Had To Get It , A 1928 series 128 fast four
RichBad replied to robert b's topic in Dodge & Dodge Brothers
That looks Awesome! Good to see you posting again:) -
'29 DA short?...or multiple shorts?
RichBad replied to Bob Zetnick's topic in Dodge & Dodge Brothers
Yes, the starter will need to be grounded. If your running off the car just bolt a ground cable to one of the mounts. Make sure you have it well secured if testing off the car - the torque reaction can cause it to jump a bit. -
Shout if you want any more pics or dimensions from this one. I think it may be quite a bit different as it’s a later model and was also made by Holden (Australia) - there may be some similarities though.
-
Another door stop done. Photo also shows the tool to help make the sliders.


-
These are the bits I had leftover, the uprights were from a 6 but unfortunately I’d cut one in the middle and a small ~1” piece from the top of both. Could be repaired/reused if you have no luck with the forming.


-
Hmm, I think I may have a couple of uprights - I repaired mine by using the best parts from 2 frames but I think the donor one was from a 6. Will have a dig around - hope I didn’t cut it up for repair strips.
-
I think we tried the rollers first then tried the press with a few bits of wood - that’s what it needed but mine only needed a small adjustment so not sure if it would work from scratch. It may well work out with lots of small presses - with a little heat to help. the uprights would be the hard ones as they have quite a curve on the bottom - assuming they are the same as mine.
-
Thanks Ron. Did you find that the door catches had to be really precise or do they have a reasonable tolerance to variation? The latch part on the door on mine has a angle on the back of the latch and I wasn’t sure if that was to allow variations in closing position or if it was just years of wear against the catch. Photo below shows the section I mean.
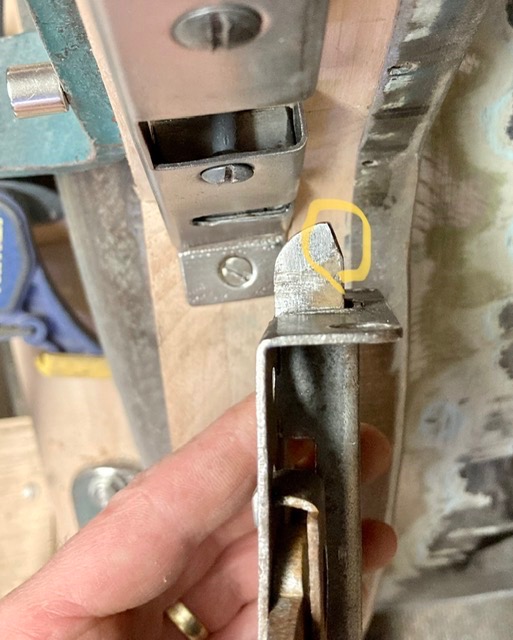
-
Working through all the little bits now to finish the body - takes ages and not much to show for it. The holders for the door “anti rattle” mechanism. Installed in the door stops The “anti rattle” sliders that fit on the rubber block. thanks to Ron for an original to copy! Finished and fitted one set Nut retention plates for all the door hinges (Had to make a bunch): Door handle retaining washers (square peg in a round hole):


-
Hi Ron, Not sure if you’ve seen Rob Teal’s work on facebook - he’s made a complete screen frame from scratch - not sure if there are any useful tips there? Also some of it is on you tube -
-
Great to see all the photos Ron - looks awesome. Did the body move around much when off the chassis for painting? I’m wondering if I set all the door strikers and catches before paint will they all need adjusting once the body comes off and back on after painting?


