


cxgvd
-
Posts
824 -
Joined
-
Last visited
-
Days Won
1
Content Type
Forums
Gallery
Events
Everything posted by cxgvd
-
Driving our 1913 Buick on tour with a group of friends for the first time since last September. Owen Sound, On is the home base for the weekend, finished the top job yesterday and the car is running well. BBQ at the host's home this evening and a 50 mile drive with a picnic Sunday. Stay well, Bev and Gary
.JPG.bae292f127c8f474354874d2793e1424.JPG)


-
 The owner and Packard live an hour from RM Sotheby's head office, likely the largest retailer of antique cars in the world. I have an interesting car which I have offered to some friends without any takers, when my time comes to sell the car it will be offered by RM. I am not having the public coming to my house from a Kijiji ad, run down my pride and joy to try to get a lower price, and deal with the banks. Good luck with your sale, Gary
 -
David Coco has helped me with advice when I sewed and installed a top for my 1915 McLaughlin last year. Last week he took a phone call from my upholsterer concerning diamond tufting. Thanks. Doug Ives I met on these forums and visit with regularly at events. Peter McIntyre repaired a crack in a windshield frame last week, gratis. Larry Schramm has the same car as me and we talk often. Thanks all, stay well, Gary
-
Today I installed an inline fuse, two junction blocks and the 16ga wiring to light up my dormant lanterns. I plan to use the four terminal junction block mounted under the front floor as the battery recharging point and all the wires are carried in stainless steel conduit. Ford Model T supplied the lamp switch mount on the dash board. Stay well, get vaccinated, sorry to hear Cadillac Carl passed away, Gary


-
Top is on my 1913 Buick Model 31, must make some adjustments and trim the excess material tomorrow, add the hidem gimp on the first and last bow. Tada. Friday we are away with a small group of old car friends for the weekend. Regards, Gary


-
Five years ago I purchased this 1939 Century with an older repaint and recent interior with 80,000 miles in Canada for about $6500. USD. Regards, Gary

-
Today, Saturday, I removed my old hidem gimp and replaced it with a low luster new length along the rear backrest. I fabricated the rear wings and installed them ready for my back curtain tomorrow. The windshield baffle is the final piece before the car has to be good to go Friday. My new windshield hinge is still at the platers, supposed to be finished today. Regards, Gary


-
To me it is always a red letter day when I successfully sew the main deck and side panels together, with help from my wife we did it. She lifted and supported the 8' 8" of Stayfast and I guided it under the needle, four seams. Stay well, Gary


-
Maybe such as most things the preparation work is 95% of the job, well, my prep work for the new top for the '13 is completed today. The photos show the top pads which are comprised of three layers of stout canvas and four layers of Stayfast topping material, nailed to the wooden bows with 5/8ths" tacks . The second shows the first piece of Stayfast, black on black, the main deck and the third shows my top straps, two layers of canvas and three Stayfast. I installed the front to back center strap which fits my definition of over restored because I like it. The extra strap looks like someone cares to me. Stay well, Bev and I are getting our second vaccine injection Monday, Gary
.JPG.565bb22f1862faded5dfa5c538b9de02.JPG)
.JPG.b75182366f1a9f268770bad5fb3e6850.JPG)

-
Finished sewing the top pads this afternoon and sewed a center strap, too. I took an hour to fit the bakelite parts and bulbs I purchased earlier from Restoration Supply in Ca to light up my lanterns. Success, fitting the old connectors with the new parts, a bit of filing and sanding. I bought a new 12V 9AH lead acid battery from Amazon which even fits the original wooden battery box. Tomorrow, back on upholstery, Gary


-
Busy month at home with a Buick and a McLaughlin to keep me out of mischief. The 1913 top is standing on it's own and ready for top pads and recovering. Pat is installing buttons and horse hair into the seat backs of the McLaughlin. I am getting the one year only 1913 lanterns to light up with 12 volts, I finally repaired a broken lens in one of the lamps and I discovered the lens frame is nickel plated, so I stripped off the black paint. Bev and I have been invited to a small gathering of friends the third weekend in June. Stay well, Gary


-
Pat has finished sewing the diamond tufted seat backs for the front and rear seats of the 1915 McLaughlin. We expect to stuff them, add the buttons, and install the new soft leather into the car on Monday afternoon. Progress, have nowhere to go though, a friend is finishing his 1913 Twombly and we are planning to have a do in July and call it the "Two New Car Tour". Regards, Gary


-
Period images to relieve some of the stress
cxgvd replied to Walt G's topic in Period Photos - Pre WWII
Last fall we had an Autocrat on tour and the only photo I have which shows double running boards is this group shot. The Autocrat is parked near the center of the line. Gary.thumb.JPG.9c1fe25f9090cba3dba00162ee340814.jpg.408c64699a3148d51f9f85c08ff7f6dd.jpg)
-
Top time for the 1913. Sockets and windshield are painted, bows are installed in the top irons and wrapped in a thin cotton which matches the top material. I raised the height of the top to a bit over seven feet though I can still park the Buick in the garage or trailer with the top up. Second photo is left over leather for the McLaughlin after cutting out the patterns for the front and rear seat backs. It will be used for door pockets and panels, misc pieces, etc. Stay safe, nothing going on in Ontario, Gary


-
My McLaughlin is on the final lap after a six year restoration which I thought would take three when I began with the cars purchase. The McLaughlin, which is basically a Canadian Buick was together but hadn't been on the road since 1991. The big problem was in the fragile rear axle, the crown wheel was weak with flaking and chunks missing. I managed to obtain a used gear and a real good friend mated the pinion with the crown and outfit everything with modern bearings and seals. The upholstery was delayed because of medical problems and COVID worries. My guy, Pat, is currently sewing the pattern onto the leather and when he is ready we will stuff it with polyester and horse hair, add buttons and put it into the car. Here is a photo of one of the six pieces the car takes, a side panel of the rear backrest. Regards, Gary

-
For comparison here is a photo of the sockets and bows for a "two man top". It shows the second and front bow must be lifted and relocated to a body mount in the front seat area and reversed when folding the roof. It's clumsy and heavy and takes two persons, last fitted to Buicks in 1915, though the 1914 and '15 big six has a "one man top". Regards, Gary

-
Posted in the wrong thread, me in my friends Cadillac. A life style I would like to be accustomed to. Gary

-
The local stay at home edict from our government gives me time to have fun with cars. My friend welded my steel windshield frame and then brazed the remaining holes closed, it is sound as a pound, as the first photo shows. Next the frame is going to to be painted black. Black is the correct finish as shown in the book, Buick, a complete history on page 97. I've also fit the new bows to my top sockets, next week I'll paint the irons shiny black. Pat, my upholsterer, is ecstatic with the patterns he produced for the front and rear backrest of the 1915 McLaughlin and we will be, hopefully, cutting leather hides this week. Stay well, get vaccinated, Gary

.JPG.a350c56b7552feddaa807ea35044d397.JPG)


-
Keith; Haartz cloth is the standard for antique cloth tops. In America, Eric Haartz's company manufactures it and wholesales it to companies such as LaBaron Bonney or Bill Hirsch who then retail the fabric. In Canada a company called Triden handles Haartz cloth Stayfast but they are a wholesale outfit. Stan Uher, of Classic Coachworks has an account with them and he ordered me 12 yards at $89.00 each. Long story short, Stan made a phone call to Toronto, had it shipped to Blenheim and I picked it up there, locally. I sent Triden a cheque in the name of Classic Coachworks. In your situation with the '16, I think I would attempt to bond a piece of my old top onto your old top and improve the appearance and cover the hole. More than that you probably should entertain a new top. At least you have a good pattern? You want the old top let me know. For the '15 McLaughlin the upholsterer is back on duty and I have hopes the car will be finished in the next few weeks. Gary

-
Hey Keith: You are welcome to my old top, maybe it would supply material to plug your hole and keep you dry. I am going to be in Dorchester Friday morning and I could bring the piece along. It is about 94"X 54". A real good friend is going to try to silver solder some fine cracks I discovered in my windshield frame. Here is another Model 31 photo with a beautifully fitted top. Gary

-
Began to install the new wooden bows into the prepared sockets of the 1913 this afternoon. Photos show the old top being removed and the interior pads and straps. Then the primed irons stacked and waiting, then the progress is slow as the bows are wedge shaped to fit tightly into the sockets and finally the first bow is in place. Nearly, I left it a bit long so I could adjust the look when all four of the bows are in. And a vine almost covering a farm shed along the path of Bev and I walk past everyday for exercise. Stay well, let's get this virus in the rear view mirror, Gary


-
Ever sell anything and regret it down the road?
cxgvd replied to alsancle's topic in General Discussion
No regrets selling cars, I do have regrets not buying some cars when I had the opportunity. I have a chance to buy an '08 Buick I've known about for thirty years, I may have to raise my offer, maybe a dream is worth whatever it costs. Life is too short or am I being overly poetic. Regards, Gary -
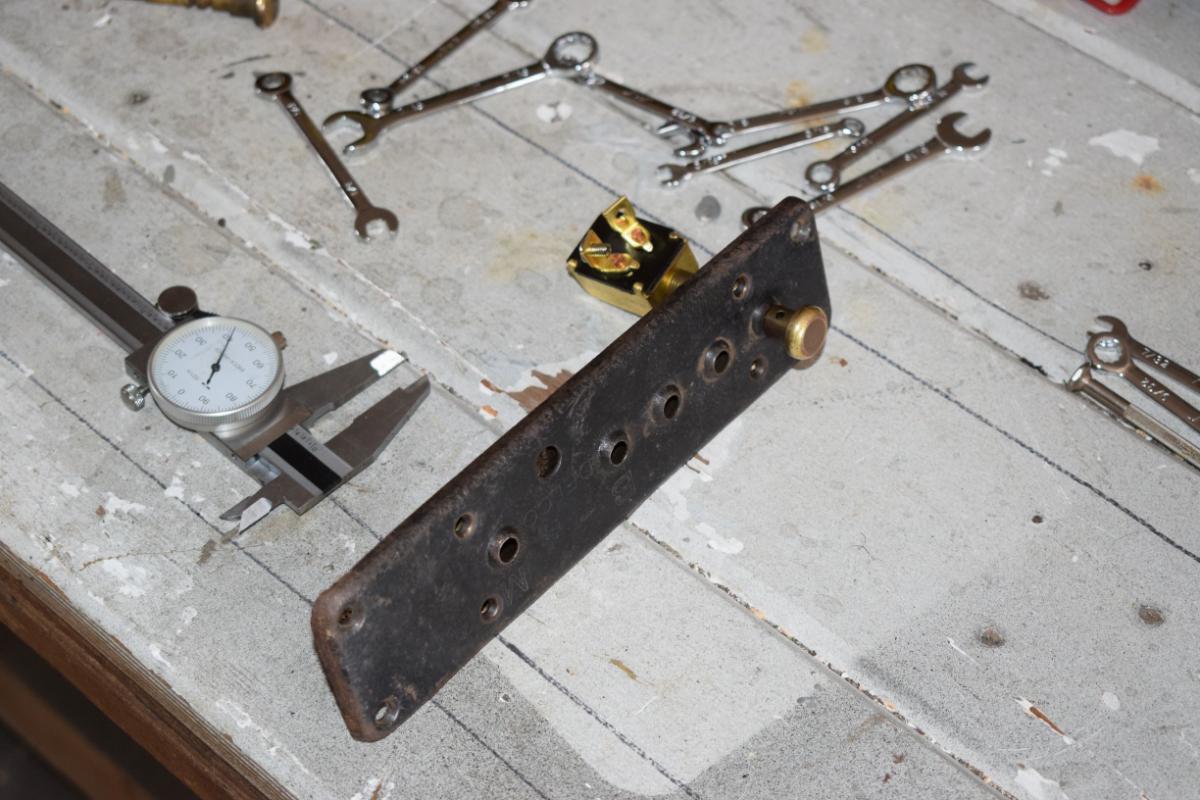
I like a website called BrassBuicks. Recently I had a thought how to modernize my ignition/lights switch mounted on the dashboard of our 1915 without destroying the original. The original switch is a mass of insulators and connections, some hot all of the time such as the horn and there are two different ignition push pull buttons. They are marked B or M depending if you want the wet cell battery, which you do, or a set of dry cells, which are not rechargeable. It is reasonably robust but I found the connections to be iffy and difficult to understand. When one of the many insulators fails there would be problems. Back to BrassBuicks, I posted a request if anyone had a switch as photographed and would be amiable to letting me have it to contact me. I got a positive response and said it was perfect for my purposes, he mailed it to me the same day with the request to pay what I thought was fair. Two weeks in the mail before it was delivered and it is ideal. The change is even easier than I imagined, there is a heavy brass plate which I bored out and tapped for the modern push/pull switch and jam nut I previously acquired. The original brass buttons even screw on to the new switch. I have room in the face plate for four new switches. More than enough, and I replaced the troublesome circuit breaker with a six panel fuse box, now every wire has it's own blade type fuse. Some BrassBuick readers posted on the site information with diagrams how to rebuild my original switch. It is a valuable internet resource and I am glad they let a guy like me be a member. The first photo is the backside showing the connections of the 1915 switch and then the first connection on the modernization. Thanks Buick members, Gary

-
Steve; My wife and I plan to attend, we have rooms reserved but being Canadian we need to know the border to the US will be open for tourists, I am waiting until the registration deadline. We are vaccinated and agree the meet will be great. Sorry, Gary
-
Raise your hand if you drove at least one old Buick this weekend
cxgvd replied to JohnD1956's topic in Buick - General
Spent the afternoon removing the old top and windshield preparing for a new top. My Model 31 speedster looks so good and after 4" of fresh snow last week we had to try the car out. Wind in my hair and wearing sunglasses, all is good. Stay well, Gary

.JPG.bae292f127c8f474354874d2793e1424.JPG)


.JPG.565bb22f1862faded5dfa5c538b9de02.JPG)
.JPG.b75182366f1a9f268770bad5fb3e6850.JPG)


.thumb.JPG.9c1fe25f9090cba3dba00162ee340814.jpg.408c64699a3148d51f9f85c08ff7f6dd.jpg)


.JPG.a350c56b7552feddaa807ea35044d397.JPG)


