


22touring
-
Posts
472 -
Joined
-
Last visited
Content Type
Forums
Gallery
Events
Everything posted by 22touring
-

1923 Dodge interior details [ photos ] needed
22touring replied to cutdown's topic in Dodge & Dodge Brothers
My car is a late '22 model, with the raised cowl and taller radiator, built during the first two weeks of November, 1922, and is is substantially similar to a car built in '23.

-
1923 Dodge Gearbox questions, and Merry Christmas to all
22touring replied to cutdown's topic in Dodge & Dodge Brothers
A DB authority, I forget who, once recommended that I use LUB 164. I understand that it about a 1600 W, and may be similar to steam engine oil, but I'm not an expert on the subject. I have been happy with LUB 164. -
Need advice on stripping down chassis
22touring replied to 22touring's topic in Dodge & Dodge Brothers
I would like to remove the brake pedal from the clutch cover so I can blast and paint the brake pedal and the clutch pedal together, and paint the clutch cover separately. The clutch pedal comes off easily, but in order to remove the brake pedal I think you have to remove the clutch release shaft. I tried to look it up in the Mechanic's Instruction Manual, but the only thing I could find was where it said to remove only the clutch pedal when removing the transmission. From that, I am inclined to think they did not recommend removing brake pedal and clutch release shaft for some reason. Maybe they're too hard to remove, unless you really have to? I can't find anything else in Mechanic's Instruction Manual about removing them. (Maybe I overlooked it, though, because it is not very well-indexed.) Can anybody tell me how to remove the clutch release shaft and brake pedal, and any particular reason why it may be difficult to do so? Or can I remove the brake pedal without removing the clutch release shaft?
-
Re: the Aussies: I'm still not worthy, but I'm trying my best to emulate them!

-
Need advice on stripping down chassis
22touring replied to 22touring's topic in Dodge & Dodge Brothers
So Mark, my rear spring shackle bolts didn't resemble yours, or other ones I have seen online, apparently because (according to the Master Parts list), my car has the malleable iron rear spring bracket that was used between car nos. 77850 and 85019, wherein the inboard side of the spring bracket is threaded. The shackle bolt just screws into it and is secured with a lock plate, screw and lockwasher rather than a cotter pin. So there's no inside nut, no cotter pin and it unscrews from the outside rather than from the inside. I spent a long time searching for the cotter pin under the frame before I figured this out! I wonder why they only used the malleable iron spring bracket for about 7,000 cars? Hope it didn't prove to be inferior or trouble-prone.
-
Need advice on stripping down chassis
22touring replied to 22touring's topic in Dodge & Dodge Brothers
Thanks, Mark! -
Need advice on stripping down chassis
22touring replied to 22touring's topic in Dodge & Dodge Brothers
The rear brake equalizer was pulled so far to one side because the other side was missing its return spring. I think that's also why the brake band on that side wasn't lining up where it was supposed to. On a semi-floating rear end, how do you remove the front shackle of the rear spring where it goes through the frame? I'm afraid I'm going to break the nut on the outside of the frame if I crank on it much harder. Are you instead supposed to remove something on the inside of the frame? -
My First Antique Auto - 1927 Dodge Brothers Coupe - Series 124?
22touring replied to JoeW's topic in Dodge & Dodge Brothers
JoeW, your car has huge potential. In addition to the improved engine, you also have the later, improved, "standard shift pattern" transmission. -
early 20's Dodge hub puller required in New Zealand
22touring replied to cutdown's topic in Dodge & Dodge Brothers
If your wheels are like mine (late '22), then the center of the hub is threaded 2-7/16" x 16 TPI. You might want to check into purchasing one of George McMurtry's* custom-made hub pullers (however, I haven't spoken to George for a number of years, so it is possible that he is no longer making them; I'm not sure). He makes hub pullers for many other makes, too. I am very happy with George's hub puller. He cuts it out of a single block of high-strength steel, it is really a work of art, and my stuck hubs came off easily with it. It also incorporates a couple of really nice features to make it easier to use: the large bolt is to expand the puller to make it easier to install, and the small bolt is to clamp it down tight on the hub's threads before pulling. It is definitely the pièce de résistance of my puller collection! *George McMurtry, P.O. Box 112, Bayard, Nebraska 69334; (308) 586-1930.

-
Repair to bottom of cowl on touring car
22touring replied to 22touring's topic in Dodge & Dodge Brothers
I kept practicing at MIG welding 20-gauge sheet metal using .023" solid wire with gas, but got poor results until I happened to notice that in all of the videos that I watched about sheet metal MIG welding, they put the beveled end of the torch's gas nozzle right on the work, at about a 45-degree angle, for the minimum possible wire stick-out. I had been holding the torch too far away from the work. As soon as I began putting the beveled end of the nozzle right on the work, while using a moderate amount of voltage (I read the instruction book that came with welder) and a high-ish wire feed speed (7 on a scale of 10, because you want good penetration), I began to get passable results and my head swelled up greatly.
-
I've got some wind wing mounts that are quite different from the ones that the other Brothers have shown you. The lady who sold me my car, who inherited it from her father, said that dad had the car serviced at the DB dealer, and she thought all of its accessories were "official" DB stuff. If you'd like to see my wind wing mounts, let me know and I'll locate them and post a picture (my car is disassembled for restoration).
-
Need advice on stripping down chassis
22touring replied to 22touring's topic in Dodge & Dodge Brothers
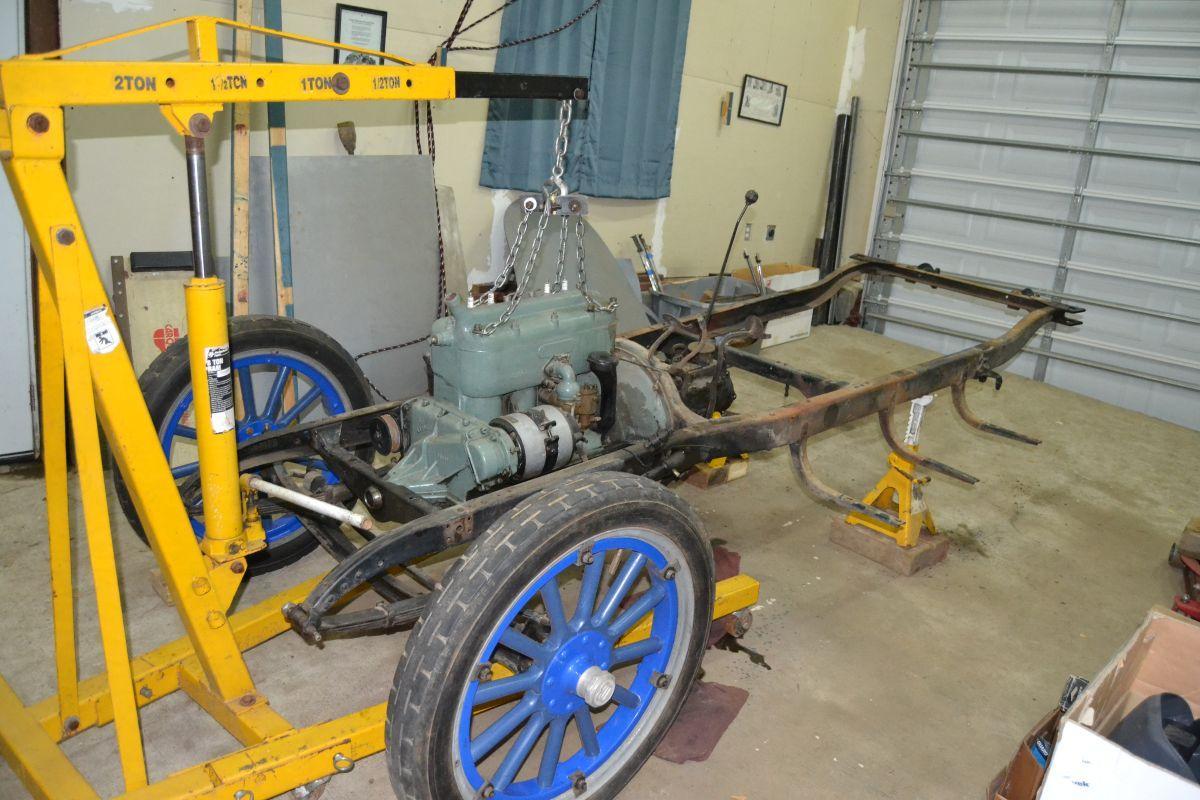
Thanks very much for the kind and informative replies. This car was always a pretty good runner before I disassembled it, so I am hoping that little or no engine, transmission, clutch or differential work is going to be necessary upon reassembly. After I removed the body from the frame, I noticed that the equalizer for the service brake was badly out of adjustment, so one side was being applied much harder than the other (picture 1) So do I just take slack out of the brake adjustment on the loose side? Also, on the right brake it looks like the drum is pulling outward from the shoe or something(? - picture 2). What is wrong here, how do you correct it, and is it related to the incorrect equalizer adjustment? Thanks again.

-
Hey guys, would you mind giving me some words of wisdom about the proper sequence for stripping all the components off the frame of my '22 tourer, so I can take the frame in for sandblasting and powder-coating? What should I remove first, and then what, etc.? I have never stripped a DB chassis before and am not at all certain where to begin! My apologies for being dumb, but I sure could use the help. Thanks very much.

-
trini wrote: "All these engines had to be pulled apart and the gears replaced with steel ones." I have an engine like that. For about 20 years after I bought it, it had a miss at idle which I could never diagnose. It turned out to be that the plastic had worn off the timing gear in one spot, so it failed to open one of the valves on a certain cylinder at idle. At higher RPMs it ran OK. I didn't figure it out until it finally jumped a tooth, quit running, and I had to disassemble and inspect it.
-
"Do they hardweld the lobes before grinding or just regrind the standard lobes?" I was wondering the same thing, John. It certainly seems like they would have to weld up the existing lobes, doesn't it? But I don't know, so I'm waiting for one of the smart guys to answer your question.
-
Can the original equipment DB camshaft be reground to provide the overlap, or must you have a new camshaft made, and in the latter event who makes camshafts like that?
-
cutdown, I'm enjoying your thread because I'm presently removing the engine, transmission and rear axle from my late '22 touring car in order to have the frame blasted and powder-coated, and am asking myself some of the same questions that you are. I just wanted to share the following with you [the link provided proved to be dead, so I'm quoting it instead] because, from what I've heard, Horace Dodge thought he was designing a car that would almost never need to be repaired, so he simply didn't care very much about servicability at all. "Dodge Bros. collectors Harry and Debbie Redding discover that it's not too easy to replace the water pump on their 1915 model: 'I wanted to pull the water pump and the oil pan. In the process I discovered that to pull the water pump shaft you need to remove the engine’s front chain case, to remove the chain case you need to pull the engine, to pull the engine you need to remove the transmission, to remove the transmission you need to move the rear axle with torque tube back several inches (basically remove the rear axle). To then lift the engine out it would be easier to first lift the body slightly. To remove enough body bolts to lift the body you need to remove pieces of the running boards and the rear fenders. I didn’t lift the body!'"
-
According to the Club's website, your car would be a 116"-wheelbase vehicle (rather than the earlier 114" wb), manufactured during the third week of August, 1926. They didn't start making the Fast Four (Model 124 engine) until March 27, 1927. I think you have the "C" motor" (separate starter and generator rather than the former combined starter/generator and with 5 main bearings and the multi-plate clutch). See: DB Production Dates (dodgebrothersclub.org) I would gladly accept any corrections, since I am not as big an expert on these things as some of my fellow Dodge brothers are. These motors run well, but don't produce much power, which means it can sometimes be challenging to drive them in today's traffic.
-
Also, make sure your fuel line from the fuel tank to the vacuum tank is in good shape. It can't have any leaks and must hold vacuum well.
-
Did you file the points lightly with a points file, and afterward squirt them off with some electrical contact cleaner? That made my '22 touring start the last time it had been sitting and didn't want to come to life.
-
Congratulations on getting a DB, Larry. I'll bet you are going to have a lot of fun with it. Rebuilding your vacuum tank is a bit difficult, but not too bad and it's very rewarding to get the stock fuel delivery system working the way God and Horace Dodge intended. Many new DB owners install an electric fuel pump temporarily until they get their vacuum tank working. I don't really recommend this because it is too Rube Goldberg in nature, but if you do, be sure to regulate the pressure down to about 1-1/2 lbs. Too much fuel pressure will make your carburetor overflow badly, causing a substantial risk of fire.
-
Milling 1920s head for higher compression question
22touring replied to Mark Gregush's topic in Dodge & Dodge Brothers
Guys, I know this is a little bit off-topic, but I really want to ask you this. There is an old story which circulated within the DB community, to the effect that trying to explore the acceleration potential of a Roof OHV cylinder head on a 3-main motor will blow out the bottom end big time. The story goes that this happened once at some antique car meet; not sure if it was a DB get-together or some other kind of meet. Have you ever heard this? Do you think it is true? WTH, since I'm going totally off-topic here anyway, did you guys know that F. Scott Fitzgerald had Nick Carraway, the narrator of "The Great Gatsby", drive a DB 4-cyl. car because he wanted to enhance the narrator's credibility? -
Repair to bottom of cowl on touring car
22touring replied to 22touring's topic in Dodge & Dodge Brothers
Thanks very much for all the great help, suggestions and pictures! -
Repair to bottom of cowl on touring car
22touring replied to 22touring's topic in Dodge & Dodge Brothers
.04", or 40 thouandths, gap, so that is not the problem. Must be wrong wire feed rate, wrong current or wrong amount of gas. What would cause my welds to be all burnt out in the center and black around the edges? -
Repair to bottom of cowl on touring car
22touring replied to 22touring's topic in Dodge & Dodge Brothers
For my first practice welds on the 20-gauge, which turned out badly, I held the two pieces of metal together with butt weld clamps at a .40" gap. Is that too far apart? I'm wondering if that is part of the problem. Correction: The data sheet for the clamps says .4 inches, but that's impossible, so they must mean .040", or a 25th of an inch! I'll measure the gap and report back.


