


22touring
-
Posts
472 -
Joined
-
Last visited
Content Type
Forums
Gallery
Events
Everything posted by 22touring
-

Need advice on stripping down chassis
22touring replied to 22touring's topic in Dodge & Dodge Brothers
My late '22 touring car has the divided windshield with the pivoting sash, and I am having a really hard time installing the outside caps and nuts on the pivot bearing shafts because I can't seem to compress the springs enough to get any threads on the pivot shafts when I install all the parts that you are supposed to. Does this sound right, or have I assembled it incorrectly? And is it normal to have to compress the spring while you thread on the cap nut? How do you compress it? -
Need advice on stripping down chassis
22touring replied to 22touring's topic in Dodge & Dodge Brothers
It's taking longer than I would like it to, Bill. And I have another restoration on the back burner until I complete the DB. -
Need advice on stripping down chassis
22touring replied to 22touring's topic in Dodge & Dodge Brothers
I used an engine hoist to remove the transmission, but it was inconvenient because it got in the way, making it necessary to lower the trans to the floor and drag it out. So I tried using overhead ropes (one in the front and one in the back, to be able to level it out) and a come-along when re-installing it, and that worked much better. I think one should completely install the clutch shaft and release fork on the bench before installing the transmission because it is much easier than doing it later, and in order to avoid (ahem) dropping one of the Woodruff keys, keepers or set screws down into the bell housing and (ahem) not being able to find it. You do have to install the brake pedal lever when assembling the clutch release shaft, but it doesn't really get in the way of the installation. -
Need advice on stripping down chassis
22touring replied to 22touring's topic in Dodge & Dodge Brothers
So I decided that I was just not getting the full and complete Dodge Bros. restoration experience unless I were to pull the rear end back in order to remove the transmission again. I just wanted to see if I could do the Rodger Hartley method, where you remove only the front rear spring shackle, or if I would have to remove both front and rear shackles and drop the leaf springs down completely. I found that it was too hard when removing only the front shackles, so it was easier to drop the springs completely. OF COURSE this extra work had NOTHING TO DO WITH my having installed the clutch incorrectly the first time. It's just that I really WANTED a major interruption to my DB resto, which had theretofore been going along pretty well. I MEANT to do it that way! For further information on this subject matter, see: Here's the setup I'm using to pull the transmission back:


-
16Dodger7, don't feel too badly about not being able to diagnose the problem right away. When I had the same problem, I tried to fix it *repeatedly* and would then go on a test run. My car would run for about a mile, but when I got to the first stop sign and let the engine idle, it would die and I had to be towed home. OF COURSE I claimed the towing jobs under the towing insurance coverage of my auto insurance policy! At least I DID claim it, until the carrier sent me a notice cancelling the towing coverage and stating in no uncertain terms that if I ever tried to buy towing insurance from them in the future it would be grounds for terminating my policy completely. And what's more, I don't really blame them for feeling that way because *repeatedly* is an understatement!
-
The metering valve stem is supposed to be attached to the head of the metering valve. Is it? Originally they were swaged together, but the swaging eventually fails. Then the head will lift but the stem won't follow, so no fuel can get in. I had to solder the head and stem of mine together. It is not obvious upon a visual inspection that they are supposed to be attached, so it is necessary to know a little bit about the carb's manner of operation in order to diagnose it.
-
Just wanted to let you know that I'm feeling your pain, Mark. Luckily for me, though, my engine has always run great. I replaced the head gasket once and the pistons and cylinders didn't seem to have much if any wear. My engine was rebuilt in 1957 by a factory mechanic at the DB plant in Stockton, CA. They had some kind of a 4-cylinder rebuild program going at the time. My gearhead buddies keep telling me that I shouldn't drive my car around so much because I'll wear the engine out, but I am hoping they are wrong.
-
Year model breaks between years.....
22touring replied to alsfarms's topic in Dodge & Dodge Brothers
Around the time of the switchover from the low-cowl cars to the high-cowl ones in July of 1922, a lot of changes were phased in over various periods of time, so there was a lot of individual variation in the production, often depending on the body type. For example, according to many sources my car (no. 807012), built during the third week of November, 1922, is "supposed" to have a positive-ground electrical system, the horn switch on the inside of the driver's door and (I think, but not sure) no outside door handles, but instead it has a negative ground, the horn in the middle of the steering wheel and it does have outside door handles. There is reason to believe that the car was original and unmodified when I bought it. Your car takes a part no. 418 top saddle on both sides. See this thread: If you still need to see what a P/N 418 top saddle looks like, let me know and I'll take a picture of mine. -
If I may express my humble opinion, I think you will obtain the greatest satisfaction from repairing and driving your DB if you get the fuel vacuum tank working correctly and use the original carburetor, repairing it as necessary. Once you start replacing the OE parts with more modern items, where do you stop?
-
I can't answer your question, Rodger, but I would like to thank you again for all the help and advice you have given me concerning my DB restoration.
-
Body onto chassis of 4-cylinder car: order of operations?
22touring replied to 22touring's topic in Dodge & Dodge Brothers
Thanks again, JayG. I think I will try to make them, using a little heat to make the bend. The one shown in my picture seems to be made from 3/32" thick bar stock that is 5/8" wide, but 3/32" is much harder to find than 1/8" thick bar, so I think I will use McMaster-Carr's 1/8" thick by 5/8" wide mild steel bar stock. -
Body onto chassis of 4-cylinder car: order of operations?
22touring replied to 22touring's topic in Dodge & Dodge Brothers
I'm going to need both of them, Ron. -
Body onto chassis of 4-cylinder car: order of operations?
22touring replied to 22touring's topic in Dodge & Dodge Brothers
Most excellent, JayG! Thank you very much. Now I just need to figure out how to make a couple of them. Any suggestions for fabricating them would be appreciated. Also, I need to get some more square nuts. Edit: does anybody replicate these? Aussie Brethren? -
Body onto chassis of 4-cylinder car: order of operations?
22touring replied to 22touring's topic in Dodge & Dodge Brothers
I belatedly figured it out. It goes under the two bolts that hold the rear of the front fender to the frame. I think it goes under the frame. The bend in the bracket holds one of the square nuts in place while you start the bolt. Am I understanding this right? -
Body onto chassis of 4-cylinder car: order of operations?
22touring replied to 22touring's topic in Dodge & Dodge Brothers
What's this little bracket?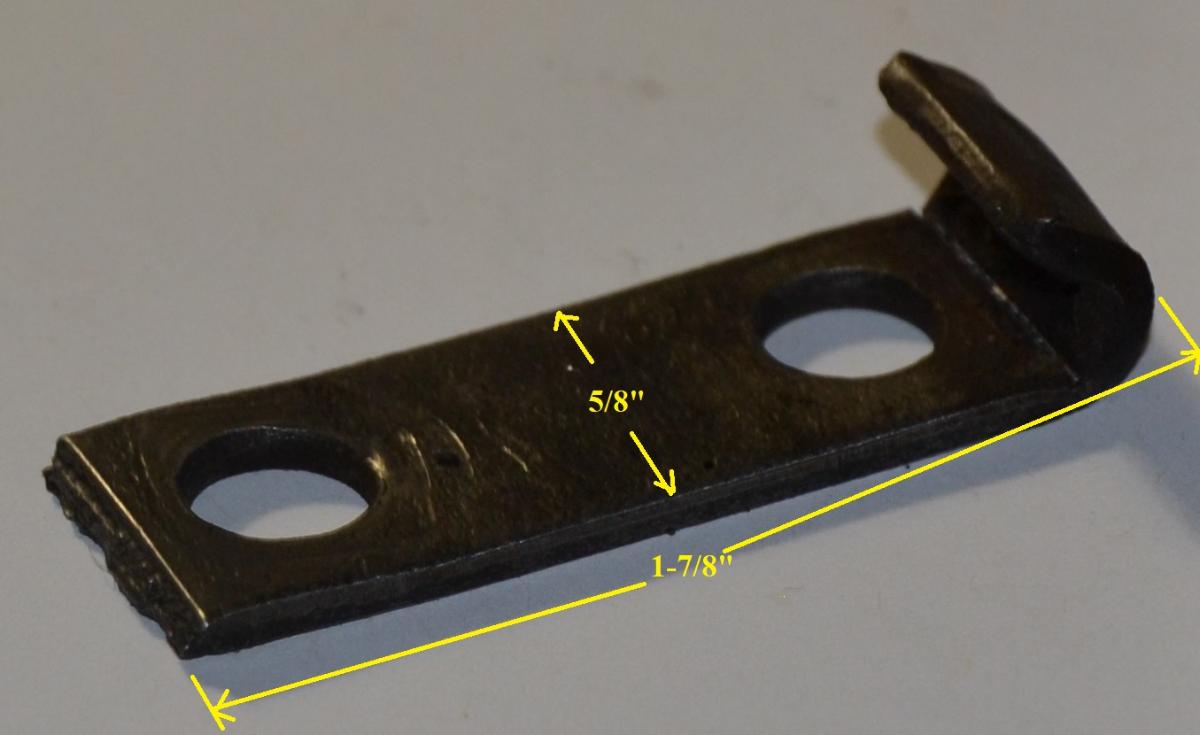
-
Body onto chassis of 4-cylinder car: order of operations?
22touring replied to 22touring's topic in Dodge & Dodge Brothers
Thanks, everybody. I installed thin strips of 1/8"-thick webbing under the side aprons, and two wide thicknesses of that webbing, for 1/4" of clearance under the body. That will prevent the bottom mounting flange of the body from contacting the rivets which protrude about 3/16" from the top of the frame. (The body mounting flange has holes punched in it to clear the heads of the large bolts which protrude from the top of the frame, but not for the rivets.) I bolted the side aprons to the frame front and rear, and then installed the running boards onto the outriggers. As TonyAus pointed out, this holds the side aprons in position. I'm going to install the brake rods and the exhaust before leveling out the frame and lowering the body because I think it will be easier to do it that way. -
What Minibago said, but I believe the same practice continues to this day. All of the production line employees (so-called "line" employees) of all three American car manufacturers, I think, get the last two weeks of July off for vacation, during which time all the production line, parts and logistical specialists ("staff" employees) work 20-hour days to switch the line over to the new models. As of August 1 or thereabouts the company starts producing next year's models, but most states still title the cars produced before December 31 as this year's model. Incidentally, my friends in the automobile industry tell me that this two-week period, when they switch the production line over to the new models, is extremely stressful. There have even been cases where they couldn't get the production line for the new models running properly during that two week period, so they had to keep the old production line running under the new one, until they got the new one running properly and could remove the old line. That doesn't sound like very much fun to me! The automobile business has always been a really tough one in which to make money. "Unit cost" has a lot to do with it. You've got to sell lots of units to get the unit cost down, so you re-style every year or two in order to sell more units. That's why Dillon, Read & Co. sold DB to Walter Chrysler: manufacturing automobiles was a tougher business to be in than the bankers thought it would be, and profits could be elusive without major periodic styling and mechanical changes.
-
Body onto chassis of 4-cylinder car: order of operations?
22touring replied to 22touring's topic in Dodge & Dodge Brothers
Thanks for all the good information. A few questions, please: Is the rubber strip under the side aprons (valences) the way the factory did it? So do the inboard flanges of the side aprons sit on the rubber or webbing strip glued to the top of the frame, and the body sits directly on top of those flanges, without any cushion? I bought quite a bit of the sticky webbing from Myers; it seems like good stuff, and I'd like to use it. Since I don't intend to let the car get wet, is there any reason not to cut thin strips of it and use it instead of the rubber strip, which I would have to procure? I will have to carefully level the frame because my shop floor is not level, so I especially appreciate this tip. I found that the reinforced notch at the front of the side aprons roughly locates the apron when you fasten it to the frame with a 5/16" X 18 carriage bolt and hold the outboard side down by installing the running boards. But I'll leave everything loose until I make sure the doors fit correctly. Thanks again for all the help, Brethren. -
Dodge Brethren, do you install the longitudinal splash pans on a 4-cylinder touring car before you lower the body onto the chassis, or afterward? I cannot figure out how to mount the splash pans, and clearly should have taken better notes and more pictures when I disassembled the car. It certainly would be nice if someone could tell me the procedure for lowering the body. Splash pans first or not? How do you mount the splash pans? Rodger Hartley told me to put webbing under them where they meet the frame, but I can't figure out how to do that. Pictures would be greatly appreciated, of course. Thank you kindly.

-
1919 Touring, I would grab those top saddles from Minibago, despite the fact that they're overseas, because they are very rare. I doubt that you will find them anywhere stateside, although they were still standard equipment when your car was made. Top saddles for later models are even more rare because after the Brothers' deaths, and probably due to reduced profits during the recession of 1921, the bankers who took over the company decided to make them optional equipment and very few buyers ordered them.
-
Found 4 tires needed, 33 X 4 and one tube
22touring replied to Mark Gregush's topic in Dodge & Dodge Brothers
nearchoclatetown wrote: "You need more then an innertube." A new inner tube will be just fine, Doug, because the tire is only flat on the bottom! -
The Northeast starter-generator was quite dependable and a quality unit (exception; some of its pot metal parts, but they don't normally cause a problem). It was expensive to manufacture (DB switched to 2 units to save money) and could deliver a large, continuous current output. When a DB car was scrapped, the wrecking yard always removed its starter-generator and sold it, typically to farmers who would mount it on their tractors, driven by the PTO or belt drum, as an arc welder capable of 100-amp continuous operation.
-
I would venture to say that the rims should be cadmium-plated or the like, and the lugs were, I believe, black phosphate treated (i.e., first wire wheel or blast them clean, and then soak them for a long time in phosphoric acid, leaving the black coating on the lug). Let's see if any of the other Brothers on the forum disagree with me, though.
-
"Postal Blue", like the color of the spokes on my '22 touring car. Postal Blue is a pretty stock color that most paint stores can mix for you. IMHO Sherwin-Williams sells the best quality oil-based paint for brush-on use. The other alternative would be to paint the wheel with automotive urethane. The entire wheel, including the hub and felloe, was painted this color. The different shade of blue that I painted my hubs and felloes is not correct and represents an over-restoration, if you care about that kind of thing.

-
1923 Dodge Screenside tailight
22touring replied to jan arnett (2)'s topic in Dodge & Dodge Brothers
In 1924, when California started requiring a rear brake light, I am told that the original owner of my '22 touring car took it to the dealer to have a brake light installed and wound up with the following lights. Not sure if they're official DB issue or not; they may well be aftermarket.


