


26-25Buick
-
Posts
134 -
Joined
-
Last visited
Content Type
Forums
Gallery
Events
Everything posted by 26-25Buick
-

Is recoring the radiator the only answer?
26-25Buick replied to 26-25Buick's topic in Buick - Pre War
Ben, it's a camera from a US firm called FLIR designed to take IR images. We actually use it at work for finding hot spots in insulation or fugitive emissions from valve stems but this seemed like a lot more fun thing to do with it. From memory this camera was about US$750 -
Is recoring the radiator the only answer?
26-25Buick replied to 26-25Buick's topic in Buick - Pre War
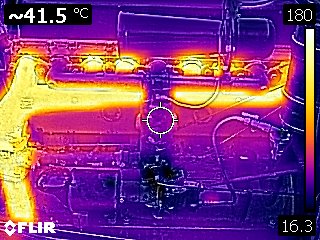
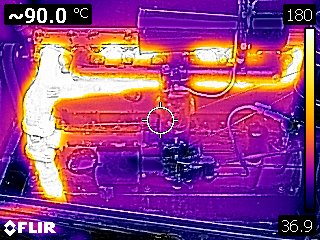
An update on what we ended up doing. With a little bit of compressed air we finally managed to narrow the location of the two leaks down to two hexes. One in the middle of the radiator and one on the left hand side. Both were about 1/3rd of way down the radiator and towards the back of the core. After trying for a while to solder up the individual tubes I couldn't get them clean enough to be able to get the solder to stick so ended up going the easy fix and filled each of the leaking hexes with solder. I haven't filled them right to the top but just enough to cover the leaking tube. A lick of paint and unless you know to look it's quite hard to tell that they are anything but a normal hex. An hour run today and not a drip of water so I've got my fingers crossed that the problem is fixed. So once again thanks everyone for all your help so this Harrison radiator can live on. Now for the fun bit. An infrared image of the radiator after running for an hour around the suburbs. It would appear from the image that perhaps the radiator is not yet 100% clean but it's not too bad and 75 Deg C seems reasonable. Some other photos of the '26. Sorry temperatures are in Celsius. Photo 1: Prior to starting. Photo 2-4 after 1 hour running. I found the vacuum tank particularly interesting as there has been some discussion over the years about the effect of heat on the tank but ours does not seem to be running much warmer than the firewall behind it. I'm guessing that the fuel level is about 1/2 way up the tank as the bottom is cooler


-
I did the same conversion as well not only so I could use a more available points set but also because the pot metal had expanded and was bound up so the adv/retard no longer worked. The gear however was the same so I didn't have to do the change that you are talking about. The only thing I did change was the plate for the adv/retard with its clamp so it would marry up with the arm off the steering column gear on the 26.
-
Hi Mike You probably noted the concern I raised yesterday in regards to moving the accelerator (gas pedal) to the right in that there is very little room between the brake pedal and the door card. These photos pretty much confirm it, certainly in our car, there is no way to get it across in to that bit of real estate and still be able to move your foot safely from the accelerator to the brake. The other issue is getting to the other side of the steering column with the accelerator linkage in the engine bay without fouling on the steering as its directly in line with accelerator's shaft and around the brake pedal and the starter arm which both press down in to this space. If there is an answer out there I don't think it will be easy as I expect all pedals will need to move not just the accelerator. For those that haven't seen a right hand drive 1926 Buick pedal box this what it looks like In the engine bay the rod from the pedal goes straight through the floorboards and connects to the shaft that takes the input to the other side of the car. As you can image this is one of the more congested parts of these right hand drive cars


-
Is recoring the radiator the only answer?
26-25Buick replied to 26-25Buick's topic in Buick - Pre War
Some great suggestions here guys. I had no experience with the "radiator repair in a can" materials so really didn't know what to expect but it sounds like there has been some good experiences but the takeaway is there is some risk involved that it may well plug the tubes again especially if some of them have only have limited flow. Ours is definately not a show car in that it has developed a "patina" from its last restoration 40 years ago. I should of put in the first post, reliability is the key for us as we prefer to take it on the road rather than parking it on the grass. One of the radiator shops did suggest the face plate approach on a modern radiator at 50% the cost of a new hex but given I've tried to keep the car as close to original as I can I couldn't convince myself this was what I wanted to do. Perhaps an oversight but it would appear that the car has not had anti-freeze in it for a long time probably because we never get freezing temperatures here in Melbourne. The downside is it doesn't get the corrosion inhibitor benefits in the anti-freeze either but the head and block appear to be in good condition when I took the head off last year. On the plus side I don't have to deal with a problem of having had the glycol been left too long in the car and breaking down in to its acidic forms. Dave_B, I'll ask because I'm sure everyone wants to know and wants to learn from your experience. Whose hex core did you have a problem with and any thoughts why it caused so much grief? So before I go rushing out to buy a new core I do have a few things I can try as nothing ventured nothing gained as the radiator is not reliable at the moment. P.S. Dave_B - I'll PM you and get the details of the radiator you have and how much it is to send it over. -
Welcome generator14. It does take some getting use to having the accelerator in the middle but on the bright side I find it easier to heel and toe the downshift than the modern layout. Many trucks also had this configuration so they weren't really setting a new direction. But back to your question if you look at the firewall all Holden did to get the pedal to the right hand side was mount a shaft that went across the back of the motor and attached to the original pivot point for the LHD. I would need to have a look at mine and see if there is enough clearance around the brake pedal but perhaps it can be moved over by making up a new lever with a bend in it. I suspect once it is moved over it may be too close to the door card especially if your door cards still have the original pockets.
-
The car has been running warm/hot this summer. Suspecting that the radiator was to blame as the outer edges never heated to the same extent as the centre I followed the advise on this forum and timed how long the radiator took to drain. At 25-30 seconds I think it was a safe bet to be the cause so I went ahead and followed the next recommendation which was take it out of the car and flush it through with CLR. It worked a treat and it now empties in under 10 secs so the diagnosis appears to have been correct. However now that I appear to have re-established flow to more of the tubes the radiator is now weeping in spots where I suspect were previously plugged with rust and scale. I can't see holes just damp spots and stains on the core. The question is, is there an easy way to determine exactly where the leaks are and to fix them? Or am I just as well to cut my losses and get a new core fitted, which by the way is a costly option as I've been quoted $4000 for a rebuild with a new honeycomb core. If at all possible I'd like to save my old core not only because of the cost, but the new cores are a bigger hex (hole) than my original. Any ideas?
-
I agree with Larry. I guess it depends what you're using to compare them with, the headlights are not spectacular but they are functional. I've found the resistance coil (overload protection/cutout) in the '26 light switch doesn't chatter with the headlights (with the standard incandescent globes) in either position dim or bright and I can attest to my cutout is working as it had occassion to at one point due to a short in the wiring. Having a dimmer switch mounted at the end of the steering column where it's subject to road grime especially without the splash guards fitted probably wasnt the finest bit of Buick engineering and any resistance here will not only dim the light output but it also increases the current draw increasing the current/temperature at the cutout. Yet another suggestion for a fix, hide a fuse box up behind the switch or put a in-line fuse in after the switch so you can't draw too much current.
-
sEEKING advice on obtaining Radiator for 1926 Buick Master
26-25Buick replied to a topic in Buick - Buy/Sell
I'm also searching for a new radiator but instead for my 1926 Buick Standard. I've found 3 places that make versions of the honeycomb radiator, one in Australia, one in New Zealand and one in the US. Unfortunately none of them had the same honeycomb size, all of them were bigger. For me the end price was all about the same regardless of where I got it from and all options required my old tanks to be fitted to the new core. -
Yes mine moves a little in and out, even after being rebuilt. Rightly or wrongly I've installed it in the car with a little pressure on the shaft to keep the shaft in the rear bush in the back plate
-
Demountable "Split Rims" for 1926 Buick Standard.
26-25Buick replied to AzBob's topic in Buick - Pre War
Hi Bob, Depends how far out of round and what sort of condition they are in, but I've had a couple of our original rims re-rolled for our 26 and they came out very well. I don't know who in the US can do it but I'm sure someone on this forum will know. -
Welcome Brian. Nice looking set of wheels
-
Thanks Roger. I'll PM you
-
I've often wondered about these higher boiling point coolants and thought are they friend or foe. Obviously they make it possible to run your car in higher ambient temperatures which is a good thing, but by doing this by their very design they could mask an issue with the cooling system as they don't boil like water. Now because they allow a higher engine temperature you would expect this also leads to greater thermal expansion of the internals of the engine which because it is now hotter than the original design could ultimately result in higher wear on moving parts and more issues with sealing surfaces as the tolerances are now less, plus any movement as a result of expansion is going to be greater. It would have me running for the textbooks but I think it's around a 0.003" more expansion at 300F to 160F. One thing you can be sure of at some point the higher temperature will reduce the viscosity of the engine oil reducing lubrication and pressure and depending on the temperature reached the additives in the oil and the oil itself will breakdown quicker. Friend or foe I guess depends what you are trying to achieve
-
Leif, I think you're right they look like they are the style 4 ones you have illustrated. Also thanks for the prompt to update my profile I've been meaning to do it for some time now. I'm in Australia.
-
For want of a better term I've called them lug bolts but whatever the correct term is, has anyone found a source for the bolt that holds the rim to the felloe for a 1926 Std 6? Whether they're common across models I don't know but I have one that has been severely abused at some stage in its life and I'd like to replace it. The shafts on the ones I have are 3" long (under the head to end of the thread) X 7/16. There is an ovality just under the head and about 1/2 way along to lock it it to felloe. The head is D shaped so it catches both the rim and the felloe. Any ideas as I don't have the gear to make my own.
-
Hi Geoff I suspect it'll be the same as our 26. The owners manual says firm and the back off1-2 segments of the nut until the split pin fits
-
New member with a 1928 Buick 28-20 two door sedan
26-25Buick replied to tdpole1's topic in Buick - Pre War
Welcome Tad, Of course in comparison to a modern car the action of the clutch is a lot higher but before you go pulling the clutch it might be worth checking that the clutch pedal is properly adjusted. The pedal should travel 1 to 1 1/2" before you feel the pressure of the clutch spring. The adjustment is down next to bellhousing. The other issue you can get is the plates get contaminated with oil from a leaky engine rear seal. The owners manual says you can clean it by blocking the drain at the bottom and add a pint of petrol and turn it over by hand to wash the oil off. Never tried it myself but I've heard it works but seems a little risky. -
Welcome Jerry I got my Marvel T3 rebuild kit for my 26 Std 6 from The Carburetor Shop in Missouri. I'm very happy with what was supplied although note you will only get a new float needle and seat and not any of the other seats in the kit but it seems to have done the trick with ours. Good luck Cheers Neil 26X-25 Std 6 Tourer
-
Hi Steve, We swapped over to the Penrite Shelsley Heavy last year in our '26 and it quieten down the valve train considerably so it obviously made a difference for us but our head hasn't been rebuilt since 1969 so it may not be a fair comparison to your newly rebuilt head. We chose the Heavy because our owners manual for the std 6 says use 50 sae.
-
I would support anything that will see the older cars being brought out for all to see. If the owners of these cars think that a century award will make a difference then it does seem like something we should be looking at. For me when it comes to Club events something I think organisers might forget is the older Buicks often get left in the shed because the distance is too far for the vehicles that can't keep up with modern traffic which means we tend to see them in static displays rather road trips. Just a few thoughts
-
1926 Buick Standard Six connecting rod bearing cap babbit?
26-25Buick replied to AzBob's topic in Buick - Pre War
I agree with Don, this looks like it's a casting flaw. Just be sure there is no other defects associated with the flaws like cracks -
1926 Buick fuel/air ratio issue with modern 87 octane gas.
26-25Buick replied to AzBob's topic in Buick - Pre War
The more posts I read on tuning Marvel carbs it seems that every one of the Marvels seems to have its own sweat spot and this spot may change. For example I've just put a new kit in to our carb (many thanks to the Carburetor Shop in MS) and the 26-25 now has a completely different set up to where it use to be. Admittedly the new air spring in the kit looked nothing like the"original" one as the new one was shorter and stiffer than the old one. Also as recommended in other posts the flap controlled by the air spring has now been adjusted to sit against the throat of the carb rather than sitting 2mm proud. But with that said it's now running happily at 1 turn on the low speed needle and the air screw is screwed in to the bottom of the ratchet. Whereas before the kit it was running half a turn on the low speed needle and half way out on the air screw. I'm not sure what this all means and whether there is a rhyme or reason for any of it but I'm sure someone out there will know. Cheers Neil -
Phil if you get a chance a photo would help but in our 26-25 Std there is no hole at the driven end. It's gear driven straight off the front of the engine. Three bolts go through the engine housing and in to the generator body and there is a paper gasket between the two. This gasket was the source of a leak on our car. By the way there is also an oiling hole at the undriven end for the back bearing in the generator but that is towards the top of the housing. Neil 1926 Std 6 Tourer
-
Looks amazing Bob


