


Ian_Greenlaw
-
Posts
1,685 -
Joined
-
Last visited
-
Days Won
1
Content Type
Forums
Gallery
Events
Everything posted by Ian_Greenlaw
-

1934 Dodge Full Body Off Restoration
Ian_Greenlaw replied to Ian_Greenlaw's topic in Dodge & Dodge Brothers
Thanks Scott, Is it only the two anchor points for the exhaust ? Is their nothing between the fuel tank ( rear of it ) and the rear of the car ? -
1934 Dodge Full Body Off Restoration
Ian_Greenlaw replied to Ian_Greenlaw's topic in Dodge & Dodge Brothers
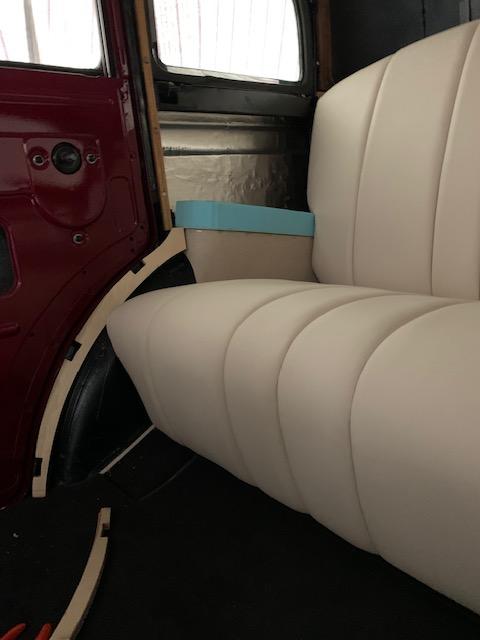
Dropped over to the Upholsterer prior to sending to the exhaust maker. Gave my upholsterer a hand fitting the front seat. In a previous post ( a number of years ago ) I cleaned up and got working properly the front seat runners. Mounted these in the floor where he cut a slot for them in the carpet. Mounted these and then put the base of the front seat in. Four bolts to hold it and then did a temp fitting of the lower cushion. Got to sit in the car for the first time in 20 years....actually got a bit emotional !.....anyhow all the rear lining boards etc should align once the garnish molds go in and a screwed into place. Still have a lot of adjusting to do but we'll get that sorted as we go along. The truck came and we loaded her up to go to the exhaust maker. Took my brother with me and we followed it along the road. As the truck driver turned the corned there was a rush of petrol spewed out from the left side of the fuel tank. Now this hasn't spilt a drop in ten years so either the filler neck has a problem or the tank has a split in it. Once the exhaust guy has drained the tank and he's finished his work, I have to drop the tank and check it out.......at least it present a problem now and not on the road......that would have been a disaster. Just goes to shows you're sure everything is ok and then something crops up ! There's never any problems.....only answers ! Cheers Ian


-
Proper bulbs for TYPE B tail light
Ian_Greenlaw replied to stakeside's topic in Dodge & Dodge Brothers
Not 100% sure but is this what your looking for ? It's 2" long nd 1 1/4" at the widest part. This is an original 6v 1934 globe
-
1934 Dodge Full Body Off Restoration
Ian_Greenlaw replied to Ian_Greenlaw's topic in Dodge & Dodge Brothers
Hi Scott, Thanks mate, she's getting there. Could you do me a favour. Could you crawl under you car and take a few shots of where your exhaust system is mounted. I know one spot but just not sure how many anchor points there are. Cheers Ian -
1934 Dodge Full Body Off Restoration
Ian_Greenlaw replied to Ian_Greenlaw's topic in Dodge & Dodge Brothers
Good for a briefcase !!!! -
1934 Dodge Full Body Off Restoration
Ian_Greenlaw replied to Ian_Greenlaw's topic in Dodge & Dodge Brothers
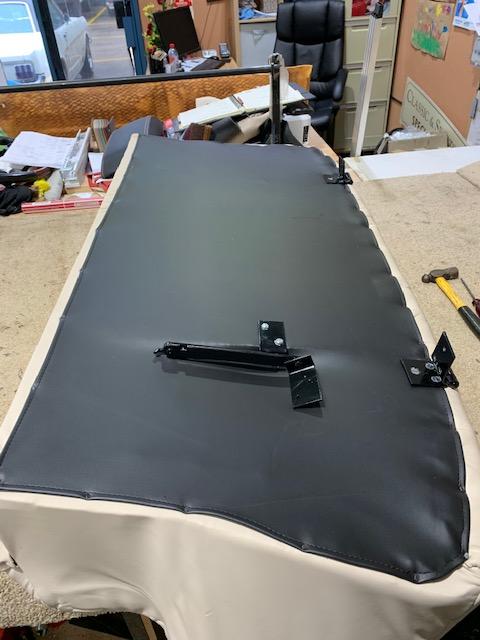
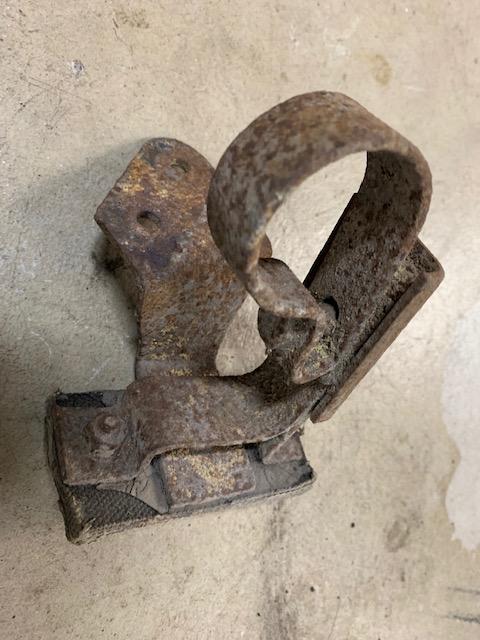
Anywho, took myself off to the Upholsterer and the first part was to reinstall the rear seat on the hinges and install the "stay". We had to unpick some of the rear lining material and find exactly where the holes were. Also we finally worked out which way around the stay went and installed that. We decided not to cut the lining material rather then leave it so the stay bracket when screwed in place actually stretched the lining material. Finally got the hinges and stay done and installed back in the car. Not a very big area for luggage I must say ! The upholsterer also lined the rear of the luggage area and made up a little mat for the floor. Cheers Ian


-
1934 Dodge Full Body Off Restoration
Ian_Greenlaw replied to Ian_Greenlaw's topic in Dodge & Dodge Brothers
Nah, all good. Imperial is the term we use for the Pre metric system of measuring. So basically its either Metric or Imperial. Imperial covers everything that isn't Metric. -
1934 Dodge Full Body Off Restoration
Ian_Greenlaw replied to Ian_Greenlaw's topic in Dodge & Dodge Brothers
Ron, your a shocker. No, they are Imperial but I used stainless steel so they wont rust. I've booked the car to be picked up from the upholsterer next Thursday and taken to the Exhaust Guy. Then the following Thursday picked up and brought back home.......then the fun begins !! -
1934 Dodge Full Body Off Restoration
Ian_Greenlaw replied to Ian_Greenlaw's topic in Dodge & Dodge Brothers
Hi all, Finally got time to sit down and post where things are up to. The upholsterer is moving along. I've attached a photo of the side that has been fitted as a trial. A lot of adjusting to do as well. Funny thing is when I got home I noticed the header panel was done and I didn't even notice it in the car. I also noticed that on the pillar near the front window has also been done but this should be covered with the garnish molds. A lot of the upholstery will be held back when the garnish molds go in. I'm going over later in the week and hopefully help to fit the front seat in place. Also started to think about the exhaust system. I went and saw a guy not too far from me and he's happy to do my system. He asked if I had the original hangers for the exhaust pipe and I said I actually got nothing when I bought the car as it must have been too far gone. Then I thought of a friend of mine who is modifying a 34 and contacted him. Low and behold....he had them hanging up in the shed. Sent them to me and I got about stripping them down as the exhaust maker has a small blast cabinet so he'll blast the and reassemble when he does my system. I was amazed and the amount of parts just to have the two exhaust hangers. I'll drop these off tomorrow. Cheers Ian


-
Hi all, Would someone out there with a 34 mind crawling under it and taking a few shots of the mounts / mounting positions of the exhaust system. When I bought my car I was given nothing to do with the exhaust system. I think there was nothing left and I assume he threw away the mounting brackets. One of the guys is modifying a 34 so he had the original exhaust mounts, so I have these but just want to check where they are mounted. I know there are holes in the crossmember at the rear of the chassis ( just forward of the diff ) for one of them but just want to check. Cheers Ian
-
How cool is that and the drawing is the icing on the cake. What a great result. Hopefully the guy who sold me my car is still kicking as I'd love to drive up and surprise him !
-
The Ressurection of Daphne - a 1932 DL
Ian_Greenlaw replied to Taylormade's topic in Dodge & Dodge Brothers
It’s a great forum isn’t it. I have had so much help from people......even just a photo sent to me has helped more than some people could ever imagine. Doesn’t sound much, but when your not sure, these things can make all the difference. Keep up the great work. Ian -
F/S 33-34 Factory Dodge/Plymouth luggage rack Lowered Price
Ian_Greenlaw replied to KLF's topic in Dodge & Dodge Brothers
These were not bought, they were made. I got the exact same size rounded brass and had them cut to the correct length. Then had the ends finished off to match the originals. Brazed threads attached to the rounded brass in the right locations and then chrome plate. The result you see is in the photo. Hope this helps Cheers Ian -
The Ressurection of Daphne - a 1932 DL
Ian_Greenlaw replied to Taylormade's topic in Dodge & Dodge Brothers
Interesting fix to a problem that haunts a lot of us. Well done !!! -
Pete........not a chance.....i'd never see em again !
-
Do you think I need to scruff ( very gently ) the lower sections first to give the paint something to grip ?
-
1934 Dodge Full Body Off Restoration
Ian_Greenlaw replied to Ian_Greenlaw's topic in Dodge & Dodge Brothers
Not sure yet. I think he said he'll glue in some velcro and then attach the other side to the back so they be removed if necessary. I'll keep you posted. -
1934 Dodge Full Body Off Restoration
Ian_Greenlaw replied to Ian_Greenlaw's topic in Dodge & Dodge Brothers
Okay, so a bit more of an update now I have my computer glitches sorted out ( which took a few weeks ). The upholsterer has almost finished the front and rear seats. The buttons went in and then it was heated with a heat gun to shrink the leather and remove the creases where the buttons are. The rear panels aboce the seats have been formed and are just sitting in place. These will be straightened and adhered. Once the garnish molds go in place that should pull everything into alignment. The holes above the rear quarter vent window are for the window winder and the passenger assist strap. Rear arm rests not quite finished yet along with the panel above it. More adjusting and adhering. Also got my hubcap skins back the other week and ready to have the black lettering and ring done. I'll tackle that when I get a bit of time. Still working on a lot of small things at home for when she gets back. Cheers Ian


-
Finally sorted a few computer issues. Here's a pic of the hubcap skins

-
1934 Dodge Full Body Off Restoration
Ian_Greenlaw replied to Ian_Greenlaw's topic in Dodge & Dodge Brothers
Its taking a bit longer than anticipated. With this virus thing and lockdown its hard to get out to look at the car. I still have to go as the upholsterer has questions he needs an answer to and show me any issues he's having. Yesterday the police pulled a South Australian guy up in country Victoria for driving eratically. His Blood Alcohol reading was .313 which is 6 times over the legal limit. There were four or five people in the car so the cops fined each of them $1650 for breaking the Social Distancing rule....hahahaha Also a mother and her daughter were also pulled up as the daughter had her "L" plates on but not a valid reason to be out. They were also fined.....but I believe the fine was revoked after public outrage. Interesting times I must say !!! Cheers Ian -
I've asked this question on an Australian Forum but also value the opinions given on this forum. I have my hubcap skins back from the Chrome Plater and I need to paint the indented word Dodge, the arrows on each side of Dodge and the indented ring that runs around the circumference of the skin. Any suggestions / experience to a methodology to do this and what type of paint would you use. Opinions greatly appreciated. Cheers Ian ( whatever happens, I'll post photos along the way )
-
The Ressurection of Daphne - a 1932 DL
Ian_Greenlaw replied to Taylormade's topic in Dodge & Dodge Brothers
Does a great job on the gaskets !! -
1934 Dodge Full Body Off Restoration
Ian_Greenlaw replied to Ian_Greenlaw's topic in Dodge & Dodge Brothers
Hi All, Went and checked on the ole girl today ( dodgng the virus on the way ! ) and a bit more progress. He formed up the rear seat arm rests, made a temproary support to get the size, the completed it with a more solid construction. He's also made some templates for the trim pieces that go above the doors and the pillars on the sides of the doors. Next he said I'll see a big improvement as he's going to fill in the rear luggage section and start to finish off the pieces that go from the headlining to the base of the windows. Also took my hubcap skins to a guy not far from me who after an hour took all the dints out of one of the skins. Next is coppering and then some adjusting and finally plating. Cheers Ian


-
1933 Dodge BARN FIND - HARLEAN'S COMEBACK
Ian_Greenlaw replied to Sactownog's topic in Dodge & Dodge Brothers
Now that engine looks good !!!! Great work -
Always read any comments from him with interest....always constructive. A valuable contributer that will certainly be missed. RIP


