


Ian_Greenlaw
-
Posts
1,685 -
Joined
-
Last visited
-
Days Won
1
Content Type
Forums
Gallery
Events
Everything posted by Ian_Greenlaw
-

1934 Dodge Full Body Off Restoration
Ian_Greenlaw replied to Ian_Greenlaw's topic in Dodge & Dodge Brothers
Thanks guys, great suggestions. I'll see which one I can get first. Have to work around the lockdown !!! Picked up the brake backing plates from the blaster and dropped them off to the painter.....some days I don't know which way I'm facing with all the things happening at one time. -
1934 Dodge Full Body Off Restoration
Ian_Greenlaw replied to Ian_Greenlaw's topic in Dodge & Dodge Brothers
Always problems, isn't there ! Thought I'd better strip the brake cylinders down just to check on them. Looks like I better do all 4. Lucky I had them sleaved in stainless steel. Once I got the pistons out it literally wiped clean internally. Now the question I have is there any way to clean up the pistons. There not damaged just a little crusty....only word I could use to describe them.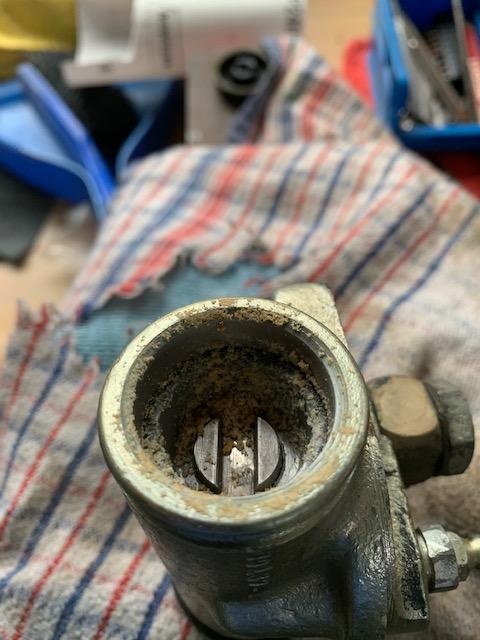

-
1934 Dodge Full Body Off Restoration
Ian_Greenlaw replied to Ian_Greenlaw's topic in Dodge & Dodge Brothers
I used a tine bit of dishwashing liquid on my luggage rack grommets only because I couldn't find a mug that would fit them in. So far so good, no discolouration. I pulled out the gear shift grommet and part of it has gone brown. I'll post a pic later to see if anyone has a cure ! -
1934 Dodge Full Body Off Restoration
Ian_Greenlaw replied to Ian_Greenlaw's topic in Dodge & Dodge Brothers
I've heated them up before but I thought I'd give the dishwashing liquid a go this time. Trouble I had was while I was fitting them I forgot I'd removed the brakes and backing plates so I must have pressed the brake pedal a bit and I had a puddle of brake fluid at the back of the car. Rookie mistake !!!!! I had to laugh though....I thought....you idiot ! -
1934 Dodge Full Body Off Restoration
Ian_Greenlaw replied to Ian_Greenlaw's topic in Dodge & Dodge Brothers
A grove around the entire back of the pad thats folded over. I had to smear a little dishwashing liquid so I could get them around the pedals -
1933 Dodge BARN FIND - HARLEAN'S COMEBACK
Ian_Greenlaw replied to Sactownog's topic in Dodge & Dodge Brothers
Sounds like youve got it sorted and drives well.....well done -
1934 Dodge Full Body Off Restoration
Ian_Greenlaw replied to Ian_Greenlaw's topic in Dodge & Dodge Brothers
They were a stock item for him but now he's disappeared so to has his products. I'll keep looking for him for you. -
1934 Dodge Full Body Off Restoration
Ian_Greenlaw replied to Ian_Greenlaw's topic in Dodge & Dodge Brothers
Not sure Les but I've never seen them again. Its funny how some of these guys just disappear....He had a good range of products and I bought quite a few from him. -
1934 Dodge Full Body Off Restoration
Ian_Greenlaw replied to Ian_Greenlaw's topic in Dodge & Dodge Brothers
It is what it is I'm afraid. I've already taken the backing plates to the blaster ( in the next street where I work ) and I've teed up the painter ( in the same street as I work ). I've cleaned up two newer banjo fittings and I'm waiting on the Stat-o-seal washers from the States to replace the copper washers. A couple of new gaskets and it will be reassembly time. Les - I bought the Dodge pedal rubbers from a guy ( Glenn Seymour ) who use to make them but he's fallen off the grid. Last thing I heard he was living on French Island in Westernport Bay. -
1934 Dodge Full Body Off Restoration
Ian_Greenlaw replied to Ian_Greenlaw's topic in Dodge & Dodge Brothers
Bit the bullet and though I'd better pull the rear drum and brakes off to replace the cracked banjo fitting. Chocked the rear of the car, got the tyres off and removed everything. You can see the damage the brake fluid has done over time. Glad I found it now rather then when the car is finished. Taken the backing plate to a blaster and then I'll get them repainted. I'm glad I bought a drum puller !....boy they let go with a bang but didn't have too much trouble. Took more time to get the brake springs off.


-
The Ressurection of Daphne - a 1932 DL
Ian_Greenlaw replied to Taylormade's topic in Dodge & Dodge Brothers
At least its getting there. I've just pulled the rear brake backing plates off the car due to a split bango fitting. Oh well....keep on going....you'll get there in the end. -
1934 Dodge Full Body Off Restoration
Ian_Greenlaw replied to Ian_Greenlaw's topic in Dodge & Dodge Brothers
Finally go to talk to the Upholsterer yesterday and pointed out alignment issues with the Garnish Molds and lining boards so we'll make up templates and have some of them remade. I'm not talking about being out a huge amount, only 1/4" but its enough to see a gap when everything is fitted and I really don't want to see that. Finished off fitting some screws under the dash and while I was fossicking around in my bits and pieces I found the brake and clutch pedal rubbers I've had sitting there for around 15 years. Cleaned them up and fitted them to the pedals.

-
Restoration of Victory Six sports roadster.
Ian_Greenlaw replied to Mattml430's topic in Dodge & Dodge Brothers
Please take shots of each process, I'm really interested to see how these turn out. -
Restoration of Victory Six sports roadster.
Ian_Greenlaw replied to Mattml430's topic in Dodge & Dodge Brothers
And here I was struggling to get a few screws in the dash. Who are you people ???....I've never seen a set up like that.....I'm more impressed than anything......hope they come out looking mint ! -
1934 Dodge Full Body Off Restoration
Ian_Greenlaw replied to Ian_Greenlaw's topic in Dodge & Dodge Brothers
Thanks Ron, I don't think I could do the trade work on the car like your doing...that takes a certain amount of skill which I don't have. Hey Matt, I'm in Lower Plenty ( near Eltham ) about 50km from you. Yep, we'll catch up one day -
1934 Dodge Full Body Off Restoration
Ian_Greenlaw replied to Ian_Greenlaw's topic in Dodge & Dodge Brothers
Thanks mate, Wish I could move a bit faster and finish it. Hopefully lockdown will be further eased and I can power ahead. Cheers Ian -
1934 Dodge Full Body Off Restoration
Ian_Greenlaw replied to Ian_Greenlaw's topic in Dodge & Dodge Brothers
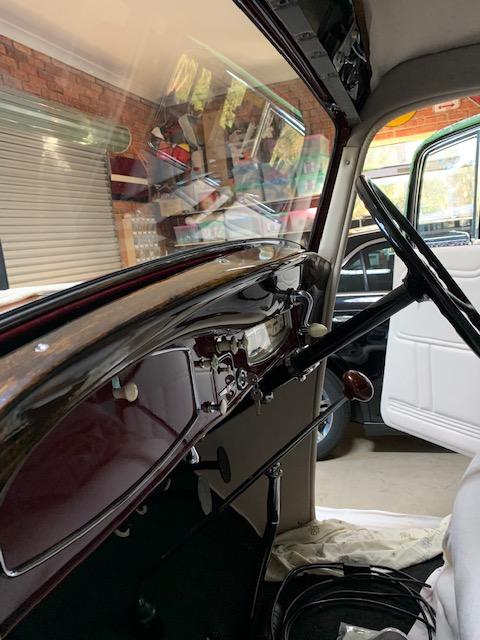
Hey all, Decided to install the first garnish mold which is the one that covers the tor part of the dash. I thought to my self what could be easier ? Grab the mold, sit it in place, do up the screws.....easy as !!! Nope.....wrong. Started off by having to find the window winder retaining bracket which I hadn't seen for 15 years. Sitting in my box of bits, there she was....finally something that was found easily. Wound the window winder out a bit, put the screws in and worked as it should. Next step the mold. Checked it over and found one of the spacers was missing. I ground down and counter sunk the hole in one I had and using blutac to hold it in place. I also noticed a notched end in each towards the end of each side of the mold and a corresponding hole in the dash. Again using blutac, I was able to hold two bolts in place. This where the fun started. I got the mold to sit in place but the bolts didn't aligh up which pushed against the blutac and pushed the bolts away from the inside of the mold. After three hours of adjusting and moving small amounts at a time I was able to position the garnish mold in its place. The top screws were put in their place using countersunk compatable washers. Underneath the dash I could see the bolt so I was able to put the washer, spring washer and not on but when I went to tighten them up, of course the bolt turned around. So lying with my back on the carpet and my feetup in the air I could just hold the front of the bolt with a pair of plyers and tighten the nut with a ring spanner on small turn at a time, and then reposition the plyers for the next shot. Finally got it to a point where it was tight (1 1/2 hours later ) so decided to crack on and get the other side done. Did that tighten up without a fight ? Nope....just like the previous one . Got them both tightened up and the window winder handle in place. After 5 hours of mucking around I think it was a good result. Cheers Ian


-
The Ressurection of Daphne - a 1932 DL
Ian_Greenlaw replied to Taylormade's topic in Dodge & Dodge Brothers
Thanks for that....found it. Now all I need is an Australian version I can get here. Ian -
The Ressurection of Daphne - a 1932 DL
Ian_Greenlaw replied to Taylormade's topic in Dodge & Dodge Brothers
Sorry, the link doesn't work : Is this what they are : DORMAN 097-021CD Engine Oil Drain Plug Gasket fits Various Applications Aussie equivalent ??? -
1934 Dodge Full Body Off Restoration
Ian_Greenlaw replied to Ian_Greenlaw's topic in Dodge & Dodge Brothers
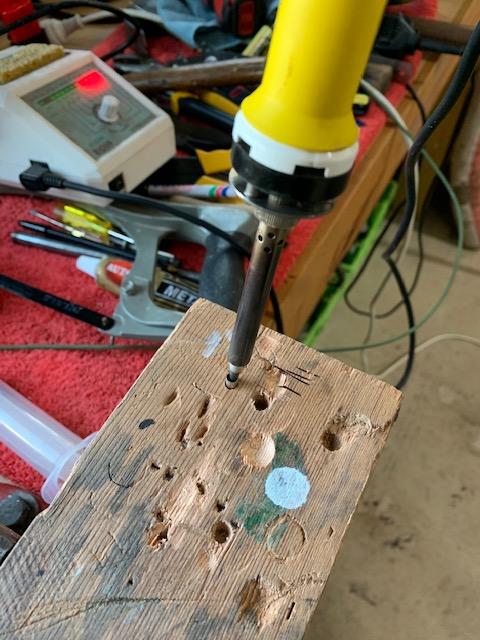
Sorry all, been busy working my around the lockdown we have here. For those of you that don't know we ( being Victoria ) had a spike in Corona Cases and metro Melbourne was put on Stage 4 Lockdown . This meant you needed a permit to go to work ( over 5 kms ) you couldn't go out after 8pm to 5am ( unless you have permit ), masks work everytime you go out, only one person allowed to go shopping........................you get the idea. The number of cases have now dropped and they have started to ease restrictions. The sad part about this is both my wife and I have mothers in Aged Care Facilities ( in their 90's ) and because the aged care places got hit the hardest ( one place half the residents died ) we are not allowed to go visit, which means we may never see our mothers again. Something we've come to terms with but a little hard on the family. I have been working on the car but due to the lock down some thing cannot be done...i.e the leaking gas tank, the people that have this are in lockdown, the upholsterer is in lockdown and the guy doing the rope assist and travel rug cord is in lockdown so I have to do what I can with what I have at the moment. I decided to fit the horn wiring. I grabbed the wire and the end which I put on it in a previous post. I needed a insulating washer which I found and fitted this to the plastic grommet I had made by a friend on a 3D printer. The wire is then fed through the steering wheel down the streeing shaft and i pops out at the base of the steering box. Checked for length and removed to fit the end contact which I bought a while ago from the restoration supply company. To attach this I drilled small hole in a piece of wood and inserted this into it. I then stuck the soldering iron into the top which heated it up enough to allow me to melt solder into it. Then I could get the exposed wire and push it into the liquid solder. Once cooled I put some heat shrink on it, refed the wire and attached it to the wiring loom connector. Another small but fiddly job done. I'll post some more updates of what I've done as soon as I get time. Cheers Ian


-
The Ressurection of Daphne - a 1932 DL
Ian_Greenlaw replied to Taylormade's topic in Dodge & Dodge Brothers
I can't find the post where you discussed the washers. What date was this posted so I can have a good look at them. Cheers Ian -
Ron, this is going to be stunning. The amount of work you've done on this is amazing and puts me to shame.....I wish I had your talents Petrol tank in a cement mixer.............thought I've seen everything ! A friend of mine had to heat up his block so he shoved it in a pizza oven.....who would have thought ? Matt, thanks for helping Ron with the photos.....really puts what he's doing into perspective ! Cheers guys !
-
Hi Ron, yep, certainly interesting times. Lockdown in Stage 4 has been extended for another 2 weeks. I need a permit to get to and from work. Can’t go out after 8pm to 5am. Only one person can go to the shops. After all this you still get morons who protest about their rights.....not thinking that they could be taking basic rights away from people who contract the virus. Enough of my ranting. There are various stages of my car I can’t do anything about as people that are doing specialised work are closed due to lockdown so I just to do as much as I can with what I have. Definitely slow progress at this stage !
-
Just read this post....Happy Fathers Day guys.........
-
1934 Dodge Full Body Off Restoration
Ian_Greenlaw replied to Ian_Greenlaw's topic in Dodge & Dodge Brothers
hahaha


