Gary W
-
Posts
1,062 -
Joined
-
Last visited
-
Days Won
14
Content Type
Forums
Gallery
Events
Everything posted by Gary W
-
Hello Mike! I have a question regarding your "fix". I got my '37 with a brass plug installed (like yours) where the spring loaded bypass valve should be. There is no hole drilled through it. It's just a solid frost plug. BUT... The previous owner removed the thermostat completely. So the water circulation runs constantly through the radiator from start-up, the way it would circulate when the car is fully warmed up. I was thinking I would leave the brass frost plug intact, and simply drill a couple of smaller holes in the thermostat flange so the water could circulate through the block during warm-up, and flow through the radiator a bit restricted until the thermostat fully opened. Does my approach sound reasonable? With the frost plug installed in place of the spring loaded valve, and no thermostat, the water circulates constantly from the moment the engine is started. My thought was leave the frost plug intact and drill a few smaller holes in the thermostat flange. I think this would allow water to circulate slowly until the thermostat fully opened and the full flow passed though the radiator.

-
When I bought my first Model "T" ('14 Touring) It did the same thing. Pretty scary stuff. The front spring was flattened out so when you steered right, the pitman arm banged into the radius rod. So, the previous owner "fixed" it by simply bending the pitman arm so it would clear the radius rod. This "fix" effectively "shortens" the pitman arm, which allows the drag link to rotate too far and then come around up to the top where your steering is now reversed. When I restored the car, I first had the front spring re-arched to the proper height. Then I ordered a new pitman arm from Snyder's which was an exact duplicate of the original and now the problem is solved. ( I also changed the original 3:1 steering planetary gears to the newer 5:1 system and I feel like I have much better control of the steering now) Please fix it. It can be dangerous in the wrong situation. Good Luck! Gary Wheeler NJ The previous owner
-
Hi Guys! Thought you'd like to see a quick 30 second time lapse video of my, my son and a couple of young guys build my 1914 Model "T" chassis. We filmed for over 8 hours and the time lapse condensed it down. Kinda cool! Have a great day Gary
-

1937 Buick Model 48: RESTORATION HAS BEGUN! (Photo)
Gary W replied to Gary W's topic in Buick - Pre War
Hi Tom; I still restore my leaf springs the same way I was taught over 25 years ago: I disassemble every leaf and run a wire wheel over the entire surface of both sides. By doing this, it will highlight any "slag" that is pressed or rolled into the steel. Then, I take my time with a chisel and make sure all of this slag is removed, because I was told that when the spring flexes, the slag will certainly come loose and start to rust and squeak. Once that is all done, I wash everything down with acetone and begin the painting. For the Buick, I had the leaves blasted clean after the wire wheel treatment. This created a clean, but "roughened" surface for the POR-15 to "bite". I applied the POR-15 on both sides of the springs, followed by two coats of the Slip Paint. (SEE POST #143 on Page 6 for the process) I started using "Slip-Paint" a few years back on my Model "T", and I really like how it performs and I don't have grease and oil squeezing out from the leaves. (And the road dirt doesn't have anything to stick to so they stay nice and clean.) I actually DID entertain the idea of buying a set of those leaf spring liners for the Buick, as the idea seemed pretty good. But the ones I saw looked like the old "Hot Wheels" tracks I played with when I was a kid, and I didn't like the look of the lip showing in between each leaf. So I opted to stay to my tried and true methods.... I'm curious to find out how they work! It seems like a very good idea. Sorry for such a long-winded answer, but my leaf springs from Eaton DID NOT come with the leaf spring liners installed. But I like to use the Slip Paint regardless. Gary -
1937 Buick Model 48: RESTORATION HAS BEGUN! (Photo)
Gary W replied to Gary W's topic in Buick - Pre War
Tuesday August 8, 2017: Hubcaps Today's post is a quickie but I wanted to show you all how nice the hubcaps came out. In previous posts, I showed the caps as they arrived from the chrome shop and they did a great job. Next came the painting of the "BUICK" logo. First, I asked Bob if he had any small detail brushes, because I was going to simply paint it like I did the door handles..... He immediately came up with a better idea: A friend of his has a machine that actually photographs the "BUICK" (or whatever you're doing), and sends that information along to a laser cutter that cuts out the self-adhesive inserts that perfectly fit the recess. You can get the laser cuts in any color, I chose a semi-flat black. Here is the finished product. Being the computer cut the inserts, there is no areas where it is "short" or "overlapped" A perfect fit. Close-up detail. And now the wheels finally look finished! I'm just doing small stuff, getting things ready for the body shell to come out of paint. Once the body comes back from paint, It'll open up about a month of work. Just have to be patient...... Have a great day out there! Gary


-
Try Waldron's Exhaust. They did a very nice job for me and are pleasant to deal with.
-
My '37 goes "curve up" It's funny that you ask that. On January 11, the bumpers were the first thing I removed from the car. When I look back at my notes from that day, I jotted down the shape of the irons, that the holes have a flat bottom to be sure the bumper was installed correctly, even the curve of the rubber parts! ......... In the margin I actually made a notation to myself that they "curve up"!

-
You might want to try this paint made by SEM. It has a very nice semi-gloss look to it!

-
1937 Buick Model 48: RESTORATION HAS BEGUN! (Photo)
Gary W replied to Gary W's topic in Buick - Pre War
Wednesday August 2, 2017: Radio Days .....Benny Goodman never sounded so good! A while back, Neil Morse was discussing "Bill the Radio Guy". I looked him up, and decided to send my radio out to Washington to have it restored. It was a very good decision! Tonight I got the radio back together and gave it a test run. My car did not have a radio originally. I got the car with a "blanking plate" over the holes where the radio mounts. I did find a radio, but it was inoperable. Bill did the conversion, and now I simply "bluetooth" the unit to my iPhone playlist and bingo......Music! Really nice work and a super nice gentleman. Check it out: So here is the unit delivered. I sent it out like this so I could have the face re-chromed and I wanted to protect the glass so I kept it safe at home. I refer back to my notes. I wrote these on February 15 when I dismantled the front to send the face plate out to be re-chromed. I called the thin spacers "vellum". I don't know the technical name. So I first laid everything out according to my diagram. Then, the glass had to be cleaned. So, being VERY careful, I gently cleaned off 80 years of fingerprints, grime and adhesive. I was so, so careful not to ruin the lettering. (There were a few little "chips" in the paint, but it's still presentable.) Again, following my notes, I placed the glass plate in the chrome face first. Next I dropped in those thin "vellum" pieces. They go in a certain way so the tabs on the next plate line up with grooves in the vellum. Next, I placed self-adhesive felt in the corners after trimming them a little so you can't see them when installed. These apparently stop the glass from vibrating. I used 3/8" Self-Adhesive Medium Duty Felt pads from Home Depot. Install the back plate, and insert the two chrome face mounting screws to complete the installation. I slid the knobs on so I could test the functioning. Close-up shot of the finished radio face. As you can see, some of the lettering is a little beat up, but you really can't see it as good as the camera picks it up here. So....The big test! I hooked it up to a spare battery..... **** CLICK ON THE BLUE LINK TO SEE A SHORT 20 SEC. VIDEO CLIP -------------> IMG_2016.TRIM.MOV <------------------ **** Benny Goodman never sounded so good! Have a great night! Gary Thanks to "Bill the Radio Guy" 1.360.427.0513


-
I agree with Taylormade. I also had all kinds of rusted crud inside my block. Remove the plugs and power washed it from all angles and directions. You had to see the river of rust that flowed out from the block! This is what I found in the block! Completely crudded up! Power washed from top to bottom, then front to back, back to front...every angle I could. Look at that river of rust coming out! Here I went into the side drain hole to blow more crud from another direction. All clean. Here you can see through to the water outlet.


-
Correct. The Running boards ARE the antennas. There are insulating spacers, cross-over wires, static collectors that fit inside the front dust caps, condenser mounted on the generator and coil, and a distributor suppressor. This is from the 1937 Buick Centerline & Centerline Dual Radio Installation Instructions. (Models 980534 & 980535) Maybe some information will apply to the '39 as well.

.thumb.jpg.39e00992b7fb7f27e7f82feec78d3fef.jpg)
.thumb.jpg.022ba2b7cec69b4348e833ae3d278788.jpg)
-
1937 Buick Model 48: RESTORATION HAS BEGUN! (Photo)
Gary W replied to Gary W's topic in Buick - Pre War
July 28,2017: Attempt to cast window crank knob and escutcheon: I followed the same idea as above and attempted some larger parts. I tried to make the window riser knobs and the escutcheons: I need six knobs and eight escutcheons for the car. So, for these trials, I used an old acrylic that I don't need anymore. So the color is a little to the "brown" not the "ivory", but I did this just to see if I could make these parts. If I actually end up making new plastic parts for the car, I'll go slower and make sure I mold everything carefully and capture every detail. Escutcheons: Using one of those salad dressing clear plastic things as a form, I poured some impression material in the well. Then, using the syringe, I covered the smooth areas to be sure no air was trapped. Seating the escutcheon into the soft impression material. Here you can see the purple material that was injected over the smooth outside. Seat the escutcheon into the impression and allow 5 minutes to set. Remove the original escutcheon from the impression, leaving a cavity for the acrylic to be injected into. Window handle knobs: First, I applied a very thin coat of vaseline to the inside of the knob and the inside of the two blue square parts that will form the mold. Both mold halves now filled. A Dunkin' Donuts large straw fits the opening in the knob perfectly. I used it as a handle so I can inject the material into the grooves of the knob. Injecting the impression material into the grooves in the knob. Sink the knob into one half of the mold. Now inject the material into the opening. Start way down low and slowly fill your way up to eliminate air bubbles. Press the mold halves together until fully seated. Release both halves so you have a purple "cube" with the original inside. A horizontal cut with a scalpel will expose the top of the original part. I used a hemostat to wiggle it free from the mold. Fill the mold with acrylic, seat the two halves fully. After 5 minutes , the new parts can be popped out of the molds. I need to clean up the flash, but I'm feeling like I can do this. Have a great night! Gary


-
1940 BUICK SPECIAL NEW MEMBER HELP NEEDED
Gary W replied to buick special's topic in Buick - Pre War
I would change the oil, (really should drop the pan to be sure it isn't gunked up with a lot of sludge and check and clean the oil pump) Flush and fill the radiator. Check your transmission, differential and steering box for proper fluid level. You can pull the distributor and by using a screwdriver blade affixed into an electric drill, drive the oil pump counter clockwise to prime the oiling system. While the distributor is out, check your point gap and dress the contacts. I'm sure the gas is old and stale, so you can easily drain the tank and put a few fresh gallons in there. The carburetor may be gummed up from the old gas...... Pull the spark plugs and check the gap and clean the contacts Air up the tires. How's the battery? I know there's more to come! -
1937 Buick Model 48: RESTORATION HAS BEGUN! (Photo)
Gary W replied to Gary W's topic in Buick - Pre War
Thursday July 27, 2017: My First Attempt at making the small knobs in the car. I tried to make a couple small parts today. All my knobs, ashtray pulls, window crank knobs.. are discolored. I am looking into the SEM products to paint these parts an ivory color, but I figured let me give this a try first: The part I am attempting to make is the small ashtray door buttons for the back seat ashtrays. *** (I did not have my Nikon, so please forgive the photo quality. These are from my cell phone) *** Here's what I used: The stick from a wooden "Q-Tip" cut into smaller pieces to act as sprue / vent. Some pink wax to attach the sprue to the two raised "alignment bumps" under the ashtray pull knob. The purple material is a polyether hydrophillic medium-bodied impression material, set in a small plastic box to create the mold. So, the first step is to inject the impression material into the grooves and details of the part, then submerge it into the small plastic box filled with impression material. After 4 minutes the mold is set. I removed it from the plastic tray A sharp disposable scalpel makes the cut easily. Spread the mold along the scalpel line and the original part pops out nice and clean. (Sorry for the poor photo quality!) In this view you can actually see the screw threads hanging inside the mold. Here's another view of the inside of the mold when you stretch the mold open along the scalpel cut. Also note the raised "rib" details. Here you see me beginning to inject the acrylic. This is a methacrylate plastic that is injected through a mixing tip that mixes the base and catalyst. I injected it all around the screw threads while the mold is open. Finish filling the mold, being careful to get the acrylic into all the details. Squeeze the mold back together while the material is still pliable, being sure to line up your scalpel cut. Push it back into the plastic tray, until it's fully seated and the pressure from the four walls will drive out the excess acrylic through the sprue holes. Here you can see the detent I made in the original impression so I was sure it went back into the same spot. Top view pushing the mold back into the plastic box. This will ensure accuracy as the walls cannot distort and the scalpel cut will line up perfectly. Make sure you seat it fully to the bottom of the plastic box. (or whatever container you use) After 5 minutes, remove the purple impression from the tray, pull it apart along the scalpel line and pop out the newly-minted ash tray knob. In this view you can make out the threads that are now cast into the bottom of the new knob. Test fit the screw into the bottom. It didn't even need an adjustment, the screw fit right in. So here is the finished product. I know there are a couple of blemishes, but not so bad for my first attempt! Here's the look back on the ash receiver. I'm happy with the results. The business end! The new part fits right into position and the screw secures it into position. I don't know if this plastic will hold up for the long haul. If anyone knows where I can find an injectable, UV stable, urethane based resin, that is already colored that beautiful Buick Ivory color...... (That's a tall order!) After the parts cure completely, I'll buff them and install these on the ash tray covers. I'll save my originals in case these dry out and crack in a month! Who knows how long they'll last but I thought I'd share what I did today. I wil be making another set tomorrow using a slightly deeper shade. Almost imperceptible to the eye, but I think it'll look nice. If it works, I'd like to attempt the window crank handle knobs. Have a great night out there! Gary


-
Hello everyone! I thought you would like to see my progress on my '37 Buick! I began the restoration January 11, 2017 and am now about 6 1/2months into it. At this point the chassis is done, the body is in the paint shop and I'm busy doing all the hardware and fasteners. I hope you enjoy the thread as much as I have doing the restoration! Please follow along and ENJOY!
-
Hello All! I thought maybe some would be interested in following along with my "Frame-Up" Restoration. I began the journey on January 11, 2017, and I am about 6 1/2 months into it now. It's all coming along very nicely! It's located in the "Pre-War" Buick section of the forum. Have a great day out there! Gary W NJ
-
1937 Buick Model 48: RESTORATION HAS BEGUN! (Photo)
Gary W replied to Gary W's topic in Buick - Pre War
July 26, 2017: Update on the Body / Paint: A quick visit to the shop this morning to check on the progress. The outside shell is now in self-etching "yellow" primer. The entire inside and underside will also be primed with this, but only after all the surfaces are sanded. The passenger's door sill area is all patched and primed, so that finishes the major bodywork. The repair patch panel is complete, sanded smooth and ready for primer. Here is a view of the underside. All those little pinholes under the door sill are fiberglassed in. The area where the fender bolts up is repaired. Everything is sanded. Now I have a very nice foundation for the new paint. I love how nice that bare metal looks when it's sanded out! After Bob is finished mixing the brew, he stirs and stirs and stirs until all the particulates are in solution. Once satisfied, fill the gun through this filter. Steady as she goes! Applying the self-etching primer to all the exposed areas. Finishing up in the front section. So here's the passenger door sill now. Looking very nice! And the right quarter panel with one coat of the primer applied.


-
1937 Buick Model 48: RESTORATION HAS BEGUN! (Photo)
Gary W replied to Gary W's topic in Buick - Pre War
I don't know the answer to that BUT ..... if someone out there knows the correct finish, I can easily make that correction. Thanks Mike! I honestly didn't give it a thought only because the grille came out "clean".... i.e: No remnants of any paint in the grooves (like the other parts did). Keep "nit picking"! I love the details! It's what makes the final product authentic. Have a great day! Gary -
Thank you Larry! Excellent material
-
Nice! These look like a great solution.

-
Hi Mike! Is the alternator made by summit just for the Ford Model "A" ? I think it's positive ground .... but it does look much more authentic! Maybe it can be ordered in negative ground??
-
Hi Larry! If you would be so kind to post the installation circuit for the radio I would appreciate it. I am installing a radio in my '37 that did not have one originally so the wiring diagram would be appreciated. Also, how do you test the radio on the bench. I have an extra 6V battery, but just don't want to mess things up. Thanks! Gary
-
1937 Buick Model 48: RESTORATION HAS BEGUN! (Photo)
Gary W replied to Gary W's topic in Buick - Pre War
I was thinking maybe in the Fisher Body assembly plant that a jig fit into that recess to align the panels prior to welding? So I'm kinda on the same page as you, but I figured I should pose the question here... someone will know! Thanks! -
1937 Buick Model 48: RESTORATION HAS BEGUN! (Photo)
Gary W replied to Gary W's topic in Buick - Pre War
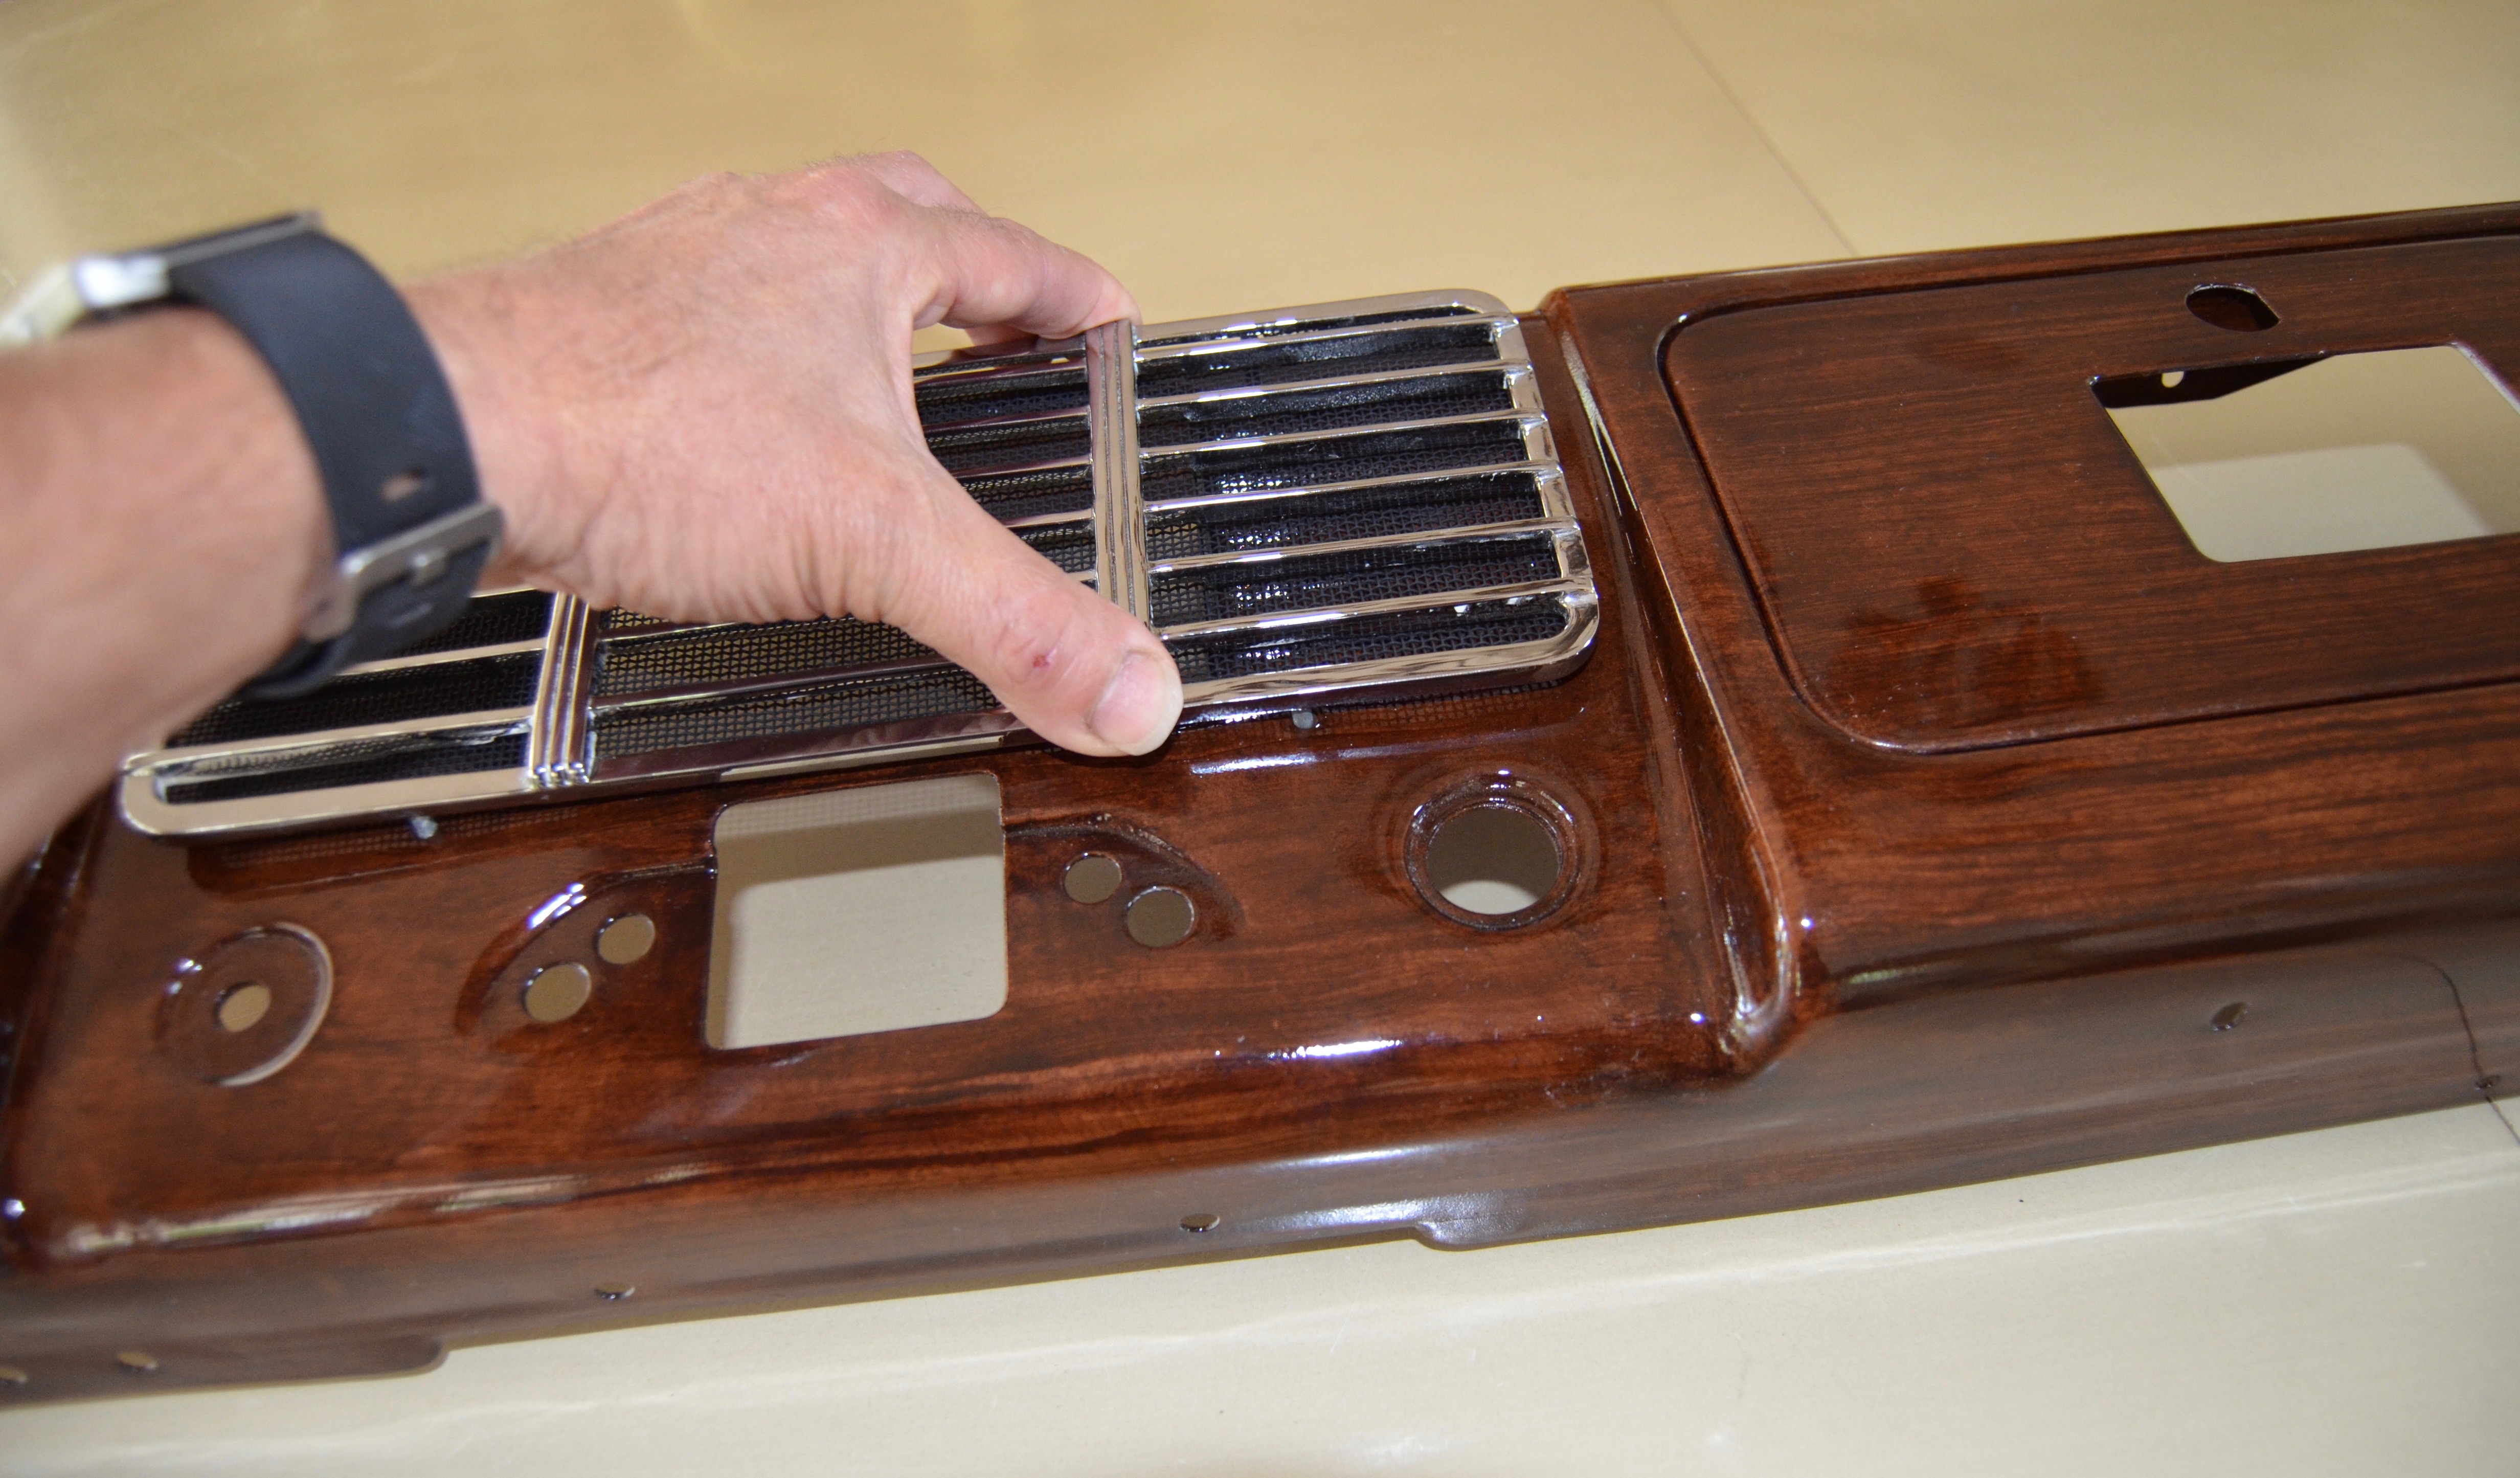
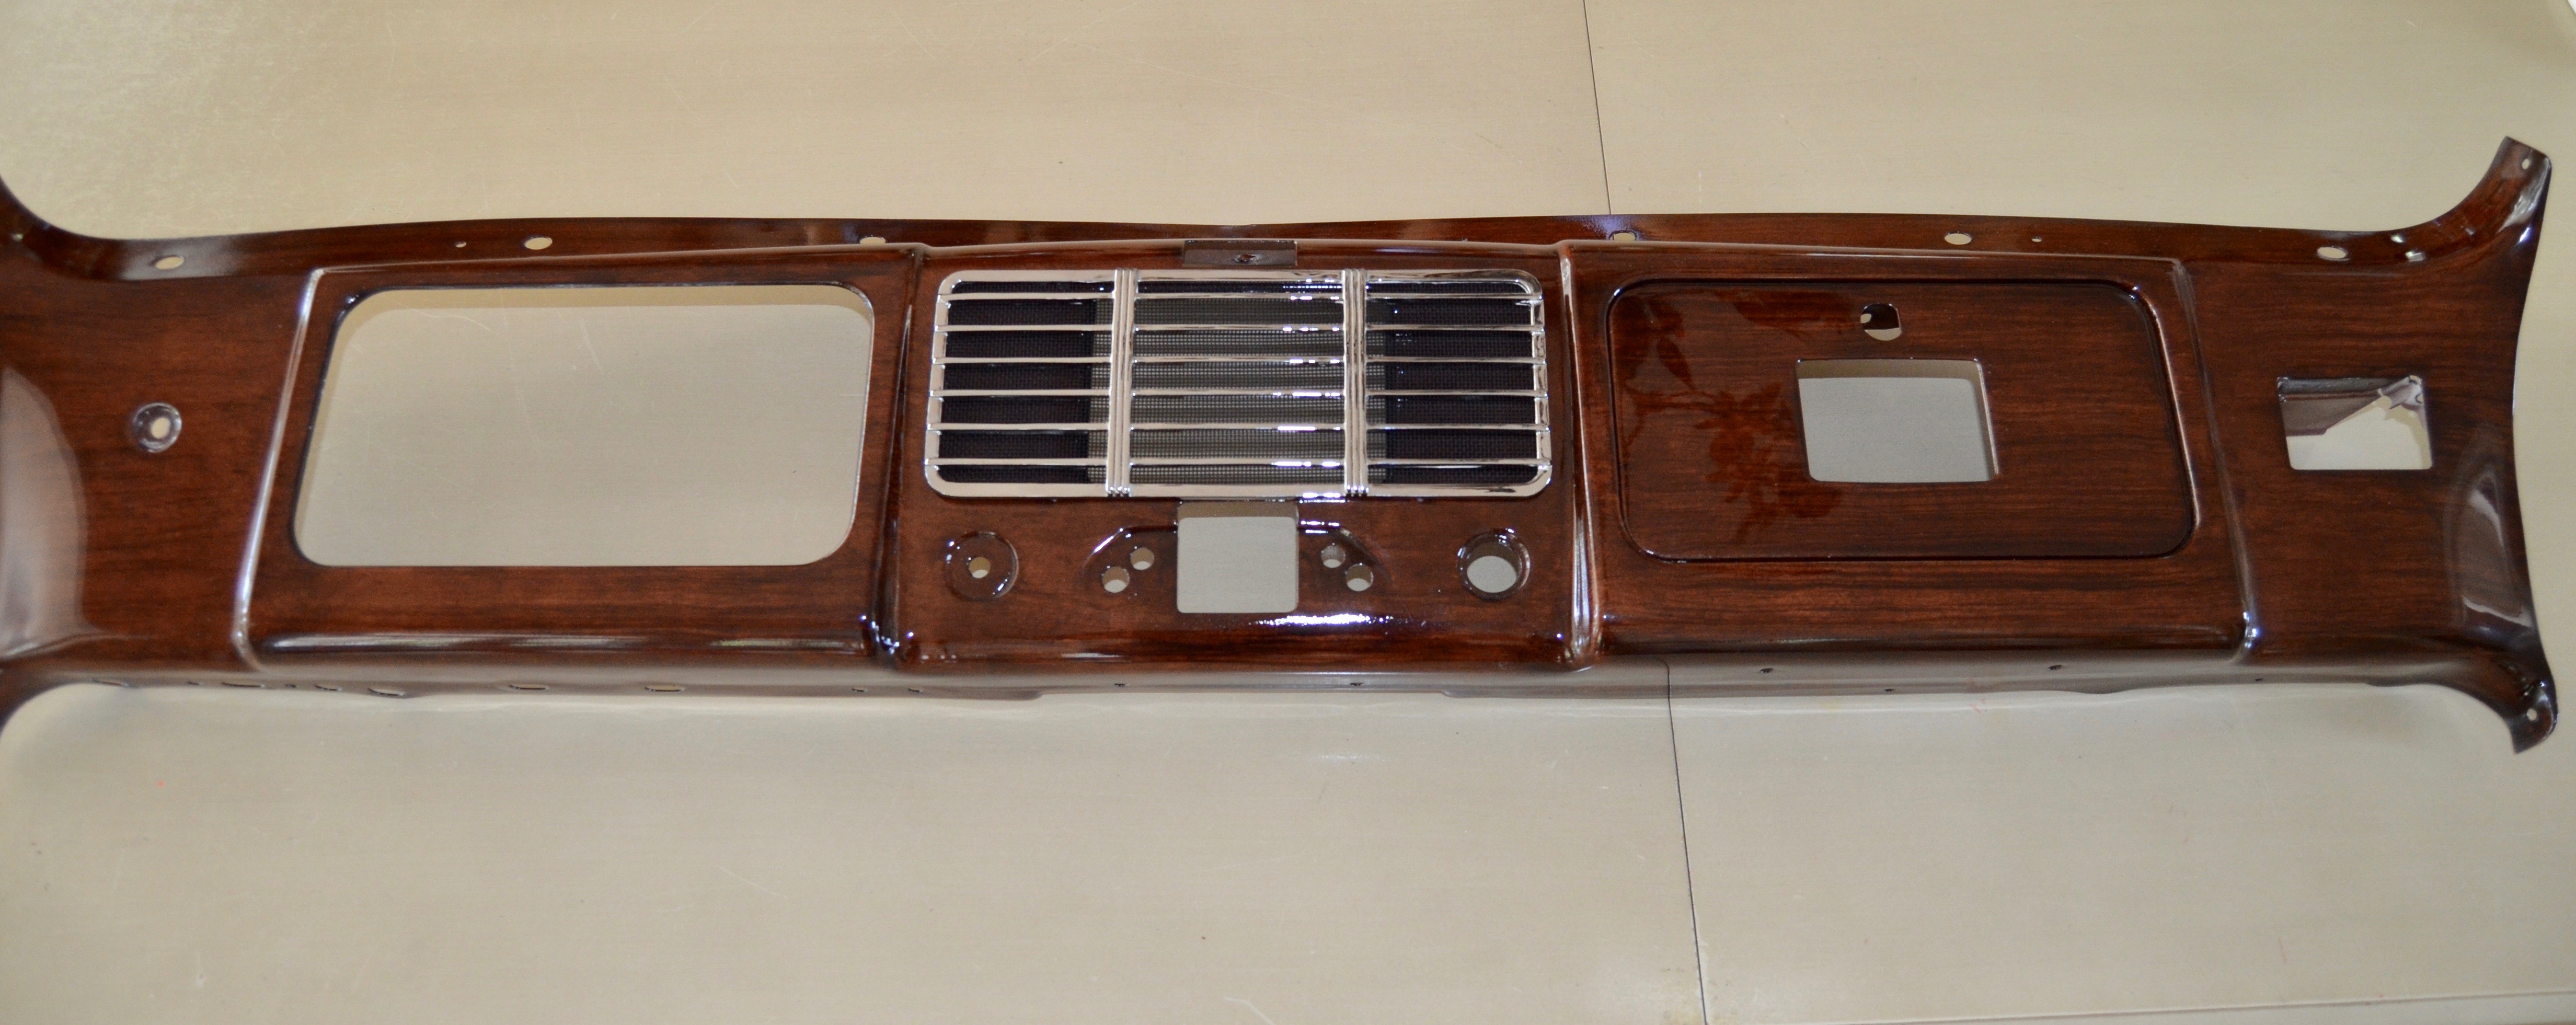
Sunday July 23, 2017: Radio Grille: Small stuff but very cool seeing the first parts going back onto the newly wood grained dash panel. Here's the "screen" that fits behind the chrome speaker grille. It was so crudded up and rusty. Actually, if you scroll back up to my previous post on Wednesday July 19 when the wood grained parts arrived, there is a "before" close-up shot of the dash as it was removed from the car. You can see the rust and the junk on this screen right through the grille. My car did not have a radio, but I am installing one. I am also missing four of those grille retaining clips. First a soaking in thinner, and a scrubbing with a stiff wire brush, both sides in every direction to loosen and remove all that rust. Here you can see the thinner turning a rusty brown. I let it soak a few more hours, and gave it another scrub, then an acetone bath/scrub to remove any residual oils..... I used this paint. I didn't want to see a high gloss back there and this stuff has a beautiful "semi-flat" finish. (You can see how brown the thinner got after it soaked!) I set up a first-class fancy spray booth, and gave it a few light coats from both sides and from all directions to try not to miss an angle. If you look close, the metal retaining clips are hanging there also, but the car only had two. I need four more of them. After a couple hours, here is the result. Back together again and.... Taking its original place as the centerpiece of the dashboard! I just had to get that together to start getting an idea of how she's going to look! I'm planning on doing as much dash "pre-assemblies" as I can without hindering the installation. It's so much easier to install on the kitchen table!


-
The website that carries that 6V alternator also sells the adapter so you can mount it properly


.jpg.820874473df9c92745ed5e9dfcfc72fe.jpg)
.jpg.61009ea288260fd1edbd10da89d1c08e.jpg)