


22touring
-
Posts
472 -
Joined
-
Last visited
Content Type
Forums
Gallery
Events
Everything posted by 22touring
-

For Sale 1928-29 Dodge Right Front Fender!!!!!!
22touring replied to mribbich@wi.rr.com's topic in Dodge & Dodge Brothers
Sorry, but I would respectfully disagree that this fender is in "very good shape". I don't understand how you can say that when it has rust-outs and such deep pits everywhere. In my opinion it is in only fair condition. If I were estimating the repair, preparation and refinishing job for a show quality repaint, I would quote 25 hours of labor. If you would like to see some front fenders from an early car that were recently sandblasted and really are in "very good shape", I can post pictures. Let me know. -
1927-1928 Dodge Bros. 4-Door Sedan (which one?)
22touring replied to Matt Harper's topic in Dodge & Dodge Brothers
Matt, I just thought I'd chime in to mention how production vs. registration year worked back then. If any of you more well-informed types find any mistakes in the following, please correct me. During the 3rd or 4th week of July of each year, the DB factory would shut down production while the employees all went on vacation. The only employees who worked during the vacation week were the assembly-line changeover specialists and the parts procurers. DB considered vehicles produced prior to the July vacation week to be that year's production, but they considered the cars produced after the July vacation week to be the following year's production. The states, of course, adhered to the calendar year in determining the model year of the vehicle. This can sometimes create confusion about the model year of cars produced between July and December. -
I know the conventional wisdom is that you cannot braze a crack like this; nevertheless, before I knew any better I did braze cracks like it and the repairs were successful. Did I just get lucky? I would like your opinions. Thanks.
-
stakeside, I was just wondering how you determined that the wheel clamps were cast rather than forged. I found that on my '22 model, a lot of the running gear that I thought might have been cast, and that had cast parting lines, was forged instead. The auto manufacturers just didn't know exactly how strong they had to make things back then, so they made them very strong. For example, in hindsight the chrome vanadium steel used in the DB bodies was definitely overkill. And remember that DB had an exceptionally large forge; that's why Chrysler bought the company. So I'm wondering if your clamps might be forged.
-
My guess is that it is a Midland Steeldraulic rear axle and drums from a Fast Four (Series 128 or 129) (four-wheel mechanical brakes), because the Senior Six had hydraulic brakes. Please advise if you disagree, since I have no personal experience with the Steeldraulic setup.
-
Upon further reading, I note that the late "standard shift" or SAE transmission first appeared in production, in the Type 7 chassis only, on August 28, 1925 (1926 model year). [IIRC, the Type 7 chassis was the bare chassis that DB sold to Graham Brothers and was the same as the screenside chassis (authentication needed)]. Screenside, panel and Type 1 chassis got the new transmission on March 18, 1926. The standard shift transmission wasn't installed in all passenger car models until March of 1927, with the production of the model 124. I obtained this information from the Don Butler article, "Good Enough Is Not Acceptable". Oops, I made a mistake. Graham Bros. made a 1-ton and a 1-1/2 ton truck. I'll bet the Type 7 chassis was for the 1-ton and 1-1/2 ton GB models. The Screenside and the commercial or panel models used the regular 1/2-ton chassis, I think. Could somebody please correct me if I am wrong. Thank you.
-
Yes, they should be. Both should have third gear selected when the shift lever is toward the front of the car (both should have the early, or "non-standard" shift transmission). Make sure both of them have either the multi-plate clutch or the single disc clutch, or be prepared to mix-n-match parts. When production of the DB Model 124 commenced on March 22, 1927, it received both the "new series" engine (a chain drive replaced the old timing gears; oil pump was now inside the crankcase; both manifolds were now on the right side of the engine; relocated water pump, generator and distributor) and the late, or "standard shift" transmission, which selected third gear with the shift lever toward the rear of the car. Incidentally, the late, or standard shift, transmission was built quite a bit stronger than the original design.
-
Sterling Electric column-mounted clock for 4-cyl. cars
22touring replied to 22touring's topic in Dodge & Dodge Brothers
I did get the Sterling electric clock mounted on the steering column of my '22 touring car. You have to remove the ignition advance and throttle lever rods from the steering column in order to mount it, but it does fit!
-
Four cylinder Dodge -- what are they like?
22touring replied to scott12180's topic in Dodge & Dodge Brothers
They're a great piece of engineering, and lots of fun to work on and admire as works of art. You can't really drive them too many places because they are too slow; about the same speed as a Model T. Don't even think about going touring with a Model A club because Model As are much faster. Most people don't know what a DB is, so they don't tend to get too much attention in car shows. You will always be in the shadow of the tri-five Chevrolets. Some of the parts are available, but a lot of others are not, so you often have to refurbish what you've got. They cost more to restore than they are worth on the market. If you can find a good buy in a car that has been correctly restored, go for it. -
Possible cheap substitute for floorboard trim on early cars
22touring replied to 22touring's topic in Dodge & Dodge Brothers
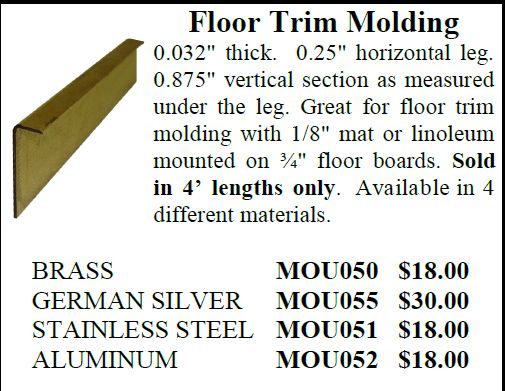
I did check the Lowe's website, jan, but didn't find anything better than the edging that Home Depot had. But maybe I missed something? Could you give me a link to the edging you're referring to on the Lowe's website that has an "oval top"? The contour of the most similar edging I could find at Home Depot was nothing like the original DB molding because it didn't have an oval top, but the Restoration Supply MOU054 seems to be very close to original. -
Is This or is it Not a '25 Dodge Coupe?
22touring replied to cahartley's topic in Dodge & Dodge Brothers
DB began phasing the two-unit motor into production around the beginning of the 1926 production year (in July of 1925), but not all the various body types got the two-unit engine until the Spring of 1926. -
Years ago, a mechanic installed caster wedges under the front axle of my '22 touring because he thought it would give the car more straight-ahead steering stability. Does anybody have any strong opinions concerning these, yay or nay? I was thinking of removing the spring shackles in order to lift the springs up off the axle so I can clean and paint the axle. But what locates the axle fore-and-aft on the spring, anyway? Do I have to mark the axle's position on the springs carefully in order to avoid putting it back together crooked? I think the lost motion in my steering is probably due to a worn sector gear. Can anybody explain how you can turn the sector 180 degrees in order to put some unworn sector teeth into the "straight ahead" position? I've heard of many people doing this, and I tried doing it once, but I couldn't figure out how to do it and had to button the steering box back up the way it was! Is there a trick to doing the job?

-
mission creep! lifting the body off 4-cyl. car
22touring replied to 22touring's topic in Dodge & Dodge Brothers
trimacar: no, the frame is excellent; I just need to repair bilateral rust holes at the bottom of the cowl. Rick Brinker: no wood in my '22 touring car. "Lifting a good body off a frame is not a huge deal" - But lots of things to remove, including the steering column, wires, rods, seats and upholstery, rear fenders, etc.! Where there's a will, there's a way! I am going to keep trying to find a way to carefully weld in patches to the bottom of the cowl without lifting the body completely. "Some may say I'm a dreamer, but I'm not the only one!" (I don't think.) I will advise if and when I admit defeat! -
mission creep! lifting the body off 4-cyl. car
22touring replied to 22touring's topic in Dodge & Dodge Brothers
I've already got the front fenders and hood off, and just wish I could lift the front of the body far enough up off the frame to be able to carefully weld in some small sheet metal patches at or near the bottom of the body. I'd hate to remove the top, seats and rear fenders if I can avoid it, and when I don't really need to lift the body completely off the frame. I am thinking of removing the front two bolts holding the body to the frame (the ones in the farthest-forward corners of the passenger compartment) to see if I can lift the front of the body up a little, maybe and put a couple of wood wedges between the body and the frame in the front. Does this sound possible, or am I dreaming again? -
One thing led to another, and now I'd like to lift the body off my touring car in order to repair a little rust. I searched this forum, as well as in the Book of Information and the Mechanic's Instruction Manual, but didn't find anything discussing exactly how to remove the body. Can anybody point me to such a discussion. or has nobody discussed it because it's pretty obvious when you get under the car which bolts you need to remove?
-
Possible cheap substitute for floorboard trim on early cars
22touring replied to 22touring's topic in Dodge & Dodge Brothers
"No go" with the cheap Home Depot trim molding! You were right, Spinneyhill: the aluminum was too stiff where it was bent, and was impossible to straighten out. I had to order some MOU054 from Restoration Supply. Surprisingly, Restoration Supply didn't have any flat fender welt. The only kind they sell has a 1/4" bead along one edge. I ordered some anyway. Is there any reason not to use this between the frame and the body, even though it has the small bead? Is the old flat fender welt becoming hard to get? Maybe Restoration Specialties has some. -
Possible cheap substitute for floorboard trim on early cars
22touring replied to 22touring's topic in Dodge & Dodge Brothers
dc-8dave: good point. I had checked neither the Restoration Supply Co. nor the Restoration Specialties, Inc. catalogs. While Restoration Specialties didn't seem to have any floorboard moldings, Restoration Supply had two possible candidates. Their MOU054 floorboard molding looks like it might be just the ticket, although somewhat expensive. Their MOU052 looks like it would also work, and is less than half the price of the MOU054, but I don't think it would look quite correct because the original floorboard trim seems to have had an oval top. Spinneyhill, an extrusion like you've mentioned would be OK, but I don't think they are available with an oval top. Please correct me if I'm wrong. I'm still hoping that maybe I'll be able to convert the cheap Home Depot molding to something looking like the original oval top trim.
-
Correct way to glue linoleum to 4-cylinder DB floorboard?
22touring replied to 22touring's topic in Dodge & Dodge Brothers
"There are two types of Liquid nails, interior and exterior." Didn't know that until I looked at the label more closely. The tubes I bought were the "interior" variety. -
I couldn't find an exact reproduction of the aluminum floorboard trim on my '22 model. Brad of L & L antique Auto Trim was helpful, but I don't think even he had quite the right "cap trim molding", as it seems to be called. I found something quite similar at Home Depot, however, and ordered 16 feet of it: http://www.homedepot.com/p/Alexandria-Moulding-1-4-in-x-3-4-in-x-96-in-Metal-Mira-Lustre-Cap-Trim-Moulding-AT024-AM096C03/205576710 The only problem with this trim molding is the "final bend" - see attachment. You don't really want that final bend, or you want it to be only a slight bend. Except for that, it would be an almost identical replacement, and cheap! Brad says he couldn't come anywhere near the price. I am going to try running the molding through my Harbor Freight pinch roller set to see if I can remove that last bend, and will report back later.

-
Correct way to glue linoleum to 4-cylinder DB floorboard?
22touring replied to 22touring's topic in Dodge & Dodge Brothers
A latex-based construction cement called "Liquid Nails", applied evenly to both the wood and the linoleum, placed together when the glue is wet, and then pressed under plywood and weights until dry, seems to have worked pretty well the second time I tried it. -
Incidentally, I think this '26 must have been manufactured in late 1925 or in early '26 because DB started phasing in the two-unit motor in early '26, while this car has the single-unit engine.
-
It would probably cost $30K to restore properly and would be worth around $8K fully restored. You would have to really love the DB coupe to take a $20K+ loss. I can see taking a loss like that, maybe, if it were a more desirable body style, but not for a coupe. That's just the way it is.
-
I don't know about Aussie models, but if you'd like to see some pictures of what an American model has under the rear seat, let me know.
-
You're on the wrong forum. You should ask this question on the "For A-Bodies Only" forum (non-AACA affiliated): http://www.forabodiesonly.com/mopar/
-
I tried doing it with contact cement, applied in swirls rather than uniformly across the surface of the floorboard, and I got a lot of air pockets under the linoleum that looked terrible, so I removed the linoleum from the floorboard and am ready to try gluing it again. It was a lot of work removing the old contact cement from both the floorboard and the linoleum! So what kind of adhesive should l use this time, and how should I apply it? A sponge roller, maybe? It seems like it's going to require a uniform coat of adhesive and then curing with heavy weight, n'est-ce pas? Thanks a lot.


