Taylormade
-
Posts
2,396 -
Joined
-
Last visited
-
Days Won
1
Content Type
Forums
Gallery
Events
Everything posted by Taylormade
-

The Ressurection of Daphne - a 1932 DL
Taylormade replied to Taylormade's topic in Dodge & Dodge Brothers
Check Crin's site out. He takes pictures of all his customer's projects as he works on them. I live very close, so I can go over and see how things are progressing, but for his out of town customers it's a perfect way to keep up on progress on their cars. I also want to point out that although my pictures make this process look easy - it's not. it's comparable to handing someone a paintbrush, paints and canvas and expecting them to produce a masterpiece. I could tell at first glance that it had taken years of practice for Crin to be so assured in his technique. That's why I used him instead of trying it myself. You can check up on my woodgraining and upholstery on the site under Current Projects - 1932 Dodge. -
The Ressurection of Daphne - a 1932 DL
Taylormade replied to Taylormade's topic in Dodge & Dodge Brothers
Took a trip to my woodgraining guy, Crin, yesterday. He uses the Grain-it system. I brought over the two last pieces of trim that I negelcted to notice and remove. They go on the sides of the windshield. They were a little crusty. Crin went to work with his cabinet blaster. And before long they were ready for primer. Crin had already primed most of my pieces. An original, he kept for color matching, isat the bottom. The primer lays down a nice, smooth surface. He uses two coats, sanding in between. The next step is to lay down the base color. My parts were not ready yet, so this is a frame from a mid-30s Packard. This base color is considerably lighter than the one used by Dodge Brothers. Once the base has dried for a day or two, it's time to grain it. A thick ink of the correct color is used. Then a plate with the correct grain pattern etched on it is covered with the ink. A rubber roller is carefully rolled along the plate, picking up the ink in the grain pattern. Then the roller is rolled across the part, leaving a perfect grain pattern over the base coat. Each section of the piece is grained. And the final result is amazing. This is how they did it at the factory. Once everything is completely dry, Crin shoots on the clear coat and sands and polishes everything for the final result. My stuff should be ready in a week or so. I'll post pictures of the finished pieces.


-
The Ressurection of Daphne - a 1932 DL
Taylormade replied to Taylormade's topic in Dodge & Dodge Brothers
Looking more closely at my original tank, I think the filler and sending units are soldered onto the tank, not welded. If that's correct, it will make things easier - at least for me. The only thing that bothers me about the tank ply33 mentioned is that the fuel line comes out of the top of the tank. I'm not sure I have room between the tank and the cover for that style pickup. -
The Ressurection of Daphne - a 1932 DL
Taylormade replied to Taylormade's topic in Dodge & Dodge Brothers
ply33 that tank is very close - just an inch or so short. It looks like I would have to weld up their filler opening, then weld my filler and sending unit mount to the tank. My car (I think your Plymouth does, too) has a cover over the tank between the frame rails with two openings for the above, so I have to have those two openings in exactly the right place. At that price, it may be worth a try - especially with the free shipping. -
The Ressurection of Daphne - a 1932 DL
Taylormade replied to Taylormade's topic in Dodge & Dodge Brothers
Took a look at the gas tank today. Lots of rust and varnish, weak metal. Vertict - I need a new tank. A light tapping on the end of the tank buckled the metal. This tank is toast. It's too bad, as some of the metal still looks good. Here are the levels from undercoat, to rust, to wirebrushed to sanded. I can salvage the fittings - the filler neck and the sending unit mount. They are in good shape. The tank is 38X15X8. The closest generic tank I could find is 34X13X9 for $185. A stainless steel tank to original specs is $740. I'm hoping Ed, my body guy, will agree to build me a new one. The sending unit was totally gummed up with rock-hard varnish. A little cleaning with a wire brush revealed the gears were brass, not pot metal. Whew! The ends do look a little iffy, though, and I may have to cut a new set from sheet brass - an easy, if tedious job. It's currently soaking in acetone and I hope things will loosen up enough that I can move the cork arm and see if the unit still works. it's always the little things that eat up time, but it's the only way to get everything working right.


-
I'll try it. I've never had acetone react with brass in the past.
-
My gas tank sending gauge gears are totally gummed up with varnish from 45 years of sitting. The stuff is hard as rock and I'm afraid I'll damage the brass gears trying to get it off. Is there anything that will dissolve this varnish without harming the metal parts of the unit?
-
I'm about to try this also. What did you use to replace the rivets?
-
The Ressurection of Daphne - a 1932 DL
Taylormade replied to Taylormade's topic in Dodge & Dodge Brothers
Yes, it is amazing. But, I discovered it's also relative. As I was watching Ed work with my jaw on the floor, he mentioned he could never learn to operate the camera I was using to shoot the process. When I tried to explain why I was using a certain lens and a follow-focus shot I wanted to do and he just laughed and said it was way beyond him. Most of us can do something well, but it's just nice to see someone else do something we could never imagine. -
Just to follow up, I had no problems getting my Illinois title. They did send the paperwork back because I hadn't signed the form for unfettered summer driving. I signed it and sent everything back in and got my title about two months later.
-
I don't know, Phil. It's a guy thing. I don't need no stinking directions. Well, maybe I do. I need to remember the manual, it's a very detailed little booklet.
-
I figured it might have something to do with the steering or handling. Thanks, Phil.
-
As I was disassembling my 32 DL for restoration I noticed something odd - at least to me - about the front springs. At the front of the frame, where the spring eyes attach to the frame, there are two different mounting systems on my car. The driver side, with some sort of snubber attachement. Sorry about all the grease, but you get the idea. And the passenger side with no attachemt. Is this correct, or have I lost something along the way?
-
The Ressurection of Daphne - a 1932 DL
Taylormade replied to Taylormade's topic in Dodge & Dodge Brothers
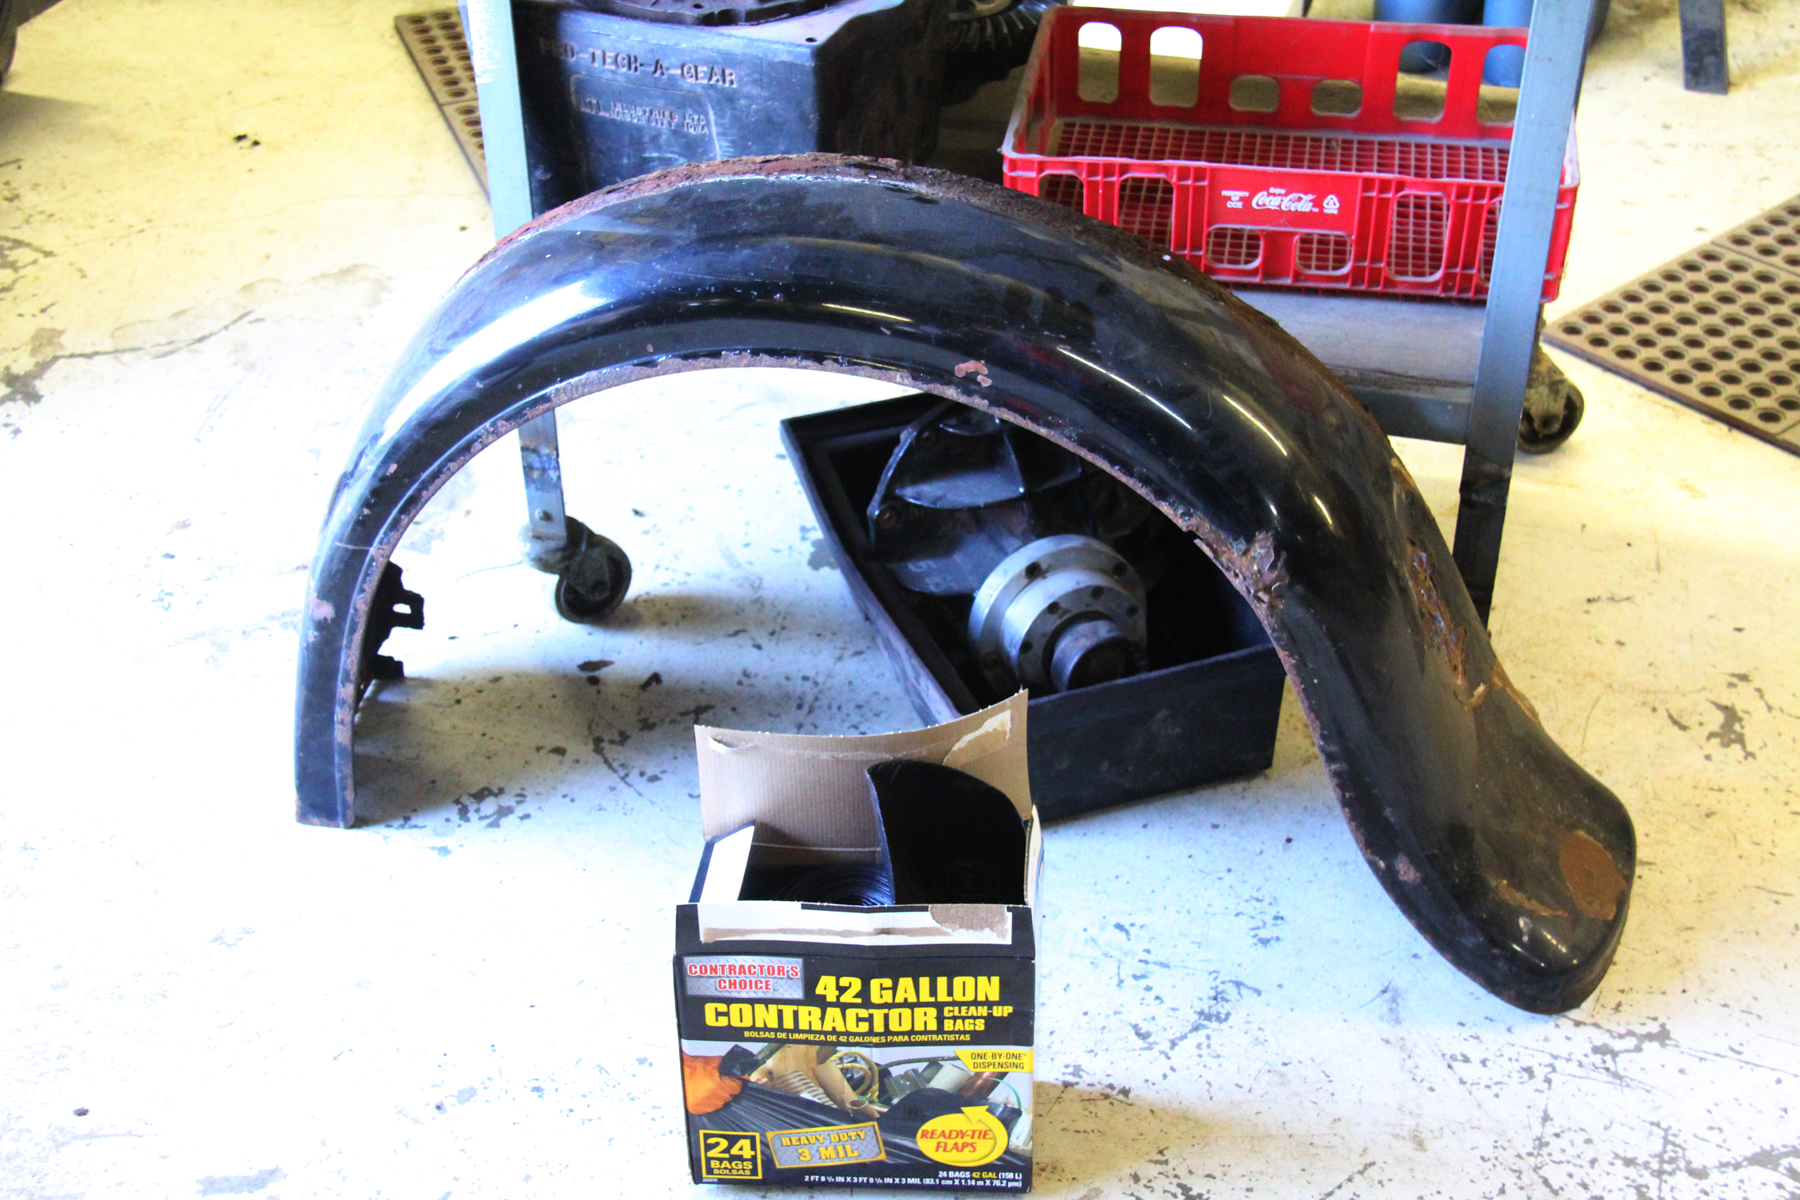
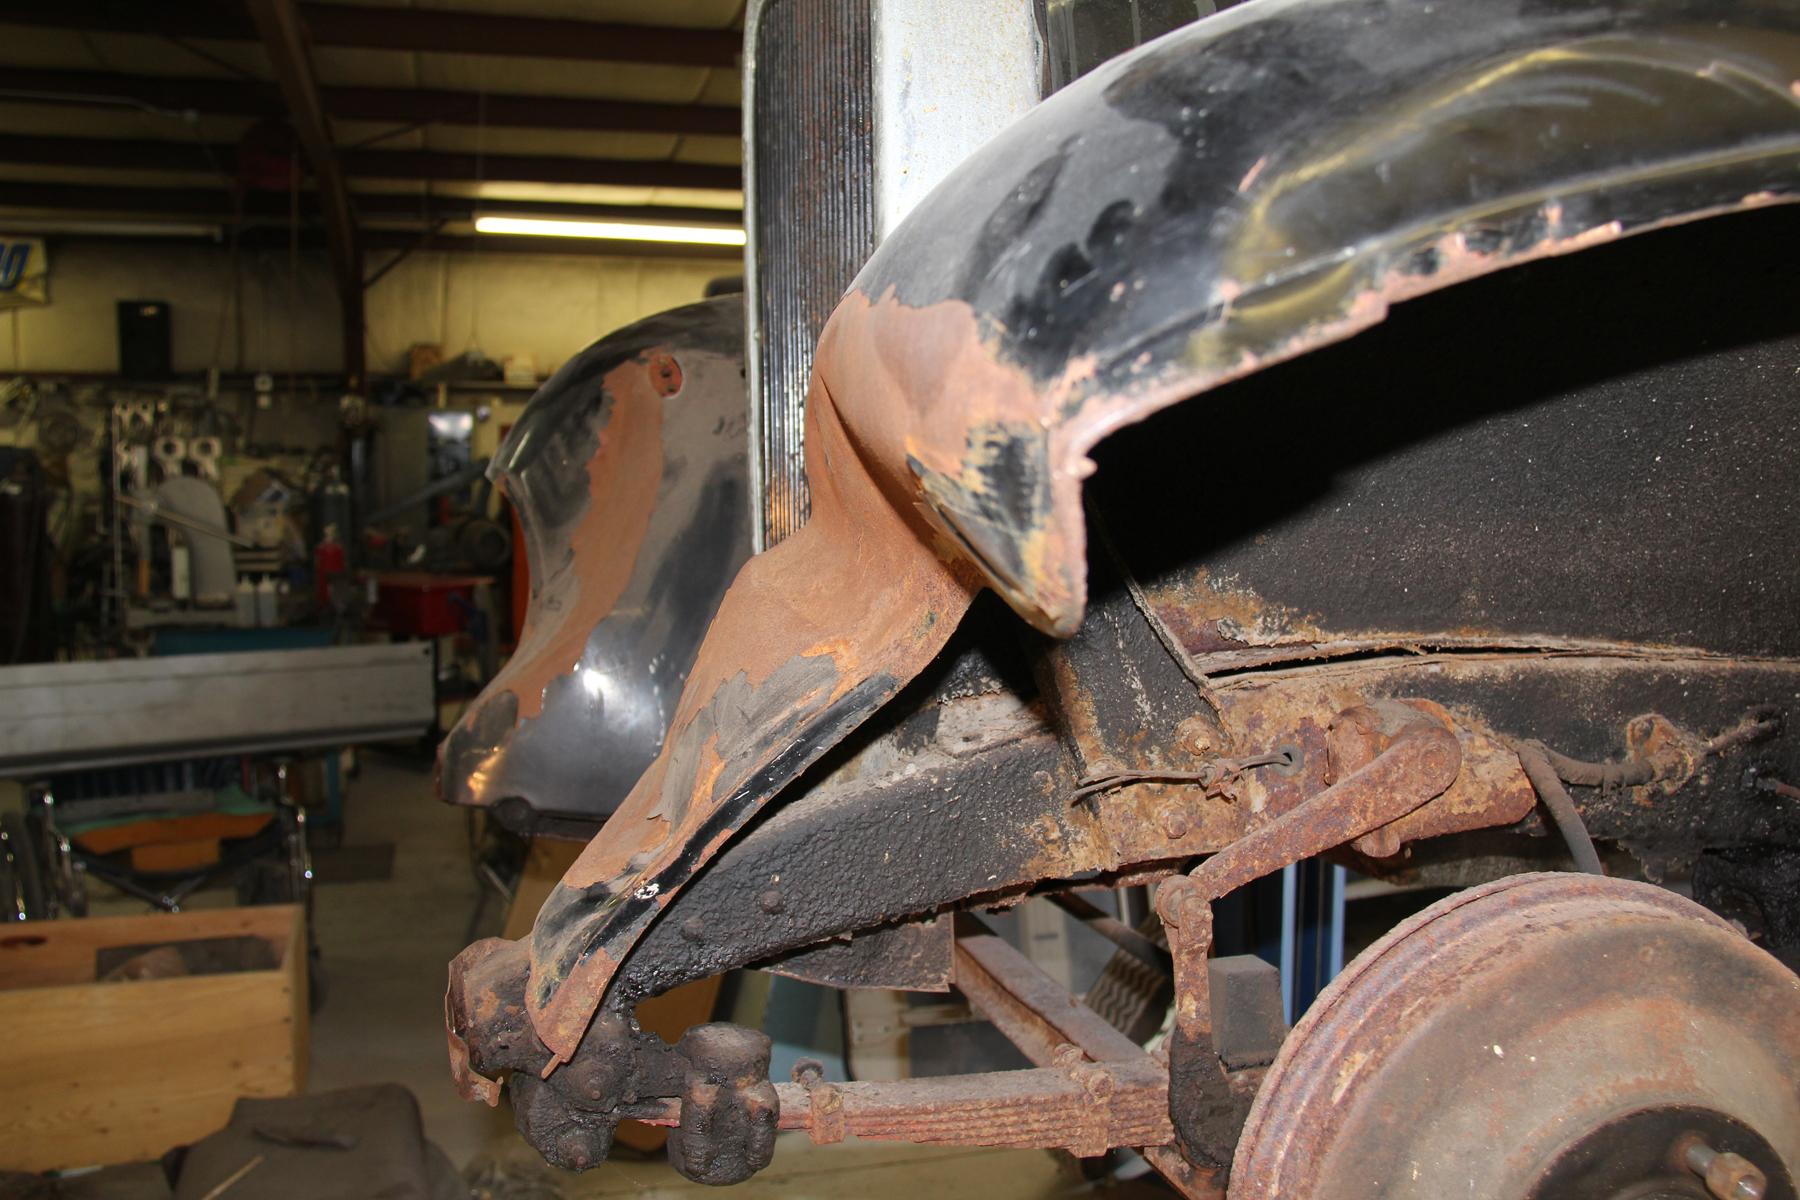
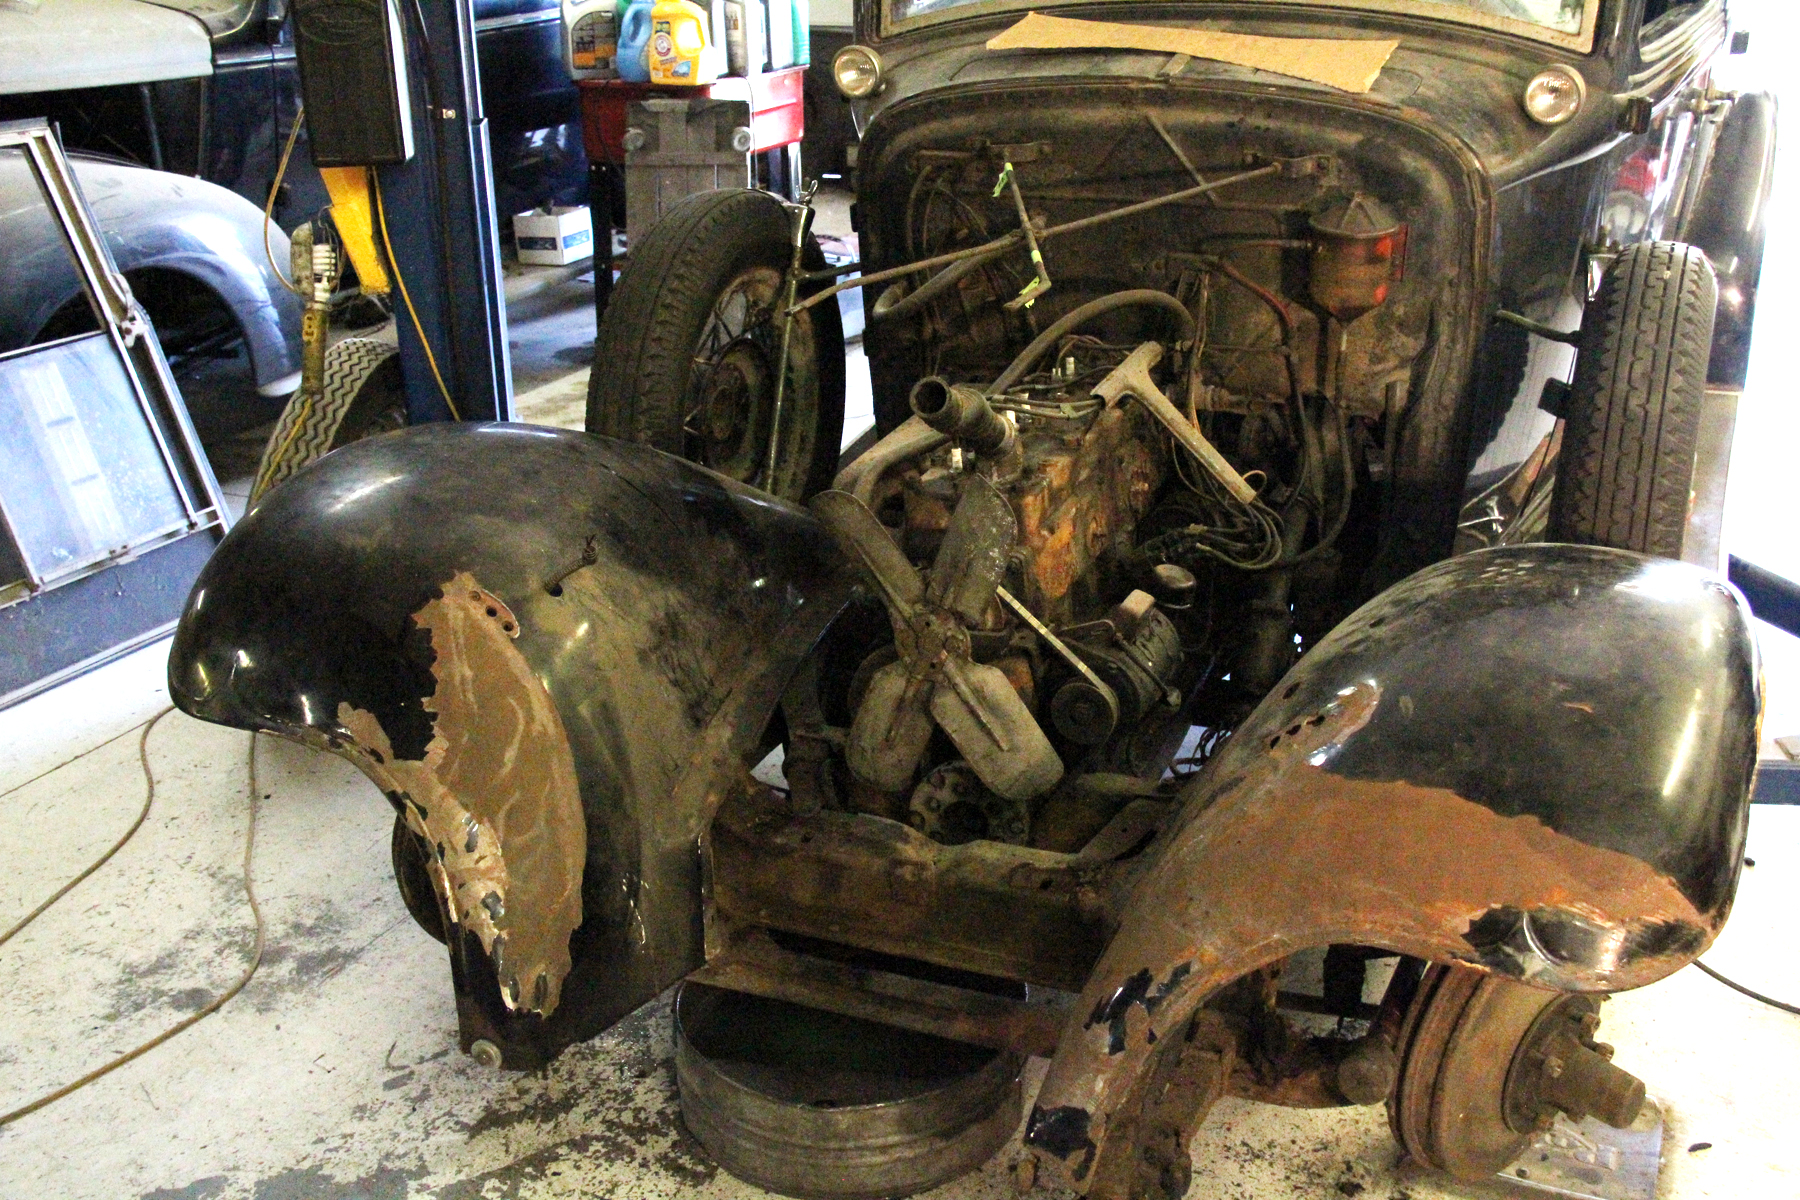
While Ed further massaged the fenders, I took off the back bumper - we removed the front before work on the fenders - and the luggage rack. I then removed the back fenders - Ed will work on them off the car. The driver side fender had been removed or replaced at some point. I could tell by the replacement bolts and the discovery of more modern fender welt between the fender and body. This fender was damaged when Dave Taylor, on of my fraternity brothers, backed the Dodge out of the frat house driveway and into a parked car. We lost the taillight with that mishap and pushed the fender in. After seeing what Ed has done to the front fenders, this should be a cakewalk. There is rust damage - major holes - around the tail light stalk mount. Also, the rusted area where the fender contacted the body may have to be replaced. We'll know better after the fender is blasted and we find out how deep the rust is. The passenger side is in better shape - just a slight crease near the back. The rusted area may have to be replaced on this one. too. The only body rust I could find was this small section in the passenger side wheel well. It's an easy fix - just a flat replacement section we'll TIG in. I forgot to show you this in the previous post. Ed has these 20s era fender tools for beading and other repairs. Very cool. We made some interesting discoveries along the way. The car was definitely painted black. But it's not the original paint job. We found sanding marks and other clues that this was a repaint - done sometime before I bought the car in 1965. Another, even more fascinating discovery involved the front fenders. Ed decided he'd need to take off the driver side fender to work the area along the frame. The rear of the fender is actually under the frame, but we figured we could just lift the front of the body slightly and slide the sucker out. That was when we discovered that the front fenders are riveted to the frame! There is one large screw-head bolt that apparently was used to line up the fender, then three rivets around that bolt and more rivets at the back of the fender. So the frame is coming off before we can resume work on the front fenders. This begs the question of how the fenders were painted. I can't see the factory riveting a freshly painted fender to the frame. So what was the order? Paint, rivet? Rivet, paint? Painting the fenders after they had been riveted to the frame seems like a stretch. Anway. we'll probably turn down some carriage blots to match the rivet diameter. The next step is for Ed to finish the fenders. By the time I make the next trip a week from today, all four fenders will be finished and the body will be loosened from the frame, ready to lift of and allow us get to work on the rusted area below the doors. The car looks a little like its been vandalized at the moment, but we are making good progress. More later.


-
The Ressurection of Daphne - a 1932 DL
Taylormade replied to Taylormade's topic in Dodge & Dodge Brothers
A huge day yesterday. I got up at 6 AM and made the 2 1/2 hour drive to Thomas Restorations and Fabrications in central Missouri. A nice, warm, sunny day. Arrived at 9 to find Ed Thomas and Daphne waiting for me on the lift. This was my first chance to get a good look at her underside. Lots of surface rust and more than enough grease to lube six cars, but everything looked very solid and intact. The frame appeared straight and the rust was surface only. We removed the gas tank and managed to get it off without damaging the two straps that hold it to the frame. The smell of varnish inside was overpowering. We took it outside and shook it - a mountain of red rust dest spewed from the filler. Although the outside metal of the tank looked solid, with that amount of rust inside, I fear some holes will appear once I give the tank the treatment. I took the tank home with me and plan to fill it with molasses to get the rust out. More on that later. I also removed two small side pieces by the windshield that I learned are supposed to be woodgrained. My grain guy has been waiting for them as he wants to do all the parts in one shot to keep the color accurate and even. With the busy work done, we tackled the front fenders. Well, Ed tackled them and I watched - and videotaped the process for a documentary I'm making on the restoration. As you probably remember from previous posts, they were in bad shape. I had smashed one in 1966 when I owned the car. We discovered lots of bondo from that repair. PO Phil Kennedy completed the carnage when he encountered the back of a truck after he bought the car. The amount of damage was something I was honestly worried couldn't be fixed correctly. Ed said he'd spent the last week just looking at the damage, trying to figure out the best way to get started. He says you just can't start banging away at the metal because if you make a mistake it does more harm than the original accident. With that, he pulled out a large hydraulic ram and began forcing the metal on the driver side fender back into shape. After spending a few minutes pushing out the major dent, he switched to the passenger side. He figured the damage was less severe on that side and once he had it back in shape, he could use the curves as a pattern for the drivers side. Amazingly - at least to me - he had the passenger fender pushed out and hammered into shape in about 20 minutes! He then made templates to transfer to the other fender. He then resumed work on the driver side fender. We had to remove the radiator and shell to get access to damage that occured along area where the fender met the frame. Ed then had to remove the thick coat of 50s era undercoating on the underside of the fender in order to work the metal. A soft torch and the heat made it easy to scrape the coating off. An hour later the drivers fender was totally roughed into shape. I really couldn't believe it. We did find some rust at the bottom of the fender above the frame. it's going to have to be replaced, as are two small sections along the front lip of both feners where the metal ripped away from the wire former underneath. Both fenders were starting to look pretty good at this point. All the fine work is next. Ed will remove all the paint and work both fenders with hammer and dolly. He says I shouldn't need any filler when he's finished.


-
1934 Dodge Full Body Off Restoration
Taylormade replied to Ian_Greenlaw's topic in Dodge & Dodge Brothers
Apparently the guy who bought mine was more into flash than function, opting for the dual sidemounts and shunning the vacuum-assisted clutch. Average salary in 1932 was around 5 dollars a day based on a five day work week. -
1934 Dodge Full Body Off Restoration
Taylormade replied to Ian_Greenlaw's topic in Dodge & Dodge Brothers
The Plymouths of the same period had a similar window arrangement. Chrysler seemed to love weird and complicated engineering, despite the Depression. Imagine how complex and expensive it was to design and manufacture that window mechanism. Same goes for the vacuum clutch and Floating Power. -
The Ressurection of Daphne - a 1932 DL
Taylormade replied to Taylormade's topic in Dodge & Dodge Brothers
Yes, they have a matching brown with a slightly darker pattern woven in, but it's from SMS, not LB. I'll get some close-ups and post them tomorrow. -
The Ressurection of Daphne - a 1932 DL
Taylormade replied to Taylormade's topic in Dodge & Dodge Brothers
Or fade to the greenish tan the original has become. I'll probably be long gone before anything gets that far. -
The Ressurection of Daphne - a 1932 DL
Taylormade replied to Taylormade's topic in Dodge & Dodge Brothers
Well, my wife and I found fabric from LaBaron Bonney that comes very, very close to the original. I'm still struggling with the correct shade of brown now that we discivered the dirty tan is just a faded remnant of the original. I have very good, unbleached examples of the fabric used on the door panels and up above the rear seat. The LB fabric possibly has a little more of a greenish tinge to it than the original, but it's very close. The nap and weave of the fabirc is the same, so we're in good shape there. Try as I might, I can't find a good, unfaded example of seat fabric. Mine is too faded and stained to get much real information out of it. In fact, i was beginning to think that perhaps the seats were a tan shade, but that didn't make much sense with dark door panels. Naturally, the 32 sales literature shows interiors with tan fabric, so who the heck knows at this point? (And Phil Kennedy pointed out to me that the same literature shows a DL with a green floor mat and that clearly isn't correct). Phil also sent me a few shots of some unfaded areas on his original car and, sure enough, there was that brown shade peeking out in a few places. You can just see the brown at the inside edge of the seat. So we are going the dark brown route. And if I find out I'm wrong after dropping 1500 bucks on material, I'm going to wander into the woods behind our house never to be seen again.
-
Isn't the axle held on by the outer bearing race? The two bearings on the axle are sandwiched between two races and the outer race needs to be pulled out to free the axle. Since this outer race is pressed or driven into the axle housing after the axle is installed, don't you need some sort of puller to get the axle out? I may be wrong here, but since I'm going to have to address this on my 32 dodge DL I'd like to be sure. Maybe you can exert enough force using the brake drum method to get everything free - I hope so! EDIT: I missed the slide hammer reference. That's the direction I was going.
-
1934 Dodge Full Body Off Restoration
Taylormade replied to Ian_Greenlaw's topic in Dodge & Dodge Brothers
Looking good, Ian. I wish my DL was that far along! -
Woo Hoo! I am now a Dodge Bros 1928 Victory 6 coupe owner!
Taylormade replied to a topic in Dodge & Dodge Brothers
I would keep the car as original as possible. A good, careful cleaning will really improve her looks. I'd replace the wiring only if the original is frayed or crumbling and I'd replace it with the correct cloth covered wire. Your car has wooden floors, so attaching seatbelts may be a problem and they look awful. I'm all for safety, but if you don't plan on major milage I'd leave them off. Turn signals mean adding lights and hurting originality, but that's your call. That car is a real find - you're a lucky individual. -
Door Window Regulator & Latch Maintenance
Taylormade replied to Phil 32DL6's topic in Dodge & Dodge Brothers
Thanks, Phil, this will really help me when I get to this task. I'm glad you had the patience to figure it out - something I'm decidedly lacking at times. -
Not a Dodge, but still... Studebaker : President Sedan in Studebaker | eBay Motors