Taylormade
-
Posts
2,396 -
Joined
-
Last visited
-
Days Won
1
Content Type
Forums
Gallery
Events
Everything posted by Taylormade
-

The Ressurection of Daphne - a 1932 DL
Taylormade replied to Taylormade's topic in Dodge & Dodge Brothers
I certainly wasn’t suggesting that Phil would have desecrated the dash. As I've said before, he was a better caretaker than I. It was that way when I bought it – along with the snappy half vinyl, half fabric interior and half yellow wheels and half black.. I actually used the “defroster” for a year before the hose disintegrated. In my naivety, I thought at the time that it was original equipment. Ah, the days of innocent youth. -
The Ressurection of Daphne - a 1932 DL
Taylormade replied to Taylormade's topic in Dodge & Dodge Brothers
A similar thing happened when I restored a 1929 Plymouth. The original mohair interior appeared to be wine red - odd since the car was painted black and greenish-blue. When I found unexposed material it turned out the mohair was originally dark blue! I'll look up puckboard, thanks for the tip. -
The Ressurection of Daphne - a 1932 DL
Taylormade replied to Taylormade's topic in Dodge & Dodge Brothers
Today, my wife, Kathy, and I took the seats and window frames over to the fellow who is going to do the woodgraining and upholstery. I had sent samples of the seat and door fabric to SMS and LeBaron Bonney and gotten some close matches back - or so I thought. As Crin, the upholstery guy, and I were talking about the stitching on the door panels, my lovely wife said, "Did they use different fabric up there?" as she pointed to the top of the panel. It did look like totally different fabric, but how could that be? It was one solid piece of cloth. Then we realised that this section had been hidden under the window frame and had never been exposed to light. I always assumed that the light to medium tan color of my upholstery - the sections not replaced with cheap black vinyl - was the correct color. Phil Kennedy's all original upholstery was the exact same shade. But there, lurking in the areas of fabric that never saw the light of day, was the true color of the fabric as it must have come from the factory. A rich, dark brown! Here is the unexposed fabric on top with the exposed on the bottom. Just a bit of a difference! By some miracle we hadn't ordered the fabric yet. This certainly changed everything. All our preconceived notions went right out the window. We checked through a LaBaron Bonney catalog that Crin had handy and discovered an almost perfect match for both the seat and door material. The seat material even has the correct small ribs we could never find in the lighter tan fabric samples. Kathy couldn't be happier as she was lobbying for a darker interior from the get-go, but I always opted for what I thought was the authentic shade of tan. Now we're both happy. She got dark and I got authentic.
-
The Ressurection of Daphne - a 1932 DL
Taylormade replied to Taylormade's topic in Dodge & Dodge Brothers
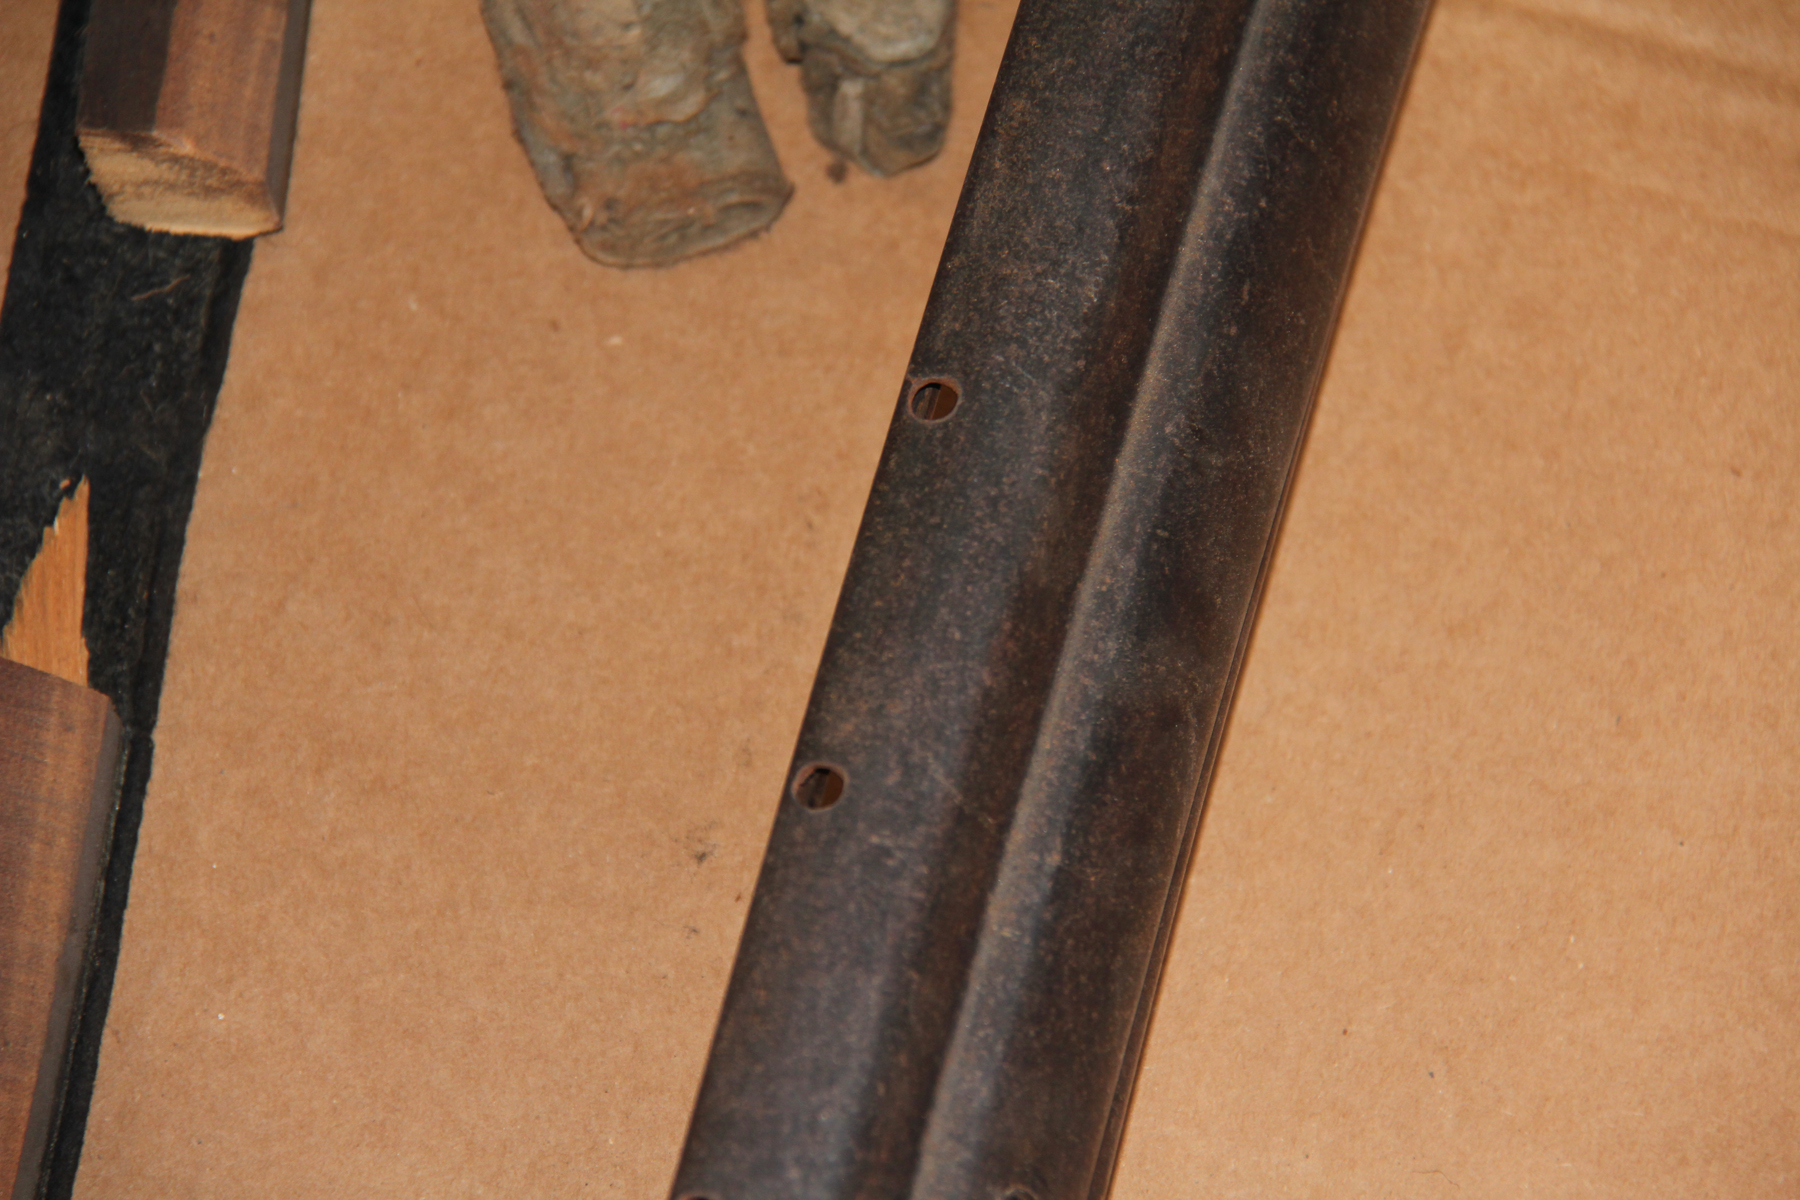
Looks like the 31 dash is close to the 32. here is the back of my dash with the wood insert sitting in its slot. The little tan tag of paper is a small bit of the paper lining that was glued to the dash as seen in the photos in an earlier thread. The missing piece of wood is where the knucklehead PO cut it out for his homemade windshield defroster. Notice the that the back of the dash was never painted and is still almost rust free after 81 years. There is a piece of felt padding between the wood and the dash. There was also some paper padding in the corners, but since this dash was obviously removed to modify the defrosto-matic, I'm not sure if it is original. Here you can see the holes drilled in the top of the dash for the defroster. They will all be filled before the woodgrain goes on.


-
The Ressurection of Daphne - a 1932 DL
Taylormade replied to Taylormade's topic in Dodge & Dodge Brothers
Yes, that is a kind of fiberous padding glued to the metal. A piece of wood sits over it and then the dash piece fits over that. I will take photos of the back of the dash and the wood tomorrow when I'm out in the shop. Some pervious owner decided to make a home-made defroster system and drilled that hole in the middle of the dash and carved out the space above the steering wheel along with cutting the inner wood piece in half. He then drilled a series of holes in the top of the dash and attached a heater hose to the hole to blow air up though it and onto the windshield. All of that will have to be repaired. The car is currently 150 miles away at the body shop, but I will check on the windshield area next time I'm there. Phil Kennedy may chime in and get you a picture from his very original DL sedan. If you have a hood I really could use it. My body man says my hood will be the hardest part to get right. I only need the driver's side pieces but will take the whole thing if you don't want to separate the unit. Please PM me if you can help. RT -
The Ressurection of Daphne - a 1932 DL
Taylormade replied to Taylormade's topic in Dodge & Dodge Brothers
And because of that, I expect to open up the engine and find clean, almost new bearing surfaces, pristine valves and no wear whatsoever. Of course I also expect Congress to pass a balanced budget, world peace and to win the Lottery this week. <quickprintreadystate style="display: none;"></quickprintreadystate> -
I surrender. In my case there was plenty of evidence in the joints that were glued. I do find it hard to beleive that other joints would be free of any traces, but as I stated, I'm no expert. One car does not qualify me to give anything but an opinion based on limited experience.
-
The Ressurection of Daphne - a 1932 DL
Taylormade replied to Taylormade's topic in Dodge & Dodge Brothers
The good news is the top of the 32 dash just unscrews and comes off as a separate piece so I can access both sides and not have to worry about damaging the glass. Here's the top piece in place - And with it removed - So working on it should be easy.

-
I don't claim to be an expert on Fisher Bodies and you may be correct. When I restored my 1929 Plymouth U all of the top wood and the floor sills were rotten and had to be replaced. This meant a total disassembly of the body. The car was a two door. Chrysler designed it so everthing behind the doors came off in one piece - actually it was three pieces welded together but acted it as a single unit in removal. That left me with the doors - some wood for support, and the front cowl with wood supports for the winshield area and door hinges. The only wood in the car that was glued together were the two large roof beams on each side above the doors. They were so large the factory opted to make them out of several pieces glued together with finger joints. The rest of the wood framework came apart when I unscrewed the screws and bolts holding them together. They were never glued together. This wasn't a situation where the glue dried out or anything, it was obvious from the surface of the joints that no glue had ever been used. The uprights were held to the floor with metal castings and locked into the top beams with a mortise and tenon joint held together with a screw - no glue. Fisher Bodies must have had a different method. I know most of the bodies in the twenties consisted of many smaller panels nailed to the wood framework with the joints covered by a decorative strip. They didn't have the larger, more solid one-piece back and probably needed the glue. Like I said, I'm no expert, but I do know that the gentleman who helped me with the woodwork told me, "If the factory didn't glue it, don't you glue it." The car was squeak free and solid as a rock.
-
The Ressurection of Daphne - a 1932 DL
Taylormade replied to Taylormade's topic in Dodge & Dodge Brothers
Something of a lull in the restoration. I didn't think pictures or text of me cleaning up the garage would be very interesting. My body guy, Ed, is off to a metal working meet on the east coast, so metal work on the car won't begin until the first week in May. It's given me a little time to think about the process that will be happening over the next few months. One thing I really noticed as I took the interior out was the lack of much double-wall construction. When I worked on my 1950 Dodge Wayfarer, one of the big problems wass getting access to body panels. There was almost always an inner panel in the way - with lots of rust in between. On most of the 32 DB it's a single layer of steel, easy to get at from the front or the back. Even the doors seem to have more openings and working on them will be much easiler. Having said that, the two areas that need work - the dent in the roof above the windshield and the area below the doors both have double walls. It figures. In the meantime, I'm going to clean up and repaint the front seat frame, cut out new floorboards - I found some very high quality marine plywood and one 4X8 sheet will take care of everything. It better at 90 bucks a pop! I also need to do some minor straightening on the inner window frames and get them over to the woodgraining guy. One setback came when I discovered a former owner - pre 1965 when I bought the car - had created his own defroster by drilling a series of holes in the top of the dash, cutting a section of the wood support behind it, and running a heater hose up through the opening. Now I have seven or eight holes to fill in the top of the dash before it can be woodgrained. I know a TIG welder is better for this, but I only have a MIG, so I'll be practicing a bit before I tackle the actual dash. Does anyone actually make round metal plugs for jobs like this? It seems like making the plugs will be harder than the welding. Pictures coming as I get to these tasks. -
I like the teflon tape idea. Freezing might br a little tough on the new paint. And as usual, the fly in the ointment is the fact that the car is currently 140 miles away at the body shop and the frames are home with me. Now I know why a parts car comes in handy.
-
Thanks Dodger, I'll take a look. RT
-
I'm afraid there's too much force between the pieces for a trash bag to work. It would probably just tear. I need to come up with something very thin, very strong and very slippery. Don't you wonder how they did it at the factory?
-
This is the kind of annoying problem that always seems to crop up during a restoration. Because I tend to get obsessed with one thing and become sidetracked, I thought I'd seek help here instead of on my rebuild thread. I removed all the interior window surrounds, or frames, the other day. Not a difficult job - take the screws out, remove the top piece, lift out the bottom piece. As I did the job, I found that getting the top, upsidedown U-shaped frame out was a bit of a problem. The lower ends of the piece bound on the top of the sill piece. It took some force to pry them out, and the edges of the lower ends scraped across the top of the sill and it left some marks. Now I'm going to redo the woodgraining in the original patterns with the usual method of basecoat, wood pattern, then clearcoat. My question is - how do I get the frames back in without scratching the heck out of the top of the sill piece? The new woodgraining with it's clearcoat is going to be even thicker than the original. I know when I set the bottom sill piece in place and then try to install the upper frame, it's going to scratch up my new woodgrain. I can post some actual pictures tonight if this isn't making sense. I don't want to trim the lower legs of the upper frame - the factory designed things for a reason and I don't want to end up with a non-original gap. Anyone have any suggestions? Anyone who may have encountered this problem in the past? My only possible solution is to try and place a very thin sheet of plastic between the two and hopefully pull it out once things were in place, but with my luck it would probably get jammed in there and rip up the finish as I pulled it free. Any help is more than welcome. RT
-
My 32 Dodge also has Freewheeling engaged by a large knob in the center of the dash. It doesn't have the vacuum clutch (or it was removed at some point), but Phil Kennedy's original 32 DL still has all the mechanism intact.
-
The Ressurection of Daphne - a 1932 DL
Taylormade replied to Taylormade's topic in Dodge & Dodge Brothers
A bit of good news, Phil Kennedy found the rest of my mirror - the glass and the other attaching parts, so that problem is solved. Thanks for the help everyone. -
The Ressurection of Daphne - a 1932 DL
Taylormade replied to Taylormade's topic in Dodge & Dodge Brothers
Phil's car has the original rubber mat still in place. The pattern matches the rubber on all three pedals. Carpet was only used in the back. I have collected everything - and mean everything - I found as I disassembled the car. There was some sort of material between the frame mounts and the wood floorboards, to prevent squeaks, I'm sure. The floorboards fit together with notched edges and the entire floor was in there tight before I removed it. I remember a story my father told me about his dad - a grumpy guy that hated to stop for bathroom breaks on long driving trips. With four boys in the backseat (named Tom, Dick, Harry and Don if you can believe it) he instructed them to lift the floorboard and do their business through the hole. All this at forty miles an hour! Not to mention what the car following thought of it all. -
The Ressurection of Daphne - a 1932 DL
Taylormade replied to Taylormade's topic in Dodge & Dodge Brothers
Thanks, that would really help. Did you get the hood measurements I sent? <quickprintreadystate style="display: none;"></quickprintreadystate> -
The Ressurection of Daphne - a 1932 DL
Taylormade replied to Taylormade's topic in Dodge & Dodge Brothers
Here are a couple of shots of my mirror. it appears to have the original base with a more modern mirrior grafted on. As far as the wood floorboards are concerned, these photos should illustrate the problem. Moisture has started to delaminate the wood layers. They are good for patterns, but not really safe to use. The two back boards might be saveable, but I'm afraid sanding off the undercoating would damage them. Notice the undercoat on the bottom of this board. It has soaked deep into the exposed layer of wood and would be almost impossible to remove with out tearing it up. The hole burned through it doesn't help, either. This is the battery cover. I have no clue if it is original. Someone drilled a new set of screw holes in it at one time.


-
The Ressurection of Daphne - a 1932 DL
Taylormade replied to Taylormade's topic in Dodge & Dodge Brothers
Damage found After lunch it was time to examine things and see what needed work. It’s always interesting to me to see what you find under all that old upholstery, dirt and grime. As I said before, I found the door sills under the carpet. They weren’t even screwed down in the back - amazing that they survived. I also found the steel battery cover under the carpet. Phil told me he thought it was gone and I’d have to make a new one. That was a nice surprise. I took off all the door panels and received an unpleasant shock when I looked at the rear passenger door. Ed, my body guy, already expected it had been damaged at one time, possibly by flying open at some point – they don’t call them suicide doors for nothing. This is what I found. Ed and I tried to decide what had caused this. Our two theories were: 1. the door blew open and was damaged and had been repaired by a total hack, or 2. the glass had been broken (maybe by the door blowing open) and the idiot who replaced it didn’t know how to remove it correctly and cut apart the door to get it out. Either way, it’s a mess. That top weld is a lapped weld. Ed will cut it all apart and weld it up correctly, also taking out some metal damage on the door skin around the hinges. Other than that, all the doors looked good – no real rust, the bottoms were solid and everything was where it should be. I then noticed that only one of the four doors still had its stop attached. This was a strap that extended out when the door was opened and stopped it before it bent back on its hinges. Steele Rubber carries them so I’ll be ordering four. Next up was an examination of the lower door sills on the body. As I mentioned in a previous post, the passenger side sill was badly rusted, but the driver side looked okay. WRONG! Some gentle probing with a pick revealed rust in both sills. They will have to be replaced. This was a little discouraging. I knew the fenders would need a lot of work, and the dents from the ice fall would have to be addressed, but I never saw this coming. Ed was very reassuring, telling me that this might have been a problem a few years ago, but since he got his new pullmax machine, he can make a set of dies and reproduce the sill with no problem. We plan to cut the section along the green line from cowl to the rear area… …and then replace the area marked in green. The rust did not develop from a concentration of mouse urine as we thought earlier. It turns out this area was designed as a closed box. Over the years moisture tends to condense in a space like this and slowly rust it out from the inside. Dodge Brothers engineers created a very strong structure, but it’s very design eventually resulted in its failure. All this means that after Ed finishes the fenders and top work, I will remove the fenders slash aprons and running boards at his shop and we will lift the body off the frame and make the repairs. To save time, I’ll take the fenders to the painter so he can get started on them. I removed the cover above the windshield to get a better look at the space behind the big dent in the roof. Two problems – first, another mouse nest. A really nasty one creating even more odor. Second, there is a double wall in the body in this area and it’s spot welded together. This means that Ed will have to carefully cut a section of the inner wall away, make the repairs and then weld the section back together. Like I said, the metal work on this car is way above my pay grade. The rearview mirror is not original, the support looks correct, but someone grafted a modern mirror onto it. If anyone has an original mirror, let me know. Taking down the black vinyl headliner – I still can’t figure out who had that bright idea – revealed still another massive mouse nest infestation. It was raining you know what. Boy was I glad when that was done! All the wood looks good, so the top replacement should go smoothly. Notice there is no padding left - the mice used all of it for thier nests. With everything bagged, photographed and labeled, I packed it all into the SUV and headed home. Next trip will be to retrieve the gas tank, free up the rusted bolts on the running boards – which will have to be replaced – and take off the rear luggage carrier so I can get it to the painter.


-
The Ressurection of Daphne - a 1932 DL
Taylormade replied to Taylormade's topic in Dodge & Dodge Brothers
Yes, the bolts had a pointed end. I wondered what that was for. -
The Ressurection of Daphne - a 1932 DL
Taylormade replied to Taylormade's topic in Dodge & Dodge Brothers
Thanks for the heads up. I've sent samples to SMS and LeBaron Bonney. I've got my fingers crossed they'll come up with something. -
The Ressurection of Daphne - a 1932 DL
Taylormade replied to Taylormade's topic in Dodge & Dodge Brothers
I don't intend to toss them out. They aren't bad, but suffer from a really crummy undercoating job that must have been done in the 50s. Sanding that off may do more damage than I'd like - or the wood can take. Also, the glue in these boards is 80 years old and tends to start failing, leading to delamination of the wood. Just as a safety matter I think replacing them - in exactly the same pattern as the originals - is the way to go. The battery is accessed by a metal cover in the floorboards. -
The Ressurection of Daphne - a 1932 DL
Taylormade replied to Taylormade's topic in Dodge & Dodge Brothers
The Deconstruction Begins I spent a 14 hour day yesterday at Ed’s shop doing what I consider the most unpleasant job in the restoration of a car – taking out the interior. I most cases, I like to tinker with a car when I first buy it; get it running, drive it around the yard, have a little fun. It’s impossible with this restoration as I’m trying to get her ready for the Dodge anniversary meet next summer. I can’t enjoy the usual luxuries of a long, slow-paced rebuild. Not that I’m trying to emulate the reality show BS – this car HAS to be finished in three weeks or it’s the end of the world – but I’m really making an effort to get things done in time, so there isn’t a minute to waste. I drove the two and a half hours to the shop were Ed is graciously allowing me to work on the car whenever I need to. I figured removing the interior would help all concerned as I can get the seats and panels to the upholstery shop to get that process started, and we’ll have a bare, non-flammable canvas to work on when the body work commences. As a caveat, this is the first restoration I’ve been involved with where I am not attempting to do “everything.” I was of the school that if I wasn’t hands on with every aspect of the work, I was cheating. I guess I’m older and wiser now. The metal work on this car is way beyond my pay grade. I’m sure my wife and I could do the upholstery and have it ready in a year or two. But I want to drive and enjoy this car in the years we have left, so I’ve contacted good folks who will do the bodywork, painting and upholstery – and at a reasonable price. I’ll be there at Ed’s shop helping with disassembly and any other way that I can, but he will be doing the real metal work. For my part, I’m doing the frame, suspension and mechanical work. If the motor needs rebuilding, that will go to a pro shop. I still really enjoy working on these cars, but I’ve become a realist in my old age. Anyway, back to removing the interior. I’m still getting past the fact that I haven’t owned this car for 45 years. I know better, but I keep expecting things to be as they were in 1967 when I last drove her. They are definitely not. 40 years in an unheated garage in Connecticut have taken their toll. What’s left of the fabric is so dry rotted it literally comes apart in your hands. The vinyl crumbles at the touch. I could only imagine what critters had left waiting for me under the seats and headliner. The bi-polar nature of the interior still baffles me – half original, half vinyl, as if whoever started the job gave up halfway through. The carpet came out first. There was non-original carpet up front instead of the correct rubber mat. It was hiding under a couple of cheap rubber mats. A plus was the discovery of all the door sill plates under the carpet. The back carpet was non-original black and was good for patterns only. Next, I tackled the seats. Both bottom cushions simply lift out. The front seat is actually adjustable and sits on two slides bolted to the wood floor. Four screws and it came off. This attachment method would definitely not pass a modern safety test! In typical fashion, the upright cushion of the back seat was held on by two bolts at the bottom and hung by two hooks at the top. Everything came out very easily with no broken bolts and little effort. I was happy to find the seat springs in good shape with most of their black paint still shiny and intact. This should help out the upholsterer. With the carpet and seat gone I got my first good look at the floorboards. They were wood from front to back. In the front corner on the driver’s side was a triangular wood piece held on by wood screws. I removed it and found and enclosed space that I believe was the tool storage area. I didn’t know what it was when I first opened it as it contained a mouse nest approximately the size of Connecticut. The stench this unpleasant discovery gave out was overpowering. I quickly donned rubber gloves and a mask, but even after I cleared everything out the smell remained for the rest of the day. With that out of the way I tackled the floorboards. As I attempted to remove them the going got quite a bit rougher. The floorboards are held in place by bolts that pass through holes in the wood and into metal tabs on the car frame. Years of upper New York State snow and salt had done a number on these bolts and most of them refused to budge. Ed came to the rescue with an impact wrench and we broke everything loose in short order. Notice the hole burned in the floorboard above the muffler. We found several sheets of asbestos nailed to the bottom of the board. OSHA alert! With the exception of the front floorboard, all the rest were in pretty good shape. I was surprised how well they had held up. I still plan to replace them all with marine plywood just to have a little peace of mind as they are the only thing between me and the road. Interestingly, the footboards are solid steel, very thick gauge and in two pieces. They had surface rust but it appears they will clean up well. There may be a few pinholes in the lower piece, but nothing that can’t be repaired easily. You can just see them at the top of this shot. Now I had my first look and the frame – greasy, dirty, but everything looked solid. There were no rust holes or any damage. A very beefy frame – new for 1932 – with a large, heavy X-section stared back at me. I found it interesting that there were no metal cross-braces in the body. It was open from the cowl to the back seat pan. Everything in between was simply wooden floorboards. I figured there would be a brace between the door pillars, but the Dodge Brothers engineers apparently believed the frame was more than strong enough to keep everything in place. At this point, I took a lunch break and contemplated my next course of action.


-
The Ressurection of Daphne - a 1932 DL
Taylormade replied to Taylormade's topic in Dodge & Dodge Brothers
Thanks. Yes, she's pretty solid almost all there and my wife and I have a pretty comprehensive plan to get her ready for next year. Of course, when things like mice urine and a rusted body part you never expected somehow show up, things can get off track quickly. I'll keep our progress posted as we wade through this restoration. I've done it before with the 29 Plymouth U and I know what's in store for us, but at least I'll take an all steel body over wood framing any day of the week. It'll be interesting to see what other hidden treasures I find under the upholstery!