


alsfarms
-
Posts
6,170 -
Joined
-
Last visited
Content Type
Forums
Gallery
Events
Everything posted by alsfarms
-

My 1910 Mitchell "parts car" project
alsfarms replied to JV Puleo's topic in Our Cars & Restoration Projects
Nice work on the oil pump. Al -
Is the "R" Reo a 4 cylinder car? I have heard of more than a few novel repairs given to these relics we work on and your story is another. Al
-
Joe, The building, in the picture, used to be on the same property that my house is on along with a store that my Great-Grand-Dad ran. When he died the property was split up and when the next generation passed, split up again. The building is currently owned by a relative of mine, (imagine that)! I may actually purchase and joint that property up with my home again and yes, what a nice place to store and work on cars! It does need a bunch of work as it has not been taken care of the the past 30 years. Gary, Your pictures sure give me the urge to spend some time on my Studebaker project. I am forcing myself to stay focused on the current project, however. Your reference is much appreciated. Do you have other body work completed on your Indy car? Al
-
While I was out and about messing with springs and such I scrutinized the Locomobile from axle. I think I have a solution as to the reason my Great-Grand- Dad replaced the original main leaf on the Locomobile. After very closely checking out the front axle, I can see that the axle is bent on the side that has had the spring replaced. I suspect that some ditch must have caught the car back in the 1920's. That early time frame my area would have had absolutely no asphalt roads and VERY few with gravel. My Dad was born in 1926 and he had no recollection of the car ever running in his lifetime. I was to young to know enough to chat with my Grand -Dad while he was still alive, he passed on in 1964, at that time I was 10 yrs. old and didn't know that I would have a lifetime interest in antiques to include about every thing from cars on..... Here is a picture of the first automobile dealership in our side of the county I live in. This building still stands and is located just around the corner from my house. My Great-Grand-Dad built/owned that business and ran it until just before his death in 1932.

-
Is anyone else to the point of dealing with frame/suspension and spring issues as you build your speedsters? Share your learning here for all our benefit. Al
-
1922-23 Dodge Bros. Sidescreen question
alsfarms replied to alsfarms's topic in Dodge & Dodge Brothers
Hello Dave and Jan, Could you take a look at the picture I posted of an EBAY back cab panel and share your thoughts on it being a Dodge Bros. Screenside cab back panel. Thanks, Al -
Hello Dave, could you look at the above attached picture of an EBAY back cab panel and tell me if you think it may be Dodge Brothers? This panel is back on EBAY again. Al
-
This picture is of the other side of the car and shows the original main leaf spring that was installed at the Locomobile factory in 1909. The end is forged and not rolled like most typical springs. I need to drill and install the spring alignment clips when I do the actual assembly. Al

-
Here is a picture of one of the damaged and repaired sometime long ago, front springs. The main leaf is not correct. Al

-
Here is a picture of my new purchased duplicate springs. They rounded the ends and tapered them, they look nice. Al

-
Here is a picture of the, virgin from the Locmombile factory in 1909, front spring set from the other side of my car. This spring is damaged on the other end and requires replacement also. Note the forged front end of the spring that forms the fitment into the front frame horn, it does not have a typical rolled formed eye like most springs. Locomobile must have thought this design was deluxe when they engineered the car! (I am not so sure about that!) Also note the "riveted on" spring stack alignment clip. I will need to drill and install these same alignment clips when I assemble the springs to the axles and frame, coming soon! Al

-
Hello Gary, Are your spring shackle bolts grade 8 or grade 5? I should give Eaton spring a call and see what dimension the bronze bushing they have come in. I would probably want a blank or one with a pilot hole only. Do you have your axles/springs all set up and assembled? A few postings up you will see the shackle bolts with provisions for greasing, very similar to what you have built for your Indy Studebaker, but in my case, more appropriate for this brass era automobile. I built my shackle bolts out of 4140 so I can toughen then with heat treatment but not make then brittle before installation. I have included the yellow brass cover that will be very similar to a "pinch top" fitting as found in 1909. Al
-
Here is one of my original replacement front springs that was broken some time....long ago.... Others of the spring stack are also broken. The whole spring set needed to be replaced. Pay attention to the eye. It is a replacement and does not match the absolute original main leave shown next.

-
Here is a close-up of the nice job the spring shop did to built these springs for me. Al

-
I thought I would follow up with a few additional pictures for springs. This is a picture showing the profile of one of the new front spring sets purchased a few years ago. They have a matching taper and end profile to the originals. Al

-
Hello Joe, Your thoughts echo exactly my thoughts to make a significant improvement to the main leaf eyes. I am certain that I could ream the existing eye holes just larger than what it is now and I agree, would not need to make a "perfect" ID. I would probably use a good grade bushing bronze, pre-drilling a pilot hole only, before pushing back in place. (That way I would minimize any additional distortion). Lastly I would drill/ream to fit my new machined shackle pins. I would then be able to sleep nights with out the spring eye dilemma bugging me! I am trying to not over engineer this issue, but I simply can't live with it the way it is! Al
-
Hello Mike, You hit the nail right on the head, regarding this problem! I am so happy with the rest of the new made spring stacks that I am just swallowing hard on the problem with the eyes. The issue does bug me to the point that I will remove the existing bushing, ream oversize and build a custom bushing to push back in. I will probably have a pilot hole only to start with, so I don't distort the bushing when pushing it in place. Then I will finish the ID of the hole to match my new machined shackle bolts after the new bushing is in place. Al
-
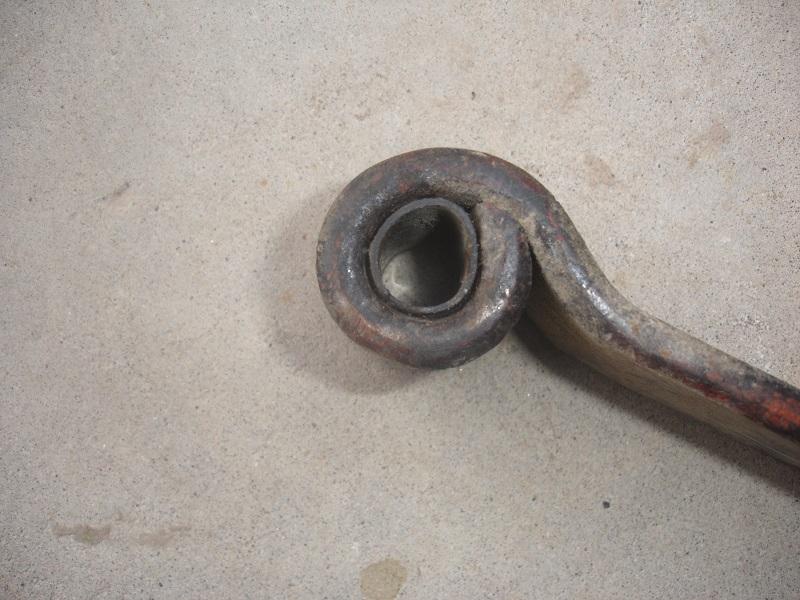
Here is a picture of one of the main leaf end eyes. I am very happy with the rest of the spring stack as they have nice tapers and rounded as the originals. However, I am not that pleased with the "out of round" bushing. I had thought of having yet another main leaf built for each of the four corners. After more study, I think I will push out these bushings, then ream the hole over-sided (without impairing the strength of the spring) then machining some new custom deluxe homemade "round" steel bushings to push in and fit properly my new shackle pins.
-
Here is one of many of the chassis and suspension grease fittings that I have machined. These will have the same "pinch top" design brass grease caps. I made these caps to be able to bottom out on the threads before hitting the head of the grease zerk. That way they will not rattle off while I am driving down the road.

-
This is a restored rear spring rear shackle, with a new pin installed.

-
This is the inside of the brass grease cap that shows extra room for the grease zerk.

-
This shows the machined and threaded end of the shackle bolt that will thread on the grease cap and have provision for a typical modern grease fitting. I did this to assure that I get things greased and keep it clean! I need to clean and heat treat all the 4140 parts to toughen them up before I put them into service.

-
Here is a picture of one of my new machined 4140 shackle bolts , along with the yellow brass grease cap. I am not quite finished with the cap. It will be configured like the typical "pinch top" design.

-
Here is a picture of the exact duplicate spring shackles I machined out. The left shows the outside and the right shows the inside. Al

-
The original main spring design has a nice tight eye in each with a steel bushing to carry the shackle bolt, but worn out severely. (The old springs are stacked with a bunch of other Locomobile parts that I can't easily get to at the moment). Here is a picture of an eye on one of the new main leafs for this car as built by a shop several years ago. The eye is not real round, according to what the bushing looks like. This is the same configuration as was the factory original spring. I think I can remove the bushing and ream to an oversize that will not marginalize the eye of the spring then install a new "Round" OD and ID custom bushing. If I keep the thing greased, I should never need to replace the bushings in my lifetime. Al


