

Randiego
-
Posts
309 -
Joined
-
Last visited
Content Type
Forums
Gallery
Events
Everything posted by Randiego
-
Hi All, I have not been on the site for a while. Progress is moving along on the 78. I am attaching pictures here of the progress. I am now putting the parts back on the finished body. The doors are off as I have to put in new rubber trim and a new window crank in one door. I took the wing windows off to replace the rubber and window chanels. I have buffed out all of the stainless steel. In the previous post, you can see the body work in progress. Here, the first pic is unloading the de-trimmed Spider at Classic Collisions in Vista, CA. 2,3, & 4, after the body work is completed and in primer. 5 & 6, the Fiat is back in my warehouse and I am getting ready to put it back together. The pics don't show the flawless paint job that Peter did on the car. As I get it reassembled, I will roll it outside for better photos. I will be posting pics of the progress.


-
I finally have time to get back on the 73 Fiat restoration/build while my 78 is in the paint shop. Here are shots of the 1608 engine that I described in the earlier text regarding the 1973. This engine was the best designed/running twin cam that FIat had offered BEFORE the EPA and CARB (California Air Resources Board) threw all of the new specs and regulations at the auto manufacturers for the 1974 model year and on. This was probably the best designed engine that a cooberation between Fiat and their "aquired" engineers (from Ferrari) came up with to date. After this engine, the performance for Fiat was severely hampered. It was still a nice driving car with the 1800 engine but not a performer like the 1608. This is why I opted for the 1973 model year. To get away from Cal Smog. And I can modify the engine to my hearts content. The first pic shows the front of the engine with the adjustable cam drive gears. When I get this car "chassis dyno tuned" the tech can adjust the cams (which are performance cams) for optimal power and performance. I painted the water pump blue to depict the cooling system. And to add "bling" I painted the head and some other parts with VHT engine paint in gold. The 2nd pic shows the Abarth Tuned Heders. The 3rd pic shows the Weber 40 IDF carbs. These are a matched set from Italy, not Spain, where they moved to a while back. They are way better than the Spanish versions of the Webers as I have been told. Below them, on the left side of the block is the Compu-Tronix distributorless, high energy (50K volts, I think), racing ignition system. It is located down on the side of the block instead on the cam box on the top of the engine. That is where the original distributor was located. You can see in the second pic a gold cover where that was located. The Compu-Tronix is driven off of the aux shaft down below. Fiat made a very good fuel pump that was serviceable. I took the original fuel pump apart, cleaned it all up and the screen and diaphragm were in excellent shape. I reassembled it and tested it. Great performance and good pressure. Plenty to supply the Webers with. Again this is not your normal engine. WIth all of the head work (ported and oversized valves), carburetion, custom crank, rods and Arai pistons, blueprinted and balanced and lightened flywheel (they removed over 7 lbs). I am expecting between 165 to 175 HP. I will not know exactly till it is dynoed. The 1608 came in at 106 HP. On a lightweight small car like the Spider, that extra 60 to 75 HP will make it EXCITING to drive ! ! Plus all new suspension components will make this into a nice track car if I chose to take it to Laguna Seca or other tracks (still left) in California. The 78 will be done at the end of the month and after I get it back from the paint shop, I will post pictures of the car. This Friday, I will be picking up the bumpers and windshield frame from the platers for the 78. Then I get to re assemble the front and rear bumpers. There are a lot of parts that come off of those items. I will also install the new glass in the windshild gasket and re assemble all in the windshield frame. All of those pictures to come in the next posting. Randy


-

1936 Chrysler Airstream C-8 Convertible Restoration
Randiego replied to Professor's topic in Our Cars & Restoration Projects
Joe, When I weld S.S., I usually have it "Tiged" (Tungsten Inert Gas). Same for aluminum. The torch is small and you had feed the s.s. rod at the flame. Generally, the bead is neat and uniform. On your exhaust, that may be a bit trickey going all around the seam. I was at my local welding supply house and a bottle of the special mix gas is pretty hefty. Unless you are doing a lot of s.s. welding, it may be prohibitive purchasing the gas, even in the smaller bottle. Plus the wire. The wire feed welder that I have, an ESAB, has a larger head and the envalope for the intert gas does a great job with mild steel. I have never used it for the s.s. One question; Where you are welding the seam, do you have enough room to go around the pipe, or are you removing that section from the car to weld it up, then re installing it? I would venture to say that it will be tricky to weld above the pipe where there is not a lot of room or visibility (unless that portion of the exhaust is removed from the car for better access). If it were me, I would take the Chrysler to my local muffler shop and have them weld it as they do this daily. It cannot be that expensive and it certainly would be cheaper than the investment in the spool of wire and the gas that you will need to weld the s.s. Plus, they do that daily and have plenty of experience in welding s.s. and hard to reach places. One thing about welding the pipe vs. the clamps. It will be solid and chances of leaks down the road (with clamps) are pretty negligable. And with s.s., you only have to do it once! Just saying. Randy -
Hey guys, Last Friday, I trailered my 78 Spider to the paint shop after I detrimmed the car. I have a consumate painter (he's Dutch and a perfectionist) who is doing the body and paint. One thing about the 78. Back in the early 80's, the previous owner got "bumped" and decided to do a repaint. Well, he did not use a Fiat color but a Ferrari "hybred" color. It isn't red and it isn't orange but a blend somewhere in the middle. A very striking color. A tech in Solana Beach told me to repaint it in THAT color as it was striking. SO.....we are. I will post pictures of the progress as I am looking to get the car back to my warehouse in early October. Having the car detrimmed makes it a lot quicker for my paint guy. I am taking the chrome bumpers and windshield frame to the platers this week. I have a few parts that need to be replaced. My original tail lights shined up very nicely but there is a major ripple in the chrome (over plastic) that will not show that great. New OEM lights are..........EXPENSIVE ! ! $760.00 each (OEM) Since that is the only major expense besides body and paint and the rechroming of the bumpers and windshield frame, I am going to go with them. This will be a 100 point car when done. And as soon as it is done, I will be back on the 73. I plan on posting pictures of the 73 and the engine soon. Work constraints eat up my free time so bear with me. The reason that the 78 is getting attention now is that an idiot did not see me and was changing lanes and "tattoed" my drivers door and front fender. I got an estimate to do the repair but after talking to the restoration shop, it would not look good with half of the car painted and the other half with 40 year old paint (and a few dings and nicks) complimenting the rest of the car. So I opted to go for a total restoration. I detrimmed the car and that knocked the price down on the complete. After I get it back from him, I will let it "season" in my shop for a few weeks before I start the reassembly. I will keep you posted with updates and as soon as this car is done, it is back on the 73. Randy


-
Chris, I've heard that Moss has improved the parts that they sell now. Not restoring any English cars today I would not know but from one of my sources who restores English cars, he has contacts in the UK and gets a lot of parts out of England. Good luck and I will be watching. You are doing it right and I am sure that your MGA will be a very nice one.
-
Roger's handcrafted 1:12 scale models
Randiego replied to Roger Zimmermann's topic in Our Cars & Restoration Projects
Roger, The fuel tank looks great ! What did GM use for a fuel filter back in the day? Just a strainer and settlement bowl? Or ? ? The gas back in the late 20's early thirties was nothing to write home about. And only one grade. But that was the simplicity of life back then, eh? -
1949 Buick Super Restoration project
Randiego replied to Skvitt's topic in Our Cars & Restoration Projects
Skvitt, Are you doing all of the sewing on the interior? If so, you are TALENTED ! Not only are you a body man but tackling the intricies of auto upholstery is a specialty that most cannot do. The seats look amazing and that arm rest assembly is a lot more complicated than what it looks to be. -
Hey all, In 2015, I purchased this 73 Fiat Spider for a complete restoration. This car is smog exempt and I am not limited on what I can do performance wise in California. I have a 1608 twin cam engine for this car. This engine was the last "performance" engine that Fiat had developed before the smog laws took a major "bite" out of performance for cars here in California. After this year, they were detuned and did not have the HP or performance that the early Fiats had. The 1608, by far, was the platform that the enthusiasts preferred. Not until the 2000 fuel injected "turboed" engine (that came later), were the Fiats desirable for the local enthusiasts. Hence the popularity of the 1608. I took my 1608 to Mark Allison in Upland, CA (a surburb or LA) and we specked the engine for all the performance that I could get for that engine. I had JMS Racing in Covina, CA bore the block (20 over) install a custom performance crankshaft, lightened (took off 7 lbs.) and balanced the flywheel, had Arias custom pistons fitted, and performance rods, and a Hi Flo oil pump installed. Then the engine was blueprinted and balanced. The head was ported and 1MM oversized stainless steel intake and exhaust valves fitted and new performance cams were installed. I purchased a Compu-Tronix distributorless hi performance (racing) ignition system and Abarth headers and a dual IDF intake manifold from Mark also. From a Porsche racing/tuning specialist in Raleigh, N.C. I got a pair of Weber (Italian, not Spanish) 40 IDF "matched" carburetors. He did a lot of performance work on them installing "Jet Doctor" specialty parts (in the idle circut) and then flo benched them for optimum performance. I had Pierce Manifolds in Hollister, Ca build the custom linkage set up for the Fiat. Once the car is complete, I will have it "chassis dynoed" for the maximum performance available. The Fiat transmission and rear end are a good design. Since I will not be "popping the clutch" they will only need to be serviced and re sealed. I also will be installing a new "donught" in the drive shaft. Nothing like new rubber for smooth operation. I will be doing a complete suspension overhaul with new bushings, tie rod ends, ball joints and a new 1" sway bar up front. In otherwords, the whole suspension will be refurbished. I will be using performance "slotted" rotors and performance brake parts to round out the running gear. Since I need to downsize my photos, I can only post a couple of pics here. But in the future, I will be "shrinking" the immages so I can upload more pics. Randiego


-
Hursst, I am now working on two Fiat 124 Spiders, a 1978 and a 1973. I recently (last week) de trimmed the car and it is now in the paint shop. I am sending out my bumpers and windshield frame to be replated. The shop here sends them to Tijuana where they do not have to deal with "The California Air Resources Board". A bunch of Nazis. Now our local shops cannot spray with spirit (laquer based) paint. They use water based urethane ! In Tijuana, I can get "show quality" chromium done. They do excellent work and at a fraction of the cost here stateside. The 73 has had all of the body and paint work done several years ago but I have not had time to work on it until recently. It is sitting on my lift, covered up in my shop. I am finishing the performance 1608 engine this week. I will be tackling the 73 as soon as I get my 78 finished. It will be show quality when I am done with it. I have attached two pics before the damage to the 78. Because the 1973 is smog exempt, I am pulling out all stops with the engine. I will post pictures of the car later on. Randy


-
Hursst, I changed the original painted wire wheels for these. Much stronger and with the chrome finish, they are a better way to go. Notice the floorboards (in the previous pics) that are the marine grade that I was talking about in the previous post? Being back East, I don't know how much winter driving you will be doing but that is the best insurance policy to prevent any future "rot".
-
Hursst, Here are some more shots of my MGA. Randy


-
Hursst, Wow ! A familiar project. Back in 2005, I took my 1960 Mark II 1600 to the shell and started a year long concour restoration here in San Diego. The body had similar "rot" in the areas that you are addressing with your car. The body prep and urethane paint took several months to complete but when it was done, it was.......perfection! When I was finished, I had a 100 point car. I opted to keep the car as original as possible and ended up only replacing the steering wheel (from Moss Motors) Back in the early 2000s the parts from Moss were not that good. Example; we took every fastener off of the MGA and sent them to Los Angeles and had them re cad plated. I had a local chrome shop here in San Diego do my brightwoork. (All of the chrome shops here are now gone). This way, there was very little that I had to repplace. Moss's floor boards (plywood) was inferior junk and did not fit properly, so I took the originals and traced them onto Marine grade ply, cut them out and then sealed them with epoxy on both sides and edges. Then I painted them with a good exterior paint to match the OEM finish, only better. Can you imagine what Morris Garage used back in the late 50's early 60's? We sourced OEM leather for the seats and console. We sourced and installed OEM carpeting to finish the interior. One of my contacts in the local car restoration business sourced original Cal License plates and tags. The envalope that they came in had "California Penal System,, Edmund G. Brown, Governor" printed on it. I had all of the original tools, jack, handle, books, auto log and receipts dating back to the original sale date. So.....all of the provenanace was presented with the car and I took 2nd at the La Jolla Concours Motorcar Classic here in La Jolla, CA in 2007. I got beat out by a freshly restored Jaguar XK 120. 😞 All of the work that you are doing here takes me way back. I will watch your progress on the car. If you have any questions please feel free to drop me an email; randy@americanarbortreeservice.com I will be happy to commiserate, er, chat with you regarding your MGA.


-
1949 Buick Super Restoration project
Randiego replied to Skvitt's topic in Our Cars & Restoration Projects
Skvitt, On occasion, we tune in to see what others are doing in our hobby/trade. You sir, are a MASTER. The attention to detail of every thing that you touch shows a skilled craftsman who really knows his "stuff". Following you restoration of this old Buick is a fascinating tale that we enjoy immensly. I was saddened to not see any current postings, thinking that this car was put on "hold" due to ? ? Anyway, it was a nice day to return to see you back at it. My dad was a "Buick head" back in the day, starting with a 1952 (after he completed medical school) sedan and progressing up to the 1956 Roadmaster wagon for our expanding family. He purchased a 1955 21' Lonestar Cabincruiser (Aluminum construction from a Texas boat builder of the day) and he bought a 1955 red and white Buick Stationwagon to pull it and haul our family to the local lakes of S.E. Kansas/North central Arkansas. Our lake of preference was Bull Shoals Lake close to Mountain Home, AR. Those Buicks were beautiful examples of Detroit Iron and served our family well. Our last one was the Charcoal/Red combination that was fully loaded with all the bells and whistles. It never once faild our family in it's dutiful service. My dad was a lifelong Buick Head. Sadly, we lost our father in 1960 and so the end of the Buicks came to pass. But the memories of those Leviathans are permanently etched in my memorybanks. More room and luxury for a family of 7 in those days. Restoring this model will be a "crown jewel" in the ensuing resto threads. Can't wait to see the next installment. Great work! -
1936 Chrysler Airstream C-8 Convertible Restoration
Randiego replied to Professor's topic in Our Cars & Restoration Projects
Living in San DIego, from the end of May thru the end of Sept., half of the cars here have Arizona plates. The "Zonies" swarm here to escape the heat of the Mojave desert. Most have two homes. One in Az and one here in So Cal. I am sure that the Professor made a lot of "relief" trips to the West to escape the heat. One exception to that is Flagstaff. That community, up in the mountains at the North end of the state is just georgeous and..........mild. Even in the torrid months of July and August. When I drove through there in July, 1974, on my migration to San Diego, I did not want to leave, it was so nice and beautiful. l have been back there a couple of times since. It has grown and the university there has become popular with kids wanting to escape the big cities. A nice community as Joe can attest to being in Arizona for the time that he was there. Other sites in AZ are equally beautiful too. But Flagstaff does not suffer from that debilitating heat that the Phoenix area suffers from. -
Roger's handcrafted 1:12 scale models
Randiego replied to Roger Zimmermann's topic in Our Cars & Restoration Projects
Forum Members, For those who have been following Roger's build of the Cadillac V16 engine and chassis, I was touting the RR chassis that the Nethercutt Museum has on display in Sylmar, CA (north of Los Angeles). WIth the covid and all the shutting down of the museums over the last two years, I was waiting for them to reopen. Finally, I was able to get up there this last Saturday and shoot the RR chassis that I had been telling you all about. I have 44 pics but I cannot attach them all here. I have selected a few to give you an idea of how magnificent (and rare) it is to see one in all of it's spelendor before a body is attached. Here is the story on this chassis. In the mid 50's, a prominent race car driver heard from sources that there was a RR chassis that was still intact in East Germany. This was to be sent to a prominent coach builder before the war broke out. The car was put into a storage shed at a munitions plant and the wall was bricked up. Amazingly, from all the bombing the small building was not damaged, however, it was burried in a lot of rubble from them bombing the plant next door. The race car driver was injured in a crash and was in the hospital in London. He was always talking about this chassis and wanted to get his hands on it. Well, his crew members (since they were idle during his recovery) started the quest to see if this chassis existed or was just a "story". They did the research and found the guy who was touting this story. Still alive. They contacted him and he took them to the site where he said the chassis was. They got through the rubble and got enough of it away from the building. They were able to peer through a slit between the bricks and to their amazement, saw the chassis. Now the real issue was; How the hell are they going to get it out of East Germany and through the Brandenberg gate? Well, they got a flatbed truck and in the middle of the night, tore down the wall and loaded the chassis onto the flatbed. They then "burried" the RR under a load of cabbages and the next day drove to the produce market on the West Berlin side of the border. (vegetables and produce were allowed to cross to the markets to sell their produce at the markets in West Berlin). They got across the border and the chassis was unloaded and shipped to England. Mr. Nethercutt heard about this chassis and made the deal to purchase it. He had it shipped to Los Angeles. It sat in the warehouse wating for them to find a body and commence the work. The chassis was intact, all original but missing the radiator surround. What you see here is how the Nethercutt team cleaned, polished and painted the chassis as when it was delivered to the coach builders back in the day. Notice the dash. That was temporarily attached to the cast aluminum bulkhead holding the instruments until the coach builder could put them in the custom dash that they would fabricate, along with the body. The curator and management of the Nethercutt Museum have decided to not to find and install a body on this chassis. Instead they are displaying it as it is. It is a work of art and indicative of how the manufacturers meticulously designed and build their automobiles back in the day. Roger's chassis is along these lines. This is a late 30's chassis and Roger's is an early 30's chassis. There is a lot of differences between a Cadillac and a RR but the underpinnings of these beautiful works of art are similar in their fit and finish, albiet some of the functions of the two are different. Randy I have a total of 44 pics of this masterpiece


-
1936 Chrysler Airstream C-8 Convertible Restoration
Randiego replied to Professor's topic in Our Cars & Restoration Projects
Joe, Your "benefactor" and friend who bequeathed the auto to you is smiling down from Heaven at your marvelous transformation from a sitting hulk to a road worthy machine. Kudos to you and your perserverence to bring this Chrysler back to it's proper running condition. And run it does ! ! It sounds great. It looks so amazing to see it driving up your drive with all the tree canopys framing the car. Those pics could very easily have been as this car was new. Great work Joe. We look forward to the next post. -
Roger's handcrafted 1:12 scale models
Randiego replied to Roger Zimmermann's topic in Our Cars & Restoration Projects
Roger, What an amazing and beautiful chassis you have created, Roger. I have a feeling that this will eclipse your previous creations. I am partial to the 30's automobiles as they were unfettered by the "bean counters" squeezing the engineering and manufacturing for more profitiable bottom lines. This era was all about quality and beauty. All one has to do to appreciate those times is to go to a Concourse auto show and see a 1930- 31 Cadillac V 16 in it's splendor. At our show here in San Diego, we had three sitting side by side. A roadster and two sedans. They glistened in the sun and had more of the crowd's attention than the rest of the cars. Just beautiful. It's a damn shame that most of the beautiful detail work will be covered up and out of sight. But the chassis will be able to be seen if you set the model on a mirror! Anyone following the threads will know and see your amazing work. I am just baffled by how realistic this chassis is. Work constraints has not allowed me to travel to the Nethercutt to photograph their RR chassis. But I plan to travel this week to get that done and finally post those pics. Again, Roger, you set the bar for what finite modeling is all about. No detail too small to tackle and incorporate into your work. We all await the next posting for the new "element" that you create. Bravo, Maistro. -
Roger's handcrafted 1:12 scale models
Randiego replied to Roger Zimmermann's topic in Our Cars & Restoration Projects
Roger, Not only are you a mechanical engineer, you can add "Petrochemical Engineer" to your sheepskin ! ! I wonder if Michelin, Firestone, Goodyear, Goodrich, Yokohama had as many "trial and error" runs as you have had? Being the mechanical mind that you are, you think through all the steps before you act. But.......materials do not always cooperate. Brass, aluminum, steel all have their properties and are not complicated once you get experience working with them. But synthetics poses a whole different set of problems. One question I have; Are the materials that you are using today the same as what you were working with when you were making the Continental tires? Or have they changed since then? Seems that you had more issues with these tires than with the ones for your previous models. And was Gerald Wingrove using the same products that you are using today? Have they changed in composition from what you used in these tires? So many products have been eliminated these days due to "environmental" concerns. We no longer can use the good paint (lacquer based) here in California. They can only use "water based" paint in the repair shops. I have to drive to Arizona to get the paint that I once was able to buy here. I have a solvent tank for cleaning parts and I could get the solvent inexpensively ($15.00 for a 5 gallon bucket) Now that same 5 gallon bucket costs me $67.00 plus tax. And I am lucky to get it. SafetyClean, who have solvent tanks at the local auto repair and transmission shops can no longer supply them with solvent. Mainly, it is a soap solution! Try cleaning up an engine block or transmission case with caked on gunk with soapy water ! My friend, who owns a shop told them to take their tank out. He found that "Simple Green" worked better than their product. First, he power washes the block/case at his outside pit. (he did not have to do that with the old system) then the part is put into the vertical wash tank and the fluid is heated to 150 degrees. It has worked O K, but not as good as the previous solvents that he can no longer get. Such are these times. Randy -
1936 Chrysler Airstream C-8 Convertible Restoration
Randiego replied to Professor's topic in Our Cars & Restoration Projects
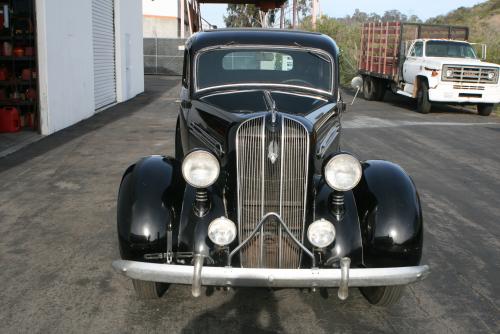
Joe, Great work on the temp guage. When I was installing my temp bulb in the block of my engine, (and mind you I was very careful) I was "gently bendig the wire wrapped copper tube to conform with a friend's picture of his 36 engine compartment that was original. The horror of the day.....the tube cracked ! ! ! 😞 One must remember that 84+ years is not kind to ancient copper. I ended up very lucky. I got a NOS guage/tube/bulb assembly from a gent who has many parts stockpiled for later use. Saved the day. But IF I had seen your detail of how you restored your temp bulb, I surely would have done the proceedure that you have detailed here. On to your topic about the driving lights. Tripp was one of the premier companies that made driving lights for the industry back in the day. Buying a pair of 6" lights in NOS or excellent condition will set you back a small fortune. Are your lights "sealed beam" or do they have the provision for bulb replacement? I'm not sure of the year that they all started supplying sealed beam lights but I think that it was post war. At any rate, I am sure that you want to keep those as they were on the car when you got it. Surely, there is a source in the club that has wiring instructions for wiring in the lights. Some member (somewhere) should have paperwork regarding the Mopar lighting kit and how the wiring was to be "run". That is a great idea about using two batteries for extra reserve. I wonder if anyone has mentioned to you about increasing the output of your generator? A friend and my "guru" regarding the older vehicles, informed me that you can also increase the amperage ouput of your generator by adjusting the regulator (inside). You take off the cover of the regulator and there is an adjusting screw that you can screw in or out for amperage adjustment. He said that you have to be careful or the downside of that is that you will "boil" the fluid in your battery. He said that you can hook up a guage and increase the output to a safe level that is above what is factory spec. I am sure that you can achieve the same results with your system without going to the expense of altering what you have. Make sure that your brushes are in good condition and if needed, you can take the generator off of the car, dissasemble it and clean the armature. That is an easy fix. I took my 36 Plymouth generator apart when I got the car, cleaned it up chucked the armature in my lathe, took a fine grit carborundum paper and sanded the "varnish" off the copper armature. I also lightly sanded the brushes, removing the "glazed" surfaces. The bushings were in good shape and were not worn. I put a good lithium grease in the bushings (both ends) and reassembled the generator. I painted the housing with Dupli Color "satin" black engine paint. (It stands up to 400 degrees). it works well and withstands the rigors of the heat in the engine compartment. Ditto for the starter too. That was 5 years ago and my generator and starter look as nice as the day that I serviced them. My starter and generator are original along with the engine. 72K miles and it still runs very strong. And Chrysler, like GM, has a provision for oiling the starter with an oil port. Now that you have sorted out the problems with your Airflow, it will give you YEARS of reliable service. The first thing that Walter Chrysler built into his vehicles.........quality. My first glimps of an Airflow was in St. Louis back in 1973. I was cruising on the freeway going to work. I was motoring along at 65 mph. Suddenly, in my rear view mirror, I saw this black vehicle coming up on me a a very good clip. I moved over a lane as this streamlined "bullet" went by me. I floored my Dodge Coronet (with the slant six) trying to catch up with that car to see what it was. At 85 mph (about the max that my old Dodge could muster) I finally caught up to read the script on the car. A I R F L O W. The car and driver looked very comfortable at that speed. What a car ! ! Joe, you are in rarified air with the Airflow owners group. We are all in respect for you doing as much as you can yourself to put this beautiful car back on the road after so many years of sitting. I look forward to your next posting. Randy PS: Attached are pics of my 36 Plymouth P2 Touring Sedan. I did a lot of work to get it up to driving condition. Now it is a reliable roadworth cruiser. It is anticlimatic to finish the work. THAT is most of the frustration and fun. Restoration gives me satisfaction when chatting with fellow car nuts and their projects. When you put your own toil and sweat into the project (AND DOLLARS), the pleasure of hopping in and driving down the road makes the journey sweeter and transports me back to a time of leisure and uncomplicated machinery. This is a distant cousin of your Airflow with the same engineers drawing up the specs for the different models. But with the same bloodlines.


-
1936 Chrysler Airstream C-8 Convertible Restoration
Randiego replied to Professor's topic in Our Cars & Restoration Projects
Joe, Nice job on the fuel line. It looks like an OEM part. On another issue. Before you solder the tube to the new bulb for your temp guage, I would anneal the rest of the tube getting as close to the guage as you can. 86 year old copper tube will be brittle and bending it can cause it to fracture. In most cases, they will be minute cracks but enough to give you angst, especially if the temp gauge dosen't work when you are all done. Wrap a wet strip of cloth around the tube for a heat shrink preventing the heat from traveling any further and then heat the tube. This will soften the copper. Nothing worse than to go through the work of mating a new bulb to the tube just to have it "crack" in a different spot undoing all your work on installing the new bulb. I always anneal the copper washers that are used on brake and other components of the car, ensuring a good seal when installing the part(s) -
1936 Chrysler Airstream C-8 Convertible Restoration
Randiego replied to Professor's topic in Our Cars & Restoration Projects
Fellas, Having two 36 autos (Pontiac Master 6 Business Coupe and a Plymouth P2 Touring Sedan) I have had the help of a master in the old auto business help me with a vacuum issue. Granted, I live in the San Diego area and driving my cars in the rain is not an occurance that I want to do, but any who live in rainy country will attest that on the nicest days, one can get caught in rainy weather. The vacuum system that runs the wipers (unless you have coverted to electric motors) is dependent on what is left over if the engine needs or is not making vacuum, i.e. acceleration as going up a hill will attest to. So.....the wipers slow and visibility is hampered. Not a good thing when getting your classic back to the barn and out of the rain. He came up with a solution that really was trick and non invasive. On his 36 Pontiac, he took a 4" X 12" length of PVC pipe and two corresponding PVC caps. He then drilled holes in the end caps, tapped in 1/4' pipe thread and installed (pipe threaded) brass barbs on both caps. He then glued the caps on made a strap and installed the assembly up under the dash out of sight. He then attached the hose from the wiper motor(s) to one end of the "tank" and on the other end, the hose from the engine compartment that originally went to the wiper motors. You can alter the tank dimensions to suit your space requirements. Now when you are driving and get caught in a rainy condition, with the vacuum storage tank, you will NOT have a slowdown of the wipers, a major safety issue. I avoid driving in wet weather but at times, even in So Cal, we can get caught in the rain. Now I am prepared for that occasion. -
Roger's handcrafted 1:12 scale models
Randiego replied to Roger Zimmermann's topic in Our Cars & Restoration Projects
Guys, I will be traveling to Sylmar to photograph the RR Chassis with my new Canon Rebel. This camera shoots in very fine detail and therefore the files are large. I have not had to reduce images for posting to the Forum in the past. I see that there is a limit on the amount of pixles that the Forum limits for posting. Can anyone direct or tell me how to reduce the size of the image so that I can get several shots attached? I am not familiar with how to do that. Thanks -
1936 Chrysler Airstream C-8 Convertible Restoration
Randiego replied to Professor's topic in Our Cars & Restoration Projects
Joe, If you are having any difficulty finding the head studs or any fastners, try McMaster-Carr. They have an amazing assortment of fastners and you can get them in grade 8 and above. A lot of machine shops use them to source hard to find fastners. Just have the correct measurements and thread pitch(s). Also, a machinist told me not to use brass nuts on the exhaust manifold as they cannot be "torqued" to the right spec more than once due to the heating and cooling of the engine. Instead, he suggested steel nuts and use "Never Sieze" or a like anti seizing thread compound. And if later, you are planning on doing a complete tear down and rebuild, they will be easily removed. Once the manifolds are installed and the car is driven, (around 100 miles), it will be necessary to re torque the exhaust manifold nuts and the exhaust flange (where the exhaust header pipe is attached) as they will loosen up causing leakage. And you do not want to have to replace the gasket if there is a blow out. That is avoidable by constantly checking and listening for leaks for the first 2 or 3,000 miles, just to be prudent. I do not know if the book calls for re torquing the head after it is at operating temperature. With the new materials that the head gaskets are made from, some do not need to be re torqued. And they are not torqued as tight as newer engines. But I am sure that you know that answer. Good luck as we are all following and are awaiting the day that the Chrysler is back on the road. -
Roger's handcrafted 1:12 scale models
Randiego replied to Roger Zimmermann's topic in Our Cars & Restoration Projects
Roger, You did not put a quarter next to the shock absorber bodies for us to compare how small they are! See what you have done? You have conditioned us to "look for the quarter" to see how small the parts that you are making are. 🙂 And to know that they are going to be working shocks........just amazing. This last weekend, we had the La Jolla Concourse Motorcar Classic here in San Diego. The weather was absolutely beautiful. This was the first one back in La Jolla since the pandemic hit. Two years were skipped and the show was missed by all of us who love to see the fabulous early marks. I would love to attach all the pictures that I took but that would be impossible. I have attached two here. In the first one is Cameron Richards with the 1931 Bugatti Type 51 Coupe. It won 1st in the Bugatti Category, which was the featured mark of the show. Cameron is the Great Grandson of JB Nethercutt, of the Nethercutt Collection in Sylmar, California (Los Angeles) that I talked about in the previous thread. The second pic is of me (yellow shirt) and flanking Cameron is Malcom, a fellow member of our club, "The Secret Car Club" here in Sandy Eggo. This Bugatti is a stunning car. You can see this car live if you go to Jay Leno's Garage on YouTube. Jay features the car, and he and Cameron take it out for a drive on the streets and freeway in L A. As I have talked about this museum in the past, they have just lifted the restrictions regarding masks and limited days that they are open. Now I will be heading there to rephotograph the RR Chassis that I told you all about. That will happen very soon. I will post those pictures here. It will be remarkable to compare those pitucures of a "naked" chassis and to see similarities to Roger's Cadillac chassis. Randy

-
1936 1937 Plymouth
Randiego replied to 36 Plymouth 40 Dodge's topic in Our Cars & Restoration Projects
Hello, I have a 1936 P2 Touring Sedan. When I bought it several years back, I wanted to see if the rear main was the source of the leak plus I replaced the clutch/disc/pressure plate. I think that I have pictures of the clutch return spring. If it is external on the transmission, I will be able to measure and photograph it. Let me know if you still need that info. One thing that impressed me with the Early Chrysler products; Their designers engineered an umbilical line to lube the throwout bearing. When greasing the chassis, you would just turn the "cap" on the end of the umbilicle hose/tube and it would send grease into the throwout bearing. This would give the bearing a very long life if that was attended to during a lube job. That was a very good feature saving a lot of throwout bearings from early failure. Plus the insides of the transmission was quite unique also. I will do my best to find those pictures. Contact me at; randy@americanarbortreeservice.com Randy


