

Randiego
-
Posts
309 -
Joined
-
Last visited
Content Type
Forums
Gallery
Events
Everything posted by Randiego
-

Roger's handcrafted 1:12 scale models
Randiego replied to Roger Zimmermann's topic in Our Cars & Restoration Projects
Roger, I was going to post pictures of the RR P2 chassis that is at the Nethercutt Museum here in Los Angeles. Upon retrieving my disc with the pictures on it, it is totally compromised and they are ruined. I will be traveling to Sylmar (North Los Angeles) with my new camera in tow to re shoot this magnificent chassis. It is in the same era as the Cadillac with similar engineering for the hardware and running gear. I will email them to you as posting all of them on this site may not be allowed due to capacity. Fellow followers who have read my previous post of the chassis commented that this is not the site for sharing about the RR chassis. So..... I will only post one or two pics of that chassis. I can also send a link to my Google Drive and you can view them there. I will be traveling to Sylmar in November as soon as there is a break in my work. Right now I am very busy but I think that you (and others) will enjoy seeing this chassis in it's naked splendor. They have done a beautiful job restoring it. It is just as it has left the facility. In the day, I am wondering if Cadillac shipped their chassis to the coach maker in the same manner? The curator of the museum said that the extra parts were in a box strapped to the chassis making a "seat" for the worker to drive the chassis out of the facility to the shipping area. You may know that answer but if not, I am sure that someone will be able to answer that question. The Cadillac V16s that have been here at our Concourse de Elegance in La Jolla have been absolutely stunning. We all await what you are going to do with this chassis. It is almost a shame to "hide" it with a body as all your intricate and detailed work is just spectacular. Again, with paint and in a diorama, one could not tell if your works of art are not the "real thing" , a 1:1 representation. We all await your next installment. Randy -
Roger's handcrafted 1:12 scale models
Randiego replied to Roger Zimmermann's topic in Our Cars & Restoration Projects
Gentlemen, You are right. It sounds like I was reping for the Nethercutt. Many are not from here and we have several museums here in So Cal. (Mullin, Peterson just to name a couple) that have exemplary collections to see. Since Roger did the Mark II and now is working on the Cadillac chassis, both of these examples are at the Nethercutt. As a matter of fact, the Nethercutt has several of the Cadillac V 16s in different years and body styles. So enough about museums. I have located the CD of the RR P2 Chassis but a lot of the pictures are compromised. If you have photos stored on CDs, a warning to you all.......Get them copied to your hard dirve. 80% of my pics are kaput. The ones that I do have, I will share but they are not the good ones showing the detail of the shift linkage, brake linkage, throttle and choke linkages, etc., etc. The museum is open, albiet 3 days a week now and the Sylmar is closed for the next month or so while they are renovating some of the facility. I will be venturing up there with my new Canon Digital and re shoot this amazing chassis, along with the other marks in the museum. I called them and they do not have individual cars on their website, just general pictures. Again, appologies to you readers for segueing away from what we tune in for. The latest from Roger. I just thought that while he is away, you might like the blurb about the Nethercutt. I will get the few pics of this magnificient chassis posted this weekend. Oh, and incidentally, they are not going to put a body on it. It will stay as a chassis only. But mind you, it really is phenominal to see how the engineers devised the systems that operate the automobile. This was 90 years ago. Randy -
Roger's handcrafted 1:12 scale models
Randiego replied to Roger Zimmermann's topic in Our Cars & Restoration Projects
Gentlemen (and ladies), I will dig up the pictures of the RR P2 Chassis at the Nethercutt Museum. My camera skills were not as good as they are today. (lighting was off), but they represent the chassis pretty clearly. I just hope that when I find the disc that the pictures are not compromised. I talked to Skip Marchetti (the director a few years ago) and he said that they had not mated a body to the chassis (yet or maybe never?). Anyway, it was very interesting to see how RR delivered the chassis to the customer/builder. There is a bulkhead fitted to the chassis and it has the necessary components for the coach builder. AND to move the chassis off of the truck/ship/railroad car, there was a box or crate that the delivery person sat on. In it were additional parts. Sure wasn't comfortable but the chassis wasn't going very far so the driver could endure that crate for a short distance. I forgot to ask Skip about the condition that the chassis was in when Mr. Nethercutt took possession of it. I am sure that it was not in that great of shape. J.B. Nethercutt has a premium restoration shop below the Sylmar museum (across the street from the J.B. Nethercutt museum). For those who do not know, J.B. was the nephew of...............Meryl Nethercutt Norman of Meryl Norman Cosmetics company. He was going to college studying chemical engineering (back in the late 20's or early 30's and was staying with her at her home. Meryl was making up facial products in her kitchen (cold cream for one) for her friends and that was growing into a business. J. D. studied what she was doing and saw ways to improve her product(s). And the cosmetics company became a booming business. He was a "poor" college student until the company took off. He met his wife, who was a very beautiful lady and looked that way into her later years. Stunning. They use to drive around Los Angeles in his old touring sedan. The car had no floorboards so when he and his fiancee would drive to the different dealerships, she had to place her feet up on the firewall. And we won't even discuss riding in that flivver in inclement weather! J.D. studied all the elite marks of that day and when they would go to the showrooms of the differnt dealerships, he could rattle off the statistics regarding any of the models that they were selling. The salesmen would be in awe at his knowledge and expertise. He would collect the brochures and swore some day to own one of the fine cars. If you live in the Los Angeles area, or are planning a trip out here, do make it a point to visit the Nethercutt and the Sylmar museum. The Sylmar is modeled after the fine delarships (Packard, Pierce Arrow, Cadillac, Duesenberg, etc., etc.) of the thirties with marbel floors, huge marble columns, potted ferns in the lobby, fine couches and chairs, etc., etc. The cars are staged just as if they were in the dealership so many years ago. AND that is not all. the Nethercutts were avid collectors of fine watches and time pieces, music boxes,orachestrons (not spelled right) and large band machines that use to be used for entertainment (before piped in music) in parks and music halls. All restored and functional. On the top floor, he has the largest Wurlitzer organ in existance. The huge pipes (two and three stories tall for some of the pipes) produce the rich sound that is AMAZING to hear. They give concerts there with different organists coming in to perform. Truely amazing collection of very fine automobiles and such. He felt that these items were works of art and his dream was to house them in a museum to be shared with the the public.......in perpetuity............FOR FREE. All you have to do is call and make a reservation to visit. In the Nethercutt museum, he even has a restored steam engine, a Canadian National and behind it is the most exquisit private railroad car that was owned by the daughter of a Titan of industry, leaving her and her sister a vast fortune. In those days, the rich traveled in private cars. Hers was purchased by the museum and was meticulously restored to the condition that it was when she traveld in it. Truely a masterpiece in their collection and worth seeing. J.B. and Dorothy (long since gone) have a son, Jack, who runs the businesses. To date, the Nethercutts have more "best of shows" at Pebble Beach than any other individual or competing museum. J.B. was always in contention with Bill Harrah for first at Pebble! One year Harrah would win, then the next Nethercutt would win. Very seldom does the museum enter a vehicle in competetion without garnering top honors. Their research/restoration shop employees fine artisans in their own right. Stunning to see these craftsmen turn out such quality restorations. So, if you ever get to Los Angeles, do not miss this fine collection. It is huge and will take at least a day to see. Every car runs and are driven on occasion. J.B. or Jack Nethercutt take a string of cars out to a local park for the company picnic and employees and family are all treated to rides. A fine perk working for the Nethercutts. The Merle Norman Cosmetics company is still in business. It is connected to the Sylmar museum. All of their employees working at the museum, in the restoration shop and the cosmetics company come to the company cafeteria and have lunch. They employ a fine chef. The food is supurb and all this is for free when you work for the Nethercutts. We had lunch there with our tour. Supurbe. I will get the pics uploaded, hopefully, by this weekend. Randy -
Roger's handcrafted 1:12 scale models
Randiego replied to Roger Zimmermann's topic in Our Cars & Restoration Projects
Roger, The intake and exhaust manifolds are a work of art. They represent a LOT of time, but you got them right. Looking back at the exhaust manifold for the 1:1 engine, yours, when painted, will be hard to tell from the real manifolds. A testament to your skill(s). We are always looking for the next installment and to see what you are up to in the build. Just amazing. -
Roger's handcrafted 1:12 scale models
Randiego replied to Roger Zimmermann's topic in Our Cars & Restoration Projects
Roger, Behind the "scene" is what we do not see. How many hours of filing, sanding, test fitting, filing, sanding, test fitting..............until Voila ! The part is finished. It is a real treat to see how you think, scratch your head and come up with the answer to a problem. You make us all think that if you connected a battery, added gasoline and hit the switch, that motor would start and RUN ! ! ! It is a marvel to see how this engine is coming together. Great work, Roger. -
Roger's handcrafted 1:12 scale models
Randiego replied to Roger Zimmermann's topic in Our Cars & Restoration Projects
Bonjour, I am happy to add that it is nice to see you back in Switzerland and after attending to other duties, working on the Cadillac once again. Roger, that is absolutely amazing to see the top of the fuel pump completed. So many mico parts that came together to make that assembly. One thing that has always amazed me (and most that visit this site) is that if the parts are painted and placed in a dioarama, no one would know that they are not 1:1 scale. It is truely amazing how detailed these parts are. Looking at the clutch and brake linkages, pedals and booster, that picture is just boggling ! You show us how intricate your planning and craftsmanship are. The results are stunning and again FEW can do what you do. I, like the rest of your following, am looking forward to the next post to see how the completed fuel pump will look. Any more thoughts about what body that you will be mating to the chassis? Actually, a completed chassis would be great WITHOUT the body. It would show all the intricate detail that is usually hidden when a body is attached. There is a great museum in North Los Angeles, the Nethercutt Museum in Sylmar, CA. They have a P2 Rolls Royce chassis on display. It was hidden during WWII in a portion of a factory that was "bricked up" and the allies did not know it existed. It was to be fitted with a body by one of the premier German Coach builders but the war broke out. The owners had it hidden in a munitions factory, behind a bricked up wall. No one was the wiser and somehow, it survivied all the bombing raids that took out the rest of the plant ! ! Mr. J.D. Nethercutt got wind of it back in the late 50's or early 60's when Germany was still divided into East/West. This chassis was in East Germany under the Communist control. They did not know about this chassis. But car people knew about it. Mr. Nethercutt brokered the deal with some East German folks and the chassis was smuggled out of there burried in a load of corn (or cabbage) going to the market in West Germany. Once there, it was shipped to England, then on to California. Mr. Nethercutt had his restoration shop restore the chassis and it was put on display. I saw it back in the early 2000's We heard from the director that they were thinking about mating it to a body but I do not know if that was done. It was stunning as it sat there and Roger, you could see all the marvelous engineering that Rolls Royce built into their P2 chassis. So, with or without a body, your work of art already is magnificent. Randy -
Roger's handcrafted 1:12 scale models
Randiego replied to Roger Zimmermann's topic in Our Cars & Restoration Projects
Roger, With the internet, the world has shrunk. It is much easier today for shopping for anything. I'm not surprised that you are most successful with the used parts market here in the US. Looking forward to the next item that you will be constructing for the Cadillac. Randy -
Roger's handcrafted 1:12 scale models
Randiego replied to Roger Zimmermann's topic in Our Cars & Restoration Projects
Roger, Looking at the data sheet(s) on the cars assembled in Bienne and the completed cars imported since the mid thirties, are there auto salvage yards and companies in and around your area that sell used parts? 300K + is a lot of automobiles. When one is "retired", do the local recycle yards snap them up? We use to have a LOT of wrecking yards here in the states. Mainly, they are back East now. Very few (in comparison) in Southern California. And we had the most cars ! When the "cash for klunkers" program was instituted by Obama, a lot of wrecking yards cashed in and scrapped a lot of old classics and not so old cars. Use to be able to go to the salvage yard and get a perfectly good used part to repair (or build) your car. Not any longer. Many, many salvage yards have closed. Seeing the old classics crushed for iron and steel is so sad. Restoring an older car has become a lot more difficult as you are spending a lot of valuable time hunting for parts all over the country instead of in your own back yard. Is that the case there in your area Roger? You work on a lot of old Dynaflo and other transmissions. Are you able to source used parts like when a case is cracked or for some other hard part is bad (not the clutches or soft parts needed for a rebuild)? I am sure that you are not limited to Switzerland when you are sourcing parts. You have Germany, France, Italy and other areas to go to. The internet has shrunk the world. How is your uese part sources these days? We do not have a clue as to how your market(s) are in Europe. It would be interesting to know. Randy -
Roger's handcrafted 1:12 scale models
Randiego replied to Roger Zimmermann's topic in Our Cars & Restoration Projects
Roger, As to your comment regarding riding in a 30's car, I am wondering if the roadways in Switzerland are narrower and thus a bit more trickey to drive than here in the States? Our roads here in the thirties were narrower than today, but unless you lived in Colorado or other mountainous states, we did not have the terrains that you have in Switzerland. Especially back in the 30's. Granted, our hiways and country roads were not wide like today, but wider than in Europe. The average hi-way speed was in the high 40's low 50's. The dealer would order the car with the usual gearing for the local terrain. In Colorado, for example, the cars came in with low gearing to tackle the mountains. If you lived in the Mid West (Kansas, Nebraska, Iowa, Illinois, Oklahoma) where it was relatively flat, the gearing would be higher as there were no steep mountains to climb. I rode in a 34 Packard 7 passanger touring sedan in the St. Louis area. What a road car that was! Huge and smooth. Ditto for the big Buick touring sedan that my friends dad had in his garage at that time. (late 60's). In the cities of Switzerland, are the streets narrow? It would be a job to maneuver a big chassis like the cars of that era possesed. Add cobble stone streets and that would make an interesting ride. Switzerland today has modern roadways but I wonder how they were back in the 30's? We see old movies showing the roadways of that era and the streets looked narrow, twisty and very much European. Hence the cars that were designed for them. Certainly the driver/chaufer of a big Cadillac had to have strong arms to wheel that big car along the roadways of the thrties. My heart would be in my throat if I had to maneuver that big car in and around those narrow streets back in the day....... Randy -
Roger's handcrafted 1:12 scale models
Randiego replied to Roger Zimmermann's topic in Our Cars & Restoration Projects
Roger is a MAGIC man. Not from this planet but on loan from a distant galaxy. Just amazing work, Roger. I loved your Continental, but I have a deep fondness for cars from the thirties. Engineers did magic with what materials and technology that was available at that time. They were beefy and built for comfort. And the styling was just georgeous. Those huge headlights, driving lights, radiators and stylish fenders/running boards. Those were automobiles. Just remember, roadways were not designed for hi speed travel. Going 50 MPH was tatamount to speeding! Most hi-ways were posted 40-45 MPH. Not until Eisenhower (into the 50's)did we have the Interstate Hiway System. And the cars and suspensions improved. But in the thirties, cars like this Cadillac, were built (structurally) for the poorer roads. A Cadillac or Packard could smooth out most roadways giving the passangers excellent comfort. I wonder what body you will choose for this chassis.....................? We can't wait to see. Randy -
Roger's handcrafted 1:12 scale models
Randiego replied to Roger Zimmermann's topic in Our Cars & Restoration Projects
Roger, Padon me for getting the wrong scale. At 1:6 scale, these parts would be much easier to fabricate. But at 1:12 scale..........unbelieveable! The difficulty in detailing the transmission, boosters, rods, clevis pins, springs, etc., etc. is mindboggling. This will be your toughest challenge yet. We will be totally in awe when you get this all sorted out and built. A picture of the transmission and shifter by itself is pure art. Painted and by iteself, one would not know that it is 1:12 scale. Just beautiful, Roger. We will be reated to one of the most complicated assemblies in your build. It is amazing how you are duplicating every aspect of this automobile, even though it will not be seen. Certainly one of GM's most georgous vehicles ever produced by their engineers and designers. At our car shows here in San Diego, we always have one or two of the 32 Cadillacs. Up close, these magnificent cars never fail to stop the casual attendant in their tracks. They are the MOST photographed. Two have won "Best of Show" and always "Best in Class". Cars after this era just did not hold up to these georgeous machines. The restoreres certainly do not have the difficulty and challenges that you are going through! But we all know following your threads for so many years, you THRIVE on the difficulties that present themselves to you. This is what is so amazing. How you SOLVE the problems, plus, you explain how you do it. Simply a master at your art. Randy -
Roger's handcrafted 1:12 scale models
Randiego replied to Roger Zimmermann's topic in Our Cars & Restoration Projects
Roger, For a 30's car, the pictures of the real transmission and hardware is...........boggling to say the least ! Very complex. I wonder how much of that you can duplicate in 1:6 scale? Oh wait, I forgot who I was talking to. Roger, if anybody can master this, it is you. It will be VERY BUSY at that site. The levers, linkages, hoses, booster etc.. etc. The GM engineers went overboard to complicate matters, didn't they? I am sure that it was all necessary but................very complex. I am sure that you will have a solution for all that hardware, though. We will all await your answer to this complex puzzle. Randy -
Roger's handcrafted 1:12 scale models
Randiego replied to Roger Zimmermann's topic in Our Cars & Restoration Projects
Ah yes, The old dillema of instant gratification. One thing about the new generation, they have NO PATIENCE ! ! ! I tried to explain to a young man (18 years old) that to get a quality job, you have to take the time to put in the effort to get good results. He just looked at me like a deer in the headlights. I have no faith in this "I Phone" generation. If it isin't in an ap or on Google, they are lost. I am sure there are exceptions to this but they are so far removed from the rest of the "herd". There is a guy, David Engles of Engles Coach Shop in Joliet, Montant who is a master wagon builder. And I mean a MASTER (like you). Every phase of wagon construction from wheels to folding tops, he builds from the old parts or from scratch. He is amazing to watch also. Craftsmen like you and he (and a few more) are the reason that we are so fortunate that Youtube came along. Now you can share your art with us all. It is exciting to open up our AACA Forums to see the latest progress that you have accomplished, plus your detaild description on how you overcame the obsticles in the part(s) progress. Just looking at the part dosen't tell the story, but you accompany the pictures with the details as to how you got there along with the trial and error(s) before the part is finished. And Roger, they look sooooooooo amazing. If we did not see you building them and they were photographed by themselves, one would think that they are looking at a full sized 1:1 part. Such is your art. Randy -
Roger's handcrafted 1:12 scale models
Randiego replied to Roger Zimmermann's topic in Our Cars & Restoration Projects
Roger, As they would say in Germany......... Wunderbar! Really Roger, Getting the components in this minute size is beyond the scope of 99.9% of the modlers out here. And to get the finite details built into every component just leaves me in awe of your skills. You may not be a watchmaker but you certainly have that Swiss ethic for attention to precision and detail. I am sure that others will come along in the future, but for now, you are in the rare either of those that have that "gift" for duplication in minature. Phenomenal, Roger. Randy -
Roger's handcrafted 1:12 scale models
Randiego replied to Roger Zimmermann's topic in Our Cars & Restoration Projects
Roger, That cannot be a minature starter? It looks so authentic. Great work in shrinking it to that size. With the bands coververing the brush vents, it will be as authentic as the 1:1 starter. This one is more complex with the offset. Amazing. -
Roger's handcrafted 1:12 scale models
Randiego replied to Roger Zimmermann's topic in Our Cars & Restoration Projects
Roger, Nice job on the starter offset. Owning two 1930's cars, the starter is the same on all this era cars. Depressing the starter button on the floor engages the starter gear into the flywheel and the switch is pushed in, energizing the starter motor. It was this way until Bendix Corp. devised the "starter solenoid" This did away with the foot switch and used the wonderous "new technology" of the electromagnet to thrust the bendix (a sliding gear on the motor shaft) into the flywheel. When the engine caught, you released the button and it would return to the neutral position. Later the key switch was developed with the internal spring. When the engine started, you released the key, returning to neutral and the bendix retracts stopping the starter motor. Most of you all know this but for those who don't ....................... Now, wearing a device (key fob) that emits radio signals to the cars computer letting the car know that the owner is here, unlocking the doors and awaiting the driver to push the start button on the dash with no key. THIS is space age. Unless your battery is dead. 😞 But in the thirties, the "self starter" was fantastic as you did not have to get in front of your automobile and crank the engine over by hand. Many injuries like broken arms and thumbs were suddenly a thing of the past as "Modern Marvels" of the automotive engineer came to be. Today we have a whole new set of items that wear out. Bendixs and solynoids go bad and need replacing. In most cases today, you cannot buy the starter solenoid or bendix assemblies separate from the starter motor (as you could a few years back) unless you know a rebuild shop where you can buy the parts needed. Try to talk to NAPA today. Most of the "kids" there cannot help you if it is not in their computer on the counter. And they only list the parts that move. Older parts are deleted from the computer but they still have them. You just have to have a counter person who knows how to look in the book to find them. (Thank heavens I know an old timer at NAPA who can pull out the book and look up the part and get it ordered for me). Ditto for Carquest, Advanced Auto Parts, O'Rilleys etc., etc. It was much simpler back in the day as the starter was manual using your foot to activate it. The bendixs and solynoids were not there to malfunction or go bad. As long as you had a pedal on the floorboard and your starter motor was in good order, it was failsafe lasting for many, many years before needing attention. My starter has an oil cup to keep the bendix lubed. And my 36 Plymouth has an umbilicle (lube hose) from the bellhousing to the throwout bearing that I give a shot of grease a couple of times a year to keep it healthy. This was part of the lube maintenance for these cars. No such dice today, eh? Suspensions are sealed and last till they go bad. Replacement time is not easy on your pockebook. On that Cadillac Roger, have you ever seen the lube chart for the engine, chassis and suspension parts? I have the one for my Plymouth P2 Touring Sedan. 36 lube points! I even have a special tool that fits over the "gaiters" (spring covers) to lube all 4 of the leaf springs. You lube both sides from the U bolts to the shackles! I was fortunate to find this rare tool on Ebay. Those were the days of preventative maintenance, not planned obsolescence. Once I lube the springs, the ride is quiet and smoooooooth. Like your 72 Cadillac. Randy -
Roger's handcrafted 1:12 scale models
Randiego replied to Roger Zimmermann's topic in Our Cars & Restoration Projects
Stunning work Roger. And to do this without blueprints........just photos. Years of automotive engineering have given you the experience and skills to "compute" how the part is made and assembled. Not for the faint of heart. As we all look on in awe, it is really amazing to see these minute parts come to "life". From the raw brass to finished component, it is always amazement to see the part in it's finished state. Can't wait to see the next installment............ -
Roger's handcrafted 1:12 scale models
Randiego replied to Roger Zimmermann's topic in Our Cars & Restoration Projects
Roger, Gerald Wingrove made 1:20 scale models that were beautiful and authentic, sans the power seats, power windows. operable lights, etc, etc. He was contracted to build these models and I am sure that his selling prices were expensive as he worked with museums, foundations and private individuals. It would be nice to be able to contact him to see what his cars sold for for a value that you can put on your masterpieces. There has to be someone who could evaluate the Avanti, Toronado and the Mark II for a real value. All the insurance company has to do is follow the threads and see how much WORK, PLANNING and TIME went into these works of art. There is Ken Foran who, like you, is a consumate modeler. His Bell Hellicopter (in Brass) and his Model T are exquisit. I wonder if contacting him may give you a lead on someone who can evaluate and assess the value of your models? Gerald Wingrove has long retired to Spain. I do not know if he is able to be contacted but he may know of a source for valuation. Louis Chernow in Missouri duplicated a Duesenberg in 1:6 scale with a running engine. A very exquisit model that is stunning. It is here in the Craftsmanship Museum here in Carlsbad, CA. I hear he is working on a Garwood tripple cocpit runabout with a WWI Liberty engine. But we have not heard from him in quite a while. And there are a few others, but the operative word here is......FEW. Really.......putting a value on the models would be difficult for us out here as I have been following you for over 10 years, watching you painstakingly fight every battle, overcoming obsticles and finishing each part to perfection. All without factory blue prints to see the actual part in true dimensions. Who else but you Roger, could attain such fantastic results? Maybe a handful of people inhabiting this world. To all of us, they are worth a million ! Until we have a "shrinking machine" you are the only one that I know of doing these classics. You may not be interested in finding out what the models are worth as they are not for resale. But to us out here, they are priceless. Randy -
1937 Buick Model 48: RESTORATION HAS BEGUN! (Photo)
Randiego replied to Gary W's topic in Buick - Pre War
Gary, Matthew is right. A NOS carb that has been sitting on the shelf for so many years has gaskets that are dry and the rubber/neoprene parts have also dried out. With this new "Gasahol" that they are selling today, this is one of the downsides of this fuel. It is designed to burn with less emissions and they have beefed it up with elements to keep fuel injection systems clean. BUT it plays hell with carburetors. If you have a good carburetor contact in your area, consult with him (or her) regarding having the carb rebuilt with modern gaskets and parts. There should be no "weeping" of fuel anywhere on a fresh carburetor. The fact that it is weeping through the base gasket and out the shaft (pin) on the side telegraphs that there is internal leaking. Snugging down the nuts on the base will not stop the leak as it is leaking internally. It sure didn't take long for this great fuel that we have at out disposal to play havoc with your new carb. You may want to look into a source for alcohol free fuel if they sell it in your neck of the woods. Not cheap but it solves the problem. There are sources for that gas or talk to your carb guy about other alternatives that you can add to the pump gas once you get the carb rebuilt. The big problem with this crappy gas is that cars sitting are subject to the alcohol eating away at the pot metal carbs, gaskets and gumming up the internals, eventually leading to poor running and even failure. Unless you live in Eastern Arizona, or other areas in the country that sell alcohol free fuels, we are screwed with this crappy gas. It was not designed with the car hobby in mind. The EPA and their regulators could give a rip about our old cars. Bureaucrats/environmentalists are extremely myopic on this subject. Don't let it pass as it could lead to much larger issues, especially if the leaking gets worse. Good luck and let us know how it works out. Randy -
1937 Buick Model 48: RESTORATION HAS BEGUN! (Photo)
Randiego replied to Gary W's topic in Buick - Pre War
Gary, Great Job. Just when we think that that is the last story on the 37, you surprise us with a new tidbit. I just wish that it is not over yet. Not till the door panel issue is sorted out and that you have a chance (in clear, dry weather) to take it out and video the drive. That would be great to see and hear it running and cruising down the road. Do you have a Go Pro or your Nikon that can film the event? If so, we would love to watch it. I was fortunate on my 36 Plymouth P 2 that the dash throttle cable works and I use it to warm up the car before I take it out for a cruise. One product that I found that is fantastic. From Jay Leno's Garage, I saw him interview the guy that has the "Little Egypt Garage". He has a great turn signal system that is battery operated and wireless remote. I installed the system on my car in less than an hour. Very easy. The sequential signal lights mounted on my trunk (They are L E D) and operate from the control unit mounted on the steering column. You simply turn it on at the tail light housing and when you are driving down the road, you press either right turn or left turn. It also has a brake light button which operates all the lights for a stop light. SInce I have factory brake lights on the P2, I do not use that feature but no more rolling down the window to use my arm to indicate a left or right. Besides, this younger generation have no idea what you are doing. They think that you are ready to flip them off or such rot. Great product. They work and look great, not messing with the harmony of the wiring of the car. It is comforting to know that people can see your intent to turn or change lanes. Randy -
Roger's handcrafted 1:12 scale models
Randiego replied to Roger Zimmermann's topic in Our Cars & Restoration Projects
Roger, Regarding your faulting the model and yourself........................BUNK ! Never have I seen such a creation as what you have done here. We know it is perfect as you would not skip or let a little "flaw" pass. You would think on it then come back with the answer showing us how you accomplished the solution to the problem. Now it is a MASTERPIECE. What is left to do on the Continental now? Are the windows in? Plus, did you get the license plates made yet? And the battery box. Just a few items that I was thinking about. We all come to this site like "moths drawn to the candle". We all want to see what you have done next. It is a rewarding release after all the pressures of the day to sit down and open the site and follow this great story. Do continue with the Tornado's work as we will all like to see what you do with it. What will be really amazing is to see the Continental in "low light" with the headlamps turned on and the tail lights and license plate lights burning. You are the master ! Randy -
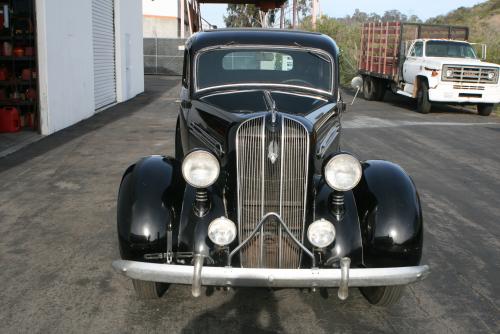
Gentlemen, I have been remiss in not getting back to you all regarding my P2. First of all, thank you for your kind words. I had my local auto electric specialty shop do the wiring harness install. It went in with not issues and all is working great. The head lights, tail lights, break lights, running lights, interior light, dash lights, horn, and heater. All is working great. Recently, I ordered the remote turn signal kit from Little Egypt Garage and I must say, it was one of the easiest installs that I have ever done. NO WIRING ! ! Wireless control. The P2 had factory break lights but no turn signals. This rear L E D light works off of radio signal. I mounted it on the trunk lid. Either the trunk lid was replaced with a later model lid as there were two "carriage" bolts in the middle as on later models, that was where the license plate mounted with the license plate light. My tail/brake lights are mounted on the rear fenders with the license plate mounted above the left rear tail light with the clear lense illuminating the plate. But as you know, from the factory, they did not have turn signals back then. It was the ol" roll down the window and hang your arm out to give the signal for the turn, rain or shine, sleet, snow what have you. I was watching Jay Leno and he had an old car with the owner of Little Egypt Garage on showing the turn/brake signal assembly installed on Jays car. (Jay has over 15 of them installed on his early cars so far). The beauty (and ease) of this product is that there is no wiring. It is done by radio signal to the light cluster in the rear. If you do not have a brake light, it even has that feature also. Great product and I had it on in less than an hour. Now I can drive with peace of mind regarding signaling my intent to change lanes or turn. Just push a button and the light flashes (sequentially). Mine is mounted half way up the trunk and the visibility is excellent. IF you have not checked out this product yet, do so. It is well worth the investment for safety and peace of mind. It has been over a year since I did the spedo/instrument cluster overhaul. The guages work and the spedo not only works but is accurate to boot. And they look like new. Do not be afraid to tackle this job. I got another instrument/spedo cluster from a fellow club member. The spedo did not work but the guages were all there. Instead of sending my original out to the spedo shop and spending a lot of money I decided to do the spedo myself. Since my fuel/temp/oil gages worked, I retained them. I just carefully cleaned the faces of the gages and they looked like new. Take your time and lay all of the parts out on a suitable cloth or towel on your work bench. Take a lot of pictures for reference and study each component as you take it off. It is NOT rocket science and is not that hard to do. Hell, if I can do it, so can you. I used Acetone on the speedometer gears and stems to clean the old grease off. Be very careful of the spring on the needle shaft. You do not have to fiddle with that as it is all in one part. (unless yours is bent, broken or ?) If that is the case, a good speedometer shop should have replacement springs available. (Some will not sell you the parts but will insist on rebuilding the spedo for you). The needle will come off of the stem and that can be (if needed) polished as you can see in my pictures. After all is clean, re assemble with a good grade of moly grease, insuring that you have all the gears and spindles lubricated. Note where the factory had a lot of grease packed around the gears and duplicate the amount that they applied to the area. After all, it lasted a long time before it would no longer function. That was because the car sat and sat and sat without being driven. The grease coagulated and would not allow the indicator needle to move, hence no speed indicating. Notice that I used sheet cork for my gasket and a Manilla file for the other gasket. I took off the blue bands (light diffusers) that surround the cluster. They were not in good shape. I found some matching mylar (Index file tabs) and duplicated them from the new material. You can get the sheet cork from Bangor Cork in Bangor Maine. I purchased a 1' X 1' sheet. It cost more for the shipping than the product. I ordered several more sheets in different thicknesses for future needs as the cost was reasonable. My local hobby store or hardware store did not stock any sheet cork. Bangor Cork was the answer. I used a regular Manilla file for the other gasket. It was the right thickness and worked great for that application. I cleaned the face of the spedo and surround VERY CAREFULLY. It is painted on and unless your face is rusted or compromised, it should clean up easily. I used a miracle fiber cloth and diluted Simple Green solution. Take you time and after you have cleaned it up, rinse it thoroughly in tepid water. Then dry it with a soft cloth. Then I waxed it with a pure silicone paste wax. (I still have a tin of Blue Coral two stage wax product. No longer available). I polished the bright surround with Flitz metal polish, bringing the surface back to its shiny luster. Also, be careful with the glass lens that goes over the face. THEY ARE NOT AVAILABLE. IF you drop it, it will break. So be careful. All in all, this was one of the most rewarding jobs that I did on my old classic. What is comforting is that every time that I get in, I look at the instrument cluster and I know that I did that. I did not farm that out to someone else. Plus I took my time with it and really "detailed" the facia and the gages. It looked better than new when I was done with it. It really looks great at night. The P2 has a two position switch under the left side of the dash. You can select low or bright illumination. And since all of the gages are in the one cluster, the "Cyclops Eye" will stare back at you. A really neat feature of the 36. My "Firestone" radio did not come in the car. I found it on line and purchased it from a seller. It is made by Stewart Warner. They made a lot of radios in that era for different companies to sell. I took it to the Antique Radio Store here in San Diego. Jeff, the owner, is a radio technician for the County of San Diego and works on all kinds of radio equipment. In his store, he has a ton of antique radio sets from the 20's through the 50's. He replace a lot of old parts with modern capacitors and the like. The radio head, (I cleaned up) is a small round dial with the Firestone name on it. There are two knobs that operate twist cables that go down to the radio/speaker box that I mounted on the firewall above the clutch/brake pedals to the left of the steering column. I had Jeff install a MP3 (? I think that is the name) port for a cable to my cell phone. When I plug in the cable in to my cell phone and then into the radio, I play from Pandora old music from the thirties and forties. When I go to a car event, my radio is playing period music. People come over and are amazed that that is not a "CD". Pretty cool. That is the update on my Plymouth. It is such an enjoyable car to drive and turns heads everywhere I go. For 82 years and a survivor (motor has never been apart) with only the suspension and brakes redone, it drives like a dream. It cruises at 60 to 65 MPH. I do not push it further than that. After all, that is SPEEDING for a 30's era car. Most drove around 45 to 50 MPH in the day. Randy
-
1937 Buick Model 48: RESTORATION HAS BEGUN! (Photo)
Randiego replied to Gary W's topic in Buick - Pre War
Now it truly is a HAPPY NEW YEAR ! ! ! What a saga that we all have been watching. Professional shops could not have done a better job. Your attention to the most minute details really inspire me to do a better job. I learned from you one major lesson. Plan, plan, plan. Some times, I just take the item apart only to be stymied by some glitch like misplacing a small component and wondering where the H--- I placed it. From now on, my workshop will be like a Swiss watch factory.................CLEAN and organized. You inspired and impressed us all with your cleanliness and meticulous attention to the details. A lesson for us all. Having a three car garage that you worked in and not a "shop" really awed us. To have done this remarkable job in your garage boggles the mind. And the results are stunning. I watch Antiques Roadshow on PBS on occasion. In the beginning of the show, they have in their intro scenes of St. Louis and on the curb is none other than your car.......................a 1937 Buick. Black two door to boot. SO..... you are in possession of a "star" ! ! Mrs. W and the family must be very proud of your work too. Now for warm weather to take this gracious beauty out for a ride in the surrounding countryside. Thank you for sharing this great story and I too have learned from you and your methods. A big shout out to the Buick Owners of America. Seems like a great group of people who were there to assist in your work. Have a Happy, Healthy, Prosperous New Year, Gary. P.S. We cannot wait to see your next "rescue". As young as you are, you have a lot of years (and cars) to restore. What will be your next one? -
Roger's handcrafted 1:12 scale models
Randiego replied to Roger Zimmermann's topic in Our Cars & Restoration Projects
Roger, The lettering for the license plate look absolutely perfect for such a small size. Tres Bien. Again, a master at work. It cooled down here to the 50's and much colder at night. Nothing like a Swiss winter though. We are WIMP's here in Southern California. The rest of the nation is in a very cold snap and I am sure that Winter is setting in in your city. But with the snow, it makes for a very cheery Holiday. So........May you and your family have a very Merry Christmas and a healthy, happy New year. Randy -
1937 Buick Model 48: RESTORATION HAS BEGUN! (Photo)
Randiego replied to Gary W's topic in Buick - Pre War
Gary, It is hard to feature that the handle rubs the fabric on one side. There is a Gnome hiding in your door waiting for you to let him out. This next year, will be you taking the family out in your spectacular Buick for a weekend drive. Such a beautiful car only to be hung up with these last little issues. But we all know that you will prevail. Now if LB would just deliver the items for you to finish the interior. Anyway, have a very Merry Christmas and a Happy New Year. Randy


