-
Posts
1,568 -
Joined
-
Last visited
Content Type
Forums
Gallery
Events
Posts posted by hursst
-
-
unimogjohn, I don't understand the second phrase of your question, but as far as my plans, first, complete disassembly, then full restoration to stock condition, using as many original parts fro the car as possible. I'm also going to try to do as much as possible myself to lower costs and learn more auto restoration skills. If I'm going to go thru the effort, I'll probably show it for a while, then drive it (carefully), as that's why they exist in the first place.
-
I bought the car out of Greensboro, but it spent most of its life near Durham. Yes, I already have the Moss Motors catalog.
-
Found a little time this weekend and did some work. Was able to take out the headlights and parking lights by disconnecting the bullet connectors. Also was able to take out the windshield frame (there's no glass in it) and take off the hood. It's amazing how much easier this car is (so far) than my '74 Camaro. Hope to get some time this weekend to take the front fenders off and make some real progress.
At this point, I need to get an owner's manual and a shop manual of some type. That will really help when I try to actually restore these parts instead of just doing the disassembly. Also, should be getting my British Heritage Trust certificate any day now.
-
Now able to spend about an hour every other day on the disassembly. Was able to remove the inner grille without too much trouble, and the inner air vents and brackets. I'd like to get the front fenders off next, but that will involve removing the windshield frame (the windshield is missing). So, next step was to remove the interior kick panels. Had some trouble with a couple screwed due to rust, so had to cut a new screw line into the screw head to unscrew them. At least I didn't have to drill. Now I have access to the bolts that attach the windshield frame, so that will be the next step.
The trash can is mostly full of debris that mice packed away behind the front air vents inside the grille area (photo 1). I still need to get the headlight buckets out, but now know there are some bullet connectors further up on the wiring harness. The harness will be replaced, but want to keep the old one intact as a reference (photo 2). Interior kick panel (photo 3). Should be simple enough to replace the material, or possibly clean the whole thing and reuse, I'll have to inspect it further. Trying to reuse as many original components as possible, with safety in mind as well. Floor is not too bad, overall (photo 4). Can probably reuse original heel pad and have it sewn into new carpet (seems like a good idea now, but we'll see how pricey that would be). Most floor boards are intact, but one is broken and someone put an aluminum patch panel in. Should be easy to replace.
-
 1
1
-
-
If you're looking for an owner's manual, you can request a copy (it will be photo copies) from the AACA library, that's where I got my copy. You would need edition #3, according to your serial number, but good luck finding that. I have edition #4, which started with car 1540611 in March, 1931, which is the edition at the AACA library. Try giving them a call, I bet you could just put in an order and pay a nominal fee for copies and postage. The AACA library is an invaluable resource for us!
-
Thanks to everyone on the tour, had a great time!
-Chris Lutz
-
Back from the Sentimental Tour. Had a great time.
Continued with the MG over the weekend. Took the bumper off, had to cross-cut each bumper bolt to drill it out, as all primary captive bumper bolts were spinning in place, making it impossible to extract the nuts on the other side of the bumper. Can't believe how light the bumper is. It offers almost zero protection from anything (photo 1).
Continued on to remove the exterior grille facing, most of the bumper support brackets, and the front fascia. (photo 2, 4). After a good soaking in penetrating lube, most of the nuts and bolts came out okay, with only a couple bolts breaking. Starting to accumulate a nice pile of rust, dust, dirt, metal shavings, and who knows what else is coming from the car (photo 3).
Next will be the inner grille and starting to work on getting the front fenders off. Still haven't discovered how to get the headlight buckets out, as the wiring does not appear to have any obvious connectors. Any knowledge on this would be appreciated.
-
 1
1
-
-
Got packed for the Sentimental Tour early, so found some more time. Took apart the headlights and bumper over-riders this time. I found that most of the nuts and bolts are quite rusty, but penetrating oil took car of most of them. So far, the car also has a lot of attaching bolts with nuts on the back, which means the whole works spinning in place or putting a wrench on one side and a screwdriver on the other and trying not to strip the screw, Had to drill out a few, as the Philips heads we too rusty and immediately stripped, but was lucky on most of them.
Not sure how to get out the headlight wiring yet, as I'm new to the MGA family. Maybe there's a connector upstream somewhere? For now, they just have to sag out of their openings. The over riders were easy, but the bumper is going to be tough. The captive bumper bolts are spinning in place when I try to take the bolt off behind them, so not sure how to get them off at the moment. Probably will have to cut them off. Looks like disassembly will be slow going.
Also picked up some 1960 VA plates today. Will register them soon. Off to the tour tomorrow AM, maybe see some of you there!
-Chris
-
 1
1
-
-
Thanks for the words of encouragement, photos, and tips, they are appreciated. Got it insured and the British Heritage Trust Certificate is on order in the meantime. I also noticed that the mouse family in the boot decided to move out sometime before I got it home, so that's good. Getting ready for the Sentimental Tour, so no work on the MG until I get back.
-
I've only restored one car so far, a 1974 Camaro Z28, from 2001-2010 and it was very difficult and expensive, but it came out very nicely. Won a First Junior award with it in 2013. I was fortunate enough to recently double my garage space, as I've wanted to restore another car. I like just about all cars, but I ended up choosing a 1960 MG MGA for various reasons. It's in rough but reasonable condition and had one owner until 2008 or so, then 2 owners who were just flippers and never titled the car, so technically, I'm the second owner. The goal is to do a complete frame-off high-level restoration making the car as original/authentic as possible and to do as much as possible myself. I'll be learning to weld and probably to do some paint and bodywork, but I'll go to a machine shop for the engine.
I picked it up in North Carolina yesterday and I don't want to waste any time in getting started. Had it titled today and started the restoration. So far, just took off the front license plate bracket. That took 45 minutes as the screw heads got stripped eventually, so had to drill them out. Next up is to get it insured as is and send off for a British Heritage Trust certificate so I can get a little more info on it. I hope to work on the car frequently, put some posts here, and have it done in 3-5 years.
-
 2
2
-
-
For Sale- Early/Mid 1930's Dodge Brothers Truck Lug Wrench. I was told it was from a Dodge truck by a previous owner. It does not fit my 1930 Plymouth, as the wrench is too big. Size of wrench is 13/16". In original condition. Tough piece to find $45+ shipping, OBO. Private Message, text, or call 703-565-7476, Chris.
-
-
-
-
-
Looking for an MG MGA Roadster project car under $6,000 within 500 miles of Washington DC. Must be at least mostly there, original engine and body. Please PM me if you know of one. Thanks- Chris
-
Looking for an MG MGA Roadster project car under $6,000 within 500 miles of Washington DC. Must be at least mostly there, original engine and body. Please PM me if you know of one. Thanks- Chris
-
Most likely a scam.
-
Still for sale, $125/OBO.
-
Sold. Thanks for looking.
-
Are these specific to the Starfire, or would any Olds 2-door fullsize work?
-
-
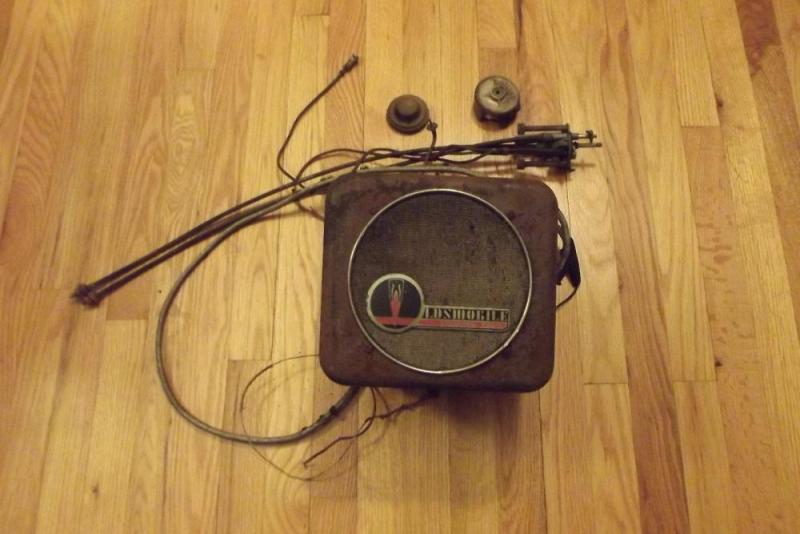
For sale is a complete AM radio setup from a 1938 Oldsmobile. This may fit other years, but please check your application.
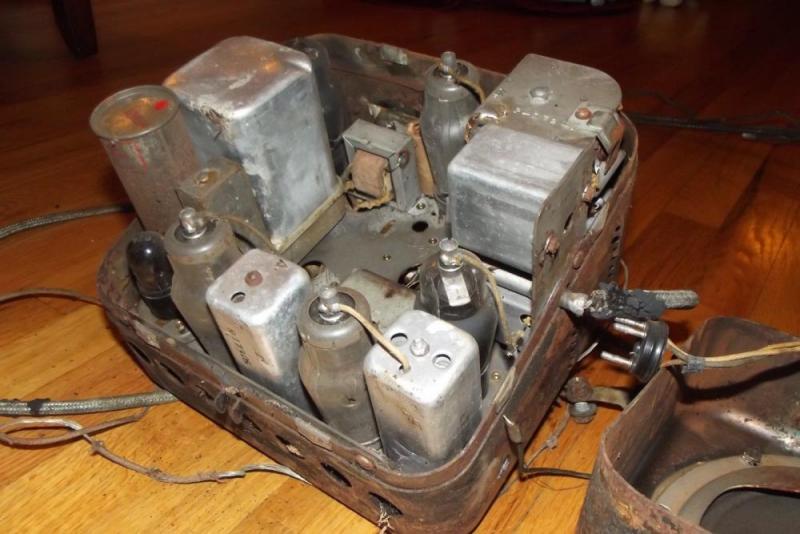
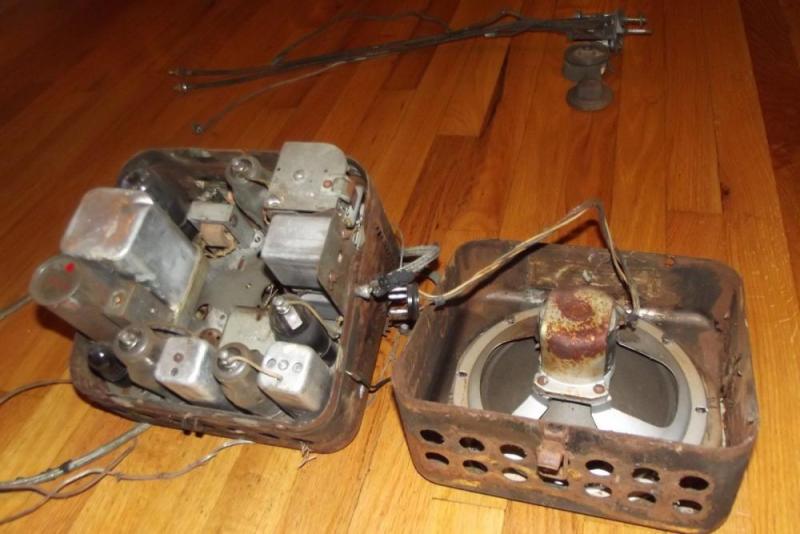
This is a complete factory original setup. The box section mounts to the firewall under the dash, above the driver pedals. The box section contains the speaker and radio itself, complete with all the original tubes. The speaker is completely intact, with no visible damage to the paper cone or the cloth fibers that go over top of the speaker on the box housing. The radio is operated by two Bowden cables that mount to the right side of the dash. The cables work free and tune the radio. There is no binding in the cables or in the tuning dial. The Bakelite knob that rotates the Bowden cables is cracked and broken. The Bakelite ring that goes around the station numbers is likewise discolored and cracked.
All of the wires that go to this unit (power supply, ground, and antenna are complete and were not cut or otherwise modified. This is a complete time capsule, taken from a 1938 Oldsmobile that has not been on the road since 1960. You do not want to miss out on this one!
Asking $150/OBO, FREE SHIPPING to continental US.
-
For sale is a 1938 Oldsmobile Rear Trunk Handle Upper Trim Piece With License Plate Light. Piece is in excellent condition, but needs to be painted body color wherever it ends up. Olds emblem in center of piece is in good condition, but would need re-chroming to be on a show car. Comes with the license plate light glass, one of the 2 screws to attach the trim piece, and one steel bracket that was loose inside the trim piece when it was taken off the parts car. License plate light lense is unsupported, so is either missing a piece, or it must work in concert with the trunk release handle mechanism, to which this trim piece is attached.
Asking $50 + shipping. I may be able to deliver if buyer in Northern VA, northern MD, or southeastern PA.


1960 MGA Restoration
in Our Cars & Restoration Projects
Posted
Been really motivated this week. Was able to remove both front fenders with not too much trouble. Had to take the doors off first. That took about 30 seconds per door. Fender took a lot longer. Plenty of rust, but mostly surface rust. Have some holes in the driver's side lower fender and both rockers. The bottoms of the fenders and rockers is fairly rusty and will need some repair, but overall, this car is much more solid than it originally appeared.
Got my British Heritage Certificate in the mail yesterday. Which I would have ordered it POST Brexit for the discount. Was a little disappointed, I didn't learn too much about it. Confirmed that it was originally white with black seats, grey soft top, it was built on Sep 21, 1959, and it had wire wheels, heater, white-wall tires, and a gray tonneau cover as options. It also has an adjustable steering column, but it is not on the heritage list of options. Maybe they forgot it or maybe someone added it along the way. They did not list the original dealer/destination, only listed "USA," plus they didn't (or forgot) to add the engine and body numbers, which I supplied, to the certificate. I expected a little more for my Pounds.
The tonneau over is original and has some of the stitching undone, so I should be able to clean it and re-stitch it, which will be a nice original feature. The top is original as well, but has some rips in it. Probably can't save it.
Photo 1: Another mouse family in the front inside fender. They had moved out. Photo 2: Found this cool Esso sticker. I'd like to save it, but I think it's too fragile to peel off in one piece. Photo 3) Pass. fender off. Photo 4) Dr. fender off and wheels back on. Found some severe rot on the driver's side front wheel from sitting. Will have to replace the wheel. Too bad, as the rest of the wheel is in good condition.
Still have a long way to go with disassembly, but making good progress. I think next I'll take over the trunk lid and rear fenders. Happy 4th of July weekend!