


valk
-
Posts
567 -
Joined
-
Last visited
Content Type
Forums
Gallery
Events
Everything posted by valk
-
Thanks again Hugh - very helpful. Doesn’t sound like Rustoleum is a particularly bad choice and my car doesn’t face the elements so I think I’ll go with that as it’s easy to get. Your response goes into my reference file. peter
-
Thanks, Hugh, for your thoughtful response. I looked on the Nason website and could not find #99 but did find a chassis black available only in gallons. In truth, I'm hoping to find a readily available aerosol alternative in a popular brand like Rustoleum. It comes in flat, satin, semi-gloss and gloss so i'm hoping one of these would suffice for my driver. Peter
-
Anyone have any recommendations regarding black paint for the undercarriage, differential, wheels, coils, backside of fenders, etc? I tried some Rustoleum Satin but it seems a bit too glossy. Is flat the way to go? Thanks, Peter
-
I’m jealous of you abilities- you make it look easy. Great work. Peter
-
Then again are these on all ‘41s?.
-
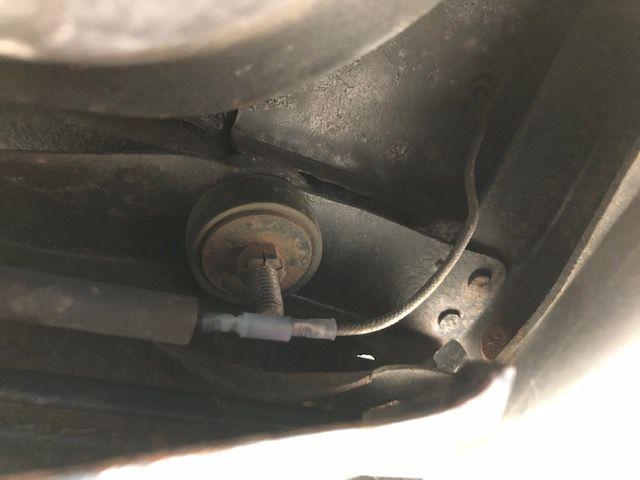
I'm sure your right, the car has both a mechanical and an electric pump. The line I disconnected from the filler neck is routed where I can't really see where it ultimately goes but it is headed toward the electric pump. Unrelated to this topic, the car has another "add-on" feature I just noticed. Tough to see, but the differential has a vent installed - the vent line (pic) follows the brake line above the diff and ends "open" on the other side. The previous owner apparently knew all the tricks in the trade.

-
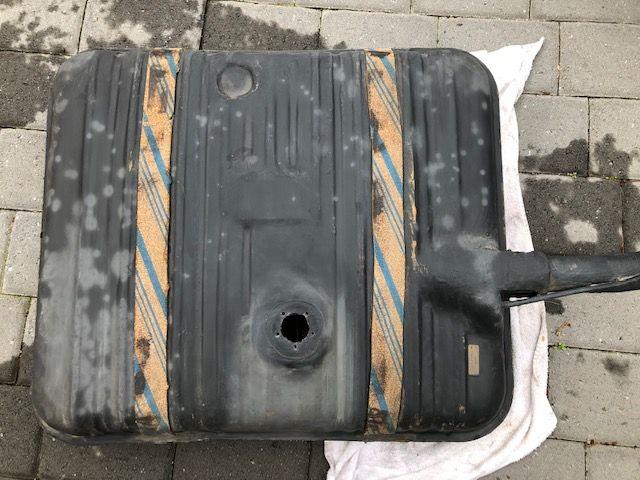
Ok the tank took some wrestling but I managed to get it out. Getting it back in probably won't be as easy. The good news is that it has been sealed by Renu (pic) and it is clean inside. The curious news is that it is covered in a rubber-like material so painting it would be a challenge - what kind of paint would stick to that? It also has an extra vent line drilled into the side of the filler tube, but that might be a good thing. Doesn't hurt anything anyway. I'm not about to strip all the rubber goop off the tank so I'll re-install it as is and win the ugly but functional gas tank award. The spots on the top are from it not being totally dry after cleaning (I'm not known for my patience). Ordered the sending unit - who knows when it will arrive.


-
Thanks Neil, you were a big help. Your point is well taken - I’ll take a pic or two tomorrow of the inside. I’d done this a couple times before on my 1950 Packard coupe I had 45 years ago!
-
Dropped the tank today and sure enough the float was full of gas. I was hoping I could just replace the float but the unit arm did not move as freely as it should so I'll replace the whole unit. I did not remove the tank entirely, just lowered it, because doing so would have been a major PITA as the tank filler pipe fouled my exhaust pipe and I would have had to really work it to get it out. Everything is pretty clean back there anyway so there wasn't a need. Any preference regarding the float: cork vs metal?? I may not have a choice but I thought I'd ask. Peter

-
Couple of things, the service bulletin makes a big deal of warming up the engine thoroughly before adjusting valves by DRIVING it. Idling in the shop won’t do. The coolant and oil warm at different rates and lash will be too TIGHT if not both thoroughly hot. Second, 12 quarts is 2 too many according to my manual. Check Your dip stick.
-
I would try locating a particularly noisy valve with a stethoscope, measure the gap and then adjust in to see if it improves. I wouldn’t go tighter than .015 though on a hot engine.
-
...until now! FYI, it is Snap-on tool number V-21A and while no longer available through Snap-On, there are a few on Ebay. Peter
-
Well I’m happy for you of course but I’ve had no luck yet locating one.
-
Err, “due to the SCREW moving when I tighten the NUT”....haven’t had my coffee yet.
-
Whoa that is cool. Where can I get one? I always seem to have to loosen and tighten the nut several times to get the gap right due to the nut moving when I tighten the screw. With this, I’d adjust the valves with the engine running as you should. peter
-
Dang Neil, just reviewed your fuel tank experience - thanks for paving the way! So well documented that I feel even I can do this. The plank-and-lift technique alone will save me time and embarresment.
-
Shoot Neil, my apologies. I do need to get a fedora, though, so I fit in better. Thanks so much for your help and I'm going to your thread now... Peter
-
Looks like kgreen is correct, i have a bogus sending unit. Either the float is bad or internals. I located the sender-to-gauge wire going through the trunk floor that Keith referenced (mine goes into the trunk at the rear driver side corner near the exhaust) and the previous owner thankfully installed a bullet plug there in unheated shrink wrap. Disconnected the plug and, sure enough, the gauge went to full. So I have to pull the tank after all but don't have to mess with any wires. Decent trade off to me. The only fly in the ointment is I also have to remove yet another splash pan to lower the tank but it appears easy enough. Thanks Boys, I''ll wrap this up and report back when I install a new sending unit.

-
Thanks soooo much Neil. I’ll crawl under tomorrow and check it out. Hope you’re right about being grounded there, best of all possibilities.
-
Thanks Neil. I agree that would be the best/easiest outcome. Regrettably, in this instance, my trunk is beautifully carpeted in the wrong material and is glued down on all surfaces (ugh). I may be able to pry the trunk side "cover" on the driver's side off enough to see if I can disconnect the wire from down in there but if not, I'm screwed. I'm talking prematurely but I think I'm headed toward having to drop the tank and replace the whole wire unless I can find an obvious ground somewhere. Question: could I then just cut the existing wire as close to the gauge as possible and splice in the new one as opposed to disconnecting it at the gauge itself? It's cheating but wouldn't bother me.

-
This is great stuff. I suspect the wire is grounded somewhere between the gauge and sending unit so I’ll disconnect it at the tank. Per Anderson, if it still reads empty that at least points to a bogus wire if I’m reading it right and I won’t have to pull the tank
-
Thanks Matt, great info and I’ll let you know how it works out. Pains me to hear of your business troubles. I know lots of folks are having similar experiences, not that that helps at all. Hang in there man. peter
-
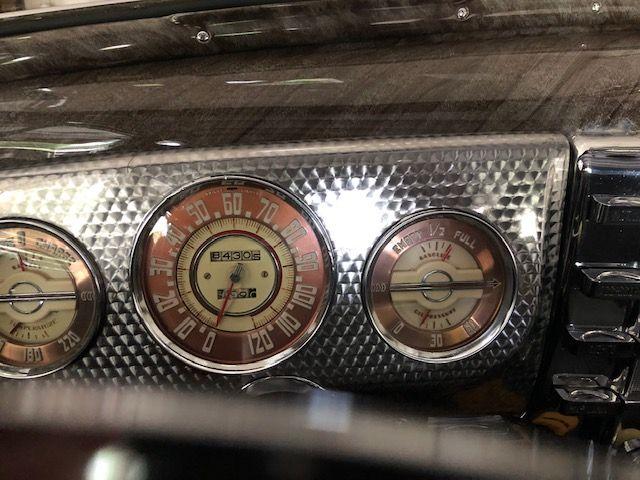
Greetings Boys, hope all are staying out of harm's way. Thought I'd look into my faulty fuel gauge and wondered if anyone knew of a clever way to determine if the problem is in the gauge or the sending unit before I take the tank down. And, no, I don't have the neat tool referenced in the manual that does just that. The needle moves from below empty when the ignition is off to just above empty when the ignition is on but is stuck there regardless of the amount of gas in the tank. The manual also suggests the problem is the sending unit when the gauge is stuck on full. As mine is stuck on empty, I guess this doesn't apply. Thanks for any help, Peter '41 Roadmaster
-
Hi neil The driver side panel i believe is original and in good condition with just a few finish cracks around the Speedo. The other panel was a redo and while it looks at a glance like it’s right, it clearly isn’t. Not a high priority but I’d like to redo both down the line. My current concern is a damn oil leak at the rear seal. I don’t have lift so it’s going to be costly to fix.....


