Gary W
-
Posts
1,059 -
Joined
-
Last visited
-
Days Won
14
Content Type
Forums
Gallery
Events
Everything posted by Gary W
-

1937 Buick Model 48: RESTORATION HAS BEGUN! (Photo)
Gary W replied to Gary W's topic in Buick - Pre War
A few little odds - and - ends today. The most time consuming is wire wheeling all those nuts / bolts / washers. Then they get a scrubbing in paint thinner, a final soak in acetone to strip all the residual oils then two coats of gloss black. It takes hours to clean up all these small parts. Manifold Studs before I have a vacuum hood that pulls all the rust / dust / debris through a triple fllter and i wrapped the whole thing in a trash bag so there is no dust flying around. Keeps things pretty neat for the job it is. Same studs after wire wheel and rinse in thinner Sprayed with Rustoleum Automotive Gloss Black


-
1937 Buick Model 48: RESTORATION HAS BEGUN! (Photo)
Gary W replied to Gary W's topic in Buick - Pre War
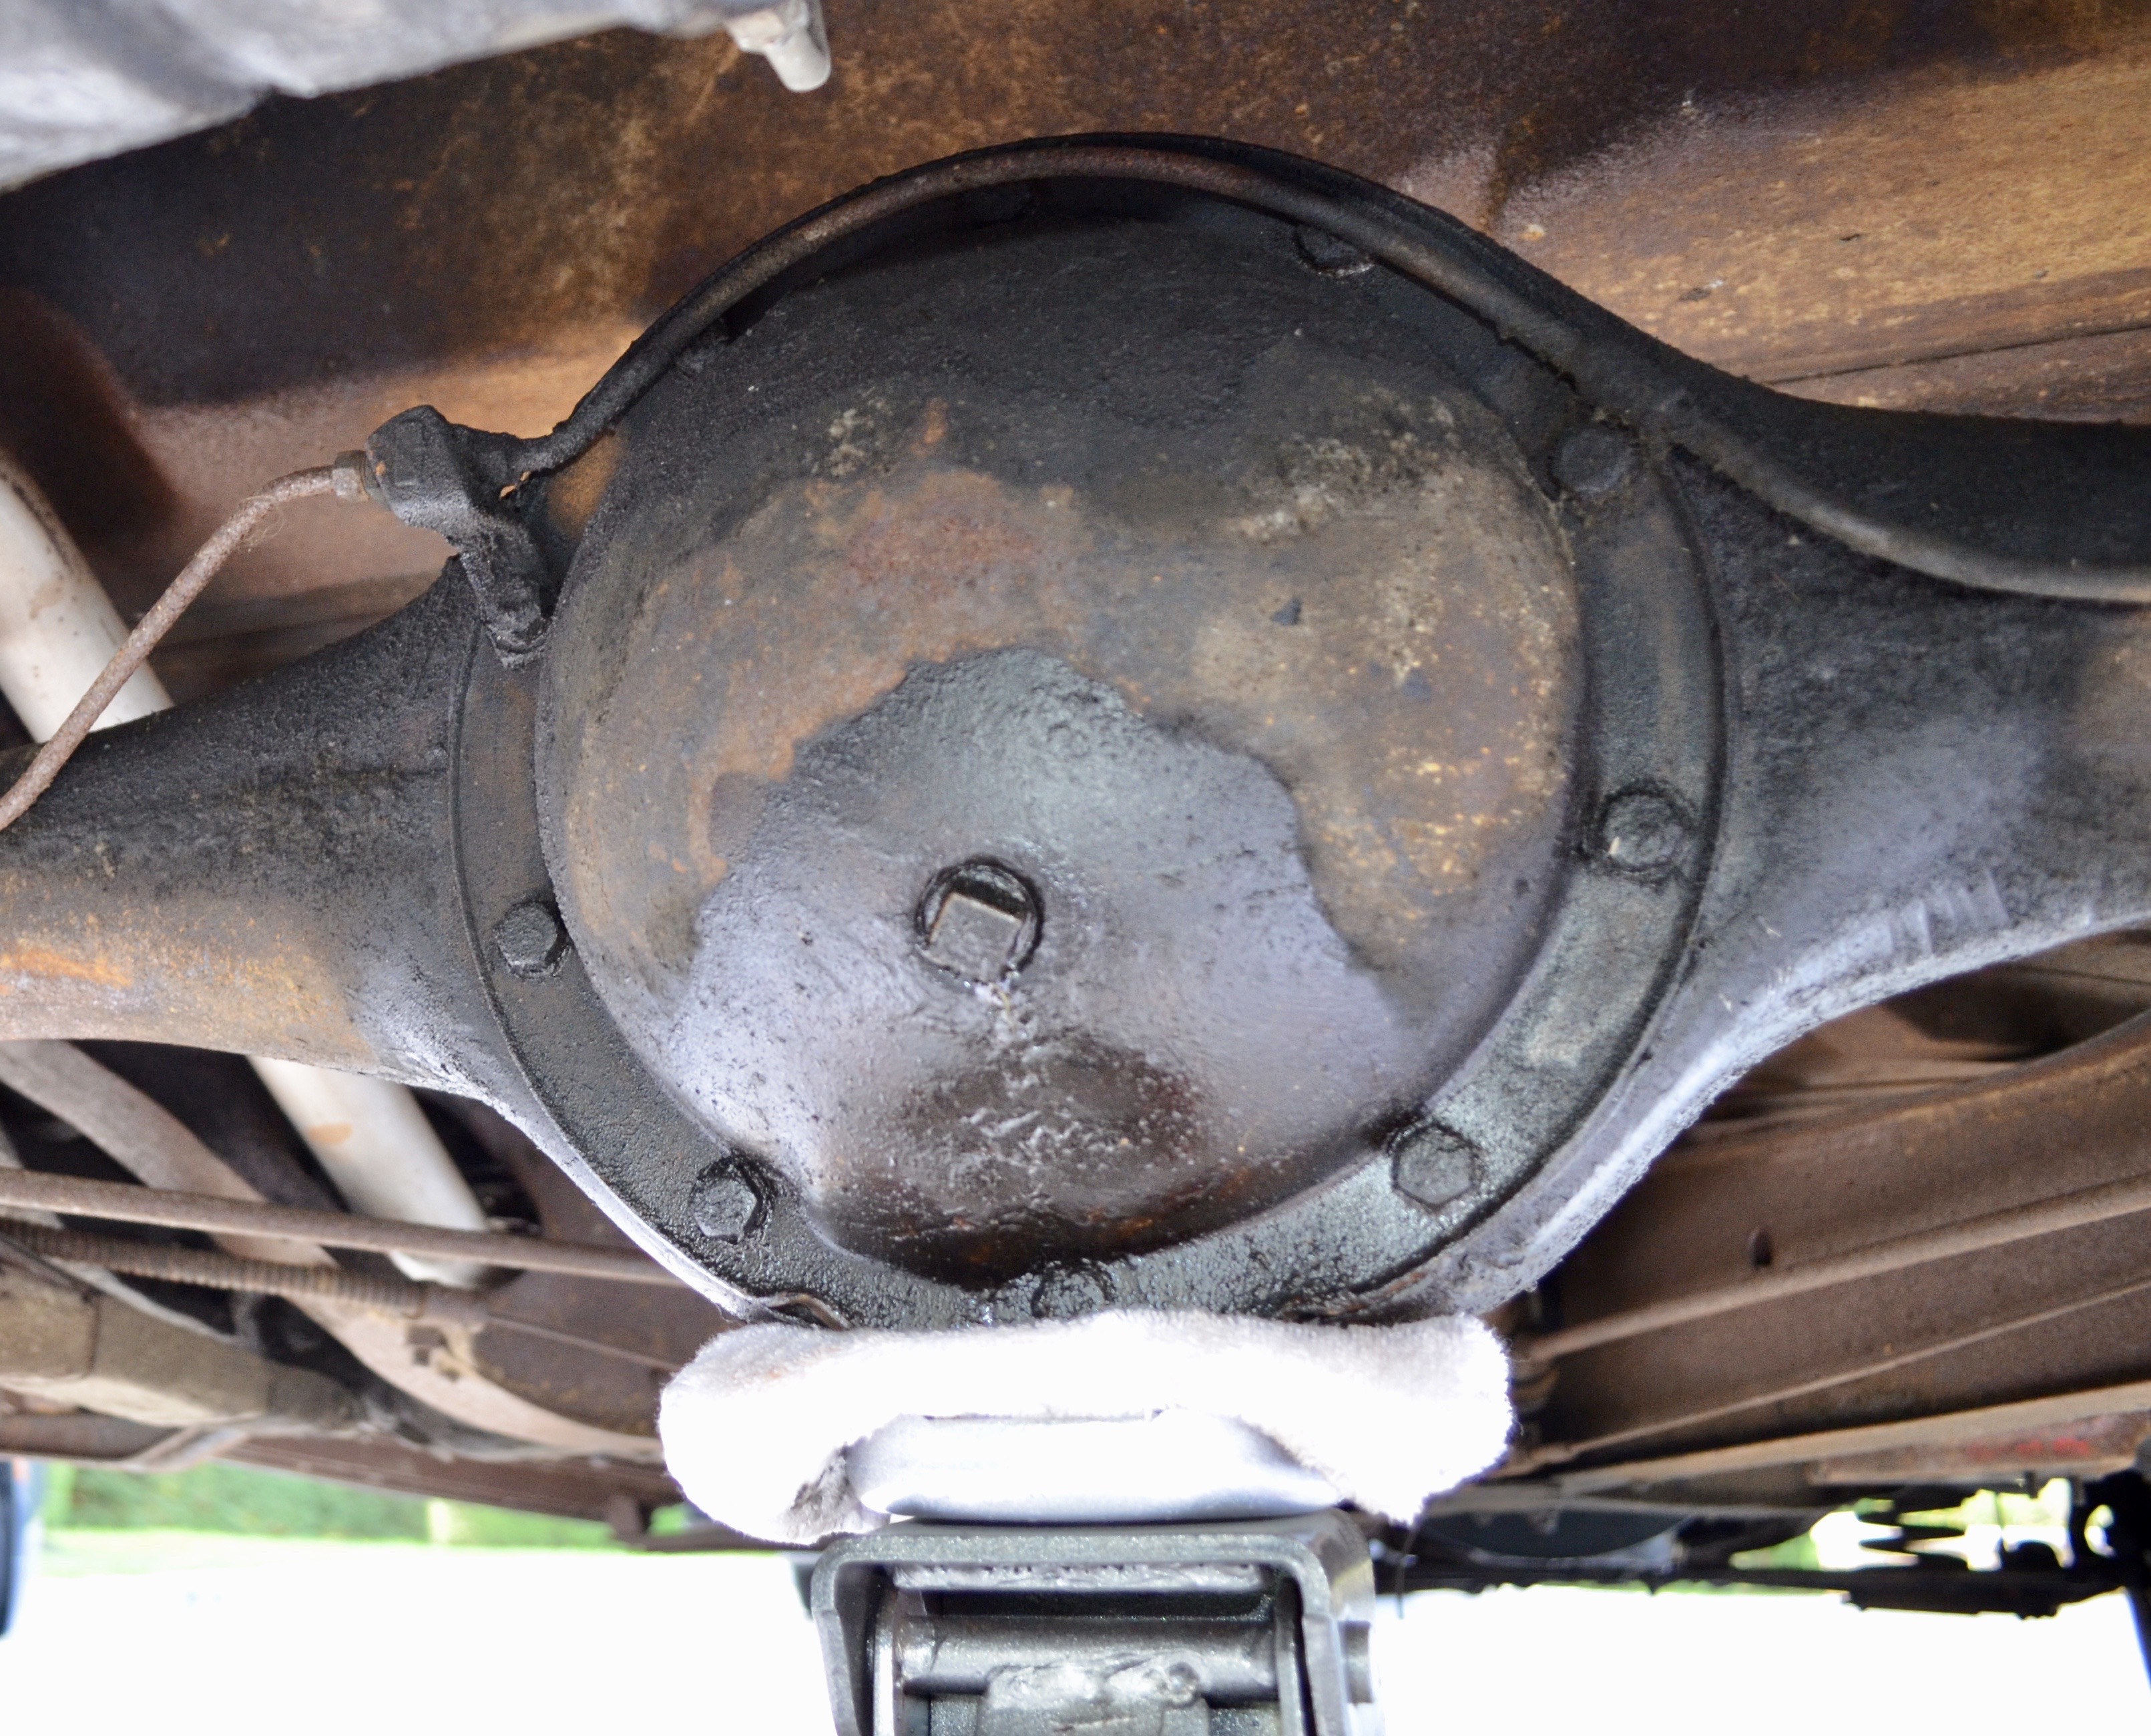
Cleaned up and cleaned out the differential housing: Before Scraping out all that old goop! All clean! Scraped all the old gasket and sealant. Sanded the outside, Painted it black. Then I hit the holes down flush, block sanded it smooth, scrubbed clean with acetone, Used Permatex Ultra-Black and installed the new gasket. Done!


-
1937 Buick Model 48: RESTORATION HAS BEGUN! (Photo)
Gary W replied to Gary W's topic in Buick - Pre War
Springs are from Eaton. Very nice people there and they know their stuff. I disassembled each leaf, and sent everyone out (except the main leaf with the threaded bushing) to be powder coated "mirror black". The front coil springs are also powder coated and i'm hoping to install them this weekend. I'll do all chassis paint touch-up work at the same time. When the leaves come back (Saturday morning), I'll paint "Slip-Plate" dry film graphite lubricating paint on every rubbing surface. Then assemble with no grease as the Slip Plate does not wash away and it bonds very nicely to the clean springs. Then when the new shackle bolt arrives, I can do the install and touch-up to the rear of the chassis as well. The main leaf is simply painted with POR-15 high gloss black because I don't want to take a chance of getting powder in the threaded bushing and ruin the leaf. -
Hi Dave. Photos of the top of the radiator: Those brackets are part of the radiator upper tank.
.thumb.JPG.3c1fc726ba76da8ec6a3cd0bec7edfb4.JPG)
.thumb.JPG.ee78dce2a1070fbc4739fef71078a8d9.JPG)
.thumb.JPG.779aba0106597b8365271cb4f97ac6ff.JPG)
-
1937 Buick Model 48: RESTORATION HAS BEGUN! (Photo)
Gary W replied to Gary W's topic in Buick - Pre War
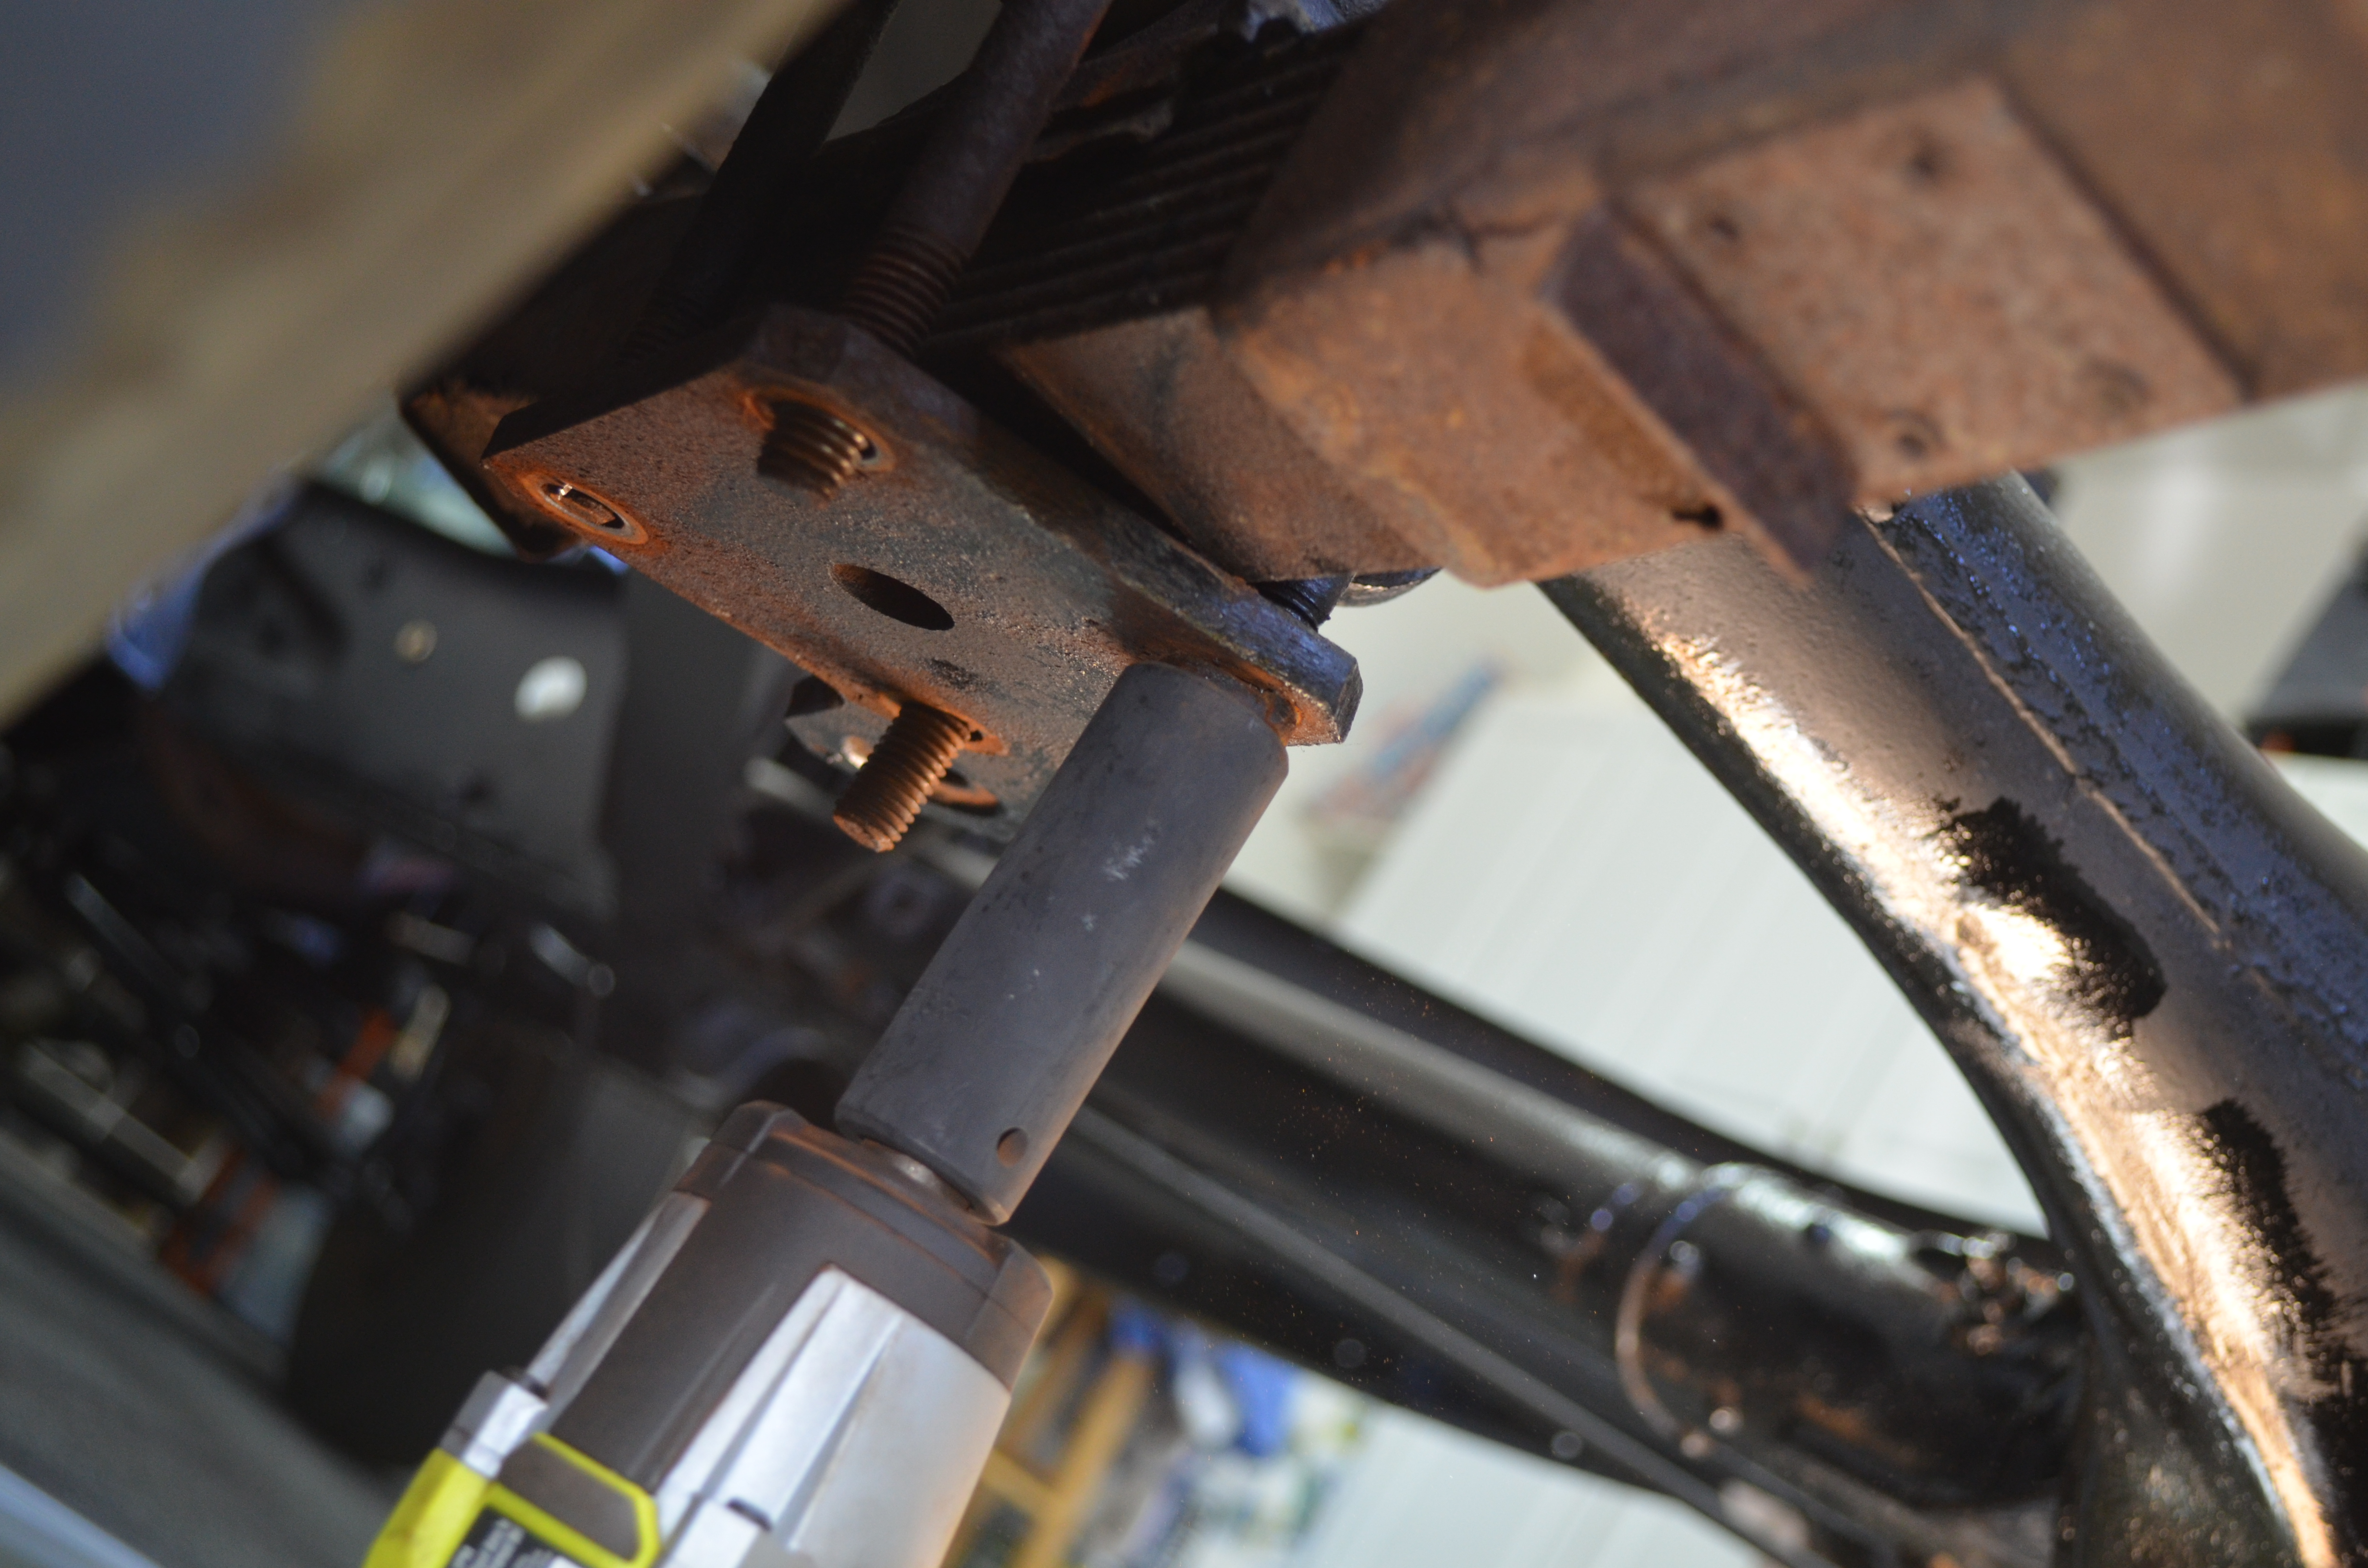
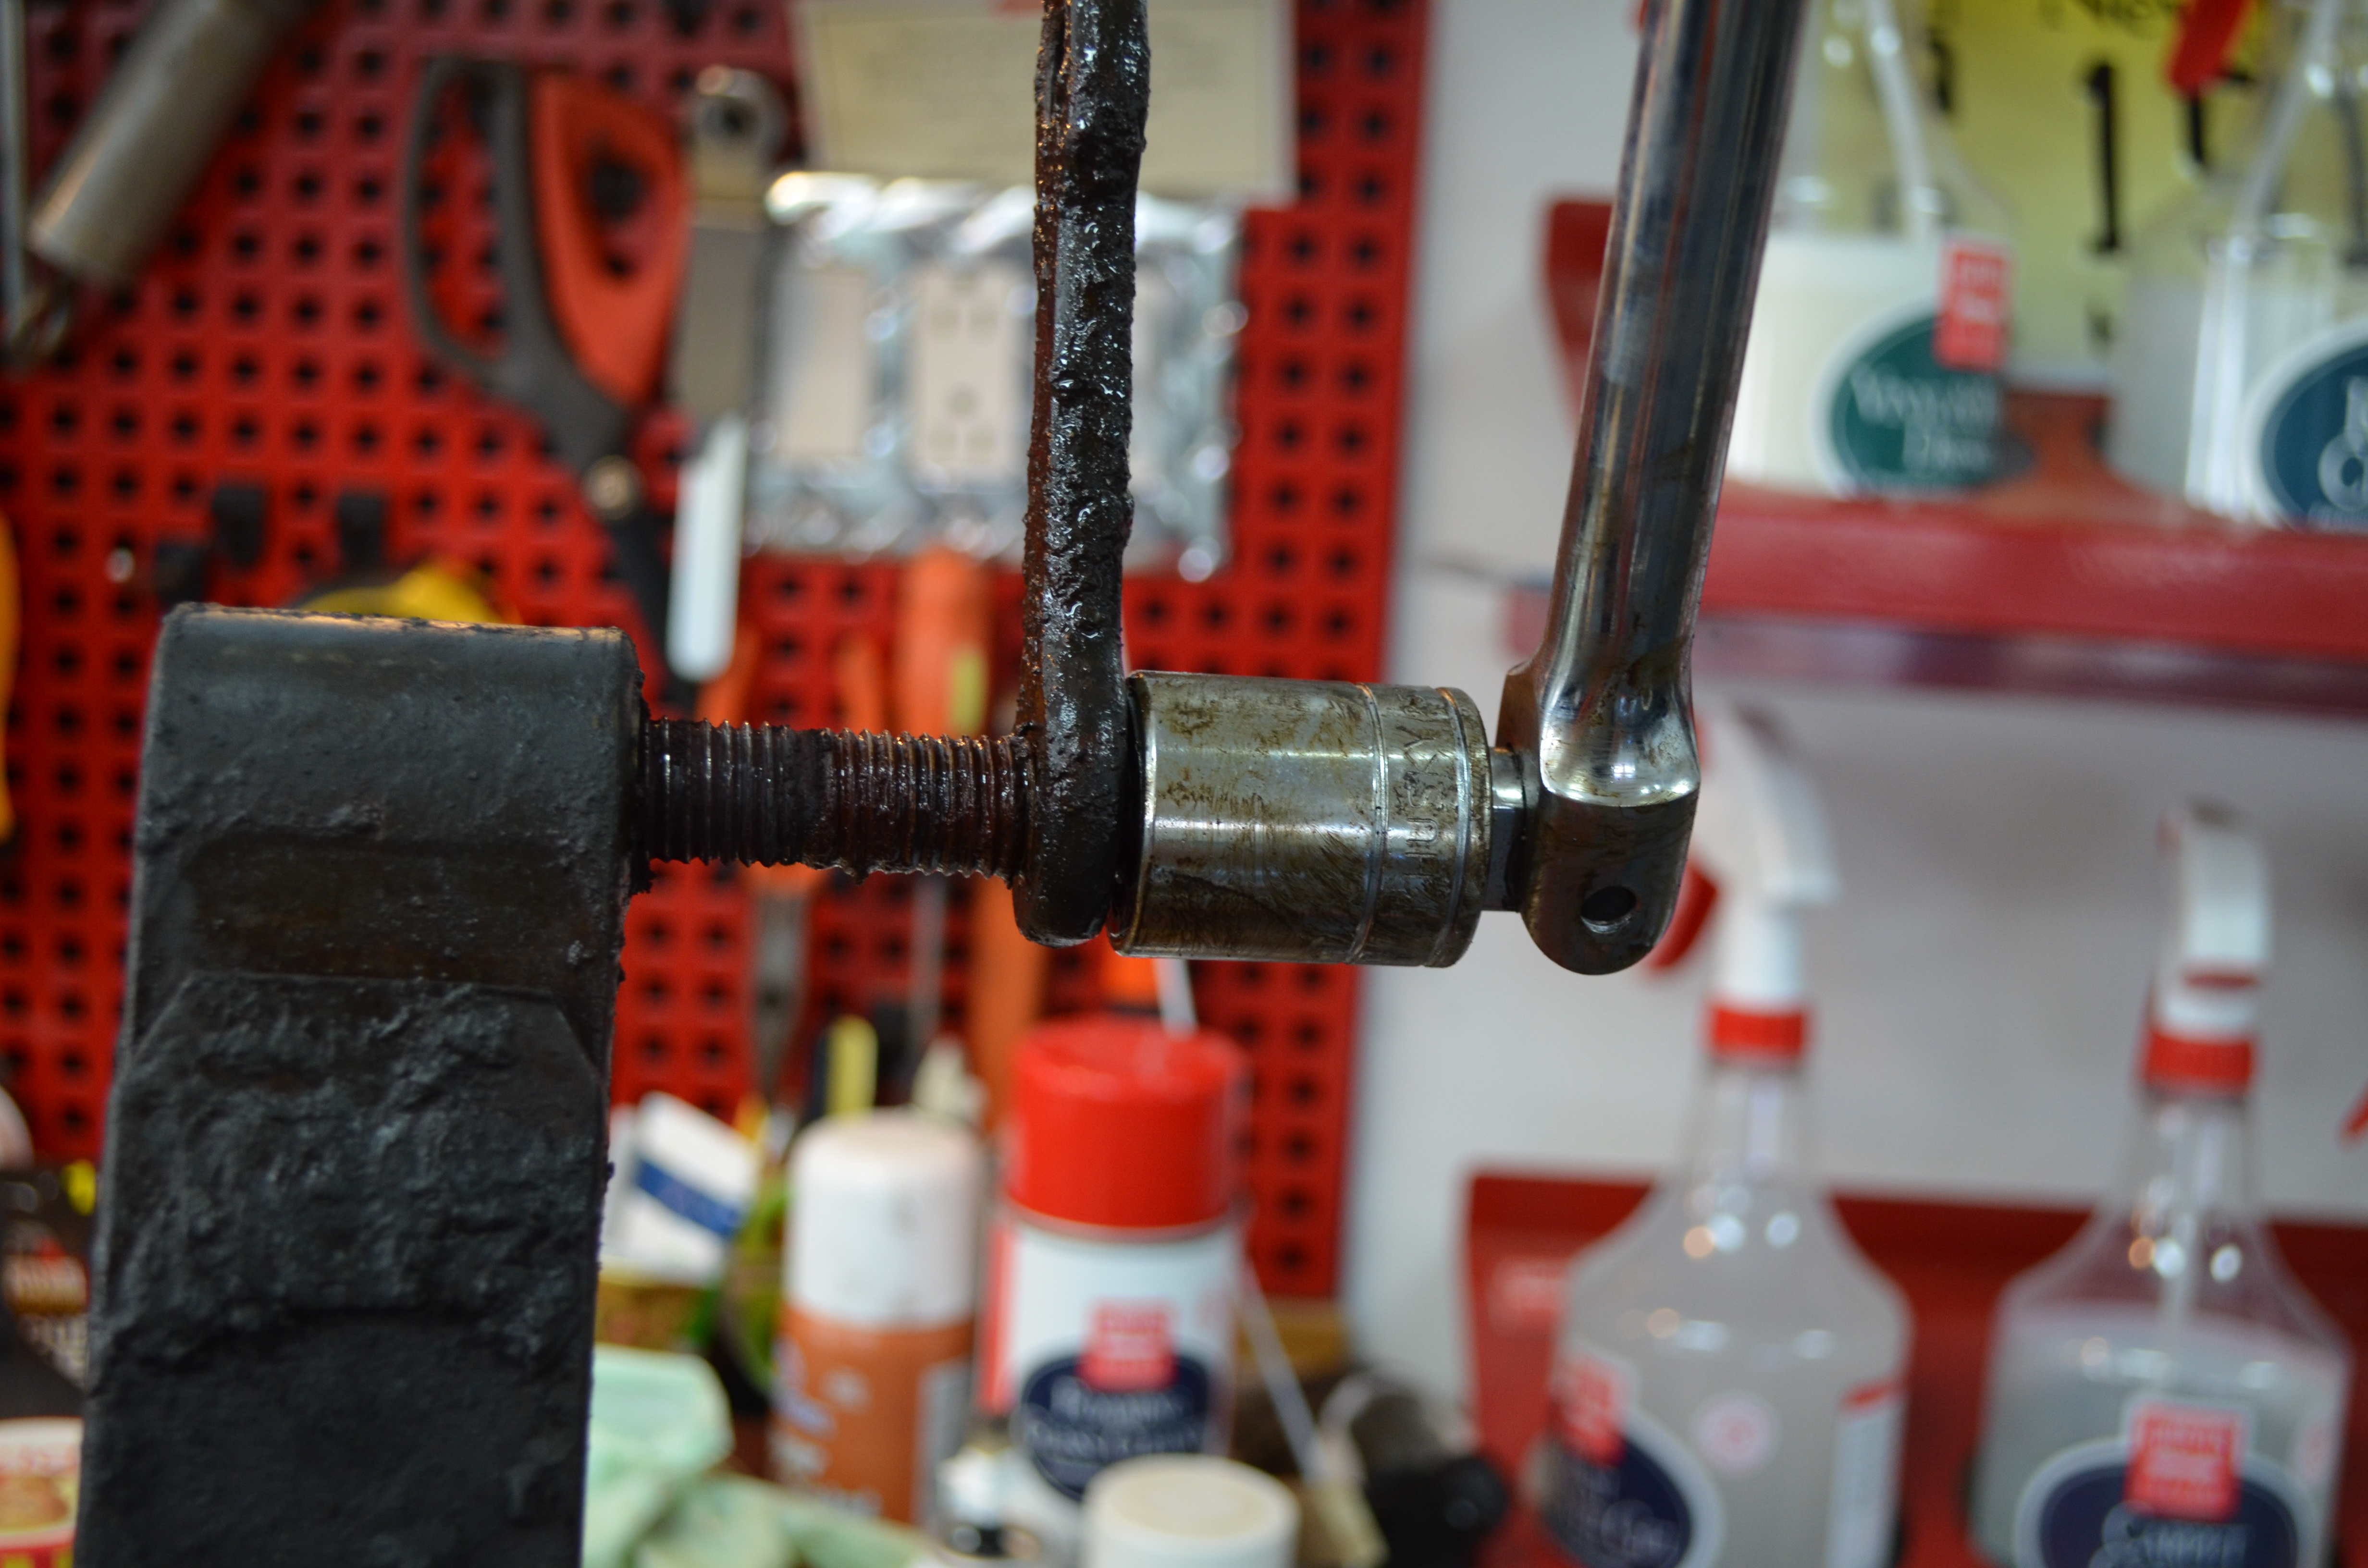
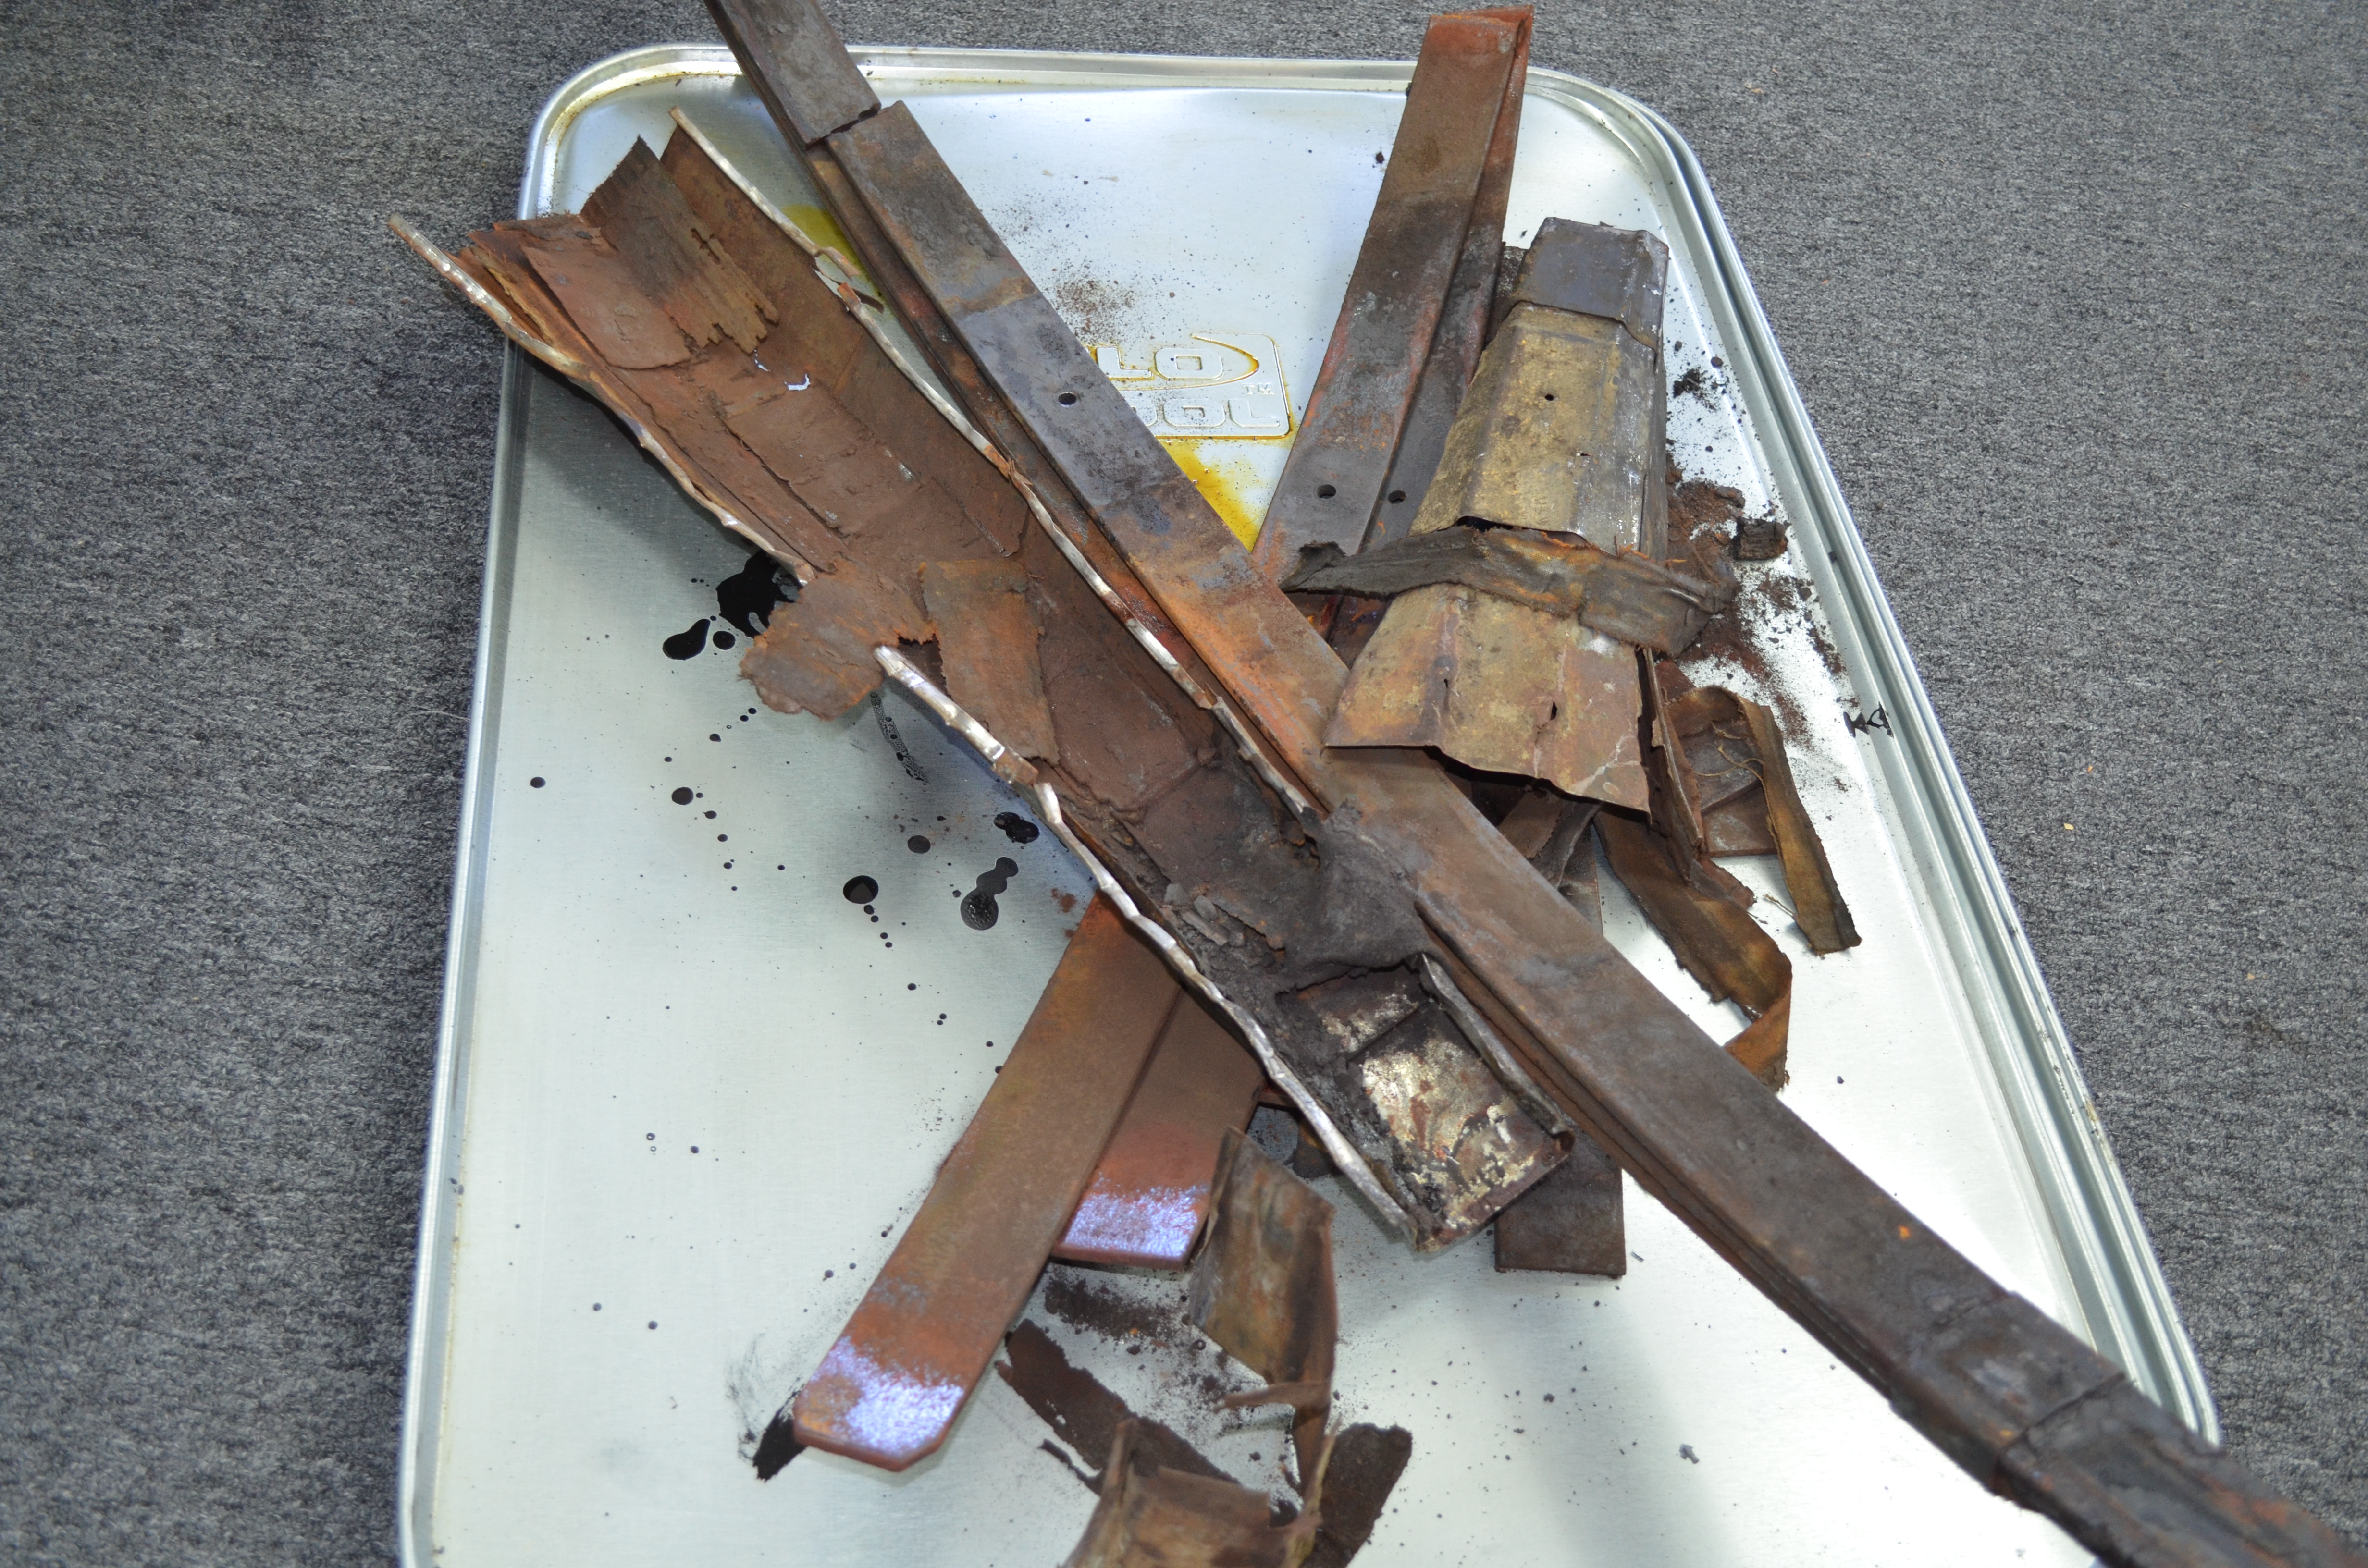
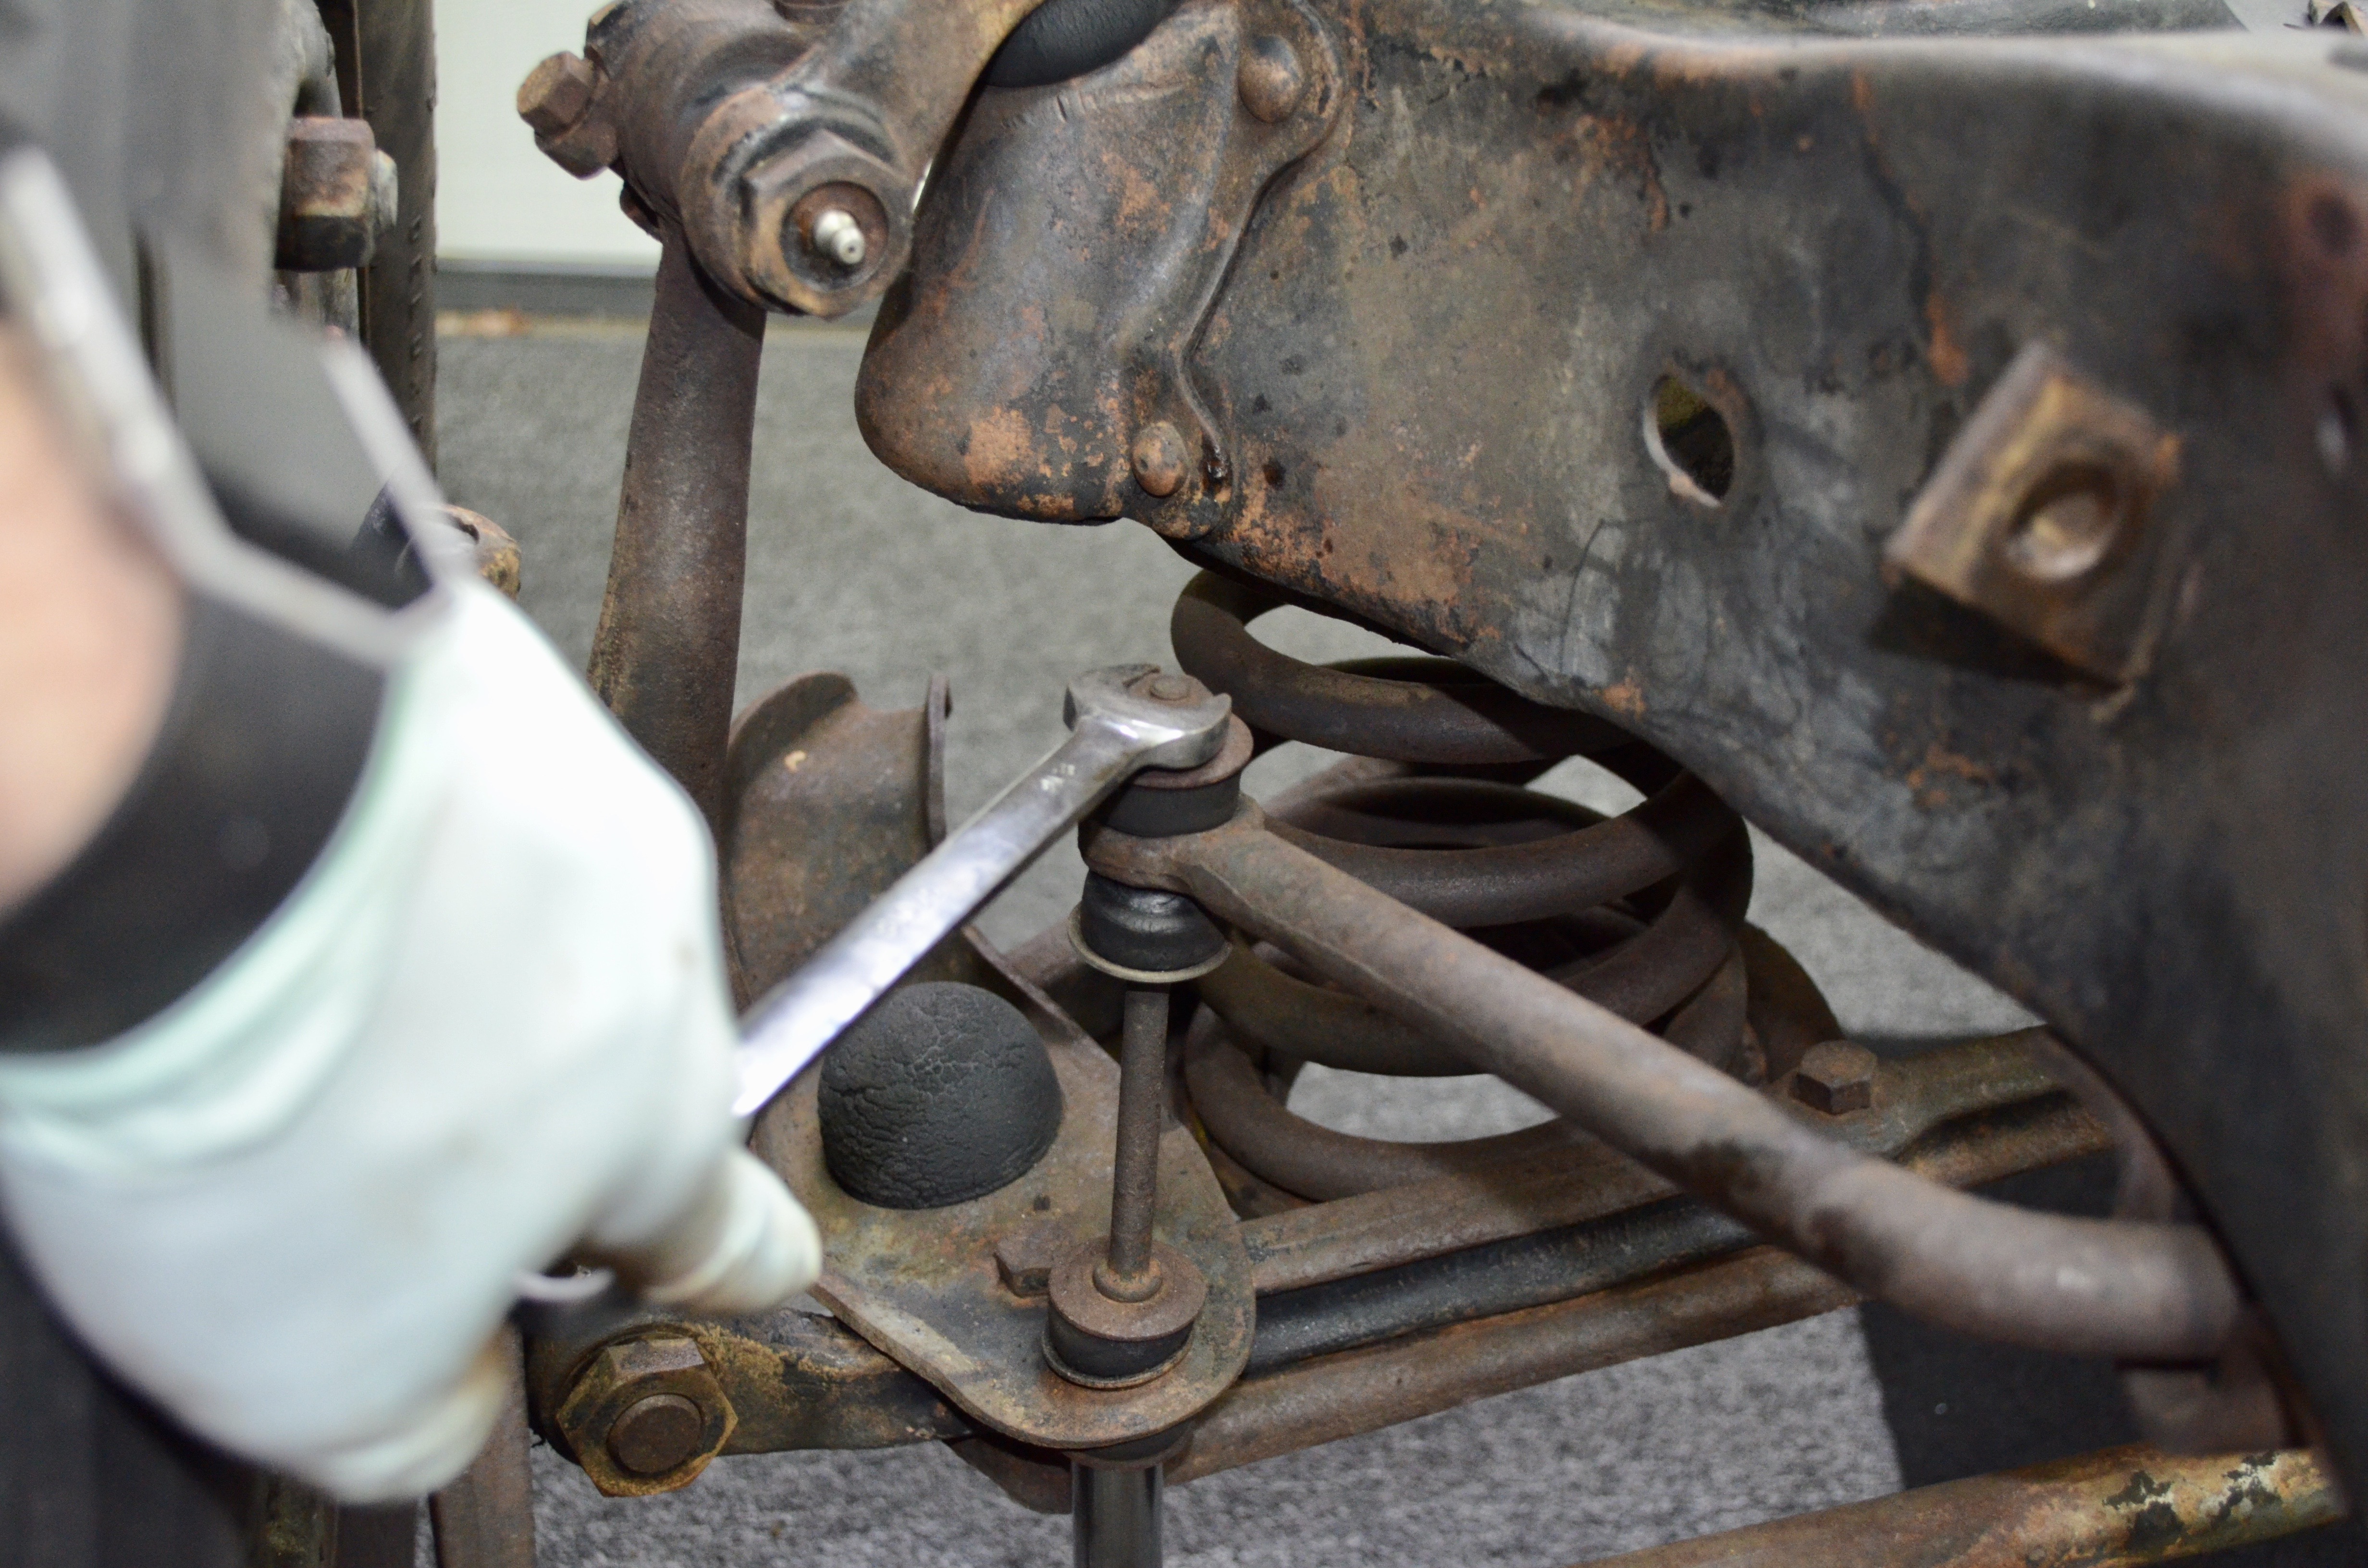
Rear Leaf Springs: Removed the rear shock Links and the rear stabilizer bar the other day so they are already off the lower spring plate. Removed the 4 "U" bolts by removing the 8 nuts (Which were rusted/frozen). The rubber bumper and it's plate come out with the "U" bolt closest to the backing plate Removed the shackle bolts from the shackles to free the spring. (This was the hardest part of the job. I broke one bolt and still have one in there. The other three came out) Removed the spring and placed it on the workbench Removed any remaining shackle bolts Removed the spring center bolt Pried open the metal spring covers and completely removed them. This revealed three broken leaves! Amazing how nice the car rode with such a bad spring under it. (Last photo shows what 80-year old springs look like!) Removed both shock absorbers, cleaned them up and filled with oil. They work beautifully so I simply reinstalled them onto the frame. So now I have a little more chassis cleaning and painting before installing the new springs. Hopefully I'll be installing the new rear leaf and my new front coil springs Saturday.


-
1937 Buick Model 48: RESTORATION HAS BEGUN! (Photo)
Gary W replied to Gary W's topic in Buick - Pre War
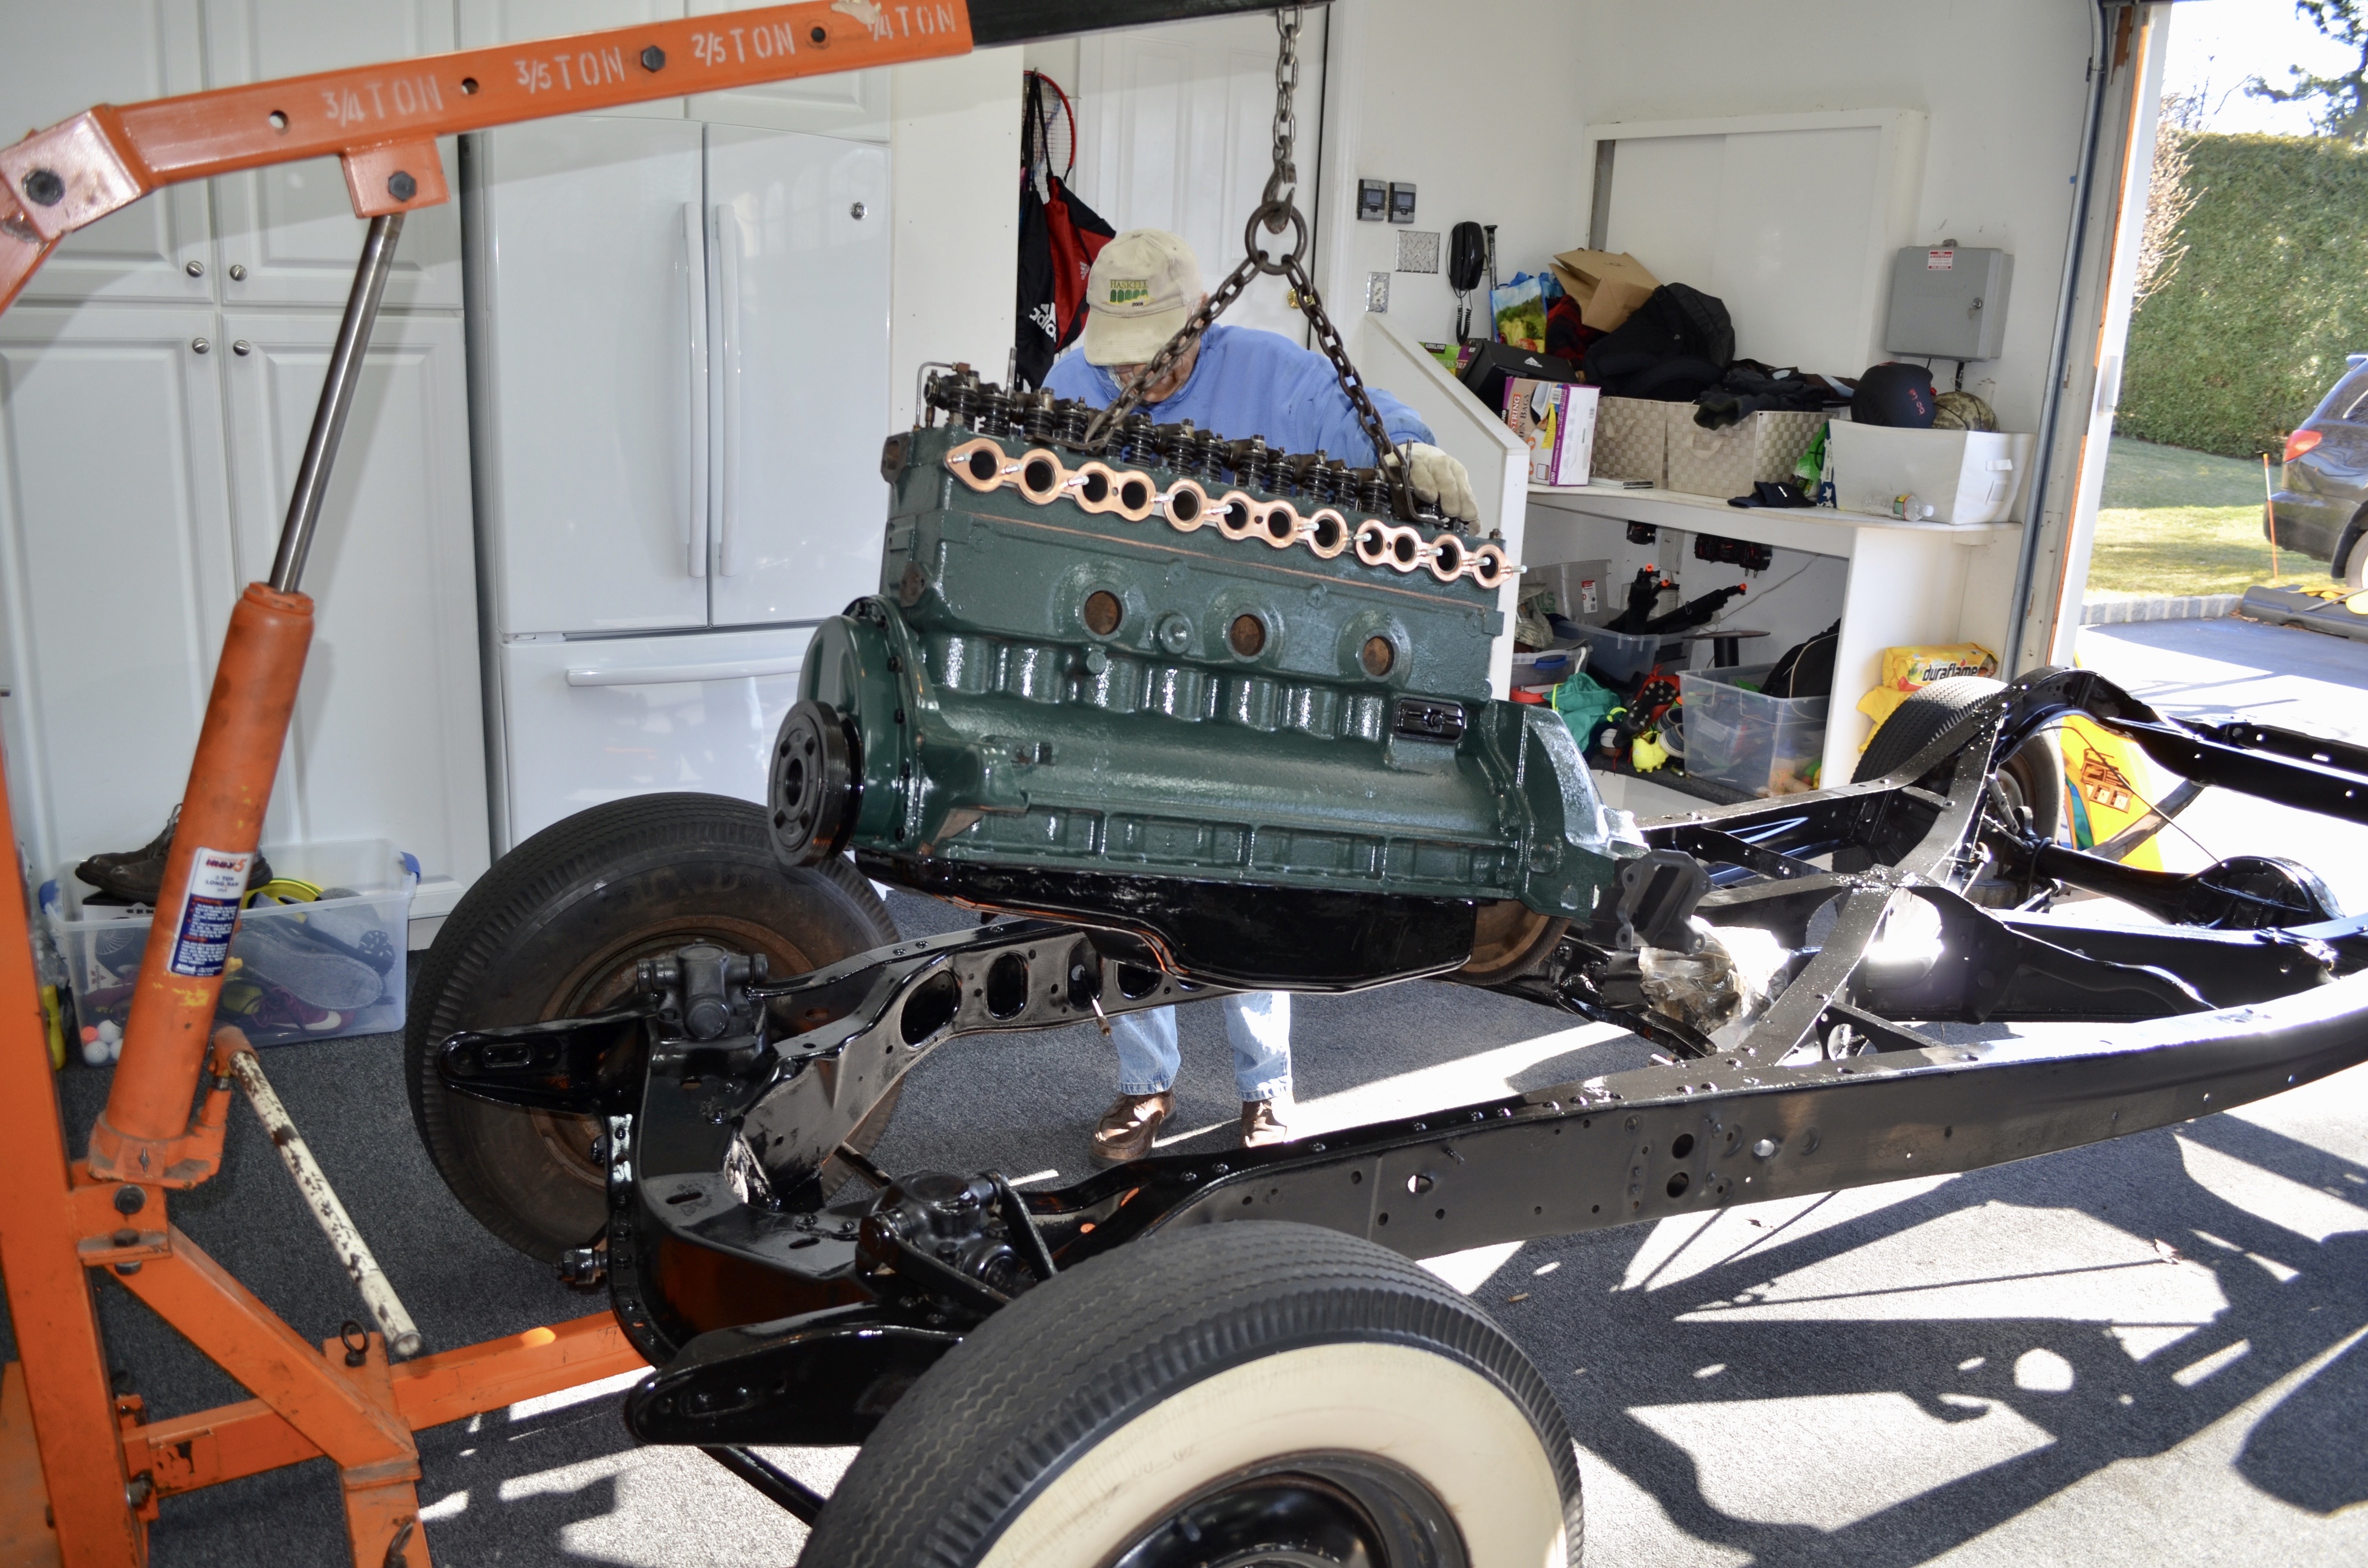
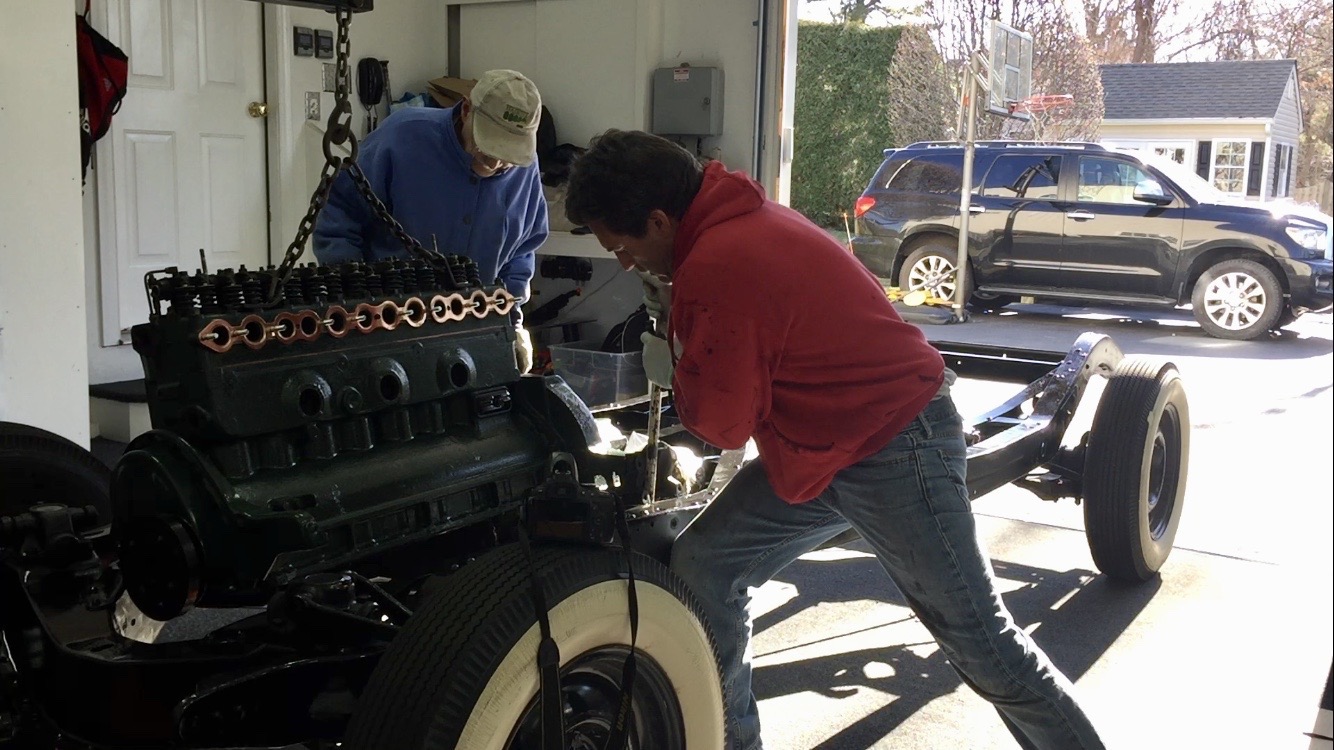
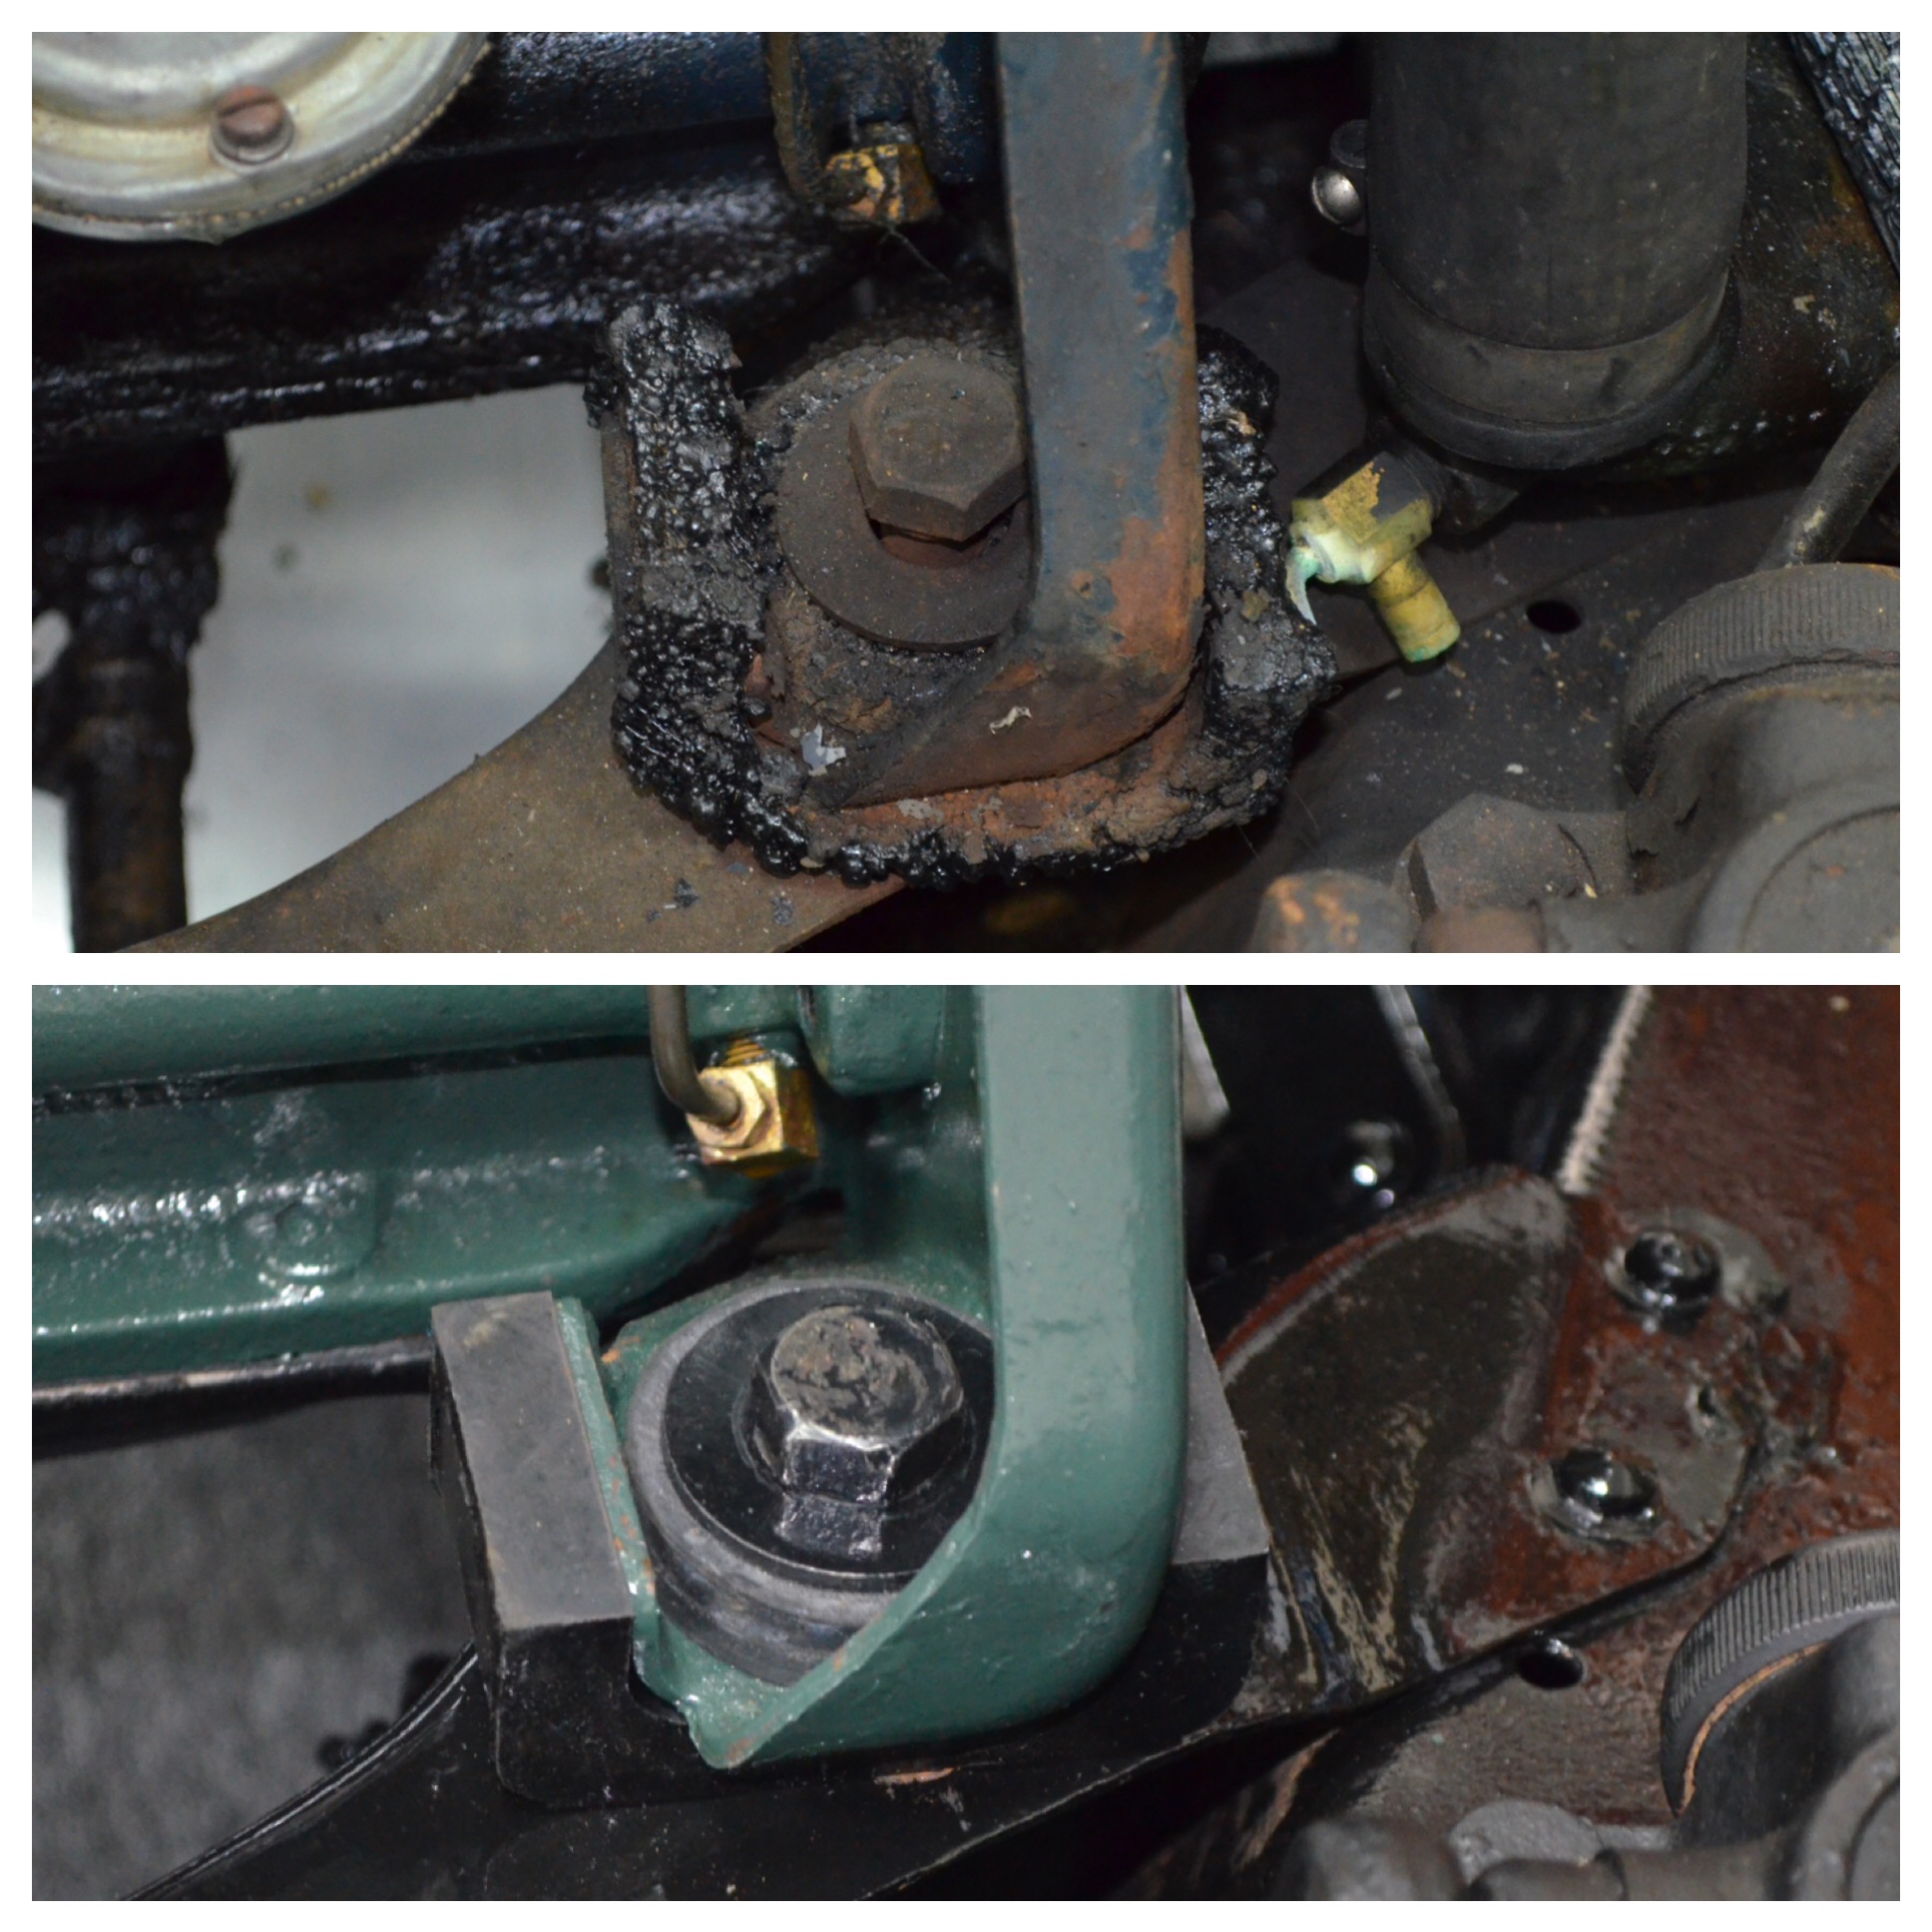
Wednesday, March 22: Today I mounted the engine back into the frame! Started by pushing the chassis outside, hoisting the engine up with the crane, and then pushing the chassis under the motor. After positioning and slowly lowering the engine, everything lined up beautifully! All my motor mounts were re-vulcanized, and I replaced the three shims that came out of the right rear motor mount. Went on to install the freeze plugs Honed and rebuilt the master cylinder Installed master cylinder and pedals Moved to the rear and removed the rear leaf springs. That was a tough job! Broke one shackle bolt in the process. Everything is just rusted together. ENGINE INSTALL: Just some photos of the engine install. Check out the last photo of the front right motor mount. Huge change over the last two months! (Next post for the rear springs)


-
Sorry for the delay...busy day on the Buick today! Here are photos of the disassembly from a couple different angles.


-
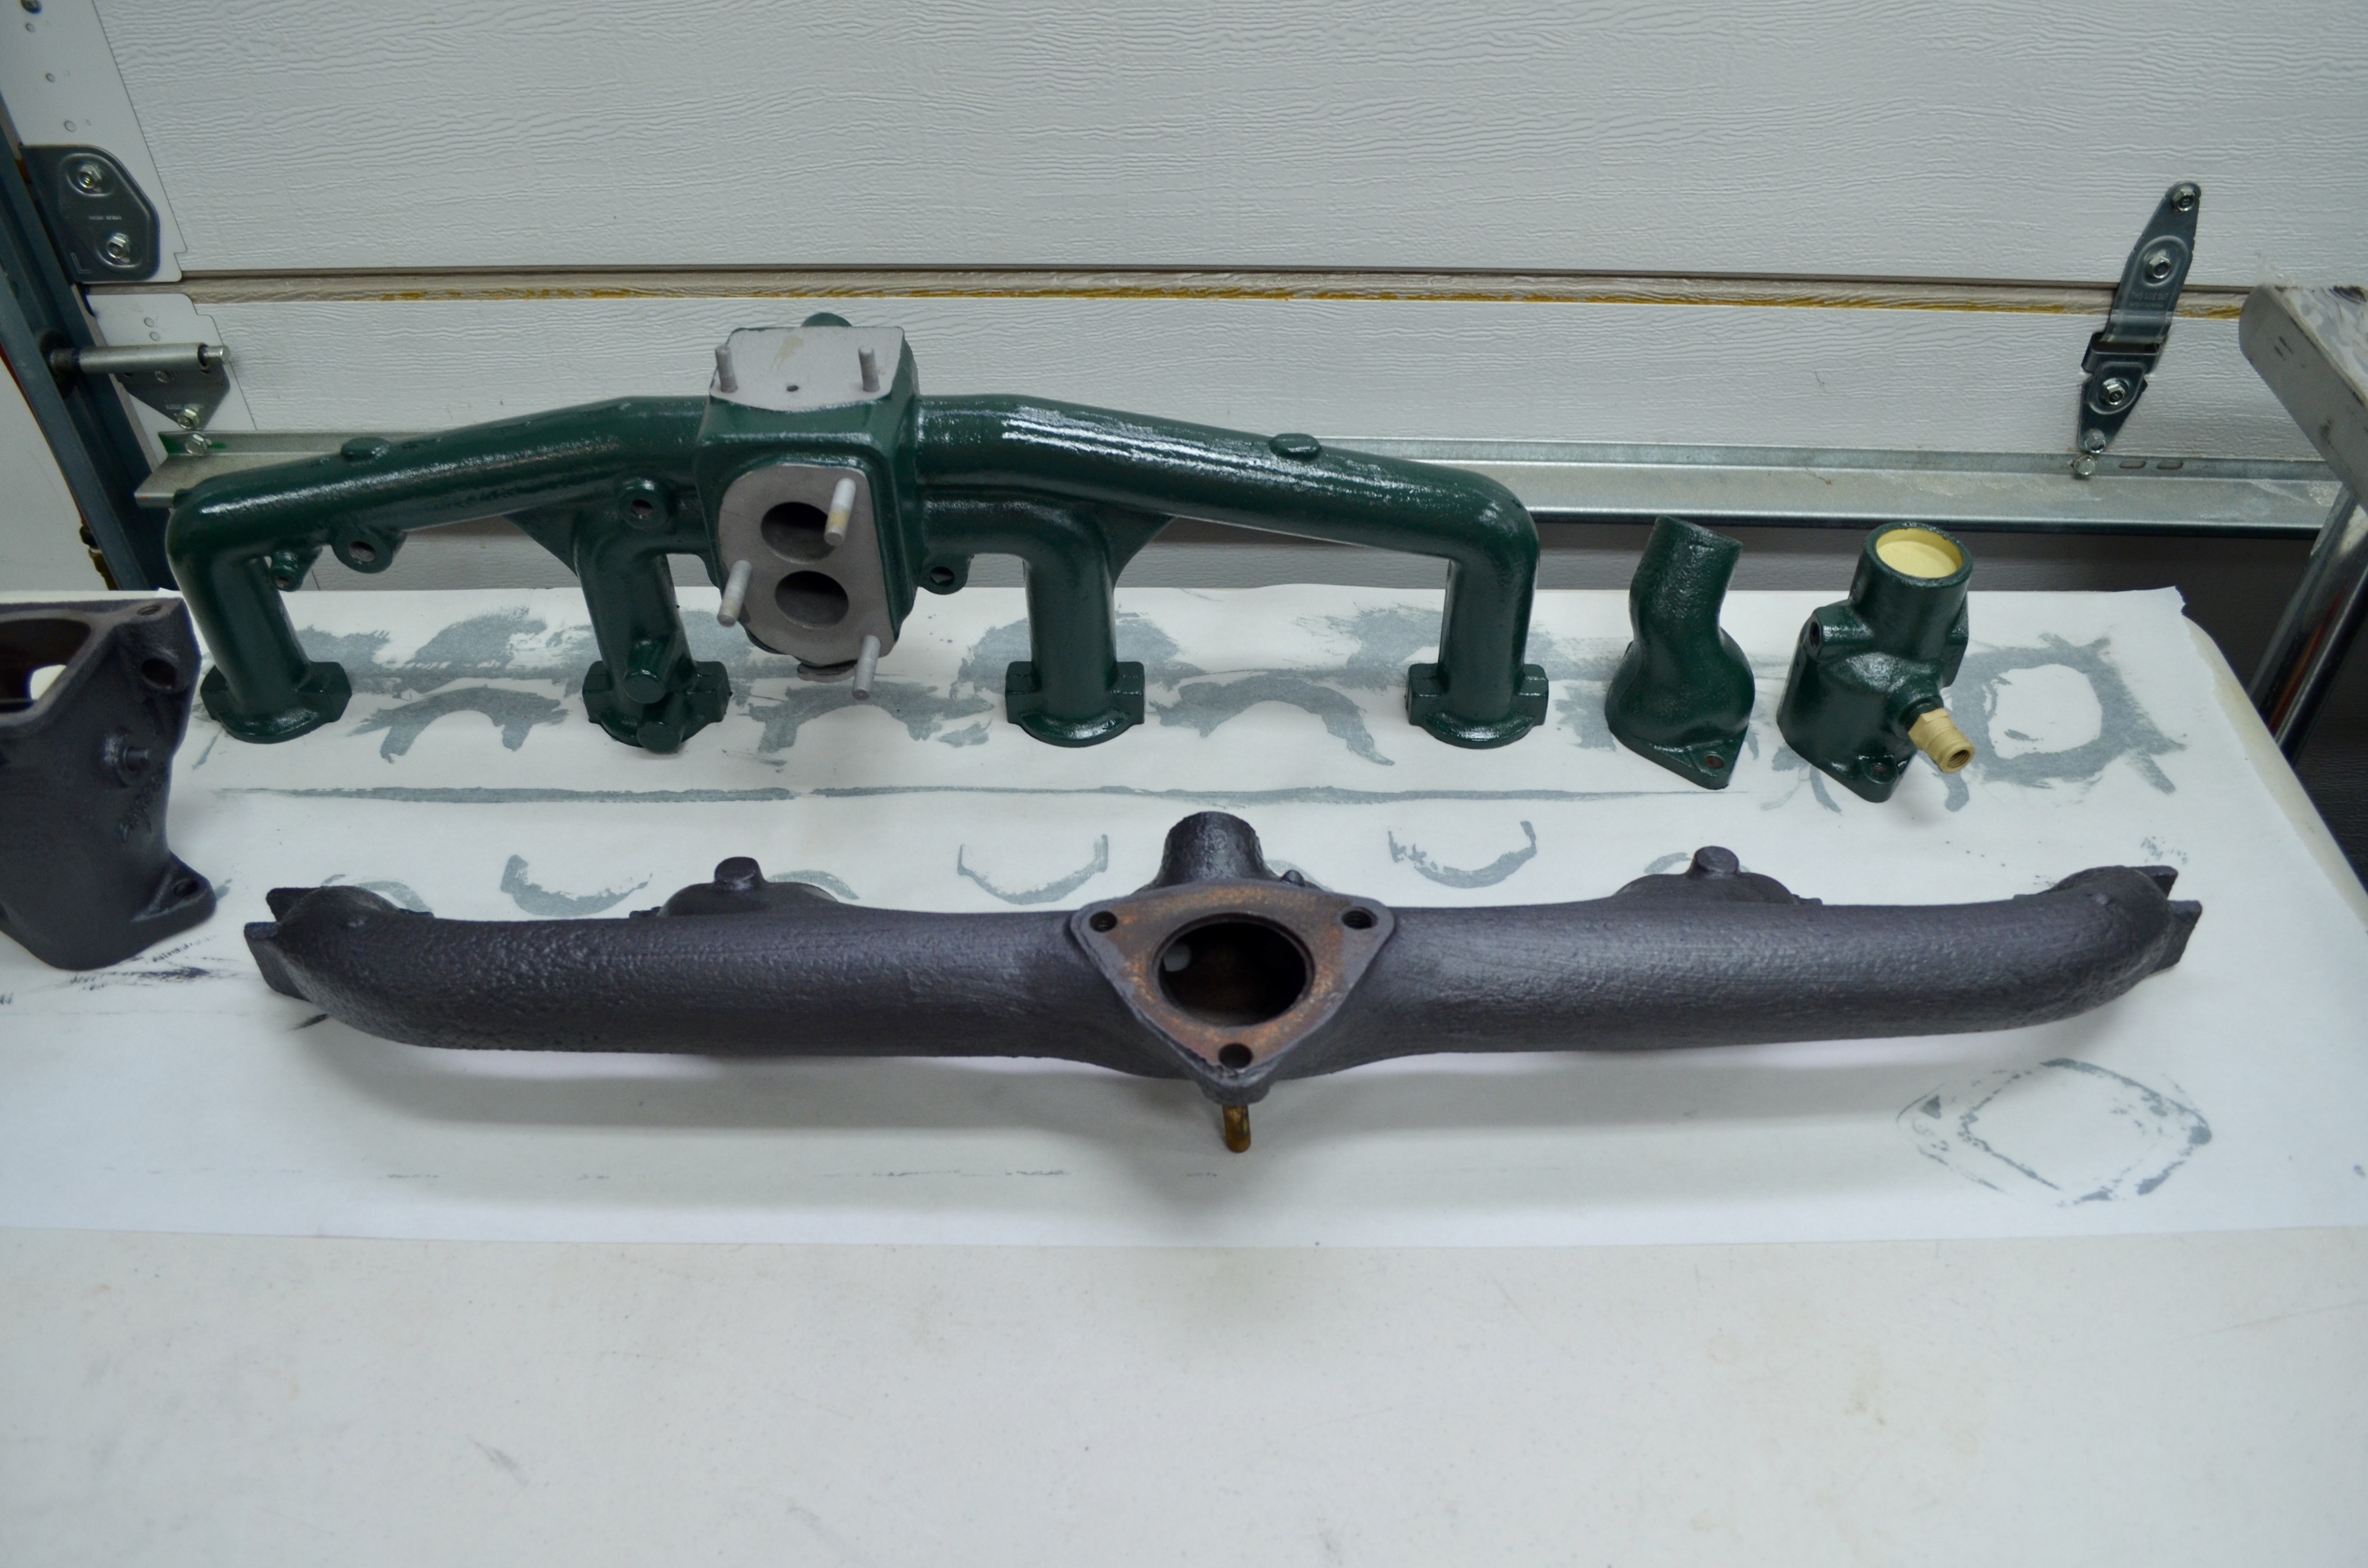
I painted the exhaust manifold and the heat riser thing under it using POR-15 high heat cast iron gray. The intake manifold is Buick engine green.
-
1937 Buick Model 48: RESTORATION HAS BEGUN! (Photo)
Gary W replied to Gary W's topic in Buick - Pre War
I FORGOT.......What is the rubber washer for?? (Right in the center of the last photo) Nothing like that came out of my master cylinder, just wondering where it goes? Thanks! -
1937 Buick Model 48: RESTORATION HAS BEGUN! (Photo)
Gary W replied to Gary W's topic in Buick - Pre War
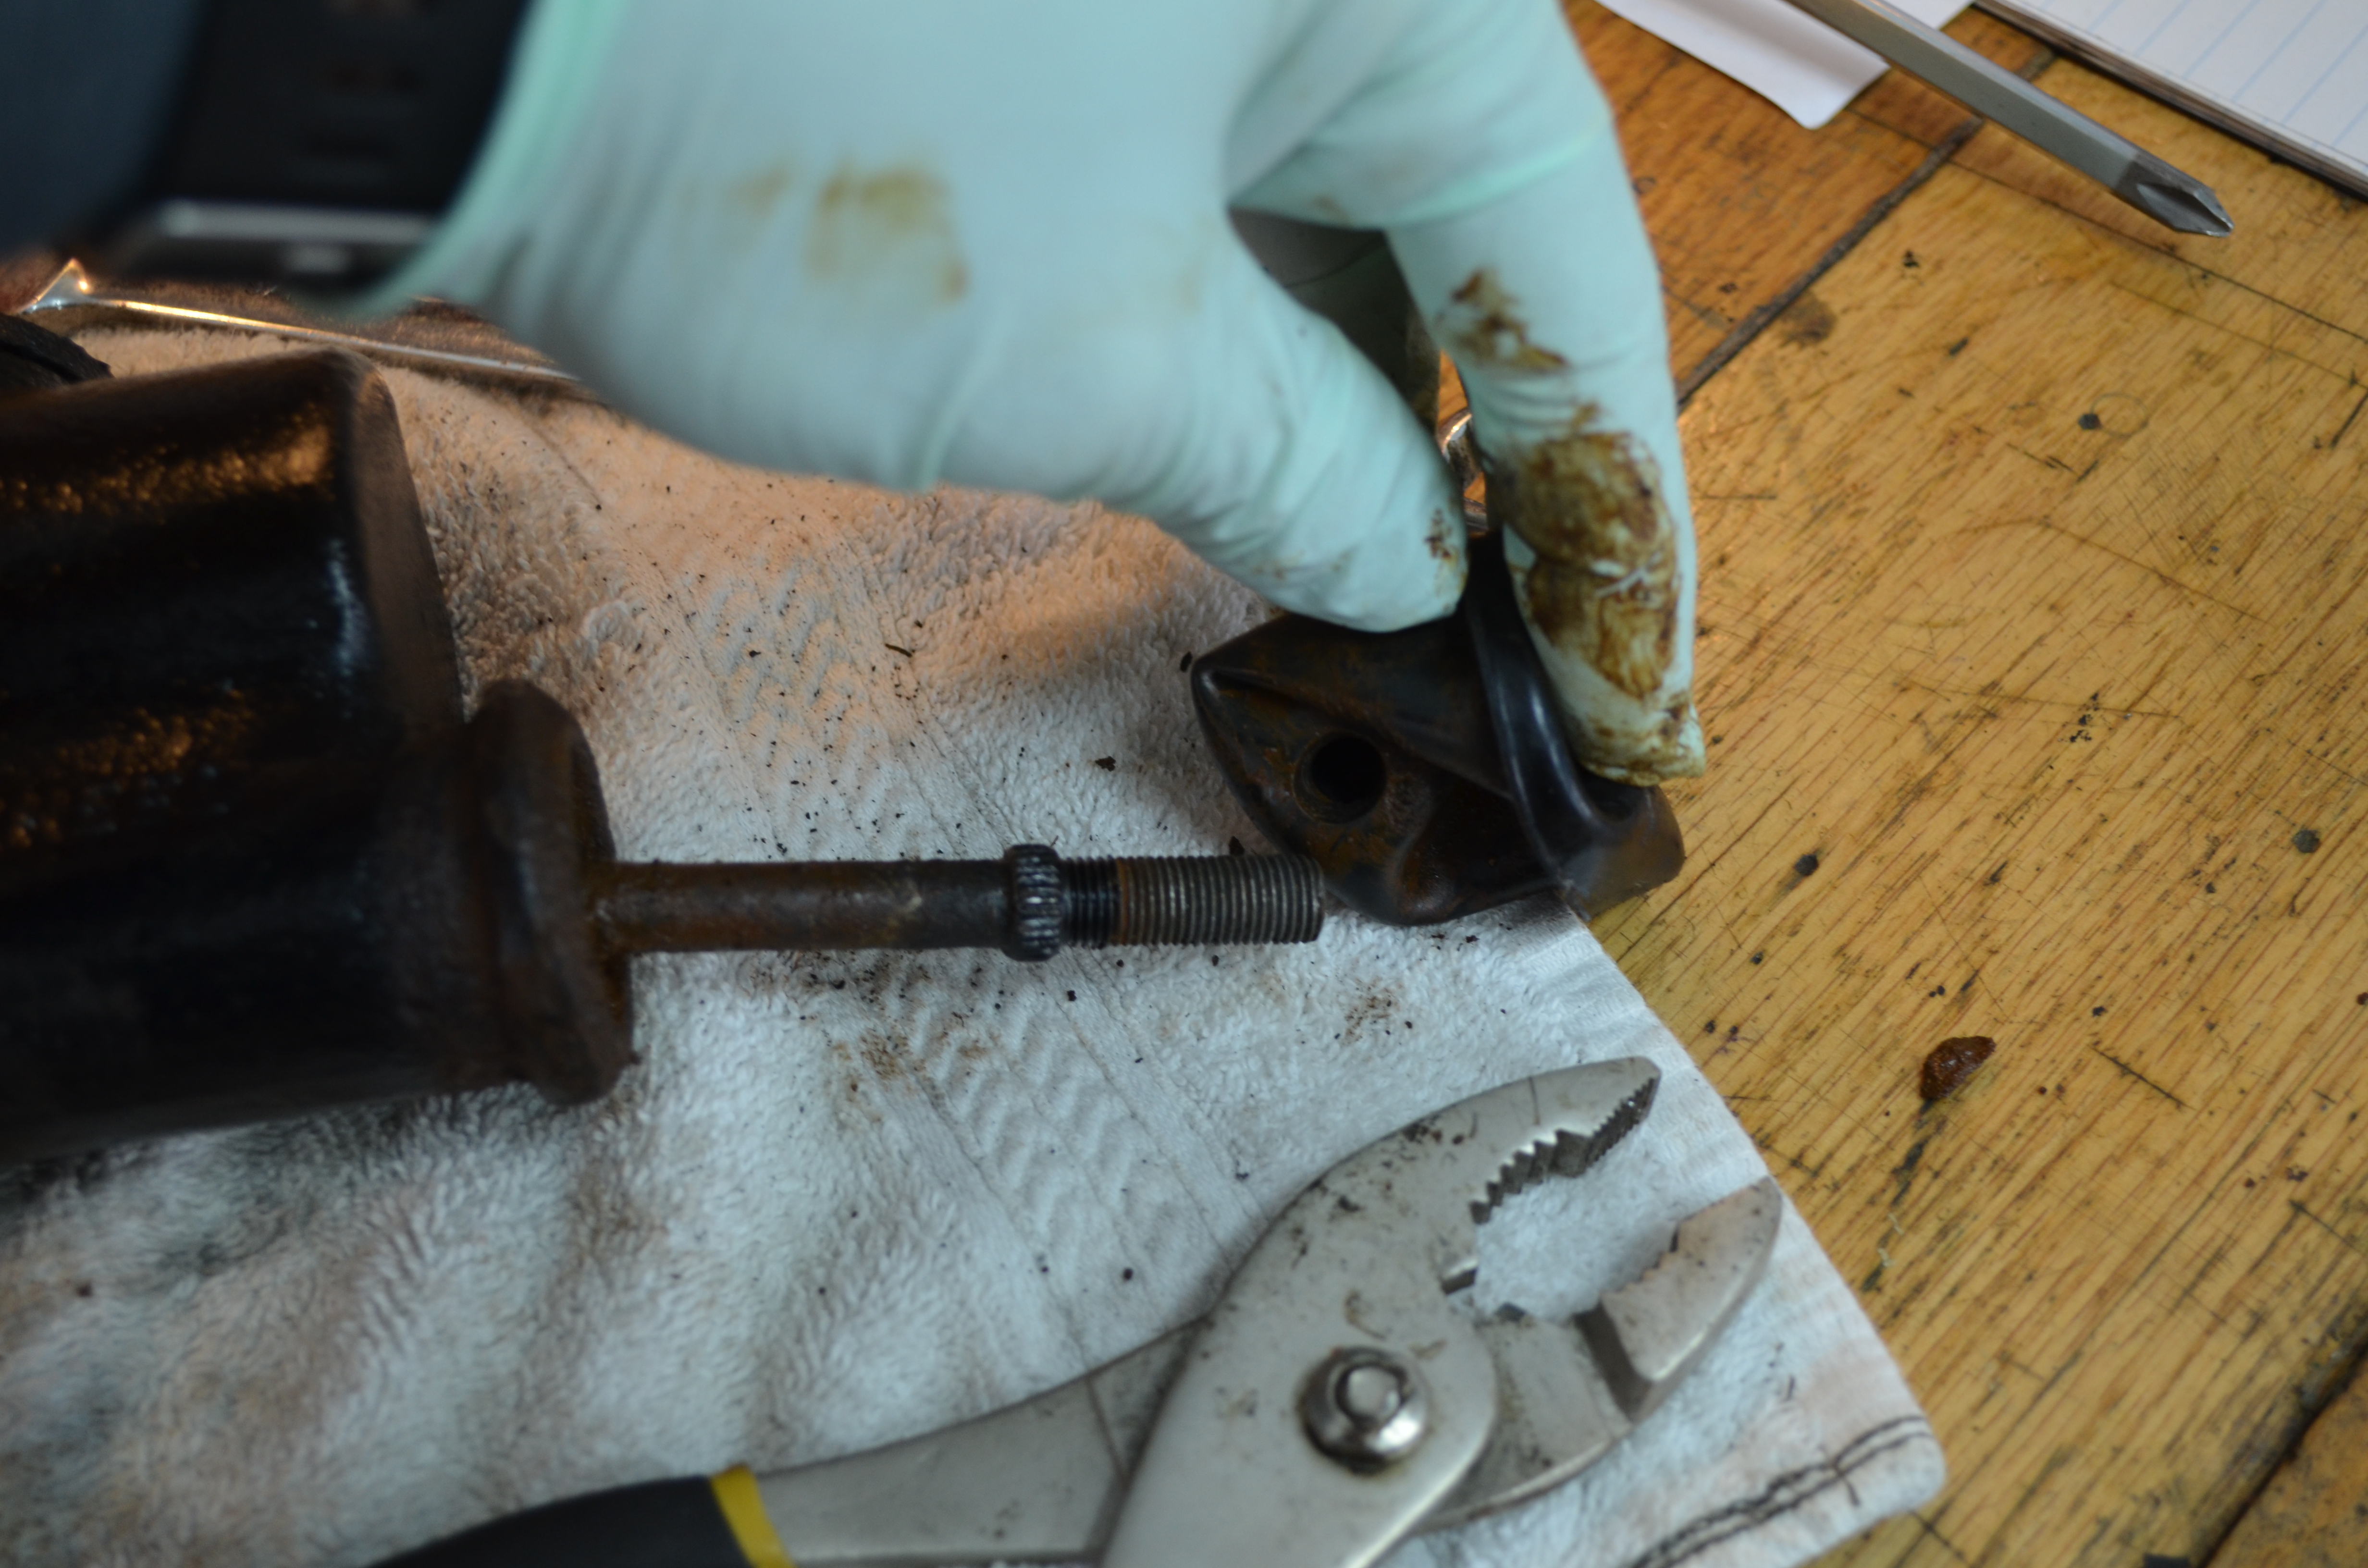
Disassembly of the Master Cylinder... A guided tour! 1. Remove the two 9/16 nuts and free the master cylinder from its support base 2. Loosen the jam nut, hold the shank firm with pliers on the knurled ring, and remove the adjustment clevis 3. Remove the jam nut 4. Remove the rubber boot 5. Remove the retaining ring 6. Withdraw the plunger parts and the valve from the front of the cylinder 7. Back to the vise to remove the large 1 1/4" nut and the copper gasket from the rear of the master cylinder 8. Push your finger in the front to remove the spring mechanism from the rear 9. Remove the filler cap from the top 10. Give it it's first bath in parts cleaner to remove the heavy crud 11. A fine wire passed through the holes to ensure they are clear 12. A little rust remover introduced into the reservoir with some scrubbing will get the remaining rust blossoms out 13. Using clean solvent, wash it out again and again to be sure it is spotless 14. A final bath in clean acetone, and drying out with paper towels and compressed air. I didn't have to hone the cylinder as it was in very nice shape. No galling or pits. I did notice the reproduction spring is lighter gauge wire, but it has one extra turn to it. Any thoughts?


-
1937 Buick Model 48: RESTORATION HAS BEGUN! (Photo)
Gary W replied to Gary W's topic in Buick - Pre War
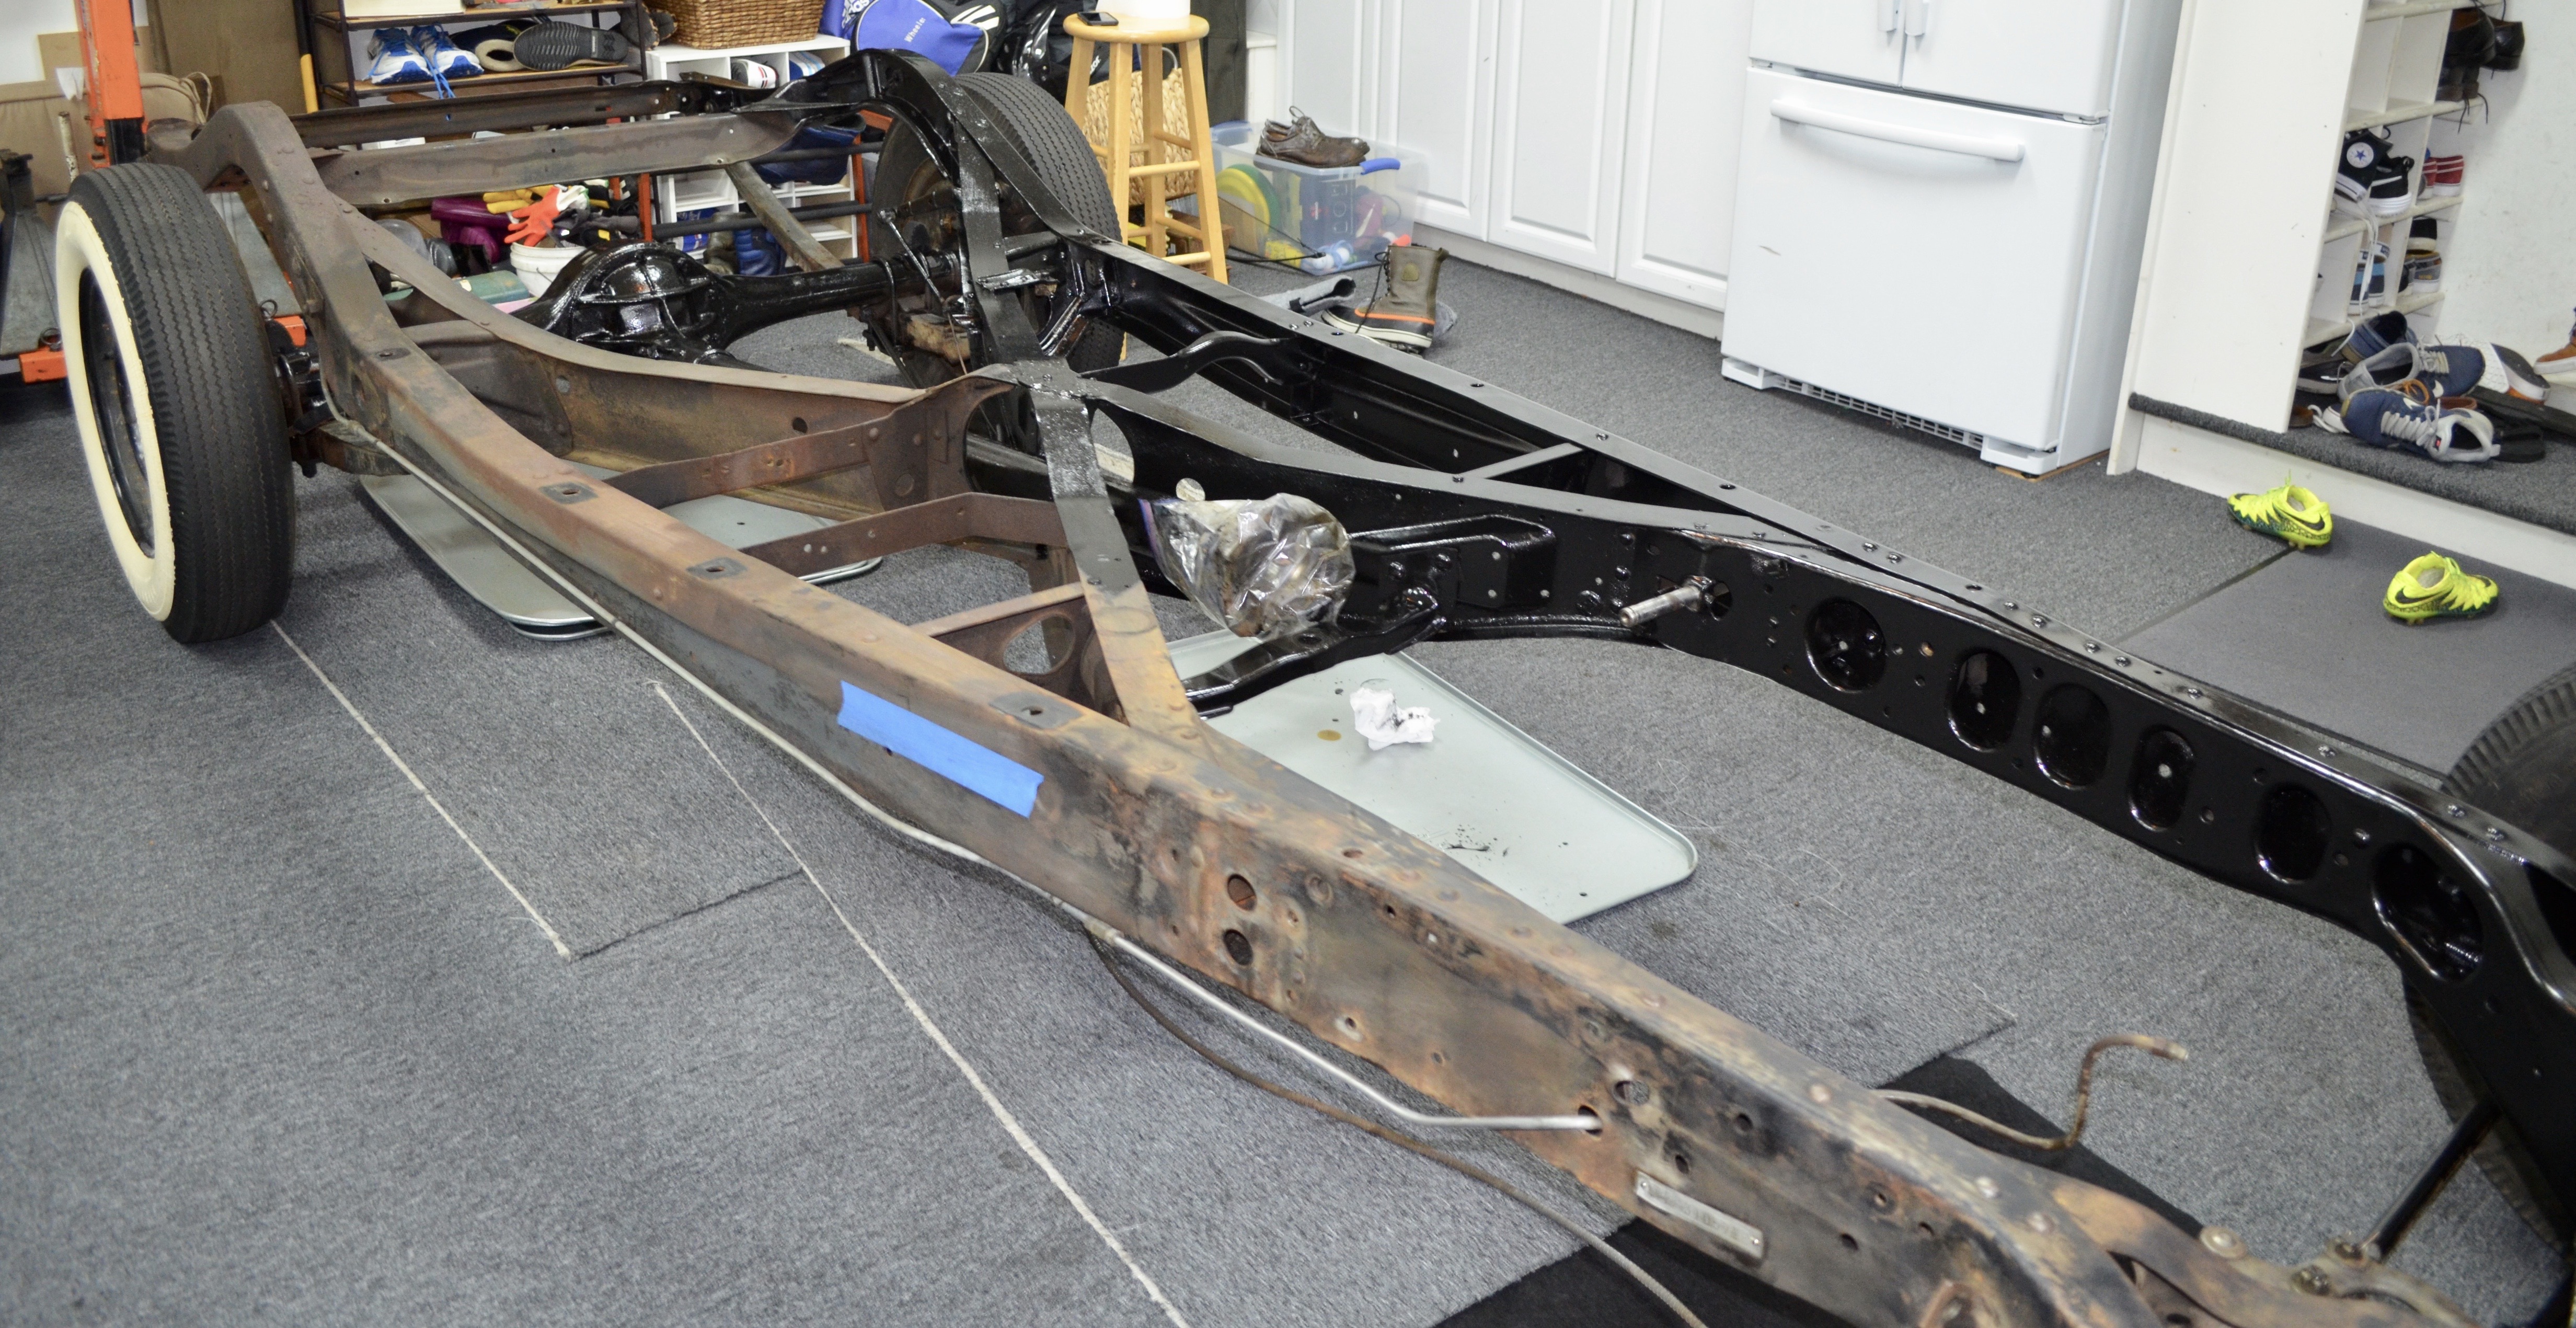
Painted the frame this morning. Started in the garage at 5:00 by removing the ground strap and the rear tailpipe hanger. Then gloved up and started on the driver's side rail. I used POR-15 semi-gloss black. It took exactly one quart to the whole job. Notice I didn't paint the springs or the brake backing plates as I will be installing the new brake lines and the new springs and I'll get those fine details done once everything is back together and all cleaned up. It came out nice. If you do it, don't start on the side rail! Start in the middle and work your way out. Much easier when I did the passengers side from the inside out. Got finished by 10:00 I'll give it 24 hours to dry completely. I want to rebuild the master cylinder this afternoon, paint the pedals and hopefully start running the new brake lines tomorrow.


-
1937 Buick Model 48: RESTORATION HAS BEGUN! (Photo)
Gary W replied to Gary W's topic in Buick - Pre War
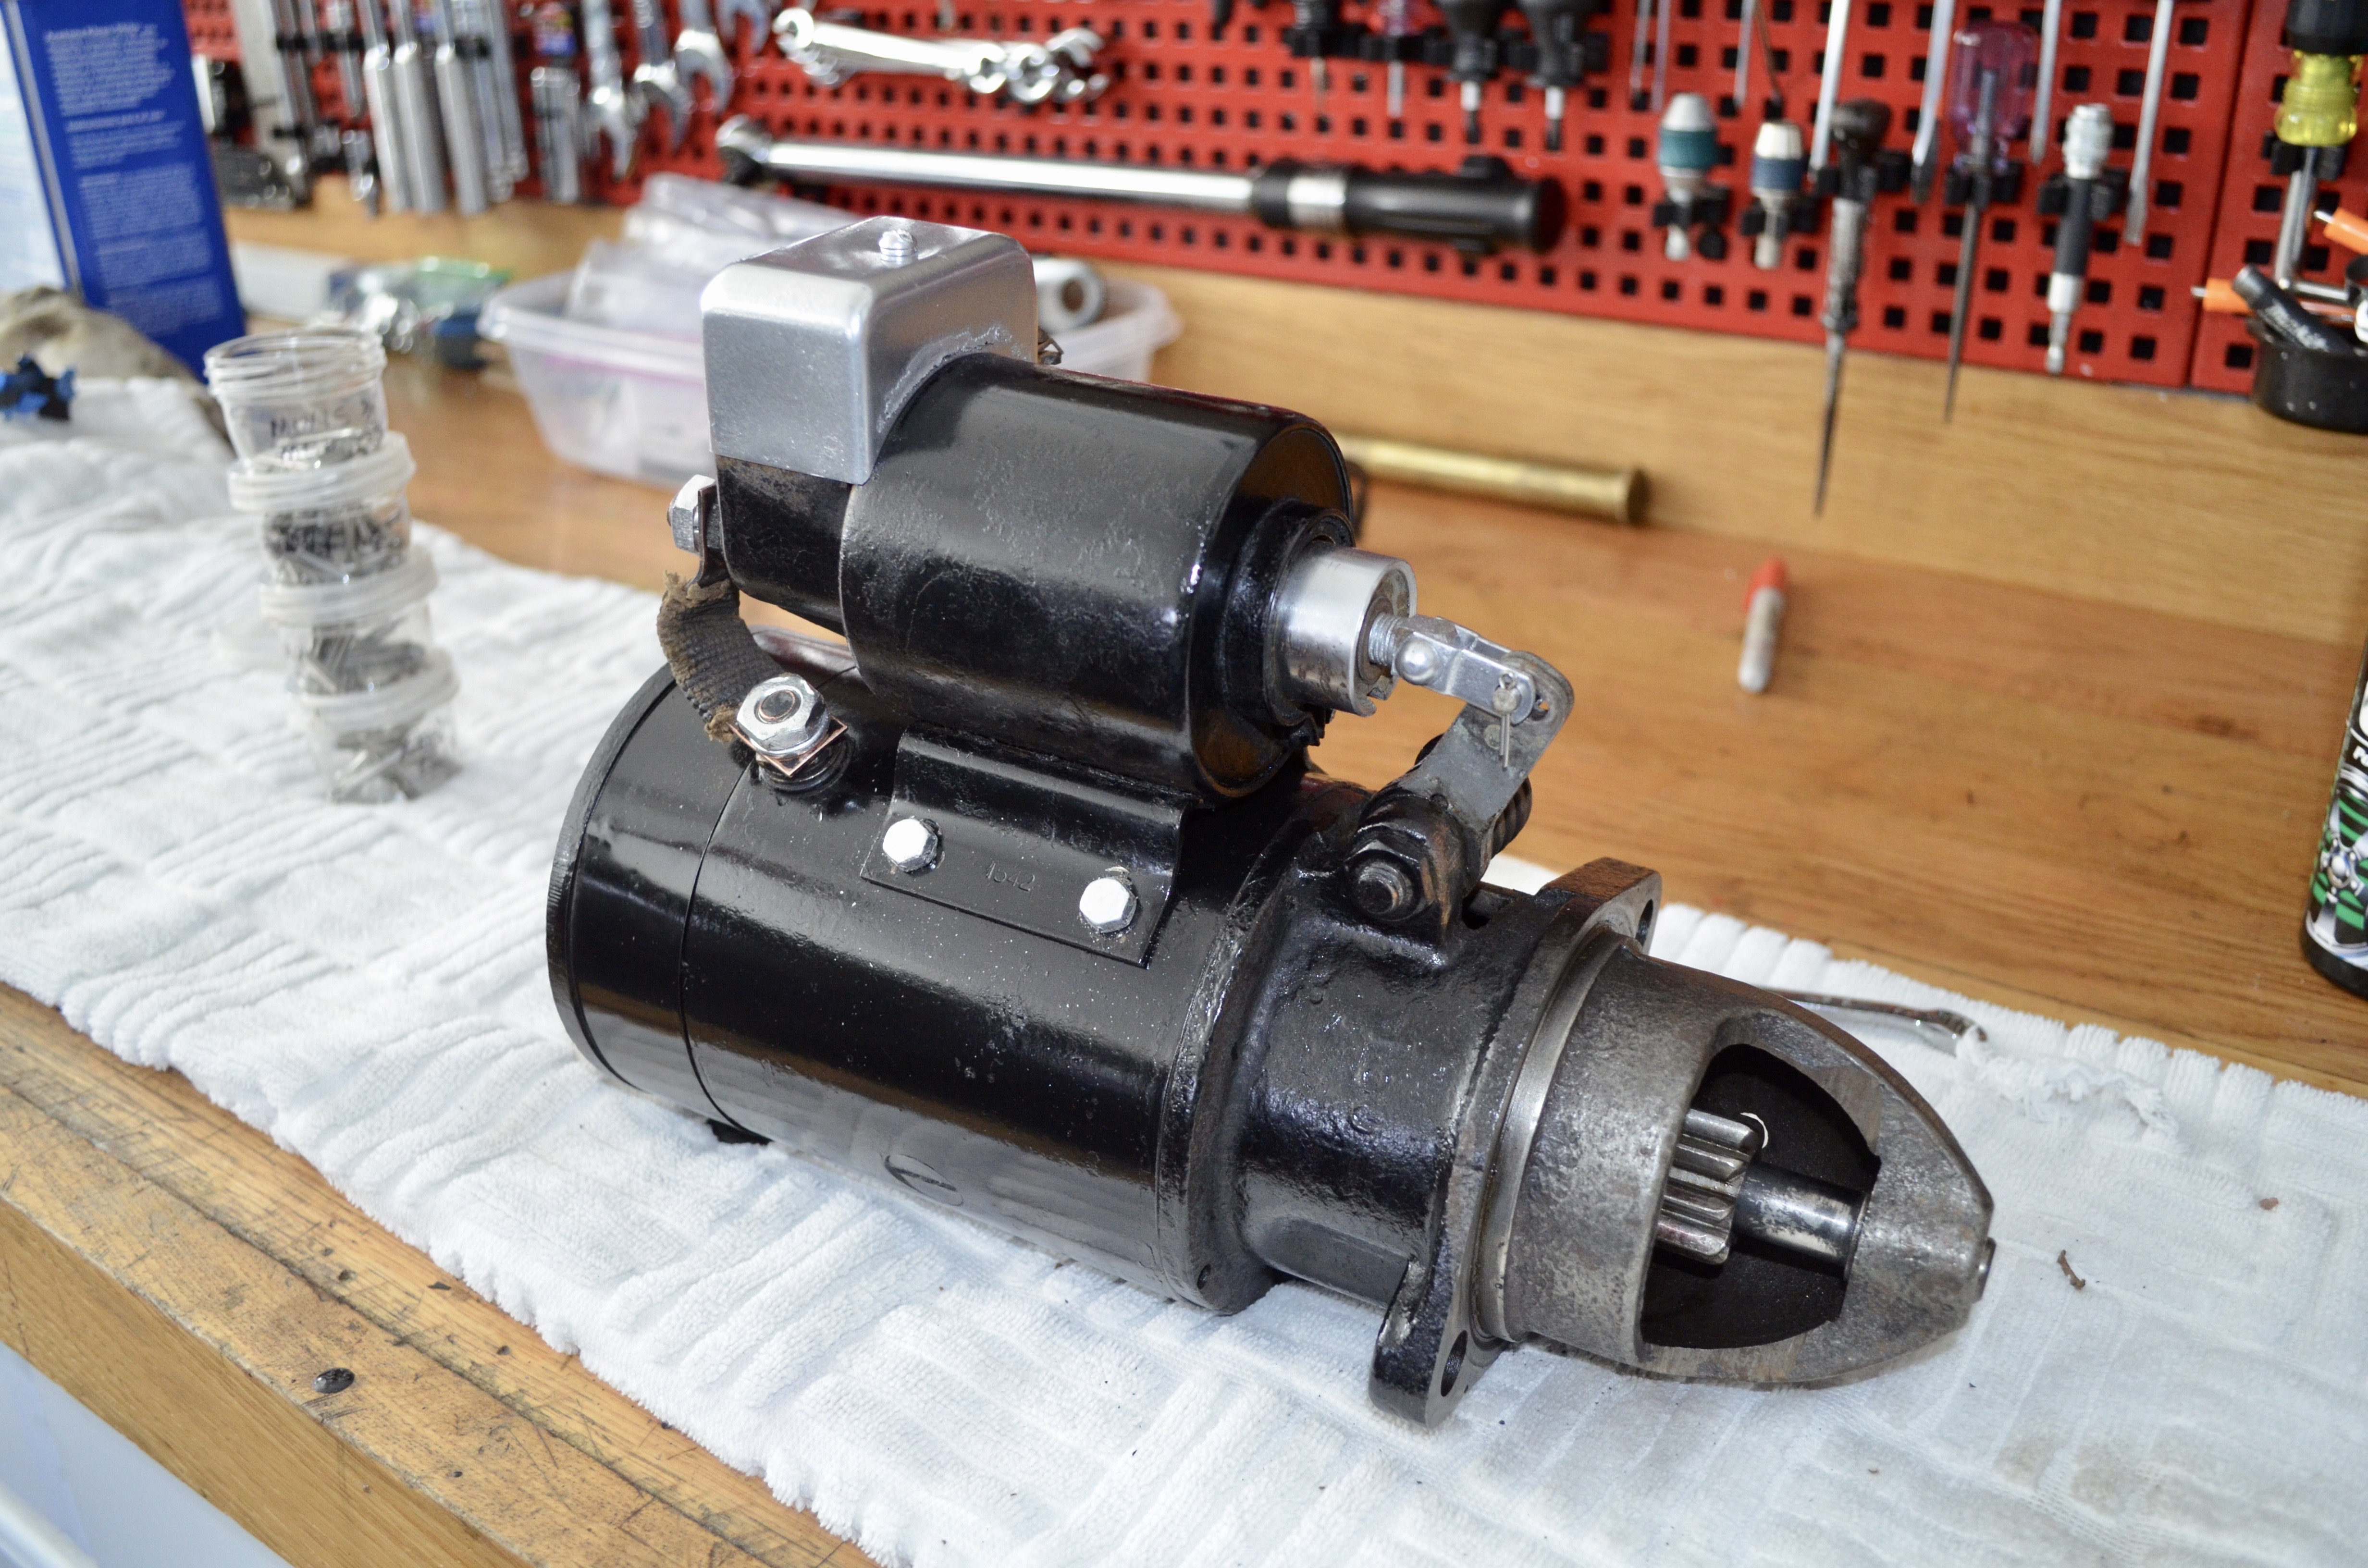
Restored the starter. Disassembled it last night, wire wheeled the parts I could, scrubbed the rest in paint thinner and cleaned with sandpaper, then a final wash with acetone. Sprayed the parts and let everything dry overnight. After work today I re-assembled everything and I am very happy results. Then I pushed the chassis outside and using four gallons of paint thinner, I washed the frame down, scrubbed it with a wire grill brush, then a final wash with towels and acetone. Tomorrow I start painting the frame, restore the master cylinder and start getting the new brake lines installed. The new brake lines were delivered today. I think most of the "pre-bent" lines should work, but the "driveshaft" line is never going to fit so I may have to use my original brake line there. I'll let you know how I make out. Some starter before and after photos:


-
1937 Buick Model 48: RESTORATION HAS BEGUN! (Photo)
Gary W replied to Gary W's topic in Buick - Pre War
Spent the day wire-wheeling a bucket of nuts, bolts, lock washers, and... the drag link, master cylinder, the brake and clutch pedal, stabilizer connections..... Then cleaned them with acetone and sprayed them gloss black. Have to spray them in small batches, too cold outside so quick spray and immediately back into the garage. AMAZING how nice the parts look just using the wire wheel!

-
1937 Buick Model 48: RESTORATION HAS BEGUN! (Photo)
Gary W replied to Gary W's topic in Buick - Pre War
I removed the entire exhaust system (exhaust pipe, muffler, tail pipe and all those clamps and hangers) All my hangers are completely dry-rotted and all my clamps are rusted to the point where they are not usable. I ordered a new exhaust system from Waldron's Exhaust. I'll let you know how it fits! Then I removed the rear stabilizer bar and the rear shock links so I can restore them and paint them. Moved to the front to remove the front stabilizer bar, so I can restore the links and replace the rubber under the clamps. After that I removed the drag link from the center tie rod so I can clean all that grease and rebuild it. Will make it a lot easier to paint the frame now that the brake lines, muffler, stabilizers.... are out. The springs are going to be replaced next.


-
1937 Buick Model 48: RESTORATION HAS BEGUN! (Photo)
Gary W replied to Gary W's topic in Buick - Pre War
I ordered a full set of pre-bent stainless steel brake lines to replace the 80-year old lines on the car. It was a job getting all the original equipment off the car, but I tried to do the job methodically and photographed every step from before I touched anything, to every step along the way so I have full documentation when the new lines come in. Hopefully they fit easily. The steps I took to completely remove the brake lines, master cylinder, pedals.. 1. Photograph and document every line, its origin and insertion and how it passes through the chassis 2. Remove the main line (the one that exits the master cylinder) from the brass block on the chassis 3. Remove the main line from the master cylinder, being sure to have a bucket ready to catch the brake fluid 4. Remove cotter key and washer from brake pedal. 5. Remove two 9/16 bolts to free the master cylinder from the frame and slide it off the brake pedal as a unit. 6. Remove the remaining three brake lines from the brass block. 7. Remove the brake light switch, slide off the retaining clip and remove the brass block 8. Remove the intermediary brake line from the chassis mounting clip, freeing it from the rear rubber brake hose 9. Separate that hose from the brake line that runs down the driveshaft 10. Open the driveshaft clips, and remove the driveshaft brake line from the rear (differential mounted) brass block. 11. Remove the rear wheel brake lines from the brass block, and loosen them from the wheel cylinders. Remove. 12. Remove the differential mounted brass block. 13. Move to the front of the car, and by holding the hose stationary with a wrench, remove the brake lines from the hoses 14. Remove the retaining clip, unscrew the hose from the backing plate, repeat for other front wheel 15. Label all hoses, and mark them origin and insertion so when the new lines arrive, it'll help get everything sorted properly. The liquid you see in the photos is PB Blaster....80 years doesn't give up so easy! But I didn't want to twist any lines in case I have to reuse any.


-
1937 Buick Model 48: RESTORATION HAS BEGUN! (Photo)
Gary W replied to Gary W's topic in Buick - Pre War
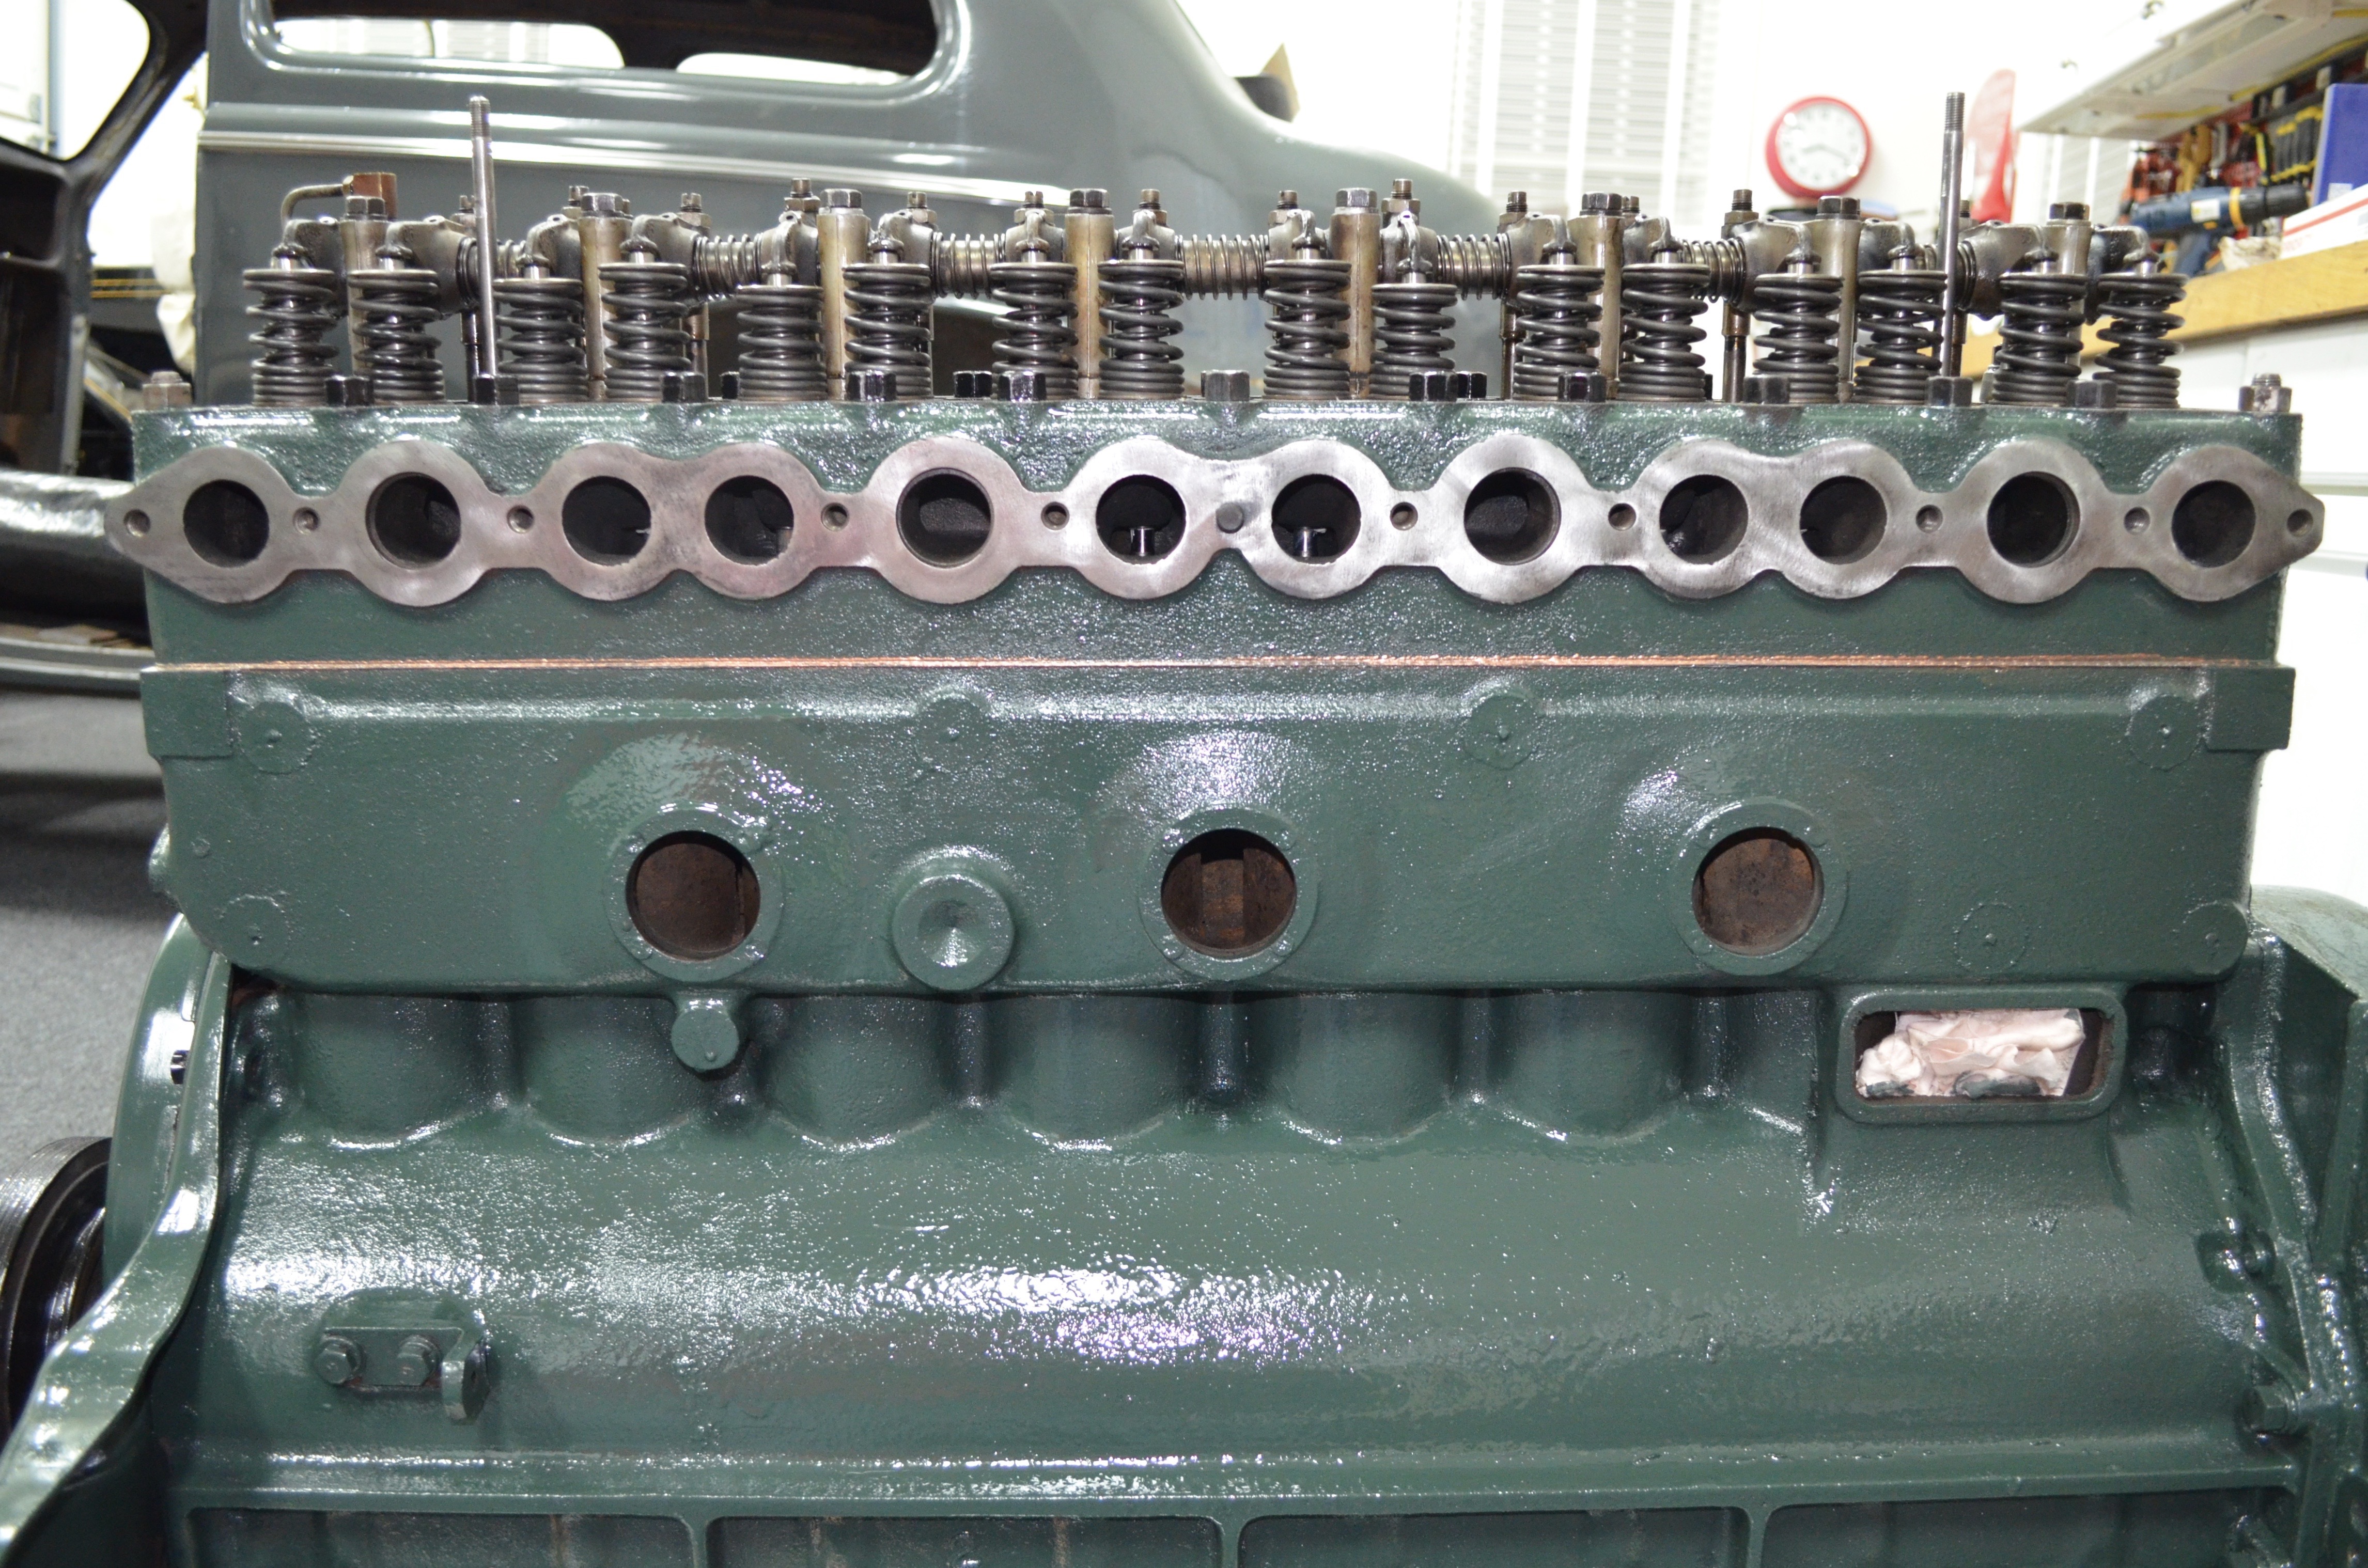
Put a second coat on the block, and painted the intake manifold, thermostat housing and water outlet all Buick engine green. Used POR-15 High temp manifold paint to paint the exhaust manifold and the heat riser in Cast Iron Grey Then POR-15 Gloss Black to paint the breather and the main leaf of the new rear springs. (The other leaves are being powder coated...I didn't want to get any of the sand from blasting or the powder in the threaded bushing) Then it was time to move back to the chassis and remove all the brake lines, blocks, clips, hoses, ..... Next post!!

-
1939 Business Coupe - Pre-Bent Brake Lines Same as Sedans?
Gary W replied to JRHaelig's topic in Buick - Pre War
Just found this company "In Line Tube" on Ebay. Looks like they offer in OEM steel or stainless: -
1939 Business Coupe - Pre-Bent Brake Lines Same as Sedans?
Gary W replied to JRHaelig's topic in Buick - Pre War
I'm at this very spot in my restoration. I need to replace my brake lines. One has a hairline split so I'm assuming there's another ready to break soon. If anyone knows a manufacturer of pre-bent lines for 1937 Series 40, please let me know. I checked Classic Tube but they don't have the Special, only Century. Thank you! Gary -
1937 Buick Model 48: RESTORATION HAS BEGUN! (Photo)
Gary W replied to Gary W's topic in Buick - Pre War
Painted the block tonight. I carefully covered all the block openings with blue painter's tape. It's amazing how nice it looks when everything is the same color. 2 coats??? So now I have to paint all the engine accessories to get ready for the final build. My plan going forward is to restore the master cylinder and do a complete brake job. Then replace all four chassis springs. After that, a nice coat of chassis black (POR-15). Then I'd like to install the engine back in the chassis as I feel it's a lot safer there.


-
Date of Manufacture .... Photo of passenger side of chassis
Gary W posted a topic in Buick - Pre War
I showed these photos in my ongoing restoration thread (1937 Buick Model 48 Restoration has begun...) but i thought this was really cool to uncover. While pressure washing the grease and gunk off the frame, I exposed what I think is the Date of Manufacture (DOM). I always love to learn more of the history, and I was happy to come across this series of numbers. The numbers: VIN: 3105718 Ithe tag riveted to the side rail) Engine: # 4 3279307 Body # 6889 DOM: February 16, 1937 Then there is another code after that: GB - 2 N ( or is it G8 - 2 N)

-
1937 Buick Model 48: RESTORATION HAS BEGUN! (Photo)
Gary W replied to Gary W's topic in Buick - Pre War
Today I took advantage of the 71 degree day and rolled the chassis out to pressure wash, degrease and clean. Took just under 2 hours to get 80 years of gunk off that thing! BUT...I did find what I think is the Date of Manufacture on the passenger side chassis rail! February 16, 1937. So she just turned 80 last month. Thought that was kinda cool. I included a photo of the rear spring shackle before and after. I was going to paint the engine, but tomorrow is supposed to be cold and snowy so I'll do that job tomorrow. I applied the decal to the freshly painted valve cover. Trying to get something accomplished everyday.


-
1937 Buick Model 48: RESTORATION HAS BEGUN! (Photo)
Gary W replied to Gary W's topic in Buick - Pre War
I like that! Much better that mine sitting on a dolly on its pan.. -
1937 Buick Model 48: RESTORATION HAS BEGUN! (Photo)
Gary W replied to Gary W's topic in Buick - Pre War
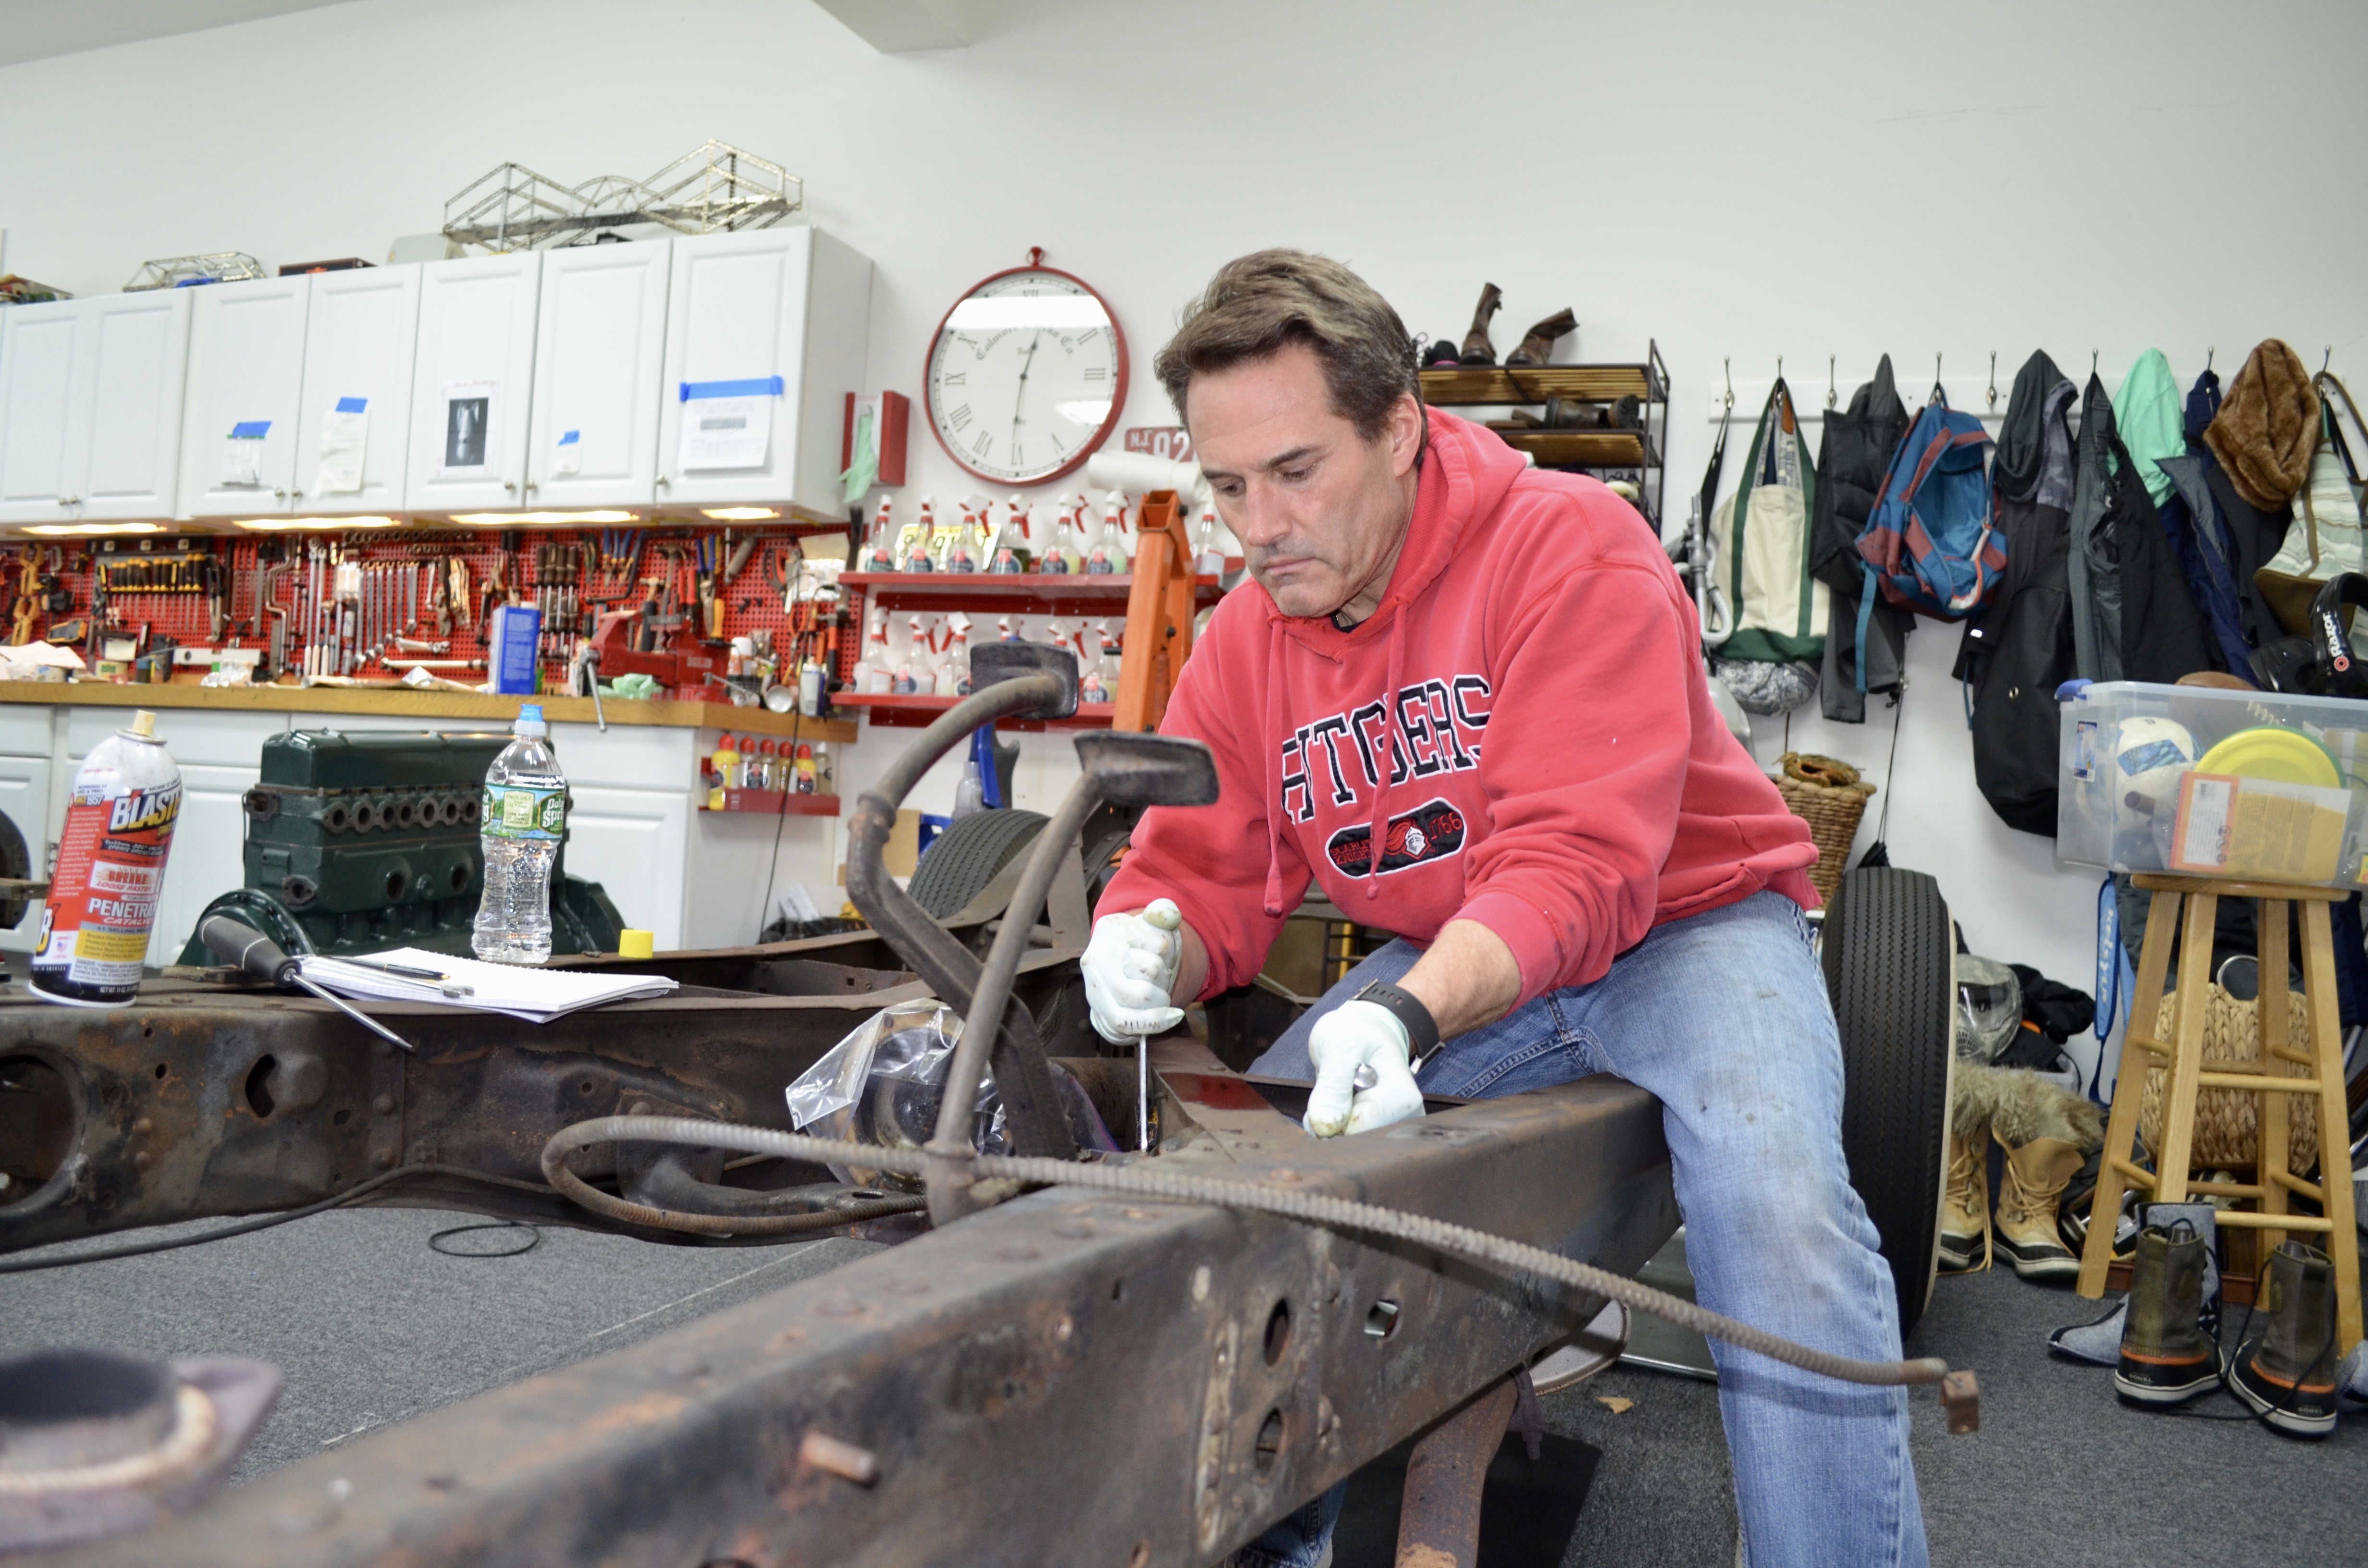
After lunch, I tackled the task of removing the body from the frame. I was able to remove the doors myself, then I attacked the body bolts. Let me tell you, eighty year old bolts JUST DON'T WANT TO MOVE!!! It took a while, but I did get all 14 body bolts out and labeled so they go back where they came. I measured the front mount so I have an idea how much to tighten them down when I reassemble so the doors, hood...hopefully don't get too out of position. so I reinstalled all four tires, and using a "GO-JACK" I was able to maneuver the car and push it outside. (63 degrees here in Jersey today!) I used the engine crane to lift the back of the body. Then by supporting the front of the body, I was able to push the chassis out sideways right out from under the car! So while I wait for the blaster to come over, I now have the chassis all ready to be power washed, de greased, and painted. I am planning on replacing all the springs, restoring the shocks, and doing a complete brake job including rebuilding the master cylinder. It will be so much easier to install the engine in the frame with the body out of the way.


-
1937 Buick Model 48: RESTORATION HAS BEGUN! (Photo)
Gary W replied to Gary W's topic in Buick - Pre War
Today's Engine Build: I wire wheeled the nuts and bolts and sprayed them gloss black. Painted/Installed the timing cover, then the balancer pulley Installed the oil pump and the oil pan then turned the motor over on it's pan. Moly lubed the tappets and installed each one where it came from. Permatex copper sprayed on both sides of the "graph-tite" head gasket, repeat Using studs to line up gasket, and then install the head and torque in sequence to 65 pounds Installed all push rods, then the rocker arm assembly. Once torqued, I turned the engine over to do a preliminary valve adjustment to .017" Installed the pushrod cover, painted the rocker cover Added 5 quarts of Break-In oil and using an electric drill counter clockwise, ran the oil pump and the oil made it EVERYWHERE! So it needs to be painted, and then finish the "easy" stuff (distributor, generator, starter, carburetor, manifolds) She should be up and running soon!


-
1937 Buick Model 48: RESTORATION HAS BEGUN! (Photo)
Gary W replied to Gary W's topic in Buick - Pre War
Seven Weeks Today: Seven weeks ago I cleared the garage and made space for the Buick Restoration. In that time, I have made some pretty good progress. Today I "finished" the engine. (Timing cover, oil pump, pan, balancer pulley, Then turn the engine over (fun); head gasket, head, push rods, rockers, push rod cover, adj valves to .017, painted valve cover...... few more additions and we're off to the races. I took an hour for lunch and then removed the body bolts, put all four tires back on and pushed it outside. Using a crane, I was able to lift the rear of the car, support the front of the body on horses and by utilizing "GO-JACKS" under the tires, pushed the frame out from under the body. I'm exhausted!


.JPG.efaba883313b486ef7db7dcc1f16ede1.JPG)
.JPG.1d9e79e969fc50a5d84a80883948a10f.JPG)
.JPG.46df2551538425e03ed66a9535e80a69.JPG)