


Riviera63
-
Posts
1,795 -
Joined
-
Last visited
Content Type
Forums
Gallery
Events
Posts posted by Riviera63
-
-
Randall,
Wow! That was help above and beyond the call of duty. I really do appreciate that. That should be a huge help when I do drill holes to install horns. I have to find a set of horns first and then I will probably wait until the weather gets into the 60's or 70's before doing the install. I will let you know if I need any additional help but, your pictures seem to be pretty thorough. Thanks again.
Bill
-
Thanks for the input guys. I have been in touch with several people including Steve. I have dealt with Steve in the past. He sells quality items at a fair price and is just a good guy in general. I am just looking to see what is available before I make a decision.
Bill
-
 1
1
-
-
18 minutes ago, riviadrian said:
I got the bottom screws into the tabs, now the top of it will not stay tight against the panel. There seems to be nothing to attach the screws to except the vinyl on the new panel. Anyone else experience this and have a solution???
Adrian,
If I remember correctly, once you get holes through the upper rear quarter panel there should be metal underneath where it mounts with holes for the screws to screw into, which will draw the filler tight to the rear quarter panel. You may need to use an ice pick to go through the panel and locate them.
Bill
-
2 hours ago, riviadrian said:
Thanks Bill! That's exactly what I needed. I was pretty sure I was correct, but I didn't want to start putting screw holes in the new panel that didn't belong. I also didn't want to put them in wrong and tear my new leather. Thanks again!
-Adrian-
I am glad I could be of help.
-
1 hour ago, Dales90 said:
Hi Bill, somewhere I have both horns, and a bracket for the longer one. Would take me awhile to locate, and would be reasonable on price if you find that group would work to make you whole.
Thanks for responding. I have sent you a PM.
-
Adrian,
Are talking about the 2 metal filler panels, one on each side of the upper back seat? If so this might help. I don't have a picture with my seat out but, it does show where/how they go. The sail panel lower trim should be removed. You need to put in the rear quarter panel armrest and rear quarter panel upper panel. The metal filler has 2 holes for screws that attach it to the side of the upper rear quarter panel, so they only go in one way. The curve of the panel fits the curve of the seat, the skinnier end on top. Then the upper back seat fits in between the 2 filler panels. I hope this helps. If that was not what you were talking about, never mind.
Bill


-
1
-
-
Hi,
I am looking to buy a 4 note horn set for my 1963. I am looking for the complete set, horns, brackets, wiring harness and attaching screws. Would consider buying less than a complete set depending on what is missing. Please PM me if have a set for sale or would know of someone that has a set they might consider selling. Thanks.
Bill
-
Rodney and Randall,
Thanks for the pictures and the diagrams. This all helps.
Bill
-
21 minutes ago, Jim Cannon said:
Bill-
If the CD is damaged, I will replace it.
You can use the measurements for the '64 Horn installation to place the horn brackets on your '63. The horns are different but the installation is the same. I think you will have to find a copy of the '64 Shop Manual to get those measurements.
Jim,
Thanks for the offer. It turns out the CD's were fine. I took my computer in. The problem actually was the disc drive on my computer, which is not defective either. What they found is the CD's I got from you are actually a little thicker than most CD's and adding the label gives it another little bit of thickness. The disc drive on my computer is is an ultra thin one and that little extra bit of thickness would not allow the disc to seat properly in the drive. Any other CD's played fine in my drive and your CD's played fine in any other disc drive they had.The solution was to load the CD's on a thumb drive and all is right with the world.
Since the 64's came with the horn mounting holes already drilled will the 64 manual give measurements to locate the holes to be drilled? I have no problem buying a 64 manual but, I don't want to do that if the info I need is not there. If someone has a 64 manual and could let me know if that info is in the manual I would appreciate it. Thanks.
Bill
-
Hi,
I have a 63-65 power antenna mast black plastic insulator for sale. These have been discontinued by Clark's Corvair. This insulator is used. It is in good condition with no cracks or splitting. I purchased 2, each one from a different vendor and kept the one I perceived to be the better one. I am selling this for the same price I purchased it for, $15.00 which includes shipping to you. This is for the insulator only. The last picture with the chrome bezel is just to demonstrate how it would look mounted on the car. Please PM me if interested. Thanks.
Bill


-
36 minutes ago, 1965rivgs said:
Bill,
The diameter of the holes is in the drawing you posted. Just need to do the conversion from decimal to fraction,
Tom
Hi Tom,
I understand that part. Those drawings are for the earlier horn placement. Does the hole size stay the same for the later horn placement? I need 3 questions answered for the later 1963 horn placement: 1.) How many holes need to be drilled? (I assume 3 since the 64-65 horns used 3) 2. What is the diameter of all holes that need to be drilled. If the number of mounting holes is 3, are the hole sizes .375 for the bottom hole and .185 for the top 2 holes as is shown in my drawing? 3.) Where/how to determine the correct location for the holes to be drilled? Thanks.
Bill
-
1 hour ago, PWB said:
Well, this '63 deluxe silver just dropped to $25,500.
http://www.ebay.com/itm/382011036901?ul_noapp=true

The 726 is the standard interior with silver vinyl. That car has the 728 which is the deluxe interior with silver leather. 63 was the only year for leather, so that is a pretty rare combination. Nice car, no air though.
-
6 minutes ago, cjp69 said:
Thanks for the help guys, I had suspected the door panels had been changed.
Not my car, just one that is on CL that a friend asked me about.
To get the correct door and quarter panels should not be hard. If he likes the deluxe interior door panel look he could easily dye the black panels silver. There are several good vinyl dyes out there. I have used a silver vinyl dye with great success on my car. If he likes the car, the fact that the door panels have been switched out could be a bargaining chip in his favor.
-
58 minutes ago, cjp69 said:
Would a silver vinyl interior (code 726) have black door panels, or silver door panels?


The 726 interior should be a standard interior with silver door panels. I have a picture of mine attached. Someone changed yours to black deluxe door and rear quarter panels.

-
2
-
-
Silver. I have a 63 with 726 silver. Looks as if someone changed door panels. Someone did the reverse on mine. They kept the silver door panels and reupholstered the seats in white.
-
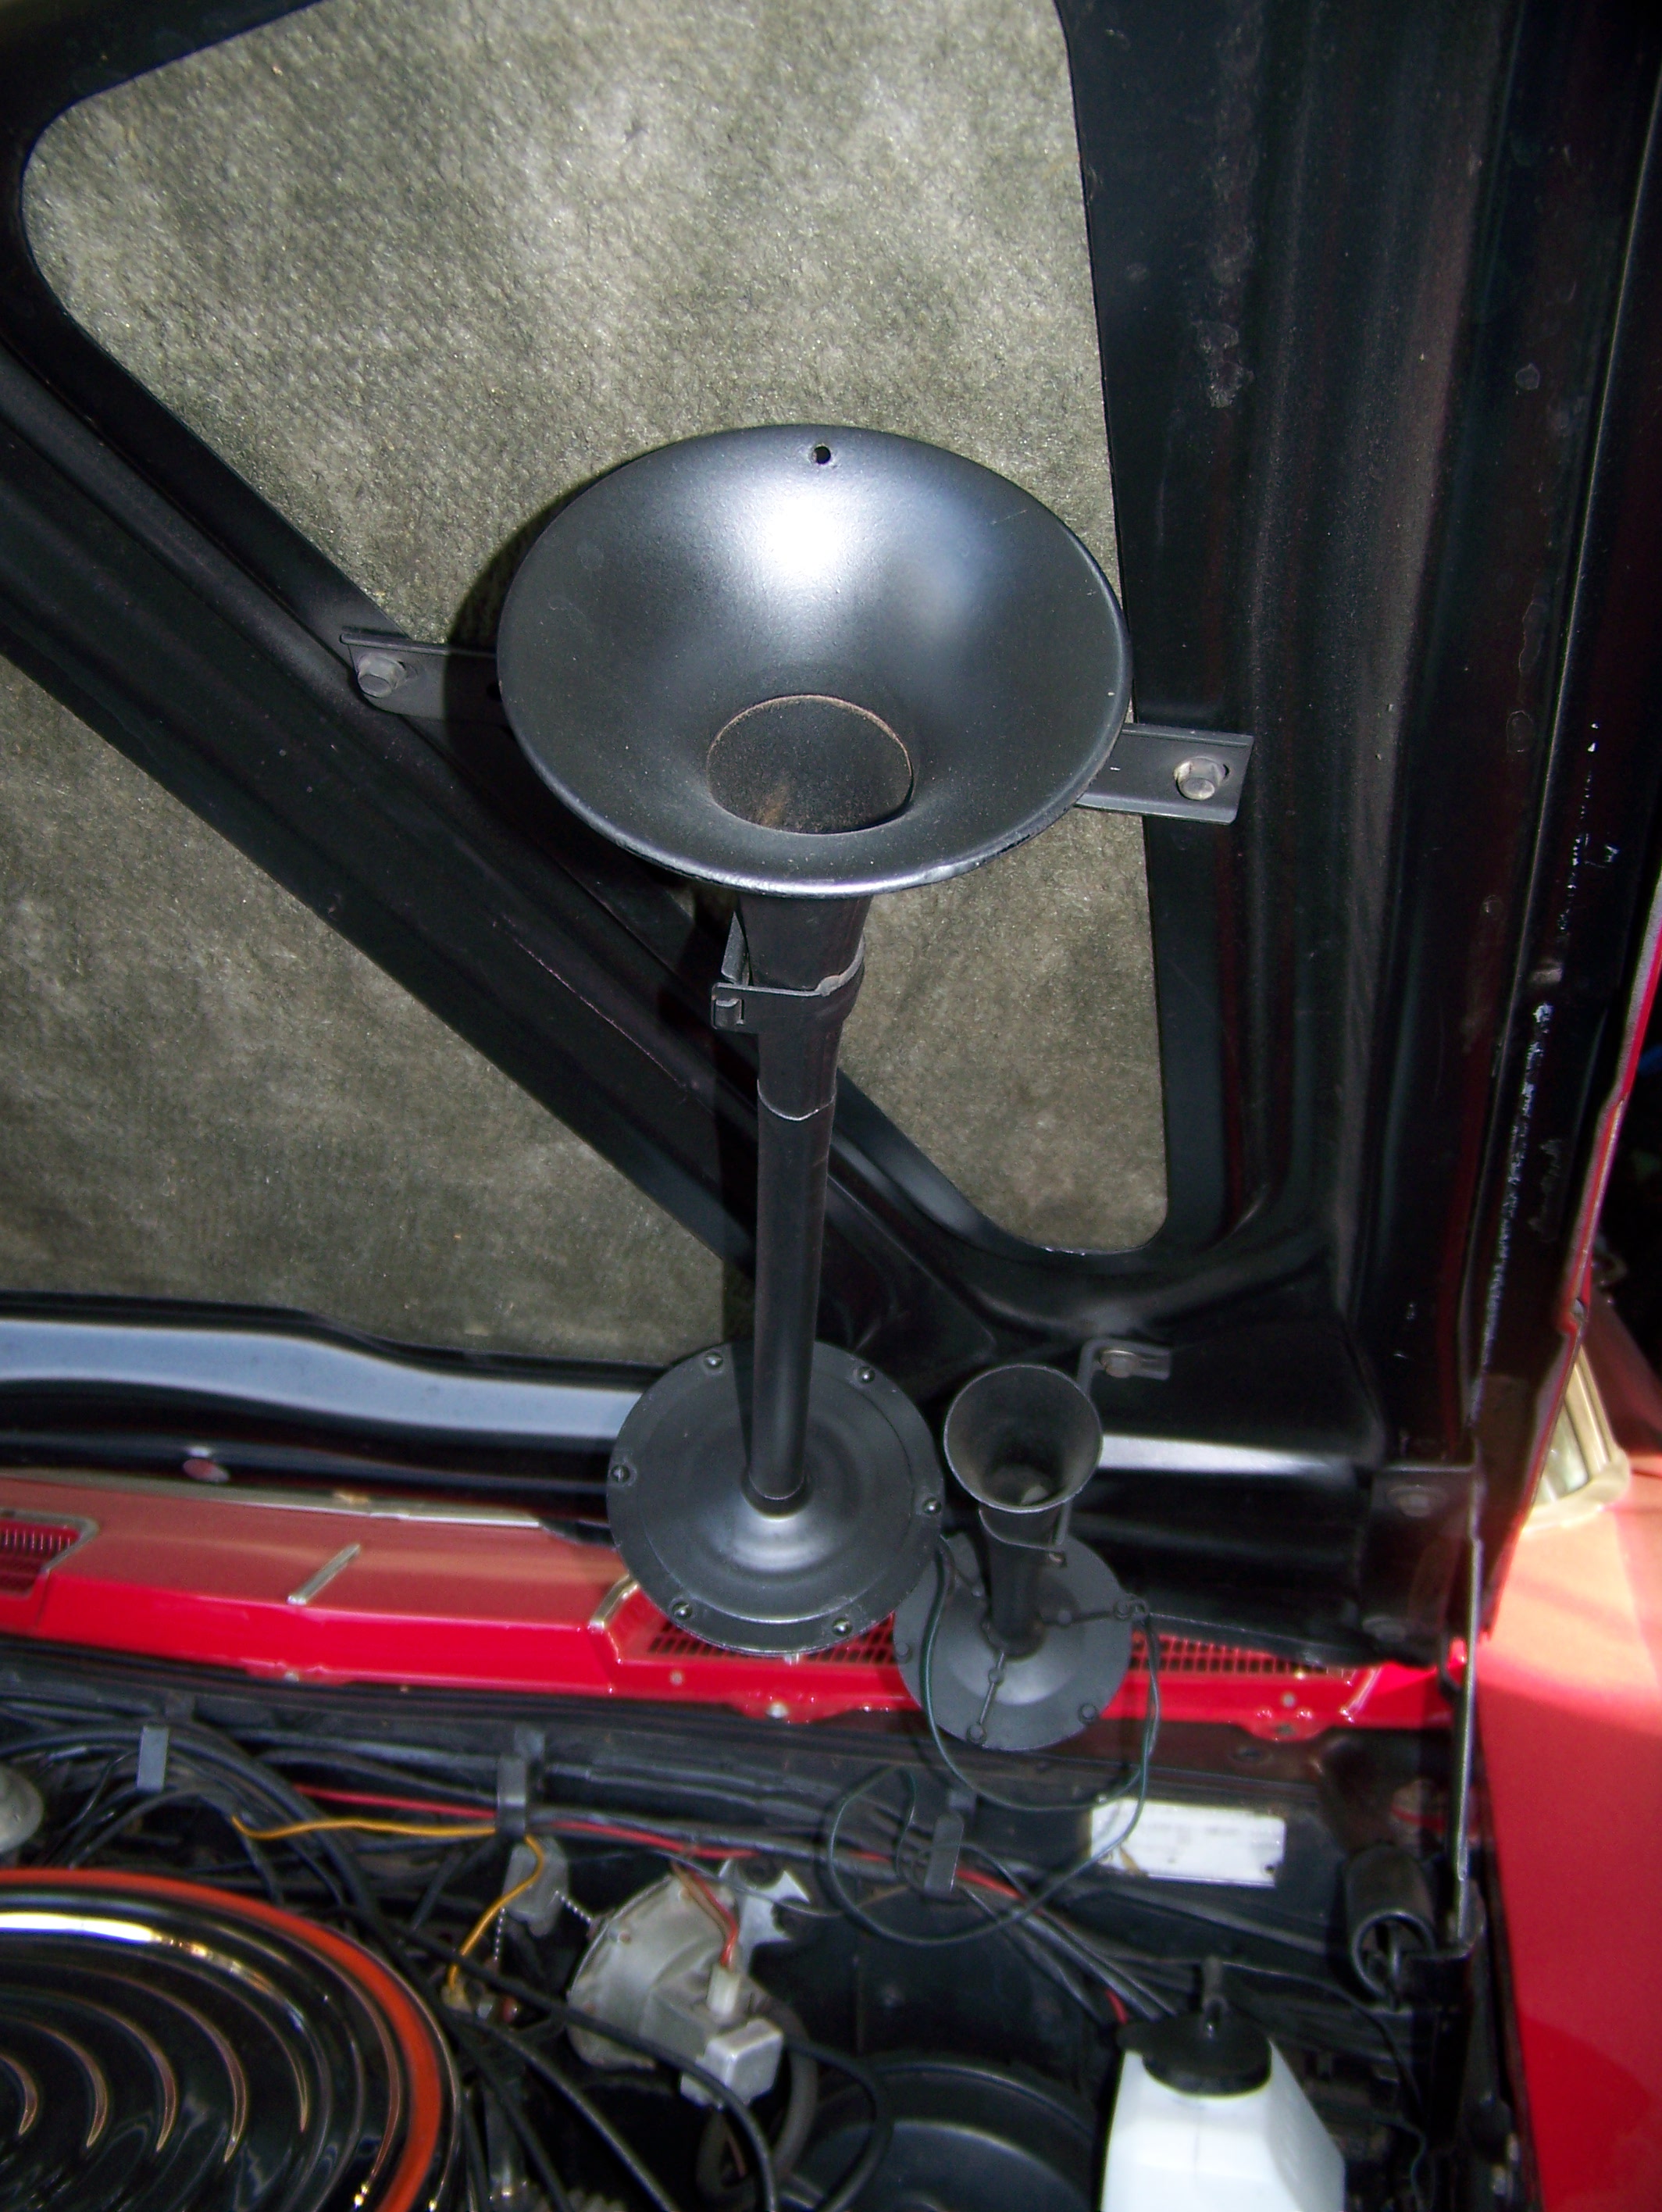
Thanks everyone for the information and offers of help. I am still shopping around for a set of correct horns, wiring harness, brackets and screws. I was aware of the correct horn numbers. My car was a May, 63 build and I do have air. Does anyone have suggestions as to how to locate where to drill the mounting holes in the hood and what size holes to drill? Was this covered in a service bulletin when the horns were relocated to the new location? If so, could someone please share this? I have Jim's Service Bulletin CD but, for some reason I cannot get it to load on my new computer. Thanks.
Bill
-
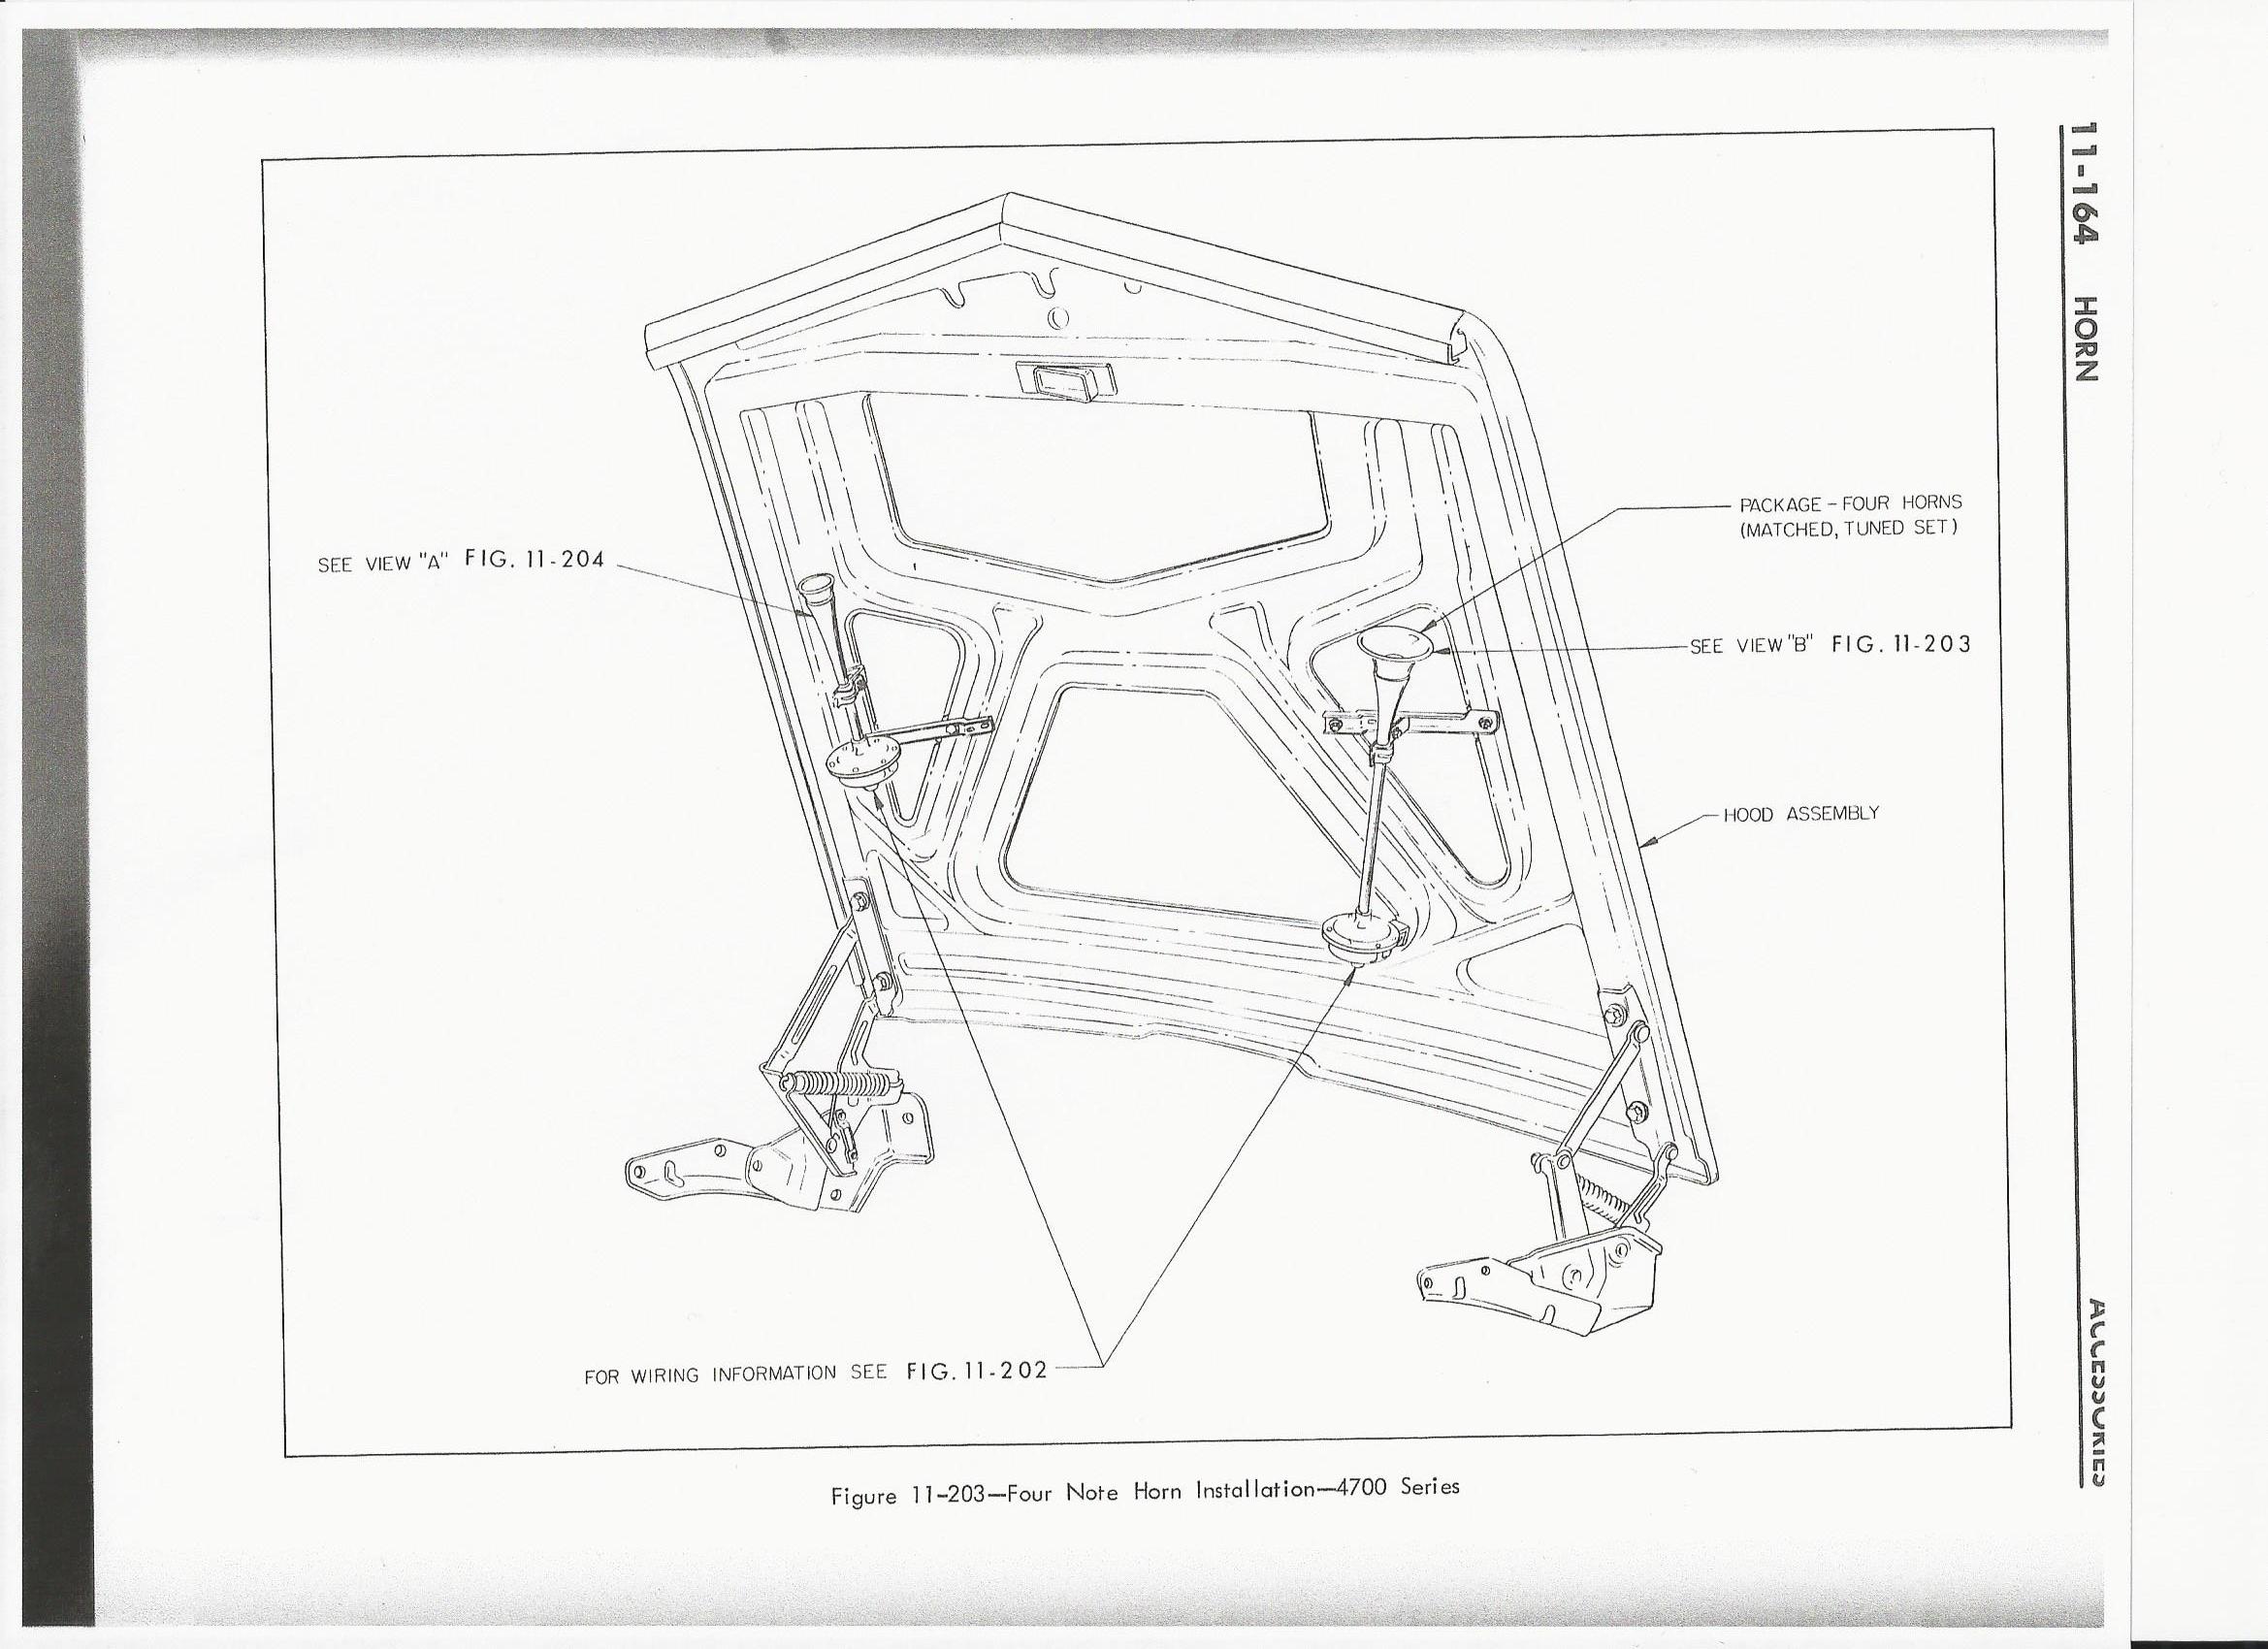
Hi,
I am contemplating adding the 4 note horn set up to my 1963. I know that the horns are located differently than the 64-65's (picture attached) and that the long horn is a different length as well. I have been told and seen it mentioned on the forum that the holes to mount them are predrilled on the 64-65 hood. My 63 does not have mounting holes predrilled. The service manual shows the horn location and does have a diagram showing some measurements for placing the holes. However, the bottom hole for the driver's side horn does not have any measurements or indication of where it should be placed. Its location is important to the placement of the other 2 holes as it is the pivot point for an arc that pinpoints where they are placed. I know many of the add-on accessories for my Pontiacs came with templates for locating cut out areas or placement of holes to be drilled. Was there such a thing for this accessory? Is there anyone out there that has done this to their 63? How critical is the exact placement of the horn's mounting holes? Any advice or help would be greatly appreciated. Thanks.
Bill


-
Chris,
I know this example isn't a total cross-country run but, may give some insight as to how a first Gen Riv will do. In 2014 my brother-in-law Greg and I drove my 1963 401 equipped Riviera out to the ROA International Convention in Colorado Springs from central Wisconsin. We made it a 2 day trip, stopping one night at a motel. On both of the driving days we drove straight through only stopping for gas. The stretches in Nebraska and Colorado where the speed limit is higher, we drove a solid 80-85 mph for long periods of time. The Riv loved running at those speeds on the highway. For the return trip we actually had 4 guys in the car and a trunk packed so full you couldn't get another thing in it. The car performed flawlessly. Again we were running 80-85 for long periods with no problem.
Last year Greg and I took the Riv to Flint, MI from central WI. via the upper peninsula which is a 10 hour drive one way. We drove straight through there and back only stopping for gas. On that trip we were running 70-75 mph for long stretches. Again the car ran flawlessly.
The one thing I took away from these trips is that these cars love the highway and highway speeds. I hope this helped.
Bill
-
2 hours ago, RivNut said:
I cut an X in a tennis ball and slip it over the antenna. Don't like having holes in the cover, they're to keep stuff out, not have passage ways cut into them so stuff can get in.
The patch only has a hole in it large enough for the antenna. I only cut a hole large enough in the cover for the antenna to fit through. I suppose there is a possibility a few pieces of dust can filter through the 1/8" gap around the antenna base. If one was overly concerned about dust infiltration you can cover the gap. I have never found it to be a problem. I have stored cars without cutting the antenna hole as well. The cover on that side of the car rides up on that side exposing a large section of the car. Choose your poison. I prefer to keep the side of the car completely covered. I did not have this problem with my other cars as I could just unscrew the antenna mast so the cover could sit flush.


-
1
-
-
The manual antenna sticks up even further. You are right about the car covers. The cover should come with self adhesive circular reinforcing patches so that you can cut a small hole into the car cover so that the cover can slip over the antenna mast. It is loads of fun trying to figure out where you should make the hole in the cover.
-
The bezel has sold.
-
Hi,
I am selling a very nice antenna base chrome bezel for the 1963-1965 Riviera. I had originally purchased this for my car and then ended up not using it. I am selling it for the price I paid from one of the reputable ROA vendors. The bezel holds a nice shine and has no pits. There is some fine wear scratching which you would expect from a piece this old. The gasket is in good shape. $50.00 plus S & H. Please PM me if interested. Thanks.
Bill


-
-


1963 4 Note Horn Installation Question
in Buick Riviera
Posted
Randall,
Thanks for the extra info. I'm glad you talked about matching before drilling. In the excitement of doing a project I sometimes I get ahead of myself and forget to do/check things I should. That is an important step and it will help me remember to do that.
Bill
P.S. Just when I was starting to think you were a nice guy you throw in that dig about the weather. We may break 50 today. I probably won't be able to get the car out for another month.