


Riviera63
-
Posts
1,797 -
Joined
-
Last visited
Content Type
Forums
Gallery
Events
Posts posted by Riviera63
-
-
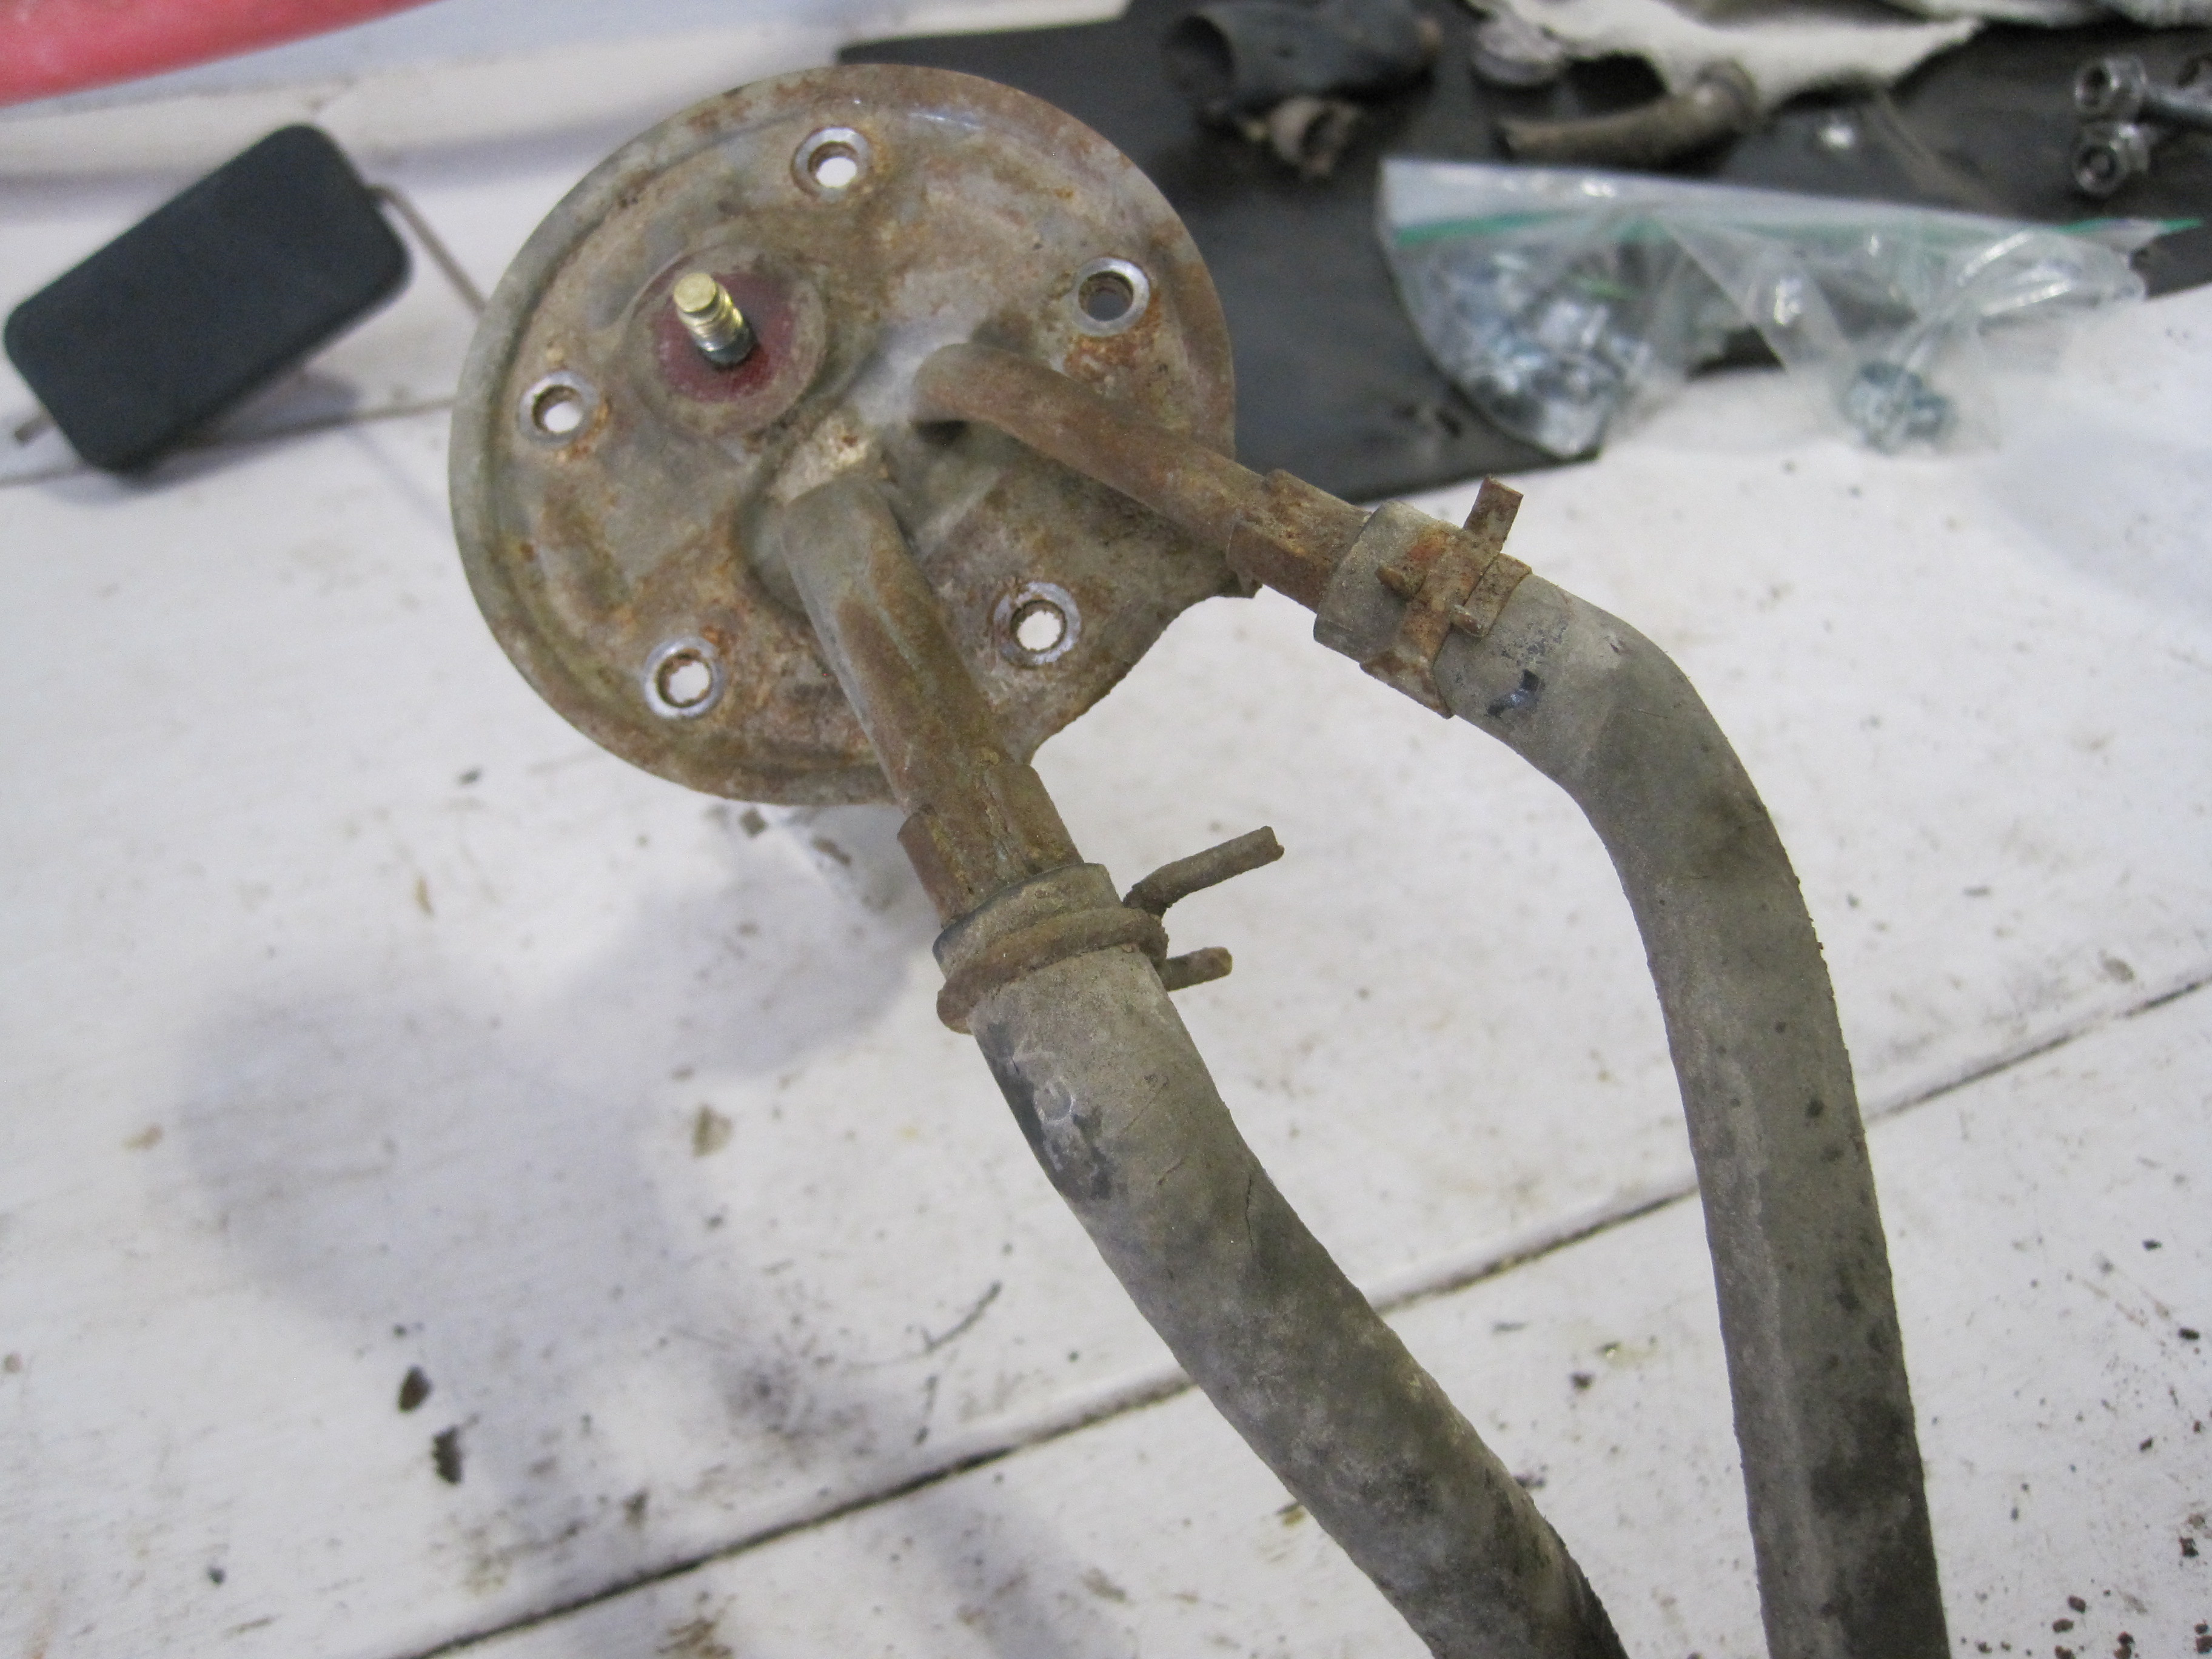
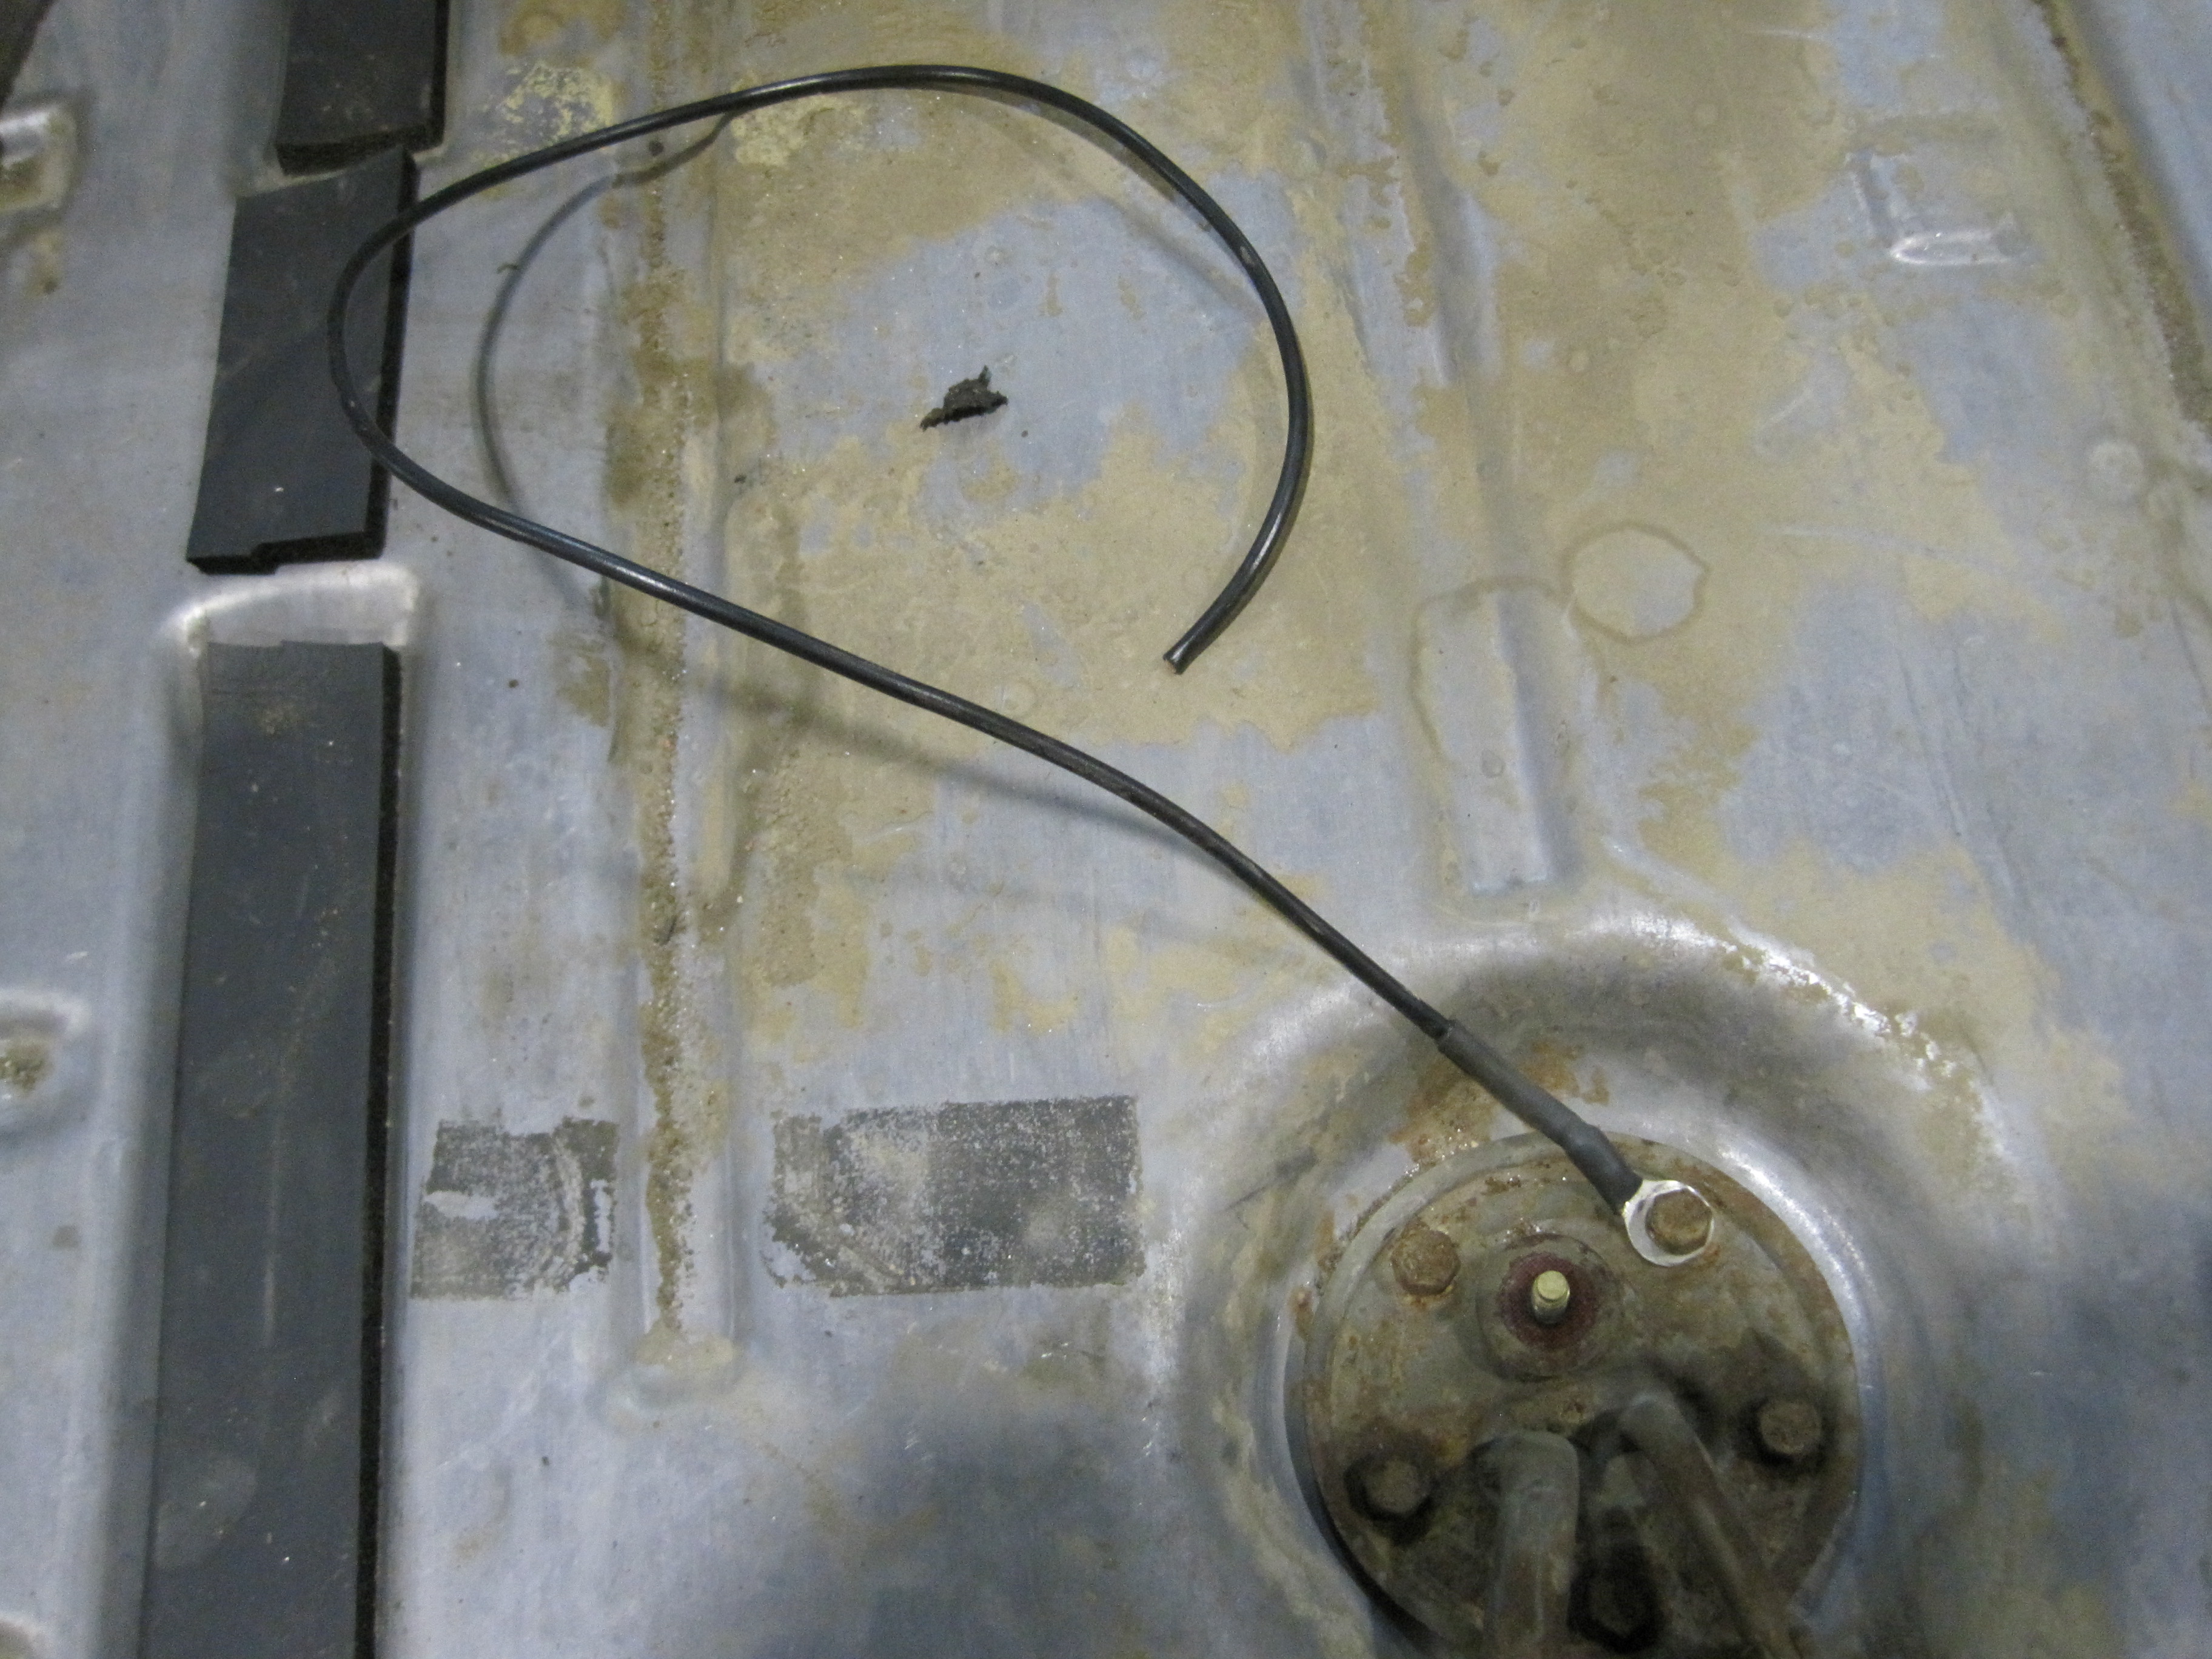
The "Riviera Rattle" has been solved. They found 3 areas where the rattle was occurring. The tank was rubbing back near the fuel filler neck. (pictures 1 & 2) The sending unit inlet/outlet was making contact with the trunk floor (pictures 3 & 4) They used different clamps that would not protrude as far up as the old clamps and they put topper tape along the top of the fuel tank to create some separation between the fuel tank and the underside of the car. They also ran a new ground wire from the sending unit for me. (pictures 5-7) To fix the frame rattle they just put rubber fuel line around the metal line to keep it from rattling. I am glad this has been resolved. While not a problem that will keep you from driving the car it is one of those annoyances that drives you crazy. I hope this will be a help for others suffering from this problem. I will also post this with the pictures under the "Riviera Rattle" thread.
Bill


-
On 9/6/2017 at 11:54 AM, RivNut said:
The TS1000 has a metric sized hole in it, just a smidgen smaller than the tube on the sender. Hopefully someone kind find a sock with the correct sized hole in it and let others know.
Maybe not metric, but not the exact size. At least that was my experience.
Got the car back today. As Ed said the TS1000 was just a hair small. They were able to ream it to fit with no problems. I have attached a picture of what the old sock looked like. I am very glad I had the tank dropped and found this out before it caused any problems. That was the only issue found. The inside of the tank was very clean
Bill

-
4 hours ago, 1965rivgs said:
Hi Bill,
Did you have the shop drop the tank away from the trunk floor and then confirm that the rattle had disappeared? Or is the source of the rattle an assumption?
If the source of the rattle is indeed contact with the nipples on the sending unit a thin compressible rubber pad, or various other materials, can be used on the top of the tank to establish a small amount of clearance between the tank and trunk floor.
Also, the `66 Nailhead fuel pump has a "chamber" built into the fuel pump body/housing which is designed to eliminate the "hydraulic hammering" in the fuel lines as per a `66 Buick Service Bulletin.
Hope you follow up on your experience re this issue because it is a very, very common issue which surfaces and has surfaced for years.
Tom
Hi Tom,
I printed off everything I could find on the forum about the infamous rattle and gave it to the guys at the shop. So, they are aware of all of the causes and all of the fixes. They inspected and tugged on the fuel lines. The fuel lines are very solidly in place as my car has been undercoated. That has also given them some insulation as well. They also got a mirror up by the top of the tank and saw that the nipples on the sending unit were hitting the trunk floor. I stopped in and they showed me everything before they dropped the tank. I know that the fuel lines still could be a possible source of the rattle but, we all concurred that seeing the sending unit in contact with the trunk floor that dropping the tank would be a good place to start. Even if it is not the cause of the rattle it was worth doing as we discovered that the filtering sock was falling apart on the sending unit. Of course once it is done if the lines are rattling also that can be dealt with at that time. I will let everyone know how everything turns out.
Bill
-
35 minutes ago, petelempert said:
As I recall, there are two types of GM socks used on Rivs... both still available. One literally has a drawstring and the other has a fitted metal ring that slides onto the fuel line like the TS1000. That one should fit 63-5. To me, the TS is the way to go. String makes me nervous. PRL
32 minutes ago, RivNut said:The TS1000 has a metric sized hole in it, just a smidgen smaller than the tube on the sender. Hopefully someone kind find a sock with the correct sized hole in it and let others know.
Maybe not metric, but not the exact size. At least that was my experience.
Thanks for the replies guys. I am in a bit of a time crunch so I just went ahead and ordered the TS1000 from Rock Auto to make sure that I have one and it gets here quickly. Rock Auto is only a little over 100 miles away from me in Madison, WI. I did next day shipping, so best case I will have it by tomorrow and worst case I will have it Friday. I warned the shop that it may be a little small. I am hoping that they will be able to make it work.
Bill
-
My car is in having the "Riviera Rattle" taken care of. They have dropped the tank as the rattle is coming from the tank inlet/outlet hitting the trunk floor. I had them pull the sending unit as long as it was off to see if there were any problems. They found the sending unit sock was bad. I see that in another thread Ed found that the TS1000 sock will work for the 1964. Will this same sock work for the 1963? If not, do you know of one that will? Thanks for your help.
Bill
-
11 minutes ago, RivNut said:
The owner of the car and I are very good friends. He's assured me that he has never received deductions for these three items before. One is blatantly obvious, but no judge has yet to pick up on it. He requests a copy of the judging sheet e ery time he has it judged. Brings a smile to my buddies face every year. ?
We probably should quit talking about it then. My lips are sealed. It would be a shame to ruin it for him at this stage of the game.
-
1 hour ago, RivNut said:
Just make sure that a 63 has the silver on black trishield and the 64 and later cars have the silver R on the center cap.
Cars at ROA events are peer judged. You wouldn't believe the number of 63 and 64 Rivieras that show up sporting 65 and later Buick rally wheels and the owners register them as "stock". AND because the events are peer judged, those cars get votes.
Don't sweat the petty stuff and don't pet the sweaty stuff. Very few folks know the differences.
Ed
PS- I know of one Riviera that has the highest award that the BCA gives and I know of at least three different things on that car that are not stock / aftermarket. The BCA judges haven't caught any of them yet, but the car is still driven away yearly with that Senior Gold, or whatever that award is. Sometimes you CAN fool all of the people all of the time. Even the so called experts.
And, DO NOT ask whose car and what's not stock. I won't reply. ?
The gold award is given for cars scoring 385-400 points in the 400 point judging. The Senior Gold is awarded for cars scoring 390-400 points in the 400 point judging AND not having any mandatory point deductions. An example of of a mandatory deduction is the deduction for not having bias ply tires. It is possible to have points deducted and still win those respective awards. I don't know what the situation is with this car. It may be that the judges just missed some things but, it would seem unlikely that they would be missed several years in a row. It could be that there were deductions for various things and yet still amassed enough points to get the award. You don't know unless you request a copy of the judge's scoring sheet.
-
 1
1
-
-
I recently put in a new alternator in my car as the one that was in there was only a 37 amp and I should be running a 52 amp. I just bought a reman from one of the chain auto parts stores and it is working just fine. I was going to run this until I came up with one that was more original to my car. Replace it and use it as a spare. I managed to source a numbers matching rebuilt/refurbished 52 amp alternator. The double pulley that came with this alternator was of a slightly larger diameter than than my original. The diameter of my original was 2 5/16" which is consistent with what I have seen on other 1963 alternators. The larger pulley has a diameter of 2 11/16". I know that this is the size I have been told was on the 1965 Riviera alternators. I don't know about the 1964's. Could I use the larger pulley without causing any problems? Would this bother with the running of any other items in the loop? I know it will turn somewhat slower than the smaller pulley. I had originally been hoping to do a straight swap of alternators without having to monkey around with taking off the pulley on the one that's in the car, clean and paint the pulley and then put it on the new alternator. Or I would swap in the original pulley on the new alternator and put the larger pulley on the spare (if it will work) so it is ready to go if I should need it. I would appreciate anyone's input on this. Thanks.
Bill
-
38 minutes ago, Sleep said:
Once I get the front end rebuilt and the brake conversion done, I plan to put a "modern" radio in that runs compact discs or aux/blue tooth. It's a shame most of my music is on vinyl...

It's an FM converter. I used one just like it in the glovebox of my 63 Pontiacs for years.
Bill
-
1 hour ago, Pat Curran said:
Ed, I am not sure where the engraving was done and I wasn't implying that the actual dealer did the engraving but I believe they installed it. I have seen 2 different styles over the years with some consistency. I have seen some that were actually engraved and I have seen some that look like a silkscreen with black letters. I have seen both examples on original owner cars and I have owned several myself with both types. A form (card) was included to be filled out (I have an original blank card in my collection). I will have to dig it out to see where it is mailed to or what the dealer instructions are.


-
 2
2
-
-
18 hours ago, Mr Jones said:
Thank you Randall - I must be on the lookout for a set of the stock ones, even though I prefer the look of the 63 covers.
The wire wheel covers were available in 1965 as well as 1963 (and 1964). It very well could be that your car was equipped with wire wheel covers at one time. If you like that look you could keep it and it would be correct for your car. As Randall mentioned the center medallion is different on the 1963 wire wheel covers than from the 1964 and 1965 covers. The 1964 and 1965 covers would have the R center medallion as I have pictured here. Even if all of your wire wheel covers were the 6/3 pattern you could still get the R center medallions and make it work as they still have the 3 notches on the back that the 6/3 covers used to hold them in place. You would just have to remove the square rubber pad on the back and possibly grind off the locator tab first. If your covers are the 4/8 pattern then it is just an easy swap of one center medallion for the other.
Bill


-
8 hours ago, RivNut said:
The wheel cover pictured in post #1 is correct for a 63 Riviera. It is unique in the world of Buick wire wheel covers. If it would have been from one of the other large model Buicks, it would have the red/white/blue trishield on a black background center cap. Starting in 64, Riviera wire wheel covers had a large silver R on a black background. Others models would have had the same cover as the 63 - red/white/blue trishield on black.
Some time back there was a big discussion about these covers. When laid flat, some covers are taller than others. Some have a six / three screw arrangement on the back whereas others have the eight / four screws arrangement.
We're any conclusions ever drawn from that discussion? It's probably time to go back and re-read it.
Ed
Here are some of the conclusions that I and Tom Mooney have come up with/discovered while he was helping me locate covers for my car.
1.) The 6/3 bolt pattern was only used on the 1963 wheel covers. Some contend that the 6/3 bolt pattern was the only one used on the 1963. Others contend that the 4/8 pattern was introduced later in the 1963 production year and/or was the style of cover that you would get if you purchased covers through the dealer.
2.) The 6/3 cover sticks out further/are taller than the 4/8 cover. Picture attached. The cover on the left is a 6/3 cover and the one on the right is a 4/8 cover. The parts from a 6/3 bolt pattern wheel cover do not interchange with the 4/8 pattern covers. Maybe some of the spokes? The center medallion can be interchanged with some modification. To use the 6/3 medallion in a 4/8 cover you will need to add a rubber backing so that the medallion will be held tight in the spinner and won't rattle. I have done this with one of the center medallions I used on my car. To use a 4/8 medallion in the 6/3 cover you need to grind off the locating tab on the edge and remove the thick rubber backing.
3.) Some of the red/white/blue covers are the exact same cover as the Riviera 4/8 cover. You just have to swap out the center medallion with the correct one. Be careful when buying the R/W/B covers. While the correct 15" diameter they are not the same height. See the picture with the level in it. The cover on the left is a 4/8 Riviera cover and the one right is an NOS R/W/B cover. I am thinking that only certain years of the R/W/B covers are the correct style for our Rivs?
Bill


-
1
-
-
10 minutes ago, KongaMan said:
"Double" and "dual stage" are not synonymous. And if you replace a dual-stage diaphragm with a single stage diaphragm with two ports (note the word "stage"; it's important), you're using a different part that behaves differently. Much like gutting the STV and replacing it with a cycling switch, you have not duplicated the original functionality; you've changed it.
Please look at section 11-16 a and Figure 11-73 of the 63 manual. They make a clear distinction between a single and a dual diaphragm.
To be clear, the 63 has two single stage diaphragms and one dual stage diaphragm. If others refer to them incorrectly, that's on them. There's no need to propagate their error. To do so only sows confusion.
I did not say that double and dual stage are the same. I was referencing your statement about the 63 manual " The 63 manual doesn't make any such clarification in the illustrations, but it does in the text: " The #1 and #2 diaphragms are enclosed in a dual diaphragm assembly". I said to me a double diaphragm means the same as dual diaphragm, double=dual meaning 2 diaphragms put together to make one in that statement. Not that double and dual stage are synonymous. As far as the STV and the cycling switch go I never said that the cycling switch duplicated the function of the STV I only reported that it was done to my car no more no less. I and as far as I know others have never stated that the terms used by myself and others are the correct terms. No one is trying to propagate an error. It is merely a way to distinguish between 2 different items. We all understand it. I think all of us that have 1963 Rivieras are clear that there are 2 single stage diaphragms and one dual stage diaphragm which is comprised of two, 2, double, dual, dos, a pair of diaphragms hooked together to make one. I'm out.
Bill
-
2 minutes ago, KongaMan said:
Isn't that the opposite of the terminology that Buick uses in the service manual? The 64 manual clearly calls a diaphragm with two ports a "dual stage vacuum diaphragm": "Two dual stage vacuum diaphragms (see Figure 11-80) and two vacuum disc switches comprise the vacuum circuit for the 4700" The 63 manual doesn't make any such clarification in the illustrations, but it does in the text: " The #1 and #2 diaphragms are enclosed in a dual diaphragm assembly. The #3 and #4 are separate diaphragms."
I would not know what the 64 manual would say. I only have a 63 and the 63 manual. I have only used terminology that was used previously and currently by others on this forum to describe these items. It is not something I invented. I understood what they were referring to as I am sure others did too. I guess to me a "dual diaphragm assembly" means the same as a "double actuator" and it was confirmed to me when I pulled my old (insert your own term here) out. It had dual (double) diaphragms. I take it in this situation as double meaning 2 diaphragms and single meaning 1 diaphragm regardless of the number of ports and how they are labelled in a service manual. I think we are getting too much into semantics and missing the larger picture. The fact is that the old (insert your own term here) that goes under the heater box is no longer available. In order to replace this old (insert your own term here) you have to replace it with a new (insert your own term here) that is not exactly the same as the old (insert your own term here) therefore requiring some changes that are not the same as original but, basically gives the same function as the old (insert your own term here). The new (insert your own term here) is exactly the same new (insert your own term here) as was ordered from Cold Air Products that is used in the engine compartment by the blower motor because the old (insert your term here) used under the heater box is no longer available. All I know is I figured it out reading those terms used by others, I did it and it works. That's all I have to say about that.
Bill
-
1
-
-
4 minutes ago, 1965rivgs said:
Bill,
I dont believe this is correct, at least not current. The double diaphrams are available. The double diaphrams have 2 ports, that`s what makes them "double". Maybe we have a lapse in understanding re terminology?
Tom Mooney
Tom,
I think we have a misunderstanding in terminology. When I say and from what I understand that, other people mean when talking about this topic, double actuator is referring to the original actuator that had 2 (double) single diaphragms, one stacked on top of the other. When I(they) refer to a single actuator, I am referring to the new actuator that even though it has 2 ports has only a single diaphragm.
Bill
-
1 hour ago, Red Riviera Bob said:
Bill, I'm following you with your progress of what you have and what direction the AC was going when you got the car. I'm cool with that.
so, you bought two (2) vacuum actuators and converted them to work as the "double"?
thanks for your help.
Bob,
No, There is no double to be had or made. One single actuator (the same one as you bought for the engine compartment) replaces the double. With the double you had a vacuum line going to each diaphragm, giving you a choice of 1/2 open or full open. With the new actuator (which has 2 ports) you will have to make a choice between full open or 1/2 open. You will not have the choice as in the old set up. One of the lines that went to the old actuator will be plugged and not used. The other line you split by putting a "tee" in, creating 2 lines from that single line. These 2 lines you created will go on to the 2 ports of the new single actuator. If you want I can send you my e-mails from and to Jim Cannon on this. I'll try to find the thread that also discussed this. Thanks.
Bill
-
24 minutes ago, Red Riviera Bob said:
Bill, we are pretty much in the same boat regarding our air conditioning. I'm happy to learn you have the volume of air you want. Additionally, any info you can pick up on a thread that helps I'll vote for everytime. I understand you converted to the 134 A and you updated the STV ? Your temperature at 40 degrees coming out of the vents is cold enough for you then that is the right temperature. I've heard by word of mouth " spec" is suppose to be in the 30''s? I really don't know. I think my temp coming out of the vent was/is too low b/c the hoses freeze once in awhile. The hose doesn't freeze up but it gets ice on both ends.
I have a friend mechanic who is taking on the vacuum challenge. He Has narrowed down the vacuum leaks and we are in hopes of having a tight as humanly and mechanically possible. I stayed with the R12 and had the STV rebuilt by cold Air. Replacing the drier, muffler, A6 compressor, hoses(s), the R12 is pricey as well can add up. Oh, I bought the #1 vacuum Actuator switch and the same vacuum Actuator you replaced as well. I have to buy the double diaphragm as well. Where did you buy your double diaphragm?
We are closing in the AC challenge repair. My friend is doing the work. I assist by getting the parts and doing the step and fetch while he cusses at the system. I'm not close to being a shade tree mechanic, but some projects I can handle I'll go ahead and give it a go. There are other things I can hold my own, but auto mechanics is not my strong suite.
thanks for the tip on the sticky vacuum switches as they are scarce and when you do find a switch the price of the switch gets your attention.
RRB
Bob,
The air was converted before I bought the car. The STV is not used in this conversion. It looks like it is there but, the inner workings are gone. The cycling switch was added after I had the car when it was getting a new heater core and radiator. I had the guy also check over the air as well. I can't even pretend to understand all of these things. I believe the cycling switch was added because the STV was inoperative.
The same diaphragm you got for the passenger side is the same diaphragm you use to replace the double diaphragm because those are no longer available. That conversion is discussed in other threads. Jim Cannon has commented on this in those threads. I followed his lead when I replaced mine.
Bill
-
26 minutes ago, KongaMan said:
In the 40s should be good. It would be interesting to know what the high and low side pressures are -- although bypassing the STV may affect that somewhat.
What we have here is a brain cramp.
") You wrote "actuator" and I was thinking "modulator" -- which is a different part entirely. You didn't happen to encounter the modulator in your travels, did you?
You wrote "actuator" and I was thinking "modulator" -- which is a different part entirely. You didn't happen to encounter the modulator in your travels, did you?
I don't know. I have no idea what a modulator is. Describe it to me and I'll see if I have one and where it's located. Thanks.
Bill
-
23 minutes ago, KongaMan said:
Bill,
Your setup looks just like mine (only cleaner
). It looks like you've converted to R134A. What kind of temperatures do you see at the vents?
BTW, where is that vacuum actuator on a 63?
And congrats on the fix. IMHO, sorting out HVAC vacuum issues is one of the most frustrating jobs on these cars.
Yes, it was converted to R134A and also has a cycling switch. I'm not sure exactly what the temp is at the vents. I know the guys that work on my car checked it once and if I remember correctly it was in the 40's. They seemed to think it was fine. I am anxious to try it out and see how it does with good air flow.
The vacuum actuator is next to the blower motor and to the left of the STV (or what's left of it).
Thanks for the pat on the back. I have had this car for 4 years now and I remember my first look at all of those vacuum hoses, the inside of the heater/AC control box on the fender and thought OMG what is this? I will never understand this mess! It was like looking at a book written in Chinese. Now that I have done some things with the HVAC system I think I have a good basic understanding of it works and it is not nearly as daunting as it once seemed. I'm not afraid of it anymore. It's been a lot of fun learning and doing new things to my car and seeing positive results.
Bill

-
On 8/9/2017 at 10:59 PM, Red Riviera Bob said:
Tom, when you say " upper pass sideof the firewall" could the location be under hood on the passenger side of the car? The " can" , is this the vacuum Actuator? If so, I be pulled the mechanical linkage and it is very very hard to move. It is hard for me to be believe there is enough vacuum from the Actuator to move anything. One of my friends were trying to get some volume of air moving some way or another. I was in the cabin and he pushed and pulled on the vacuum Actuator linkage while taking off a vacuum hose to the Actuator, I got enough air volume equal to a hurricane.
I bought some a vacuum hose kit because the hoses looked awful weak. The mechanic that did the AC compressor, drier, evacuate the old AC R12 gas and did get the cold air working said I needed a #1 vacuum switch AC control part # 1194602. Actually the mechanic pointed to the switch and said you need one of those switches. The mechanic didn't say anything about the Actuator or hoses. Now, I left the shop paying for 8 hours labor and a diagnostic fee. I had cold air, but I couldn't get the cold air in the cabin. I have no beef paying for the work that was completed, but don't you think I should have been given some direction for next steps to get the air in the cabin?
In summary, you are suggesting a new vacuum Actuator could improve the operation ? Old Air has one for $52.00.
all I've got to do is to get the vents working, the cold air is there. Thanks again for your help.
Red Riviera Bob
Bob,
Thank you for starting this thread. Reading this has helped me solve the problem I have had with my AC since I purchased my car. I too, had the same problem. Cold air, you could hear the blower fan going for all it was worth but, low air flow at the AC vents in the car. The maddening thing is that it would blow fine once in a great while. I went through and did several things that in hindsight were all good to do but, did not solve my problem. Including but not limited to replacing the #@%!*&! double diaphragm which was shot and removing the blower/heater box to replace the spring in there. I was fortunate to have small hands as I don't know how I would have gotten a couple of those screws out or back in on that heater box without a hoist to put the car on. This post that you and Tom were going back and forth on set me on the path to getting my car cooling the way it should. I just finished replacing the passenger side vacuum actuator on my car a half an hour ago. Problem solved! Powerful air flow out of all AC vents. Of course, now it probably won't get hot again until next summer. Here's hoping for hot weather for the trip to the ROA convention in Overland Park, KS next year. This is gives me a great sense of relief and accomplishment. This may not seem like much to the guys that know these cars and are mechanics but, for the "shade tree" mechanic it doesn't get any better than this. In my doing this replacement I ended up dealing with the #1, #2 and #3 vacuum switches because I did some vacuum line replacement. I talked to Jim Cannon about these. You should check all 3 to make sure that the plungers move freely. The grease hardens and they get sticky after all of these years. Spray some silicone in the vacuum ports and move the plungers back and forth to get them moving freely. Do not use WD 40. It may be that yours was just stuck. You can also put vacuum on the ports by mouth or with a vacuum tool to see if they work when you move the plungers. I had a couple that were pretty sticky. They are pretty easy to get to and remove. I hope you get to the bottom of your problems soon and thanks for indirectly helping me solve mine.
Bill

-
1
-
-
1 hour ago, telriv said:
Originally my '64 was equipped with a 37amp. I switched to 63 amp. They say the voltage regulator was diff. but I didn't change it & it been on for MANY years. I'll look to see what I may have & get back to you. May take a few days.
Tom T.
Tom,
If you did find a suitable core how much would you want for it? The reason I ask is that I have found a correct alternator that is already rebuilt and refurbished for a pretty reasonable price. Depending on how much you want plus shipping to me, shipping to the rebuilder, the cost of rebuilding, and finally the shipping back to me. It may be more cost effective for me to just get the one already done. I don't want you to do all that digging and searching and then say no. Let me know. Thanks.
Bill
-
25 minutes ago, telriv said:
61 amp (maybe 63 also) was an option as far as I know. I have a whole bunch of '64 A/C alternators. If your looking for a particular one I could check what I have.
Tom,
I am looking for a 52 amp alternator as I have an AC car. The alternator that was in my car was only a 37 amp. Can I use a higher amp Delco from another year with out any problems? Such as a 55 amp or 61 amp? I am not sure sure yet which way I am going to go but, one of the things I have considered is finding a good Delco core of a suitable amperage with a double pulley that I can get rebuilt/restored. I would be open to seeing what you have. Thanks for the offer.
Bill
-
1 hour ago, RivNut said:
That's what I'd call a broad statement.
I'm sure that many GM products used Delco Alternators in 1963. How many, besides the a/c equipped nailhead used a double belt pulley? Of all the pulleys I've taken of alternators on these cars, I've yet to run into one where the fan and pulley are one integrated unit. How many times have I pulled a dual belt pulley of an OE alternator to attach to an alternator that didn't even come with a fan or pulley?
For what it's worth, If I were you, I'd listen to the sage advice you get from those on this forum who are involved a one particular car rather that someone who restores what ever his customer brings into his garage. Did he tell you about the last 1st generation Riviera that he restored? Besides, how many people just walking by your car are going to know for sure. If you're being judged at an ROA or a BCA event, chances are the judges will be part of this forum, not some concours restorer.
I "Googled" one piece fan/pulley and searched through a couple of pages of pictures - couldn't find one. Most of what I found when I "Googled" 55 amp GM alternator, came up with pictures like this - but yours should have a double pulley on it. I'm also curious about the manufacturing process. Most pulleys are cast iron, most fans are stamped steel. How can one produce one item made from two different materials?

Ed,
As I said in that post I just threw what this person said for informational purposes only. I was not making a statement as to who was right or who was wrong. The alternator that is correct for our cars is a 52 amp not a 55 amp so that's not a true test. I found many remanufactured Delcos, in fact most with the black fan and pulley. My friend on the forum that I referenced had his rebuilt and it came back black which is what prompted this discussion. I am not concerned about how the remanufactured alternators look I was wanting to know what the original alternator looked like. A 1100622 or 1100633 52 amp alternator from Delco is going to be made to look the same whether its on a 1963 Buick Riviera or a 1963 Corvette, double or single pulley. In his defense he never said the double pulley was one piece. In fact, he comes right out and says that. He was referring to single pulley set ups from this time period. As he said the 2 pieces were tack welded together not forged in one piece of one metal. I value the opinions of the people on this forum which is why I monitor it and ask questions. To insinuate that I don't is wrong. As he said ask 10 people you'll get 10 different answers. Information is power. Discussion is good and hopefully at the end of it all we arrive at the correct answer to the question
-
For informational purposes I e-mailed someone that does concours restorations of alternators asking him what finish they put on the 1963 GM alternator fan and pulley and why. This is what he said back:
"As for the color I'm almost 100 % sure that Delco started zinc plating fans around 1967, most 1963 - 1966 alternator came with the one piece fan/pulley and in my 38 years of doing alternators I have never seen a zinc plated one piece fan/pulley on an original core, and I have never ever seen a double pulley zinc plated on a 1963 unit. I believe all double pulleys were painted black and the fans that were used with them painted also, and since the double pulley was never offered as a one piece fan/pulley the 1963-1965 fans were different then later date fans. In 1963 the one piece fan/pulley had round spot welds on the pulley to hold it to the fans, in 1966 they came with rectangal spot weld on the pulleys to hold it to the fans. This alternator has the correct 1963 fan. I believe that the zinc plated fans and pulleys were used on HI-OP units around 67, but the pulleys were different on the corvette the pulleys a wide space before the fan and the camaros and chevelle had a deep groove pulley. If you ask 10 people you'll get 10 different answers. So having said that I believe all double pulleys were painted and so were the fans used with them."


RIVIERA RATTLE - FIRST GENERATION - CAUSE AND REPAIR
in Buick Riviera
Posted
My car is in having the "Riviera Rattle" taken care of. They have dropped the tank as they could see the inlet/outlet of the sending unit is hitting the trunk floor.
The "Riviera Rattle" has been solved. They found 3 areas where the rattle was occurring. The tank was rubbing back near the fuel filler neck. (pictures 1 & 2) The sending unit inlet/outlet was making contact with the trunk floor (pictures 3 & 4) They used different clamps that would not protrude as far up as the old clamps and they put topper tape along the top of the fuel tank to create some separation between the fuel tank and the underside of the car. They also ran a new ground wire from the sending unit for me. (pictures 5-7) To fix the frame rattle they just put rubber fuel line around the metal line as suggested earlier in the thread to keep it from rattling. I am glad this has been resolved. While not a problem that will keep you from driving the car it is one of those annoyances that drives you crazy. I hope this will be a help for others suffering from this problem.
Bill