


Riviera63
-
Posts
1,795 -
Joined
-
Last visited
Content Type
Forums
Gallery
Events
Posts posted by Riviera63
-
-
I am in the process of having a windshield wiper wiper motor and washer rebuilt/refurbished. Right now I have an electric aftermarket washer pump that is mounted on the firewall. Once I get the rebuilt motor and washer installed I will need to run new washer pump hose. I have looked on CARS, Inc. and they have 3 different sizes of hose listed, 1/4", 5/32" and 7/32". I would like to get the ribbed hose as original. CARS, Inc. lists the 1/4" hose as "correct ribbed original". Can anyone confirm for me the the correct size please? Thanks.
Bill
-
On 5/29/2021 at 7:31 PM, telriv said:
Bill,
Seems like your taking this vehicle apart one piece at a time.
Tom T.
Tom,
RivCat did literally take this car apart piece by piece, labeled and stored the parts. I made 4 trips down to see him and get parts. The last trip in April netted me a pick-up full inside and out. Since then, I have been slowly scrapping out pieces not worthy of resale. I then pick out a piece or 2 and get them ready for sale. I don't just grab a part as is and list it. I like to do what is necessary to get the piece as nice as I can get it for resale by cleaning. getting rid of rust, testing to make sure it works, etc. I am still hampered in what I can do after my shoulder surgery which slows the process.
Bill
-
-
-
20 hours ago, Jolly_John said:
Bill, You must live in a rough town....or, at least, in a sketchy neighborhood. Sorry to see someone stole your hubcaps over the winter. John
John,
My neighborhood is very safe. I remove them before I take pictures as a precaution. There is a person that lives in town very close to me that will see pictures of collector cars in the area or see the car in person and then target the car for theft of the wheel covers. Sad that someone will stoop that low.
Bill
-
On 5/24/2021 at 1:49 AM, XframeFX said:
Bill, I know the feeling. I too was itching to install my seats from when I re-started my project over 5 years ago. First, I had to deal with my gutted interior. Got the seats installed last October. Before the big snows, I actually drove it for the 1st time since 1994 when we moved from our old place. My other project was towed but I drove the Riv sitting on an inverted milk crate back then.
Your recovery is going to take a while but I hope you will regain full mobility. Definitely have someone do your seats for such a physical job.
Your Riviera is a looker! Nice to finally see it. The rain you had sure made your yard lush.
I have a thick pad made of wood chips (red circle) to catch Dynaflow drippings and it works well.
Today May 23rd, after having it insured and a license plate, I drove my Riv for the 2nd time. I have mixed feelings. For one, many things became un-fixed during the drive. No horn, AM/FM tunes 1-way only, slips the other way (spent 2-months on that radio!), turn signals don't cancel at certain tilt positions, Driver's rear quarter glass operates 2" because screws for the outer chrome with new whisker fuzzies are sticking out into the glass. What did I do!
Secondly, creaks, rattles and wind noise. Hoping the latter will be improved after installing new vent window rubber I purchased from Steele. As for the rattles, I tightened and lubed everything. This may be caused by what I observed running the nailhead in the garage. The engine idles rough! The whole cabin resonates with the engine thumping like a pump. Tough to start and takes a long time to warm-up. But then it starts with the bump of the starter. I was hoping the drive might improve with fuel system cleaner but no change. It does run better when up to temperature but that thumping! Longing for an LS3!
All images are from today/tonight.


John,
Thanks for the kind words.
When I replaced my quarter window fuzzies I did a similar thing. I did not get the screws in deep enough and they scratched the chrome of the leading edge waetherstrip. I did get them in deeper but, ended up replacing the chrome and the weatherstrip. I was not happy.
If you do the vent window rubber also do the channel in the vent window assembly that the front door window rides up and down in. I replaced those on my car and that cured a lot of my wind noise. You have the vent assembly out already to do the rubber. I did a write up in the Riview a few years back on that process. Not a hard job.
The problem with the turn signals in a tilt wheel GM car of the time period is common. I had a 63 Grand Prix that had those same problems. My car does also in one position which fortunately, I do not use. The solution has been discussed at length here on the forum. Some day I will get to that one.
The big leak of transmission fluid is peculiar to the Dynaflow when not run for a long period. The wood chip pad is a good idea. I use the old standby cardboard. Mine leaks a little but, I have found the more I drive the car the less it leaks. If I drive it enough the leaking virtually stops. That is my challenge going forward to drive more and enjoy the car more.
Don't give up on that Nailhead! Everyone has an LS especially on the car shows on TV. Only the elite have a Nailhead in their car. I have a friend that put an LS in his 63 and has only driven it 25 miles in the last 3 years for various reasons. Different engine, different problems. Mine did not run perfectly when I got it. It runs like a top now. I love that motor. Smooth and quiet with just the right amount of rumble out of the exhaust. On the highway the finest of all the collector cars I have owned.
Bill
-
On 5/23/2021 at 6:19 PM, Chasander said:
Bill silver interior-very sharp
Chuck,
Thank you. I think I know why you like silver interiors. I have been waiting since 2016 when we met at Back to the Bricks to see the progress on your car. That was one of the reasons that Kalamazoo being cancelled was last year was such a big disappointment. Let's hope we can meet up sometime in the near future.
Bill
-
-
-
8 hours ago, SwedeDownUnderR63 said:
Hi Bill,
Shoulder surgery doesn't sound great. Let's hope for a quick recovery.
I am sorry but your futuristic looking driver's seat did hit a memory:
I run into something similar in the early 70's before I got the Riviera I had in Sweden. I worked for a few years in the steel industry in Sandviken, Sweden and once gota ride with a college in his SAAB 92. He had a Chow Chow that he had left in the car whilst running an errand. Everything chewable in the driver seat was gone when he came back and as he didn't have that much money he was stuck driving on a small wooden stool for a while... The passenger seat had also issues so I sat in the rear seat pondering the small adventure that I had run into. Life was a little bit simpler in that time.
Let's hope you can get someone to help you get the "internals" installed soon again. A '63 Riviera is so fine tuned that driving it with one arm for a while shouldn't be an issue. Enjoy the coming summer.
BTW silver looks fantastic, that together with red and the black that I have internally in mine are the top 3 alternatives for me.
Hi Jan,
I just started physical therapy and it will be 6-12 months for a full recovery.
I did a similar thing when I was in high school. The front seat of my car was out for some upholstery work. I remember using a wooden chair of some sort to sit on while driving. Yes, times were simpler and I sometimes wonder how we survived.
Thanks for the kind words. I do love the silver as well. Had someone asked me about a silver interior before I bought this car I probably would have said no thanks.
Bill
-
The long winter hibernation is finally over. At last, a stretch of consistent warm weather here in central Wisconsin prompted me to get the Riviera out. Low 80's and sun after several days of rain. Always an exciting time of year to hear the rumble of an awakened Nailhead. Crank until the oil light goes out, pause, 2 pumps on the accelerator and ignition. I am always amazed at how easily this engine starts and smoothly it runs after a 6 month rest.
You will notice the custom driver's seat I have installed. Extremely easy to install and did not cost much. My winter storage garage does not have enough room to do any real work so I had to pull the seats out before I stored it for the winter. When I pulled all of the seats out in the fall and took out the driver's rear quarter panel to replace the 2 chrome pieces I had no inkling that shoulder surgery was on the horizon. I am just 2 days out of the sling, so someone else will be reinstalling the seats and the rear quarter panel.
One of the chores of getting the car out of hibernation is the clean up of the Dynaflow "burp". Made much easier with the drip pan a fellow forum member clued me in about several years ago. I will need to get those seats in so I can take it for a long drive and get the transmission fluid topped off. I can't wait. I envy all of you that are driving already.
Bill


-
 4
4
-
-
1 hour ago, 65VerdeGS said:
Thanks Bill for the photo - shows exactly what I was wondering about - the configuration and length of the black sleeve.
Hope your shoulder heals quickly and well.
Cheers!
Thanks for the good wishes. Glad I could help.
Bill
-
1 hour ago, RivNut said:
Thank, but I found the answers I needed. Last night my grandson took the bezel and a measured drawing I made with him so that he can come up with a working model. Once I've seen that and give him 👍 he'll make a few. Thank again.
Ec
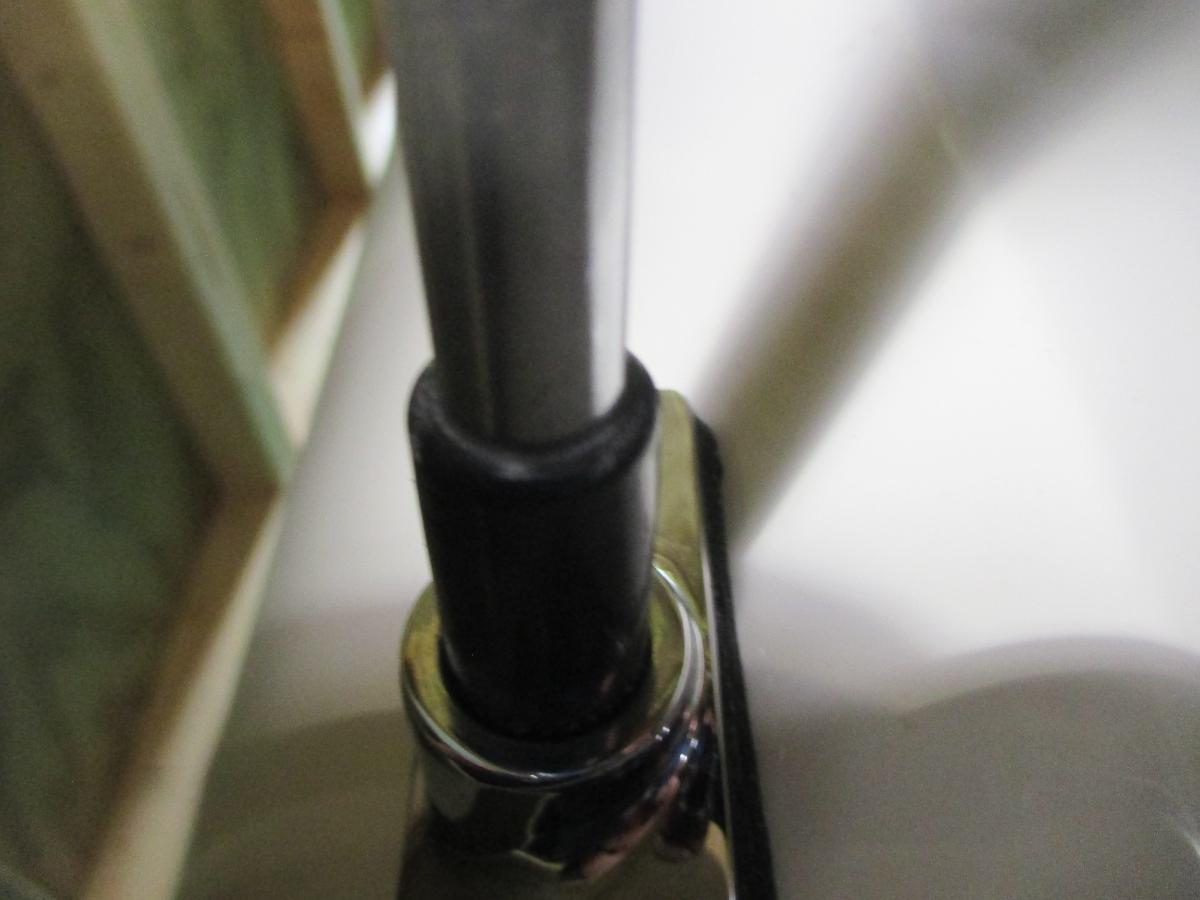
Just as a heads up, the pictured insulator has been cut off so it may not be the correct length. These were prone to crack at the top and sometimes were shortened to remove the cracked portion. The top has a rounded edge. I think you can see that in the picture I took. The top sticks up above the antenna bezel exactly one inch. I didn't quite get the correct angle to show that. I had shoulder surgery 6 weeks ago and it was tough to juggle camera, tape and light with one arm basically useless. Maybe someone has an intact one to get the correct overall length.
Bill

-
1
-
-
-
-
-
-
On 5/14/2021 at 7:24 PM, Kevrev said:
Hi Mate, Does anyone know what holds these lights in the sails. Is there some sort of clip

![20210515_101708[1].jpg](//content.invisioncic.com/r277599/monthly_2021_05/7853513_20210515_1017081.jpg.02159487bf484a9339e3b07ceb0f8424.jpg)
Mystery solved. I checked my sail panel lights. The light assembly is held in place by a philips head screw. There is a pre drilled hole in the inner metal of the roof that it screws into. The clips (like the one you found) for attaching the sail panel also go into holes in the metal of the inner roof.
Bill


-
2
-
-
-
9 hours ago, RivNut said:
Hmmm! You need to dig deeper. The clip you pictured is for mounting a trim panel to a body. My sail panels are someone’s concoction of an original. I took the lamps out but don’t remember exactly how the were attached. I think the bezel and the bracket sandwiched the sail panel between them then the two were screwed together tightly securing the lamp assembly to the sail panel. I do know that the same brackets are screwed to the console. Hopefully someone else will chime in here.
Ed, you are correct about the console brackets. They are attached directly to the outside of the console with screws that screw into the plastic of the console. The picture I have shows the console version with the same brackets and screws as shown above. I am not sure about the sail panels. I can check mine later today. I can't imagine they would be that much different as they utilize the same light bezel/fixture.
Bill

-
The 4236 Bosch plugs are still available from Rock Auto for $0.88 each. I ordered 16 last week and got them today.
Bill
-
1
-
 1
1
-
-
-
-


![20210515_101708[1].jpg](http://content.invisioncic.com/r277599/monthly_2021_05/7853513_20210515_1017081.jpg.02159487bf484a9339e3b07ceb0f8424.jpg)


Windshield Washer Hose Size
in Buick Riviera
Posted
Jason,
As you stated I remember the original OEM hose being thin walled and ribbed. When you go to a parts store all they want to sell you is vacuum hose which is thicker walled. Of course it would work but, I would like to get OEM style if possible. I had assumed that the hose from the washer bottle top to the pump and from the pump to the jets would be the same as it looks to me that all three nozzles on the washer pump look to be the same. I can't check that out as the motor and pump are out being redone. I can measure the nipples on the jets. Is it possible that the ribbed 1/4" hose CARS, Inc. has listed is 1/8" inside diameter?
Bill