


chistech
-
Posts
2,799 -
Joined
-
Last visited
-
Days Won
24
Content Type
Forums
Gallery
Events
Everything posted by chistech
-
 Ah, she has beautiful eyes! Getting very close Jerry.
 -
I did see that but at the bottom it says 6 so I’m not sure if you go to cash out, it’s going to tally up the six. Have to just give it a try I guess. Thanks.
-
I know a guy who bought two or three cars just like this but with actually no miles. They came out of a closed/deceased dealers collection and I’m not sure if they were ever titled. All were black with that shiny blue metallic looking vinyl interior. I believe it was two Buick’s and one pontiac. I saw them in person and they were virtually new. You opened the door and there was even plastic still in places. Early seventies cars, both two and four doors. Can’t remember the models and specifics but they were all time capsules. They are out there.
-
Curious on what people are using to glue their mats down. Mine are urethane and not rubber. I need to glue down my mats to the metal mounting plates and I’ve been looking for a source for 3M 3549 B/A in quart size. Everything thing I find is trying to sell me a six quart (12 qt because it’s two parts) case when I only need one set of quarts. Lord 310 is also another option that’s been recommended but I can’t find that either.
-
Unfortunately, I believe the producer has a lot to do with the way many in these shows are perceived. Let’s face it, if there is no drama, most except the very subject devoted would watch it. Humans, by nature are some of the lousiest animals on the planet. We like mean, nasty, gory things. I rodeoed for years and people don’t go to rodeos to watch the riders be successful. The calf roping and team roping is when most get up to stand in line for food and drink and few watch those performances. People want to see riders bucked off and hurt. Even in barrel racing they like to see some sort of high speed failure whether simply knocking over a barrel to horses stumbling and crap happening. Same with these shows, the majority of the immature watchers really don’t care about the true specifics of the show. I bet half the time the actors like Dan probably spew crap for the hell of it just to see if people like us, who really know are watching and can have a laugh at his BS. Dan: “over here we attached this pie cost to the front of the henway for better handling.” Let’s face it, these businesses have been found by television and not the other way around. They had to be doing something right to be in business long enough to even be considered by the network. Problem is they all signed on and agreed to play the games the networks want to keep the viewers. I actually had a local cable network want to do a little series on my one man shop bringing back the old cars. My neighbor is a high up at the network and really liked what I was doing. When people from the show came, they realized with just me in the shop, there wasn’t enough excitement, only real stuff going on and the show would have to be more like a “boring” series documentary (their words) So they asked if my wife could get involved, (she isn’t other than often riding with me to pickup or deliver cars).They wanted her to come out and yell at me or tell me she’s fighting with some parts supplier on the phone. I was going to need unhappy customers who wanted their cars sooner than I could get them done, etc.. So you can see, a real production with 100% real information is not wanted these days. TV is no longer a vehicle for knowledge like MOO Wild Kingdom or National Geographic was. Look what they did with the UK production Wheeler Dealers, the actual repair work shown was deemed to expensive to film with Ed China! Hell, even our news is no longer truthful and is more entertainment than anything. Needless to say, when I reneged on their ideas, they told my neighbor they weren’t interested as either was I. Our world today is all fake and it’s a shame. I take all these shows with a grain of salt and still liked FW more than most. I believe Dan was probably more like us than we think and got tired of playing the scripted guy they wanted him to play. I’m sure he was hoping on making money and getting more business but like the rest of us, there’s no gold at the end of the rainbow. It doesn’t surprise me he pulled out. I think anyone with half a consciousness would if they let themselves get sucked in in the first place.
-
32' Oldsmobile Deluxe Convertible Roadster
chistech replied to chistech's topic in Our Cars & Restoration Projects
Thank you John and yes, they offered metal spare covers as seen in the picture of one of the other known wood wheeled roadster. I was offered a pair that needed repair and were missing a few parts that would have been needed to be hand made. When you figure in the cost, work to restore, the benefits of having them didn’t outweigh the good looks of the exposed wheel in my opinion so I opted to not purchase them. Same with the SS thin wheel trim rings. I finally collected all six of original Oldsmobile trim rings and after some thought, I decided not to install them. There are many Olds out there with trim rings, and often they are Ford ones which are much wider than the originals but there are virtually only three including mine with the correct perimeter pinstripe around the wheel. Most don’t even know the wheels had this stripe due to theyears taking a toll on the wheels original paint. My choice is to be unique but still OEM. On the roadster in the picture, it hasn’t been seen by too many in years and it’s actual condition is unknown to most.
-
Looks like you’re getting a much better fit on the trim ring now. Looks great.
-
32' Oldsmobile Deluxe Convertible Roadster
chistech replied to chistech's topic in Our Cars & Restoration Projects
Started hanging the parts (running boards and rear fenders) because I need to drill holes and make sure I’ve got paint removed in the right places so there is a good ground for the taillights. Mounted the passenger side board and rear fender. All the original holes lined up correctly without too much maneuvering and once I knew the rear fender was in the right place, I drilled the six 5/16” holes for the carriage bolts that hold the board to the frame supports. With the fender and board all tightened up solid, I mounted the rear tailight and adjusted the brake light switch so both the running light and brake light works correctly. The fender has been sanded and is ready to buff and everything will be coming back off and any small areas needing attention will be taken care of. Installed both side mount iron assemblies with their locks. Everything fits properly which is good! Got in the shifter closeout test piece that Joe made up and it looks even better in hand. Once he puts the metal in the next ones, I’m sure it will fit and work perfectly.


-
32' Oldsmobile Deluxe Convertible Roadster
chistech replied to chistech's topic in Our Cars & Restoration Projects
Haven’t gotten the piece back yet to try fitting it. The final version will have a steel core in it both for strength and to keep shape. The quality is very good but it is a two part urethane so it’s not really dull like rubber would be. It has more shine which in turn seems to make it blacker than a molded rubber would look. But even if the color is slightly off compared to an original, no one has a brand new one like it so it’s already a 1000% better than a non original shape piece would be. The pedal-pad mold we’ll be making next will use the same tooling and be made from the same material so the two pieces will be of original design and matching color. With the brand new rubber mat and the two new floor pieces, I believe the finished floor will look like a brand new 32’ Olds did 87 years ago. -
32' Oldsmobile Deluxe Convertible Roadster
chistech replied to chistech's topic in Our Cars & Restoration Projects
My Buddy joe call me yesterday and told me the good old US mail worked extra quick for some reason and he got the mold in one day! He sent me pictures of the first test. One small air bubble on the back of the lip which wouldn’t be seen anyway but all I can say is it totally blew me away when I saw it this morning. All the careful machining work payed off. We’re the only ones presently reproducing this part. Joe is going to try adding the metal stiffener when he gets back home from a trip. Pictures of the original and our freshly molded urethane one.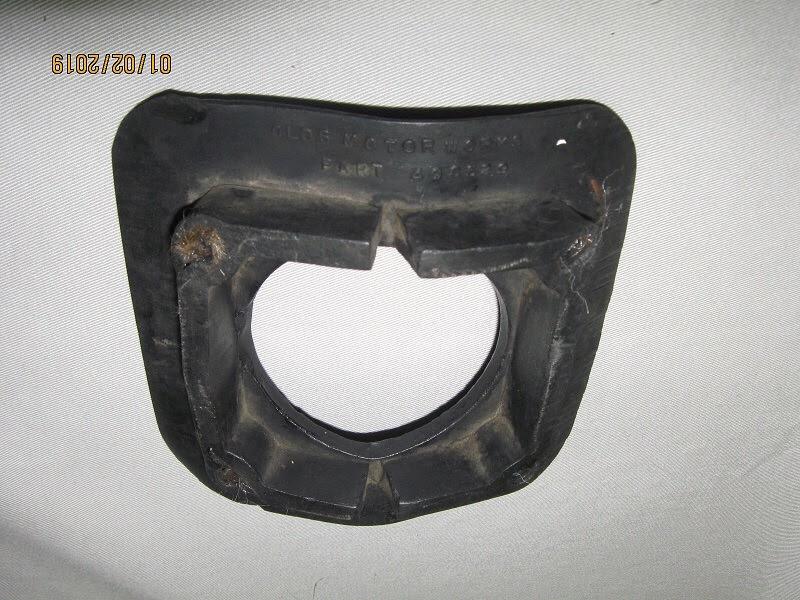


-
32' Oldsmobile Deluxe Convertible Roadster
chistech replied to chistech's topic in Our Cars & Restoration Projects
Today I went to my moms garage and picked up my two spare wheels/tires and the drivers side hubcaps. Today’s antique car tires, size for size, tend to run larger than their earlier predecessors. I was told that the Lester 5.50-6.00 x17 would fit into the fender wheel well without having to partially deflate them. Well today I had the car outside so tried putting them in the wells and sure enough, they fit, and they just fit to the point you couldn’t ask for a better fit. Not too tight where they take paint off and not loose where they move around. The tires really add a lot to the sides of the car. Just wish I could get the rest of the sheet metal finished and installed. Tomorrow I’ll fit the passenger side spare irons to the fender and cowl. Still waiting on other sheet metal as we’ve had some contamination problems causing too many fish eyes and we’ve repainted those pieces. Trying to find out what the cause is. I’m running a high end Sharpe desiccant oil separator/dryer system and we can’t find anything obvious as of right now but the problem is giving us way too much rework and putting me behind schedule.


-
1961 Mercury Meteor 800 restore
chistech replied to Laughing Coyote's topic in Our Cars & Restoration Projects
A little piece here, a little piece there, but they all add up to a nice finished car when we’re done! I remember doing the same thing on my Olds and now it’s really satisfying looking at those areas and seeing nothing but smooth shiny paint. It will all come together and be worth it. -
32' Oldsmobile Deluxe Convertible Roadster
chistech replied to chistech's topic in Our Cars & Restoration Projects
Installed the rubber running board onto the metal running board and installed the chrome strip along the edge. Started to fit the board to the drivers side and found the wood I replaced was just a little too thick and was hitting the top of the running board. I had to trim the wood with chisels to narrow the bottom edge enough to clear the board top. Cut and trimmed up a piece of welting and held it in place with double sided tape, then bolted the front of the board to the rear of the fender with six 1/4-20 bolts. I will have to pull the rubber board off later when I bolt the running board down to the two support irons. I’m waiting until I have the rear fenders in place before I drill the holes through the boards. Because my boards were restored with repopped bottoms, they have no mounting holes and I need to align everything up first before drilling holes.


-
Jerry, I’ve always found the gaskets sold for the headlight lenses are either too thick (Chevy) or not thick enough (Olds). It seems no one has those darn things right. They tell you they’re for this year and make but they never seem right. I’ve even used the round rubber for setting screens in windows and doors for the headlight buckets. You can get that in different diameter and it ends up sealing very well.
-
32' Oldsmobile Deluxe Convertible Roadster
chistech replied to chistech's topic in Our Cars & Restoration Projects
Finished off the mold tonight and will be shipping it out to my buddy joe tomorrow. Made up the four screw pins, the center plug, and four 22ga plates that get molded in to help add rigidity to the plate. I need to bore more holes through the plates so the rubber will hold the steel better and not separate off the steel. The reinforcement plate will be put in right after a bed of rubber is poured into the mold. The taper of the screw pins will hold the metal plate right at the perfect height and then the mold back will be added, then the whole mold filled with rubber. Looking forward to seeing the test pieces and hopefully all this work was worth it.


-
Jerry, my Olds has a similar tab that fits in a slot in the top of the bucket but I’m not sure if that’s the way yours are.
-
32' Oldsmobile Deluxe Convertible Roadster
chistech replied to chistech's topic in Our Cars & Restoration Projects
Went to the machine shop tonight and watched my buddy finish up his part of the mold. He milled the two beads and drilled the back half of the mold I made for the alignment pins. Now I just need to make up the four screw pins and the center whole plug. I am really amazed how close to the original piece this mold is looking.


-
Parts for 31’-32’ Olds are getting very scarce. I would suggest joining the antique Oldsmobile association and send out a mass email of your needs to all the 31-32’ owners like I did. I was able to locate virtually all the parts I needed for my 32’ doing exactly that.
-
32' Oldsmobile Deluxe Convertible Roadster
chistech replied to chistech's topic in Our Cars & Restoration Projects
Well, the caveman got it done today. The thing about a majority of machining is good old math and measuring. It was real easy to make the mold back half just working off of center with 3/16, 1/4, 7/16, and 1/2” end Mills. I used the undersized Mills to make the plunge holes and initial slots then cleaned everything up with the full size tooling needed. Going to clean up the mating face a little with just a red pad, will drill holes, and use alignment pins to mate this half to the other. Now I need to make the four screw plugs out of 3/8” aluminum round stock next. If the machine shop can get to the front half in the beginning of the week, there’s a good chance the mold will be finished by the end of the week so I can send it to joe for some testing.
-
My 1910 Mitchell "parts car" project
chistech replied to JV Puleo's topic in Our Cars & Restoration Projects
I have to admit joe, I would have just drilled a couple of holes in hardwood blocks instead of milling the Aluminium ones but I also admit it wouldn’t have been quite as much fun making them!😀 -
32' Oldsmobile Deluxe Convertible Roadster
chistech replied to chistech's topic in Our Cars & Restoration Projects
The mold is coming along now. The four perimeter holes for the pins to mold the screw holes are in and the center hole has been bored. The center hole is encircled with a round edge but it’s 3/16 rather than the 1/8” around the square perimeter. We made two test samples to determine the height of the 3/16” bead. The shallower one is .050 and the deeper one is .070. We are going with the .050 as it duplicates the original bead better to our liking. Both the 1/8” and 3/16” beads will be set up and done on the CNC mill. I will I’ll be starting on the very basic bottom half of the mold which is so basic, even a caveman could mill it!

-
The 31557 came in the standard and deluxe form both using the same numbers. 5 wheel is standard, 6 wheel side mounted is deluxe with some interior differences. I’m looking into the rumble seat if it was ever offered. You cannot correctly install a rumble lid in a trunk model Chevy like you can with a Ford A. There is a big difference in the lid, the hinges, and even the wood framework is different I believe. I’ll let you know as soon as I get an answer.
-
32' Oldsmobile Deluxe Convertible Roadster
chistech replied to chistech's topic in Our Cars & Restoration Projects
Meant to post this from last week. My buddy with the machine shop who likes doing parts of my projects with me did some work on my shifter closeout mold. Using the angled cutter I bought, he cut the bevels on the perimeter of the mold after he had milled the inside of center section cutout with a standard 3/4” end mill. The inner radius of the angle cutter matched the outer radius of the 3/4” end mill so that worked perfectly. He then radiused each corner of the ribbed plate I had made up for just light press fit. In this picture the ribbed plate is .100 too high in the mold so the back will be milled off the .100. Then a .125 ball end mill will be run around the whole mold centered on the parting line of the ribbed panel and outer angled part of the mold. The 2 3/8” center hole will be bored in the ribbed plate along with the four .375 holes that will be for the pins to mold in the screw holes. I will be making the pins, the center plug with a .125 ball end groove, and the whole 1/2” thick back of the mold. While the angle is not exact to the original, it will be better than anything available and one would have to get right on the floor up close to even see the difference.


-
REPORTS ON A 1914 HUMBERETTE RESTORATION
chistech replied to Mike Macartney's topic in Our Cars & Restoration Projects
I was thinking the same thing. It looks like there’s at least .375 on each end which should leave enough for a clip with a shorter pin. -
32' Oldsmobile Deluxe Convertible Roadster
chistech replied to chistech's topic in Our Cars & Restoration Projects
Some more pictures of the recent work described in the previous post.


