


RockinRiviDad
-
Posts
1,268 -
Joined
-
Last visited
-
Days Won
1
Content Type
Forums
Gallery
Events
Posts posted by RockinRiviDad
-
-
Stupid me, I never painted my rotors & calipers when I installed them. They started to rust
 so yea, I tore into that project & get looking nice with a little love...
Bad news:
As I got into this project I noticed more drama. I will have to pull receipts or look thru this thread to find out where I purchased my front end rebuild kit. This car only has 600 miles on it & if u zoom in to see the upper ball joints u will see that the rubber they use is JUNK. Its already frigin broken/cracked all the way thru the rubber...lower ball joints & upper control arm bushing same s#!+...
...never a dull moment in this journey...


-
20 minutes ago, Hazdaz said:
I haven't looked through the entire thread, but I am liking the results so far and those rims sure look familiar!
Warning: If u haven’t had a good laugh in a while then feel free to read thru my thread haha. U will see all the bonehead moves I’ve made in this process. I will be fixing all the pix soon too. This is my first build...its taking waaaaaay tooooooo looooong haha. I shoulda built a Nova haha
thank u for the feedback tho. Yes, our wheels are VERY similar haha. U have a sweet looking ride. Someday, God willing, I will have a sweet ride too haha
-
As u can all imagine, the motivational juices started flowing. I decided to clean/paint/install my clamshells (headlight visors). I did not install the headlamp motor yet. Come to think of it, I’ve had it boxed up in the shed & never even bench tested it. Hmmm...that might be a good idea huh haha.
I also got a hair in my butt & ordered some L.E.D. Headlamps from the super nice guys at Vintage Car L.E.D.s...kinda cool but not cheap...$189...they work great & the best part was they are “plug & play”


-
I forgot to mention I also bought the same type of wheel for my 4.5” angle grinder for the hard to reach areas. It also helped on some of the stubborn areas. But, as u can figure, the angle grinder leaves the swirl look similar to the DA grinder would. The drum/barrel style tool I bought leaves a brushed finished look. I had multiple people tell me to rock the bare metal look on the entire car haha. I like the look...but NOT on a 60’s era car. I think the 50’s era cars (& older) look cool in bare metal. NOT this car.


-
 2
2
-
-
UGH...I don’t know where to start...how about with an apology for dragging u guys along thru the longest build thread of the century...sorry

Happy New Year gentlemen. Time sure flies by way too fast. Looks like its been over a year since I posted any progress
I will be fixing this build thread. I like pix. PhotoSuckit ruined a ton of threads. Lots of work ahead of me there too
Bad news:
Back in August 2016 (post #238) I reported that I found what seemed to be a reputable bodyshop. Unfortunately, that didn’t work out. After 10 months of countless excuses from the shop owner I decided to give up hope on ever getting my car done by this shop. So I typed up my experience on Yelp. Yelp is a powerful tool haha. My review must’ve struck a nerve haha...truth hurts haha...the shop owner was so pissed that he couldn’t even call me about the review...he called my boss to cry to him about it claiming he wanted to file a formal complaint haha...
In the end, no money exchanged hands, no bodywork was ever done, no formal complaint, my car was never touched, time, money for a replacement hood/truck & tons of frustration was the outcome.
This whole bodyshop experience lite a fire under my butt...Tons of work to report...Some steps went forward & some went backwards. BUT I have NOT quit
Good news:
In previous pix u can see I have been rockin the Cheech & Chong color scheme for quite some time now. It was fun...the fun lasted for 10 minutes!! haha. Then I wanted it one color soooo bad. Since good shops are hard to find, I opted to do something about it myself. I bought a cool new tool to help me strip my rusty hood & trunk down to bare metal. No its not a DA as most people use. I wanted something better & faster. I was able to find monster wheels for it on Amazon which was cool too. The wheels it comes with are kinda small & super expensive.
The underside of the hood with all the bracing was hard to clean. I borrowed my buddy’s HF media blaster & went to town. The blaster had technical issues (combined with user error haha) & did not work very well. I got the job done tho.
Bad news:
Once the hood was striped, I hired a local jobber to spray it for me with the same lite grey epoxy primer I had on the doors & fenders. He convinced me to let him do the minor bodywork on the hood. It seemed easy enough. Well, in my inexperience of the bodywork steps, the sandable primer that he applied over the epoxy was a much lighter grey. So the goal to get my entire car ONE color was not looking good...again


-
Perfect.
I tried a new photo sharing site (Flickr). It’s either not very user friendly or I’m just getting old & cant figure it out.
I will try your route. Thank u
-
-
Heck!! What am I worried about? Let those thieving bastards take this POS…Maybe my migraine will finally stop haha
-
The dude in the video said that digital cameras have the same problem.
-
Ever since I saw this short video I try to be careful about posting pix. So I was using Photosuckit eversince. Now that option is no longer available.
Is posting our pix thru the forum a safe alternative vs using a photo sharing site? Sorry if this is common knowledge. But I mentioned before…I’m slow haha
-
Holy smokes is right!! I was just lurking on the forum today!! Did I set off a security alarm? Did u set up a virtual tripwire or are u spying on me haha. Just kidding.
Wow, life has a funny way of screwing up our plans right? I’ve been telling people I started my build 3 years ago haha…NOT. According to my build thread, I started 4 years ago. But I actually tore into my car months before that. I know I’m slow but we’re not quite at the 5 year mark haha. But I might be the oldest/longest build thread on here right? Do I get a trophy? Haha
I do have good & bad news to post as I have been inching along. But I wanted to post pics as well. Keep a lookout for my thread.
Are pics still a favorite here? Unfortunately, this ‘PhotoSuckit” deal screwed up most of the pix on my build thread. I wanna fix those pix & post new ones. Fixing the old pix is gonna take time. I am trying to figure out what route to go with posting pix.
What photo sharing site are u guys using?
Thanks for reaching out Winston. If i hadn’t been lurking I may have missed your post. Everything happens for a reason.
-
 1
1
-
-
??…good to know. Thx for sharing
-
DAMMIT!!!
Now I'm gonna have to remove cabinets &/or pull some of the wife's wall decor to make room for this AWESOME wall tattoo haha
thx for sharing...me likey mucho
-
4 hours ago, RIVNIK said:
Thanks, Clark's! Glad you were watching. If those items ever come back I'll be placing an order immediately!
X2
-
4 hours ago, RIVNIK said:
Thanks, Clark's! Glad you were watching. If those items ever come back I'll be placing an order immediately!
X2
-
There was an older gent who built them out of fiberglass & posted ads in the Riview. I bought one & my buddy bought two. He stopped making them after my purchase due to health reasons.
Ive been away for a while now but I can remember someone saying this old gent was back in business.
Worth a try…
-
U know I will.
Me likey posting my progress
In a sense, my build thread is a sweet journal. Just in case someone ever wants to buy my car I can direct them here
-
Thanks for reaching out boys...
Unfortunately, no real updates...Life has kept me busy...I do drive it a little...approx 300 miles on it now
With some pointers from Chris Nolan (thank you), I have tinkered a little bit on the car, nothing major...
Chris is right, my car is scheduled to start bodywork on March 1st...I'm excited about that
I decided to go with a different color than the Metallic Gunmetal grey that I posted on my build thread...
My new color choice is a lot lighter than the gunmetal grey
-
I agree this "Tim" has crazy skills. Let's all give him two thumbs up, the metals he deserves AND our money to make us all our own sets of wood inserts…only if he wants to get rich cuz I'm sure plenty of guys here would pay haha
-
-
On October 7, 2016 at 8:17 PM, Dialtone said:
Holy shnikees. I believe the last time I logged onto the forum your Rivi was on the rotisserie. ( yes i know it's been a long time since I logged in)
David keep on pushing forward, you might be a jerk, but not a quitter joking
Hey! What's up SoCal brother? I skimmed thru this thread to find that it's been 14 months since u checked in. Welcome back.
If I knew what I was doing I may have had this damn project finished by now. All I can pray for is that I get this car done WELL before u decide to check in again in another 14 months
")
-
4 hours ago, KongaMan said:
Why would someone paint the engine bright blue?
Probably for the same reason I painted my 65 Nailhead red...cuz I wanted to
As u can see on my build thread my car is far from finished. A co-worker read thru my build thread & offered 16k for my car as is. I turned it down. I'm beginning to regret that discussion

-
Damn, that blue shows nicely
-
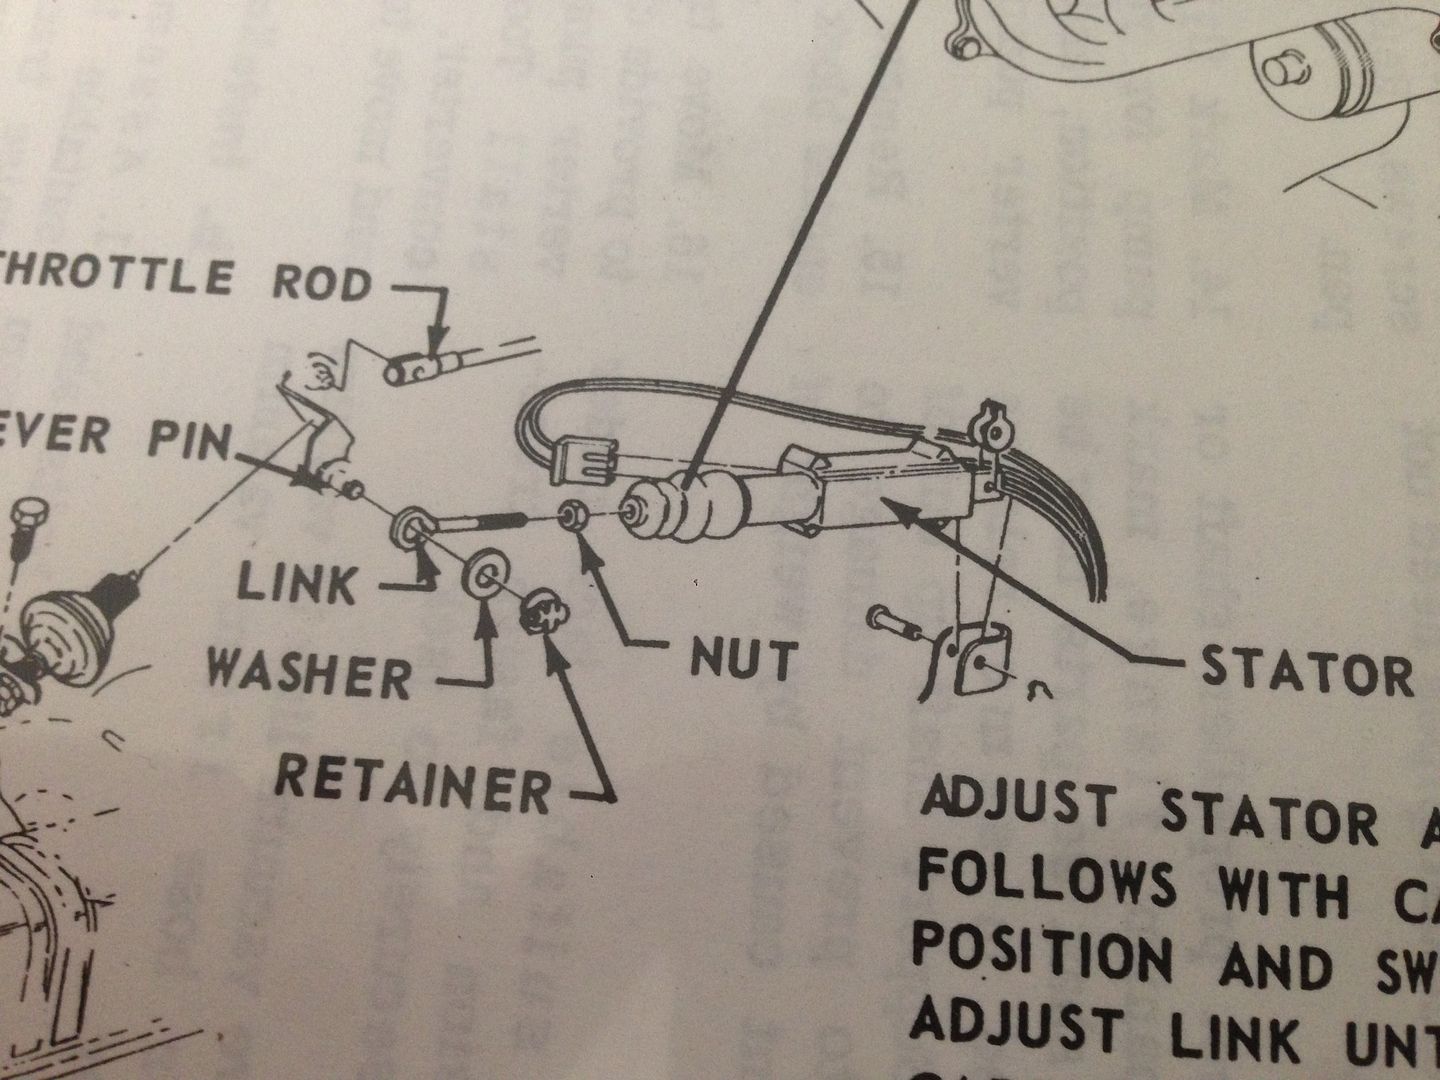
Haha...sorry to confuse u Ed. I was afraid I was gonna do that. But thanks for studying the pic & giving it your best guess. The retainer in your link is NOT a 65 Riviera retainer. Not sure if the 63-64 guys can apply such retainer.
Chris, maybe we are all a bit confused. In this pic taken straight from the manual it clearly labels the "retainer" that connects the Stator/Detent Switch eylet to the carb linkage. Is this the retainer u are looking for?
 so yea, I tore into that project & get looking nice with a little love...


My 65, another build to follow
in Buick Riviera
Posted · Edited by RockinRiviDad (see edit history)
Bad news:
I called my machine shop/engine builder guy to ask why they used steel freeze plugs in my heads. He didn’t know why. He agreed that only brass plugs should’ve been used. Well I sprung a leak. Luckily I at home when it happened. Another tough lesson I learned was that I probably should’ve taken my engine to Russ Martin in NorCal for a rebuild... .
.
U can see the cracks on my upper control arm bushings. Some cracks are almost all the way across
Good news:
I was able to remove & replace the plugs in my garage. It was a bit of a pain. But it coulda been worse right?