


RockinRiviDad
-
Posts
1,268 -
Joined
-
Last visited
-
Days Won
1
Content Type
Forums
Gallery
Events
Posts posted by RockinRiviDad
-
-
Not sure what happened here...it shows this thread has 85 views but no one replied??
I'm no expert & this may not be the "correct clip" u are looking for. But this is how I have mine hooked up...does this help??
-
On September 6, 2016 at 1:12 AM, fatbuick said:
I've had time to look through your restoration. What a great job. Look forward to seeing more progress and realise now you already have disc brakes.
Thank u & likewise. Your car looks amazing.
I do have disc brakes in the front now. But totally like how Jeff (JRRivi64) did the rear disc conversion too. I may end up with that set up too
-
1 hour ago, telriv said:
Just use a "Newer" 808 box from a '70 up. Even a Caddy variable ratio is a bolt-in.
First I've heard of such a great life hack…I'm in.
Thx for the tip…
-
Damn I LOVE that black sheen on the chassis...I love it so much I may strip mine down & do it over...can I use a mulligan?
I obviously bought the wrong paint

Did u have your steering box rebuilt to the quick ratio specs?
loving your work broseph...keep it up...
-
20 hours ago, Schmiddy said:
You can find some additional explaining pictures in my flickr Albums here (specially under the section "Wood Applications" and "Doorpanels"):
https://www.flickr.com/photos/142025655@N08/albumsHave fun!
Great pix...great work...thx for sharing...
Questions: were the thin gauge metal inserts that u cut also installed/adhered behind the wood veneer? If so, what is there purpose? Or did u use them only as a template to cut out the veneer?
-
 1
1
-
-
On 9/6/2016 at 0:52 AM, fatbuick said:
I enjoyed your explanation. Very easy to understand
X2
-
YES!!!
Where's my 5 bucks Chris? I told u Jeff would be back haha JK
")
Glad to see u back in the garage Jeff. Looking very nice.
-
WHHHHAAAAAAAATTTTT?!?!
Your build has been an interesting & exciting journey. U were faced with some serious ups & downs. But u finally ended with an awesome outcome. U summed it up the best "Resurrected from the grave" indeed. Good job brother, hats off to u, much respect for seeing it thru...your work ethic is a big inspiration to me...thx for sharing & good luck. Hope it sells HIGH haha...that would be good for all Riv owners...it may not be the same as your neighbor paying big bucks for the house across the street. But getting good money for your Riv sure would be a home run in the Rivi Lovers Handbook
Words I couldn't have said better:
2 hours ago, Seafoam65 said:Man that's a lot of work to do just to turn around and sell it the moment it's finished!
2 hours ago, steelman said:Really enjoyed following along on the build.
25 minutes ago, lrlforfun said:It's such a combination of organization, skill, energy, tenacity...many of which I struggle with. You, on the other hand have demonstrated much higher levels of each item.
Good luck at what ever choice you make
Here is the link...I'll be watching...well, we all will be haha
http://pages.ebay.com/link/?nav=item.view&alt=web&id=162203251849&globalID=EBAY-US
-
@ Snake: Thanks for the advice Greg. I actually spent this past week reading up on this fabulous ST400. My car already has the toggle switch installed under the dash. Both wires from the toggle switch were coiled up under dash. ?? Weird. Did I do that? I couldn't remember were these wires were suppose to be connected to. Now I know, thanks for the info. Now I question if I ever actually used the VP back when I was driving this car. It's only been 20+ years ago
.
I have only clocked 85 miles on this rebuilt engine. It sounds like I should probably wait until I reach the suggested 500 mile "engine break-in" range before I reconnect this VP toggle switch. Otherwise, I know myself, I may be doing the one wheel squeal all over town & end up with a broken engine...again
 .
.
-
Here is some good info on bushings for the 1st Gen guys. Don't know if this applies to your '70
-
I also accidentally stumbled on the fact that our brake lights & turn signals don't work unless ignition key is on. Engine shouldn't need to be running.
I bought all metal replacement taillight sockets for my 65 at the "help" section of my local Pep Boys. I didn't like the plastic sockets pictures above. Those only have two grounding tabs. Adding ground wires fixes that or just buy the metal sockets which have multiple all metal tabs.
That plus using Chris' (Alini) contact cleaner & cycling the turn signal switch advice fixed my problem.
Be careful with that contact cleaner. As Chris mentioned, make sure it's dry (blow it dry with air nozzle) before u turn ignition key on to test them. I think I popped my fuse that way.
-
Damn! That is one clean ride.
Good job! Congrats!
My only hope is that my build comes out half as nice as yours. Ok, maybe not half. I'll settle for 1/3 as nice as yours
cuz I wanna drive mine haha
-
This thread is about the 65 front grill. Wrong place for a seat question. U can start a new thread & you will get responses related to your issue.
-
Are the studs suppose to come off? Every single one of mine stayed on the grill.
-
If cleaning equals metal is left unprotected I would paint it…
-
-
On August 24, 2016 at 0:34 AM, bodayguy said:
You lose all the circular design in the stock ones.
The 65's don't have the cool stock circular accents in our gauges that the 63 & 64 guys have. Guys with the 65's wouldn't "lose" much. But we would gain a lot if u don't mind swaying away from original.
…I don't mind
-
1
-
-
In my struggle to figure out where to mount aftermarket gauges, searched online for ideas. Then, a few months ago I stumbled upon those gauges also. I had never heard of Dakota Digital. But who am I…nobody. That pic is a little deceiving. I originally thought u get what u see pictured. NOT. They are selling ONLY the gauges, wiring & computer module. Like Ed said u reuse your bezels to secure the new gauges into your existing dash. They are a little pricey. But in my opinion that's money well spent.
I googled reviews on their products & people seem to be happy. Since my original search peaked my interest, now I seem to see Dakota Digital logos & ads displayed on TV shows I watch & magazines I read. Go figure. I'm guessing they've been around for a while I just haven't had an interested for gauges & now I am.
Now to answer your question: have I seen the gauges in a car? YES. To top seeing Dakota Digital ads everywhere my neighbor built a sweet convertible 67 Camaro. One night he pulled up & asked if I wanted to take a drive. Of coarse, I jumped in & DAMN that car is fast haha. It turns out he's got those exact gauges & he loves them. Well, I didn't measure them to see if they are the exact same size. But to my eyes they look identical.
A cool detail he shared was that when the gauges want u to know something important is happening (i.e. low oil, high temp etc) there are bright red LED lights that flash to get your attention.
With the little bit I've learned about these gauges, I'm sold…I will probably end up with a set
-
…I can't wait haha…I'm almost there with my build
-
1
-
-
4 hours ago, coOverwatch said:
are you going to do a two tone or graphics on your Riv? or just one solid color? been trying to figure that out for my 64.
Thx guys
The one good thing about my car is that I basically started with a complete car. But thx for offering parts. I will let u know if I need anything. This is the right place to sell your parts. U should've have any problems with that
The Chip Foose two tone paint jobs look cool. I've seen plenty of Rivi's with that style paint & they look amazing with the right color combo's. But my Riv will receive a solid color on the whole body. Trying to keep it simple & tasty haha
-
1
-
-
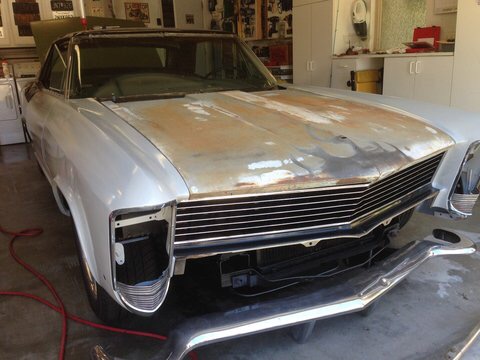
Edit: one important note I forgot to add was a big THANK YOU to ROA Ventura County Regional Coordinator "Leroy Pickett" he gave me the replacement hood u see in the pic. He even threw in the custom flame job also for free haha. Thank you sir!
@ Winston: Thx, I needed some garage time haha feels good…My color of choice has been a metallic gun metal grey. Then I saw the 2016 Challenger on the road & caught my eye. The color is called Granite Crystal. Obviously, this pic doesn't do the metallic any justice but wait until u see one on the road if u haven't already.

-
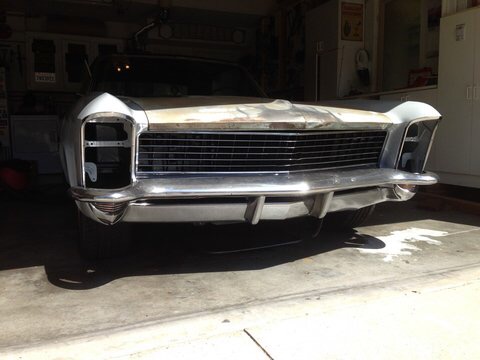
I have good news and bad news to report. I know this has become a long long long build thread...Sorry. I didn't expect this either. But at least I am making some sort of progress & I too have not quit
Good news:
1) I have finally chosen what seems to be a good body shop to work on my car. I have reserved a spot in their shop for the end of this month. Aside from the good work I've seen them put out a cool detail about this shop is, like Jason Z said, they only asked me to pay as work gets completed. I really like that. They will only do the bodywork & I will use my cousins booth to spray it (not sure if I will be spraying it or if I should just hire his painter...will keep u guy posted)
2) I was able to take two weeks off of work. One week for the family vacation & one week as a working vacation in the garage to put my car back together for the shop to see what goes where & how. My theory is to have the panels in place & have them align them for me & get the gaps right. Chip Foose & Gas Monkeys make this part look easy. Taking my car apart 3 years ago was easy. But putting it back together took lots of help from multiple ratchet straps, my floor jack, jack stands & my son pushing/pulling just to get bolt holes to line up haha
3) Car now handles well, runs strong, I got 10+ miles on her.
4) Chris Nolan (Alini) has helped me sort out lots & lots of details (brake light/turn signal/running lights, window tracks/motors, exhaust, door skin removal, fuel gauge, seam sealer, grounding engine/electrical, etc...)
Thank u Chris for the time u take to help & for the motivation your sweet Rivi brings
Bad news:
1) The sand blaster with 30 year experience that I hired claimed that he has never had anyone complain about warped panels after he was done blasting sheet metal. This statement came after I told him about the horror stories I read online where people experienced warped panels. I was so happy with his work as u can read in an earlier post. Especially since he got it done in one day. After I coated everything in epoxy primer u could see the crazy warpage on the hood & trunk. So I had to spent time & money sourcing out replacement parts

2) Having fun hot dogging my bucket of bolts around my block with no front clip is one thing. The extra weight over front suspension after I installed the front clip had me fearing for my life when I drove it. The car was all over the road. I called an alignment shop & limped it over there. This damn shop had to keep my car overnight in order to get my alignment right (not the cars fault, young alignment kid didn't know what he was doing). All good now. A detail I failed to see while my car sat in my garage was both front wheels were toed outward causing each wheel to fight each other when I drove it. Yes, I know I could've totally fixed that myself & drove it safely to alignment shop...but remember, this is my first build. My eyes were glazed over by what looks like a car taking shape in my garage & I totally missed the wheels being toed out.
3) Rodded radiator has a pin hole in it near the cap. Not leaking fluid thru it but it seems to be steaming out thru the the pinhole. That plus my water pump leak is causing a slight overheating issue when my fluid gets low. Water pump will be replaced with a FlowKooler pump in the near future.
thanks for watching haha


-
2
-
-
Sorry...I am not much help...I have a similar issue...I've been told it may me the cause of a bad/faulty ground?
I will 'sub' to this thread & wait for other responses...
good luck...
-
On August 7, 2016 at 10:59 AM, buick-riviera.pl said:
Where the 4th is going to ?
Front control arms (1 bushing per side)
-
1
-


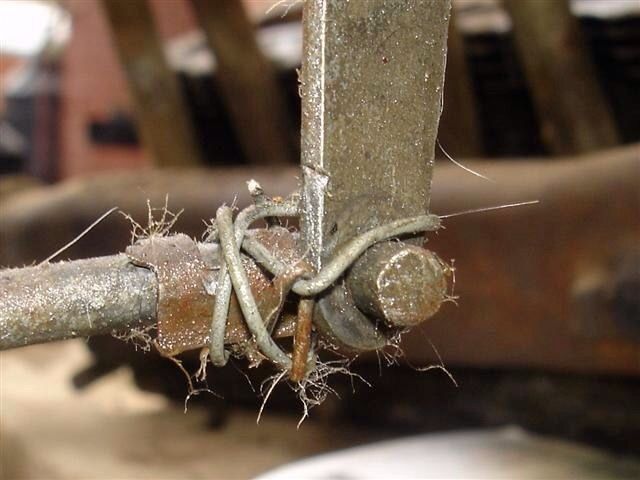
What is the correct clip for the throttle kickdown
in Buick Riviera
Posted
I'm just kidding...sorry...I know that wasn't funny & I know it didn't help brother. Here's a slightly better answer.
I am still struggling with the proper name of the kick down switch (which I think the book calls the Stator & Detent Switch) & switch pitch switch (which the book calls Idle Stator Switch). My crude description is probably all wrong so excuse me if I am confusing others...anyway that is material I should ask in a separate thread.
To get to the point, I hope u are asking about the clip that secures the silver boxy thing next to the carb. If so, the book shows a clip called a retainer...I don't have such retainer but here is a pic of something similar to what the book shows.
Hopefully, someone with the right retainer can pop their hood, snap a pic & post the pic here for us to see