


Roger Zimmermann
-
Posts
3,129 -
Joined
-
Last visited
-
Days Won
24
Content Type
Forums
Gallery
Events
Everything posted by Roger Zimmermann
-
Some people here do know that I'm building scale models. I did not a lot: a 1963 Studebaker Avanti R1, a 1966 Olds Toronado and a 1956 Continental Mark II. Each model is taking a very long time as they are scratch built; I had 9 years for the last one. When I was finishing the Mark II, I was thinking that it would be the last model. Fortunately, I'm still able to do something, but I will not tackle a 10 years project. Slowly came the idea to do something with Cadillac. One, if not the most prestigious model, was the V16. What I intend to do is a 1:12 scale rolling frame with the engine/transmission/suspension and steering. I would limit the MY from 1930 to 1933. 1934 have an independent front suspension; I have enough models with that type of front axle. My issue is to find enough documents/technical drawings and/or pictures to be able to conduct this project. Of course, dimensions are a must and I hope that one or more viewers have informations or could tell me who has some. If costs are involved, there is not a problem. Once, there was a V16 in Switzerland; I will have to research if the car is still in this country but most probably I will not be able to take from it all what I will need. Usually, shop manuals from that time have nice drawings from the mechanical features; this would be something to consider. Who will cooperate? Anyway, thanks for the help! For those who did not see my topic in the general forum, I'm adding some pictures from the Mark II model. I asked recently the same in the Cadillac LaSalle forum.


-
 Translated in the metric system, it's about 0.12mm "wobble" . I'm wondering how precise those assemblies were when new. Anyway, I appreciate all the work you are doing on that machine.
 -
1950 Crosley Farm O Road Restoration and more
Roger Zimmermann replied to dalef62's topic in Our Cars & Restoration Projects
It seems that the dog like it! -
Roger's handcrafted 1:12 scale models
Roger Zimmermann replied to Roger Zimmermann's topic in Our Cars & Restoration Projects
Even without updates, there are still a lot of people looking at this thread; I'm really surprised. The story will continue next week, if the paper load accumulate during 3 weeks is allowing it! -
Mike, sorry if I was absent with comments for a long time. We are now in vacation; yesterday, the temperature was above 44°C. The best place to stay was at the beach!
-
Roger's handcrafted 1:12 scale models
Roger Zimmermann replied to Roger Zimmermann's topic in Our Cars & Restoration Projects
Even if the glue was old and not very well applied, boy, the old leather is hard to remove! The seat's modifications are done with 2 components filler. All the desk surfaces are covered with filler dust! In the second picture, the rear shelf and seat base are ready. I just have to glue the leather, which I don't have yet. In the background, a picture from the real seat. How they look like into the model. The rear shelf is not yet installed. For practical reasons, it will be glued at the body. Of course, when the time will come to glue the new leather and perform the paint operations, everything will have to come out again.


-
Roger's handcrafted 1:12 scale models
Roger Zimmermann replied to Roger Zimmermann's topic in Our Cars & Restoration Projects
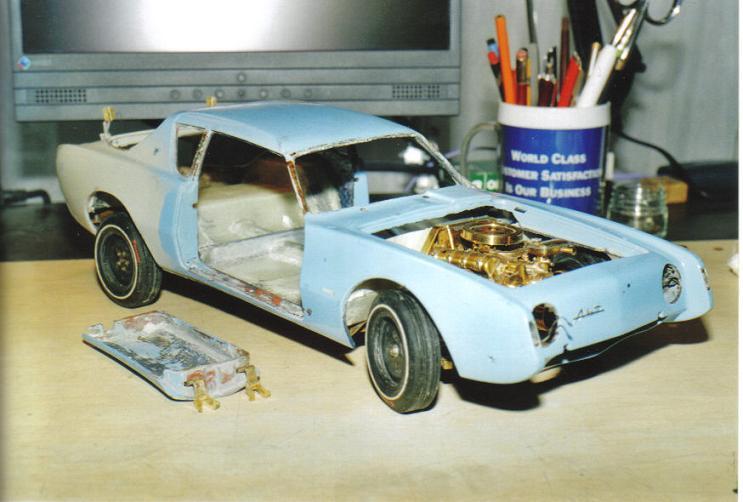
Friday, Dec. 29, 2006 Today, I'm showing some parts wich are now scrap; first picture. At that time, I kept them for a while, as you never know...One is sure: the windshield's chromed molding will not be used again as the shape of the opening was modified. Even the steering wheel will be replaced. The shaft was a Meccano part, replaced with a new shaft of better proportions. As I wrote earlier, the trunk lid and hood are new; their shape is a better reduction of the original ones. The round lid in th background is showing the color I choose for the model. On the screen, the difference is not obvious. It's a turquoise paint for a Volvo (don't remember from which model and MY), very similar to the Avanti paint. Anyway, some parts will be used on the new version, most of the time with some modification. the third picture is showing the rear seat bottom and the rear back rest. The red leather was not very well glued, the shape was irregular and the profile too flat.


-
1950 Crosley Farm O Road Restoration and more
Roger Zimmermann replied to dalef62's topic in Our Cars & Restoration Projects
They are looking like toys! OK, large ones, but toys anyway! -
So a small engine and so complex...I hope you will not be upset: typical English!
-
Roger's handcrafted 1:12 scale models
Roger Zimmermann replied to Roger Zimmermann's topic in Our Cars & Restoration Projects
Saturday, Dec. 09, 2006 Another view form the frame. Emergency brake, suspension and steering are operational. In that first picture, the frame is under the body, attached to it with screws. The rear of the body was already modified. The restauration work is slowly going on. We are maybe still in 2006 or early 2007. On the second picture, new hinges are fitted to the door. If we could have a look faced to the front, we would see that the body is too flat between the front fenders. On the last picture, I'm doing the "A" pillar in brass; this time, they will have the same dimension!

-
1952 Studebaker Commander Starlight Coupe
Roger Zimmermann replied to Eric W's topic in Our Cars & Restoration Projects
That refreshment is doing justice to that car. I like it! -
Roger's handcrafted 1:12 scale models
Roger Zimmermann replied to Roger Zimmermann's topic in Our Cars & Restoration Projects
Early 2002, GM decided that they had to reduce the number of employees in Switzerland. At that time, I had a good contact with a colleague from the management; this may the reason why I was among the people who had to go as he knew that I expected an early retirement. Around Easter, I was told that I would leave the company at the end of September. The conditions were not too bad, about 50% less revenue as when I was active, but zero stress and the possibility to do what I wanted. I could only say thank you! Autumn arrived, the early retirement too. The company promised that I would get some German to French translation to do and effectively I got some for some years. Therefore, I was not totally jobless but I had more free time. When my new condition settled (it's nice to sleep really longer!), I had a look at that Avanti model and was thinking that some "cleaning" would be a benefit to it. We are in 2003, the begin of a new adventure! I really don't remember with what I began in 2003. I remember however that the general idea was: - replace the wheelcovers, the existing ones were bad looking with the time - repaint the model with a more pleasant color, more in line at what was offered on the Avanti models. I very soon found the new paint: a turquoise from Volvo! I did the first trial on March 3, 2003! - replace the leather stained by the contact cement used more than 35 years ago I remember when I took the dash panel assembly and slowly the idea came to do another frame. When I began it, I noticed that the width at the back of the model was excessive compared to the original. Stupid as I am, I decided to reduce the excessive width only 50% to avoid a too heavy rework at the body. Once the frame was done, I saw that I could not do a rear axle without a drive shaft. However, this drive shaft must have some connection at the other end, it cannot be held in the air! Consequently, I did a transmission. And at what this transmission will be attached? OK, go ahead and to an engine! Once the engine was done, I saw that it was no ore possible to close the hood. Like the rear, the front end was too broad and too low. Therefore, bye bye the hood and the filler between both front fenders! By going from the rear to the front of the body, I saw that the roof was 2mm too low on the right side. An other problem which plague me for a long time: the windshield's rake was incorrect. To modify that, new "A" and "B" pillars were needed and the roof at the front had to be elongated. The doors had not the same length. The hinges were cemented at the door and at the body; it was a good opportunity to do new ones attached with screws on door and pillar and to correct the length of the doors. While I was correcting the width of the rear of the body, I saw that the shape from the model is not at all similar to the real car. As a consequence, the trunk lid was discarded and the rear of the body deeply modified. At that stade, I regretted my option to modify only slightly the width of the rear, but it was too late, I had to continue and hope that it would not be too obvious. With a new frame, the existing floor did not fit anymore. So, the old one was cut and a new one made with resin and fiberglass. It's now easy to understand that it was no more a refreshment but a reconstruction. What did I kept from the old model? Just a few elements: - the doors, just corrected for the length - the outside door's handles - the front fenders, just heated a bit to have a narrower front end - the roof, elongated at the front - the rear window All the other parts will be scrapped. As I was not visiting any forum during the first part of the reconstruction, I did unfortunately no picture during the construction of the frame, engine and floor. I do regret it now. I just did pictures from the finished frame and engine.


-
Roger's handcrafted 1:12 scale models
Roger Zimmermann replied to Roger Zimmermann's topic in Our Cars & Restoration Projects
Even if almost nothing was left from this model, it had following specifications: it had a working suspension and steering but no engine. Instead of a nice V8, there was a battery box for the headlights, tail lights and inside illumination. By pushing the brake pedal the stop lights would illuminate; it was the same bulb as for the tail lights, but with 3V instead of 1.5V. The trunk had a remote handle to opening it, similar to the real car. The hood could be opened by pushing the clutch pedal, and the side windows were opened/closed with the inside handle. The outside color was an unfortunate baby blue; the choice of spray cans was very marginal in the sixties or I was not looking at the right places! The wheelcovers are good looking on the pictures; they were made with resin and sprayed with a silver paint. The rear window was made with Plexiglass, this window was used without modification for the last model's version. Most chromed parts were made with brass (already!) and chromed. The door's handles were used with a slight modification for the last version. -
Roger's handcrafted 1:12 scale models
Roger Zimmermann replied to Roger Zimmermann's topic in Our Cars & Restoration Projects
During the construction from that model, I felt less and less comfortable with the frame's look. In between, GM had a contest for scale models, similar to what was done in the USA. I registered and the benefit was a set of wheel and tires made with hard rubber much more suited than the Meccano wheels. The new wheels and tires required a frame modification to fit. I cut the frame aft the front wheels, creating a front suspension more in line with the Studebaker look/design and I did also a new steering box approaching the original one. some cosmetic modifications were also done to the frame, but the basic was still there. The first two pictures are showing the "new" frame; I took that picture much later, in 2003 during the reconstruction from that model. The discarded front end is on top of the photo; I still have it as well as this primitive frame. Souvenirs, souvenirs! The model was most probably finished around 1966; it's good looking in pictures even if there were many, too many errors.


-
Roger's handcrafted 1:12 scale models
Roger Zimmermann replied to Roger Zimmermann's topic in Our Cars & Restoration Projects
That the reason why my bodies were made with cardboard! There were interesting constructions to do with the Meccano (and I did some) but for cars it was not realistic. I cannot resist to show those old frame and suspension pictures when somebody new to scale model is claiming that he (I was never confronted with a girl/woman doing scale models!) cannot do progress quick enough. The beginning is always a little bit hard! Unfortunately the Chrysler model did not survive an attempt to give it a real frame and suspension; it was destroyed more than 40 years ago. -
Roger's handcrafted 1:12 scale models
Roger Zimmermann replied to Roger Zimmermann's topic in Our Cars & Restoration Projects
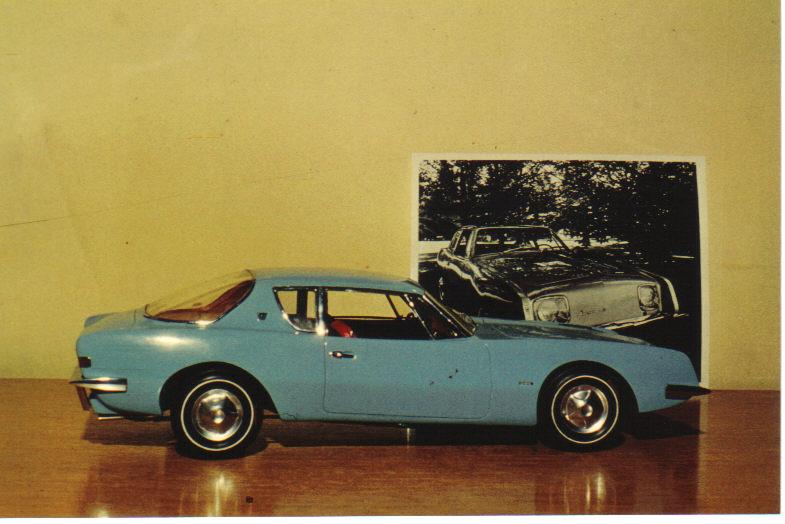
As the Toronado is now ready (the back window is glued), it's time to relate the story from my first real model. All what I did before was dictated by the frustration not having toys detailed enough with, for example, opening doors. The story about my 1:12 Studebaker Avanti Since a boy, I was always fascinated by cars. There were some cars in the small village at the countryside where I grow up, especially VWs (I will never understand why this ugly thing, noisy, unpractical was sold in such quantities). I believe that one of both grocers from the village had a early fifties green 2-door Chevrolet; this was probably the king of the village! Ironically, my parents had no car et never had one. If by chance a Studebaker was parked at one of both cafés from that 300 inhabitant's village, I could stay hour(s) to look at it. The 1950 model was the one which started it all. We are going forwards for some years: in 1963, the Studebaker Avanti was shown at the Geneva Show; I'm sure that I was a nuisance for the stand's personal as I could not away from this stand! I will not relate here all my attempts to recreate cars during my youth using cardboard and a frame done with the Meccano kit. The last vehicle done with this hybrid material was a 1963 Chrysler. I did for this model an innovation: by wetting the cardboard, it could be better shaped in both directions at once. This is the first image. After the Geneva show adventure, I had to replicate this Avanti. At that time, I was 18 years old; my father, a wood worker, had not the right tools for my needs. Anyway, I began to do a frame using as a guide the image from the sales catalog I reluctantly got in Geneva. My father had some galvanized sheetmetal; I used that for that frame. Why did I choose the scale 1:12? Probably because the available skinny Meccano wheels were suitable for that scale. The construction went muck quicker than what I did in the recent years; there were less details and the resemblance was...marginal at best! This is the second image. I was proud from my front suspension and steering system miles away from the reality, third picture. The main idea was to do again a body using my "new" technique with wet cardboard. However, one of my colleague at the apprenticeship told me that I would get much better results using polyester and fiberglass (he was living in a town and me in the countryside, what a difference!). It was totally new for me and I had to do my experiences with that product. A small story about it I still remember: the instructions stated that it was important to have about 25°C to allow the polyester to set. I waited that my parents went away a Sunday afternoon to heat like hell the furnace in the living room using wood to get the desired temperature, even more, for my first experience. As it was probably autumn or winter, all windows were closed. I still hear the exclamations from my parents about the heat and the bad smelling when they came back! I learned quickly enough that a positive mold was necessary as first. Then, as a second step, a negative form should be done using the positive mold. Finally, the negative mold is to be used to get the final part. How easy it was with cardboard: not overheating needed, no bad smell and quickly done! How could I do the positive mold? I choose probably by accident the plaster. Not the one used by the sculptors but the cheap one to do walls and ceilings! It's easy to work with once it's dry (sometimes too easy) and it's doing a lot of dust. This later aspect was not important, the shop from my father was full of wood dust. A little more did not matter. The fourth and fifth pictures are showing the plaster. Me at work, probably 1965 or 1966, sixth photo. The first result can be seen at the last picture.


-
1952 Studebaker Commander Starlight Coupe
Roger Zimmermann replied to Eric W's topic in Our Cars & Restoration Projects
It's not easy to sand runs! Anyway, you have to wait a very long time to have the paint cured completely. As the guy who painted the car was generous with paint, the danger to go too deep is marginal. Anyway, your car is much better looking than before! -
Roger's handcrafted 1:12 scale models
Roger Zimmermann replied to Roger Zimmermann's topic in Our Cars & Restoration Projects
As noted previously, the transmission is hardly to operate with the shift lever. Is a look inside the transmission useful? Who knows… The 13 screws were quickly removed; I just noticed that I did a gasket with blue RTV material, a product I do hate since I restored real cars. The transmission itself is very simple: a group of gears is sliding on the output shaft, allowing reverse, first and second gear. They are moved with the help of a cart, guided with two rods. The problem is at the steering column; I noticed during installation that the tube for the transmission is not moving freely. To improve it, I should remove again the steering column, carpet, dash…Sounds “déjà vu”! As it makes no sense, the transmission pan was installed again, and the gear put in neutral. I still have to glue the back window (not a big deal); I can say that the Toronado is now completed and ready to sleep another 50 years!

-
Roger's handcrafted 1:12 scale models
Roger Zimmermann replied to Roger Zimmermann's topic in Our Cars & Restoration Projects
Even if I have no update to publish, there are still people looking at this thread! -
Thanks Chris! Yes, I still have it; however, if somebody is coming and want to buy one of the 2 cars I still have (this Biarritz and the '57 Brougham), I would let it go without regret. The work on those cars was what interested me at the first place; to drive them with our crowded roads is not always pleasant; this is the reason why I put between 100 and 500 miles on them each year. I drove much more in the eighties when my '56 Sedan de Ville (now sold) was ready. I was younger too!
-
Thanks! Unfortunately, not so detailed as Mike's thread!
-
Thanks Spinneyhill! However, it went not without difficulties and some pocket change!
-
some more.


-
Once the car was ready, it was time to enjoy it. Unfortunately, it did not went that way: I had trouble with the engine: when it was cold or just warm, no problem. I could drive a long distance, as long as the speed was high enough. If I wanted to restart the engine after one hour, he would come immediately, but he had no power. One day, the engine even stalled while driving at about 50 miles/hour! I believed that it was vapor lock and all my efforts to solve the problem were made in that direction. I even let install an electric fuel pump, without much improvement. 2 of my friends owning '56 Eldorados had no problem with them; I had myself no difficulties with my '56 Sedan de Ville; just this damned Biarritz was a nightmare. In 2006, I had enough. I asked a garage in the region if they would help me to find a solution. as they deal mostly with Packards, I was sure they could help. At the end, they found that the intake manifold was sucking false air, then the new ignition coil was bad as well as the battery! Since the repair, I drove a long distance under a difficult situation without problem. Now, I can really enjoy it! Really? During the restoration work, I bought a Pertronix ignition system. One year, when I took the car out of its hibernation, I had a similar condition as when the intake manifold was warped. Same problem again? I asked around if that issue could come back; among them I asked Daytona products. I got a very interesting detailed answer; something was interesting. “It may happens that cars fitted with a Pertronix system may develop a similar condition” The next few days, I installed again point and condenser: the engine ran never that well! I immediately throw away that electronic system and never thought at it again. Some pictures from the finished car are attached.


-
You see, Mike: you have the ability to play with cams and pistons; something I would not dare!


