


Roger Zimmermann
-
Posts
3,129 -
Joined
-
Last visited
-
Days Won
24
Content Type
Forums
Gallery
Events
Everything posted by Roger Zimmermann
-

Scale model 1932 Cadillac V-16
Roger Zimmermann replied to Roger Zimmermann's topic in Cadillac & LaSalle
Alex, why don't you show your project, here or on the Cadillac LaSalle forum? By the way, looking at the parts book is very interesting, but a bit boring!. Even if the engine stayed the same for many years, there are changes between generations (A, B, C, etc.) Finally, even if few parts are identical, some are the same, no matter if the engine is a 8 or a 16 like steering knuckles and front hubs. Water pumps from models 370 A, B, C are the same as V-16 A and B. Maybe other small parts too, but of course, with 4 cylinder less, the main parts are different. -
Roger's handcrafted 1:12 scale models
Roger Zimmermann replied to Roger Zimmermann's topic in Our Cars & Restoration Projects
Sept. 24, 2007 Just for the fun, the completed rear seat is installed into the model. The driver seat is installed too. It’s evident that the seat back can be tilted but, like the on the real car, it’s not adjustable nor locked in place The whole inside trim will have to go out again for the paint process (in one year maybe?).

-
Roger's handcrafted 1:12 scale models
Roger Zimmermann replied to Roger Zimmermann's topic in Our Cars & Restoration Projects
Yes, Mike, I did it that way. Maybe two thin brass bit soft soldered together to have more rigidity, but I'm not sure. Then of course, the word was soft soldered on the base. Compared what I did more recently, I'm almost sure that I could do better. The lazy way it etching, (or 3-D printing) but, in my opinion, it's too easy, dexterity is not required with that chemical process. -
Roger's handcrafted 1:12 scale models
Roger Zimmermann replied to Roger Zimmermann's topic in Our Cars & Restoration Projects
Sept. 22, 2007 Even during summertime I could do some small things for the model. The original front seats were completely incorrect; I began almost from the ground up. The way the seats were adjusted did not please me anymore, therefore, I did « quickly » two new ones. The rails are moving on two balls each; the lever is allowing the seat to be adjusted on an adequate length. I could keep the original seats but with many modifications. Here is the result; the second seat is still covered with the red leather. The excess glue is hardly visible on the picture. That red leather will be soon taken away and the plastic basis modified to look like the first seat. Then the turquoise leather will be once glued.

-
Roger's handcrafted 1:12 scale models
Roger Zimmermann replied to Roger Zimmermann's topic in Our Cars & Restoration Projects
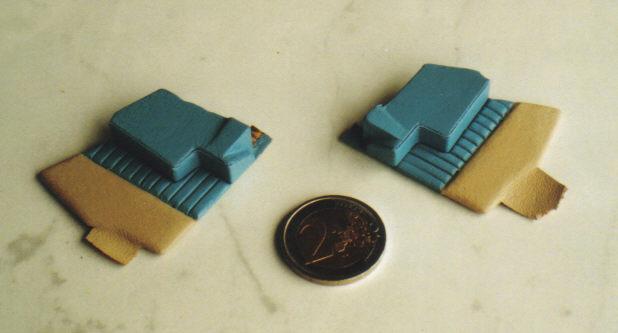
July 25, 2007 Sometimes it can take a long time but it happens. I did for a long time pictures the traditional way with negatives etc. Now, I will get a digital camera! It will be shared (this was the plan but it went differently) with Christine, she takes the opportunity to learn how to use it. We did a try, here is the result. On a PC screen, that word « Avanti » is not very well done. In reality, it’s 10 mm long (0.4 »). The space between the characters is too narrow to use a file and rather prone to be bent while doing it. It will be chromed later; the base will be painted fawn and the outside of the console covered with turquoise leather.
-
Roger's handcrafted 1:12 scale models
Roger Zimmermann replied to Roger Zimmermann's topic in Our Cars & Restoration Projects
No, not yet! Somewhere I have a giant Euro, but no US quarter! -
Roger's handcrafted 1:12 scale models
Roger Zimmermann replied to Roger Zimmermann's topic in Our Cars & Restoration Projects
June 06, 2007 With analog cameras, pictures cannot be shown until the negative roll is completed. Here are some, with comments. I had the leather and I had the paint for it. It was time to see how it would look like on some trim parts I could rescue and modify. On the first picture, the part on the right side is the unfinished LH quarter panel. To simulate the stitching, thin leather bands are glued on the hard surface. The end result can be seen on the part at the left. Second picture: Both trim panels are ready, together with the arm rest. A chrome trim will be inserted between the blue and fawn leather; an ash tray will be inserted into both armrests. The excess leather will be glued into the quarter window aperture during the final assembly. Third picture: I could not resist installing temporarily the quarter trim panels and the seat bottom. The rear seat back rest is still uncovered as you can see. The leather work is requiring a lot of attention and concentration. From time to time, I need to do something else; this time, I began the front bumper. The fourth picture is showing all the necessary parts. For various reasons, I had to redo the central part four times! The supports will be black painted, the 3 main parts will be chromed and both rubber pads will be flat black. I’m using large screws for that assembly: 1 and 1.2mm screws. A view of the front bumper, ready to be installed, less the plating. The main supports are rather easy to assemble at the frame rails; the bumper ends are attached to the front fenders with one screw each side; they are not so easy to install on the model, but it can be done. The front bumper is installed on the sixth picture. As I was in a good mood with the bumpers, I began the rear one. For practical reasons, I had to do some changes compared to the original set-up: the original bumper is attached to the frame with brackets and the bumper ends are attached to the fenders from under the vehicle. This method was just not possible on the model; I did following changes: the vertical bumper guards are attached to the main bumper with concealed strong supports which are attached at the frame underside. The bumper ends are attached to the rear fenders with screws installed from inside the trunk. To change a bit the work, I began to rework the dashboard. On the next photo, it’s ready to get covered with leather. The last photo: this is the covered dash. The picture quality is disputable; I will try to do better the next time! The next things to come: doing the tail lamps apertures into the body.


-
1960 Pontiac Bonneville (Maude)
Roger Zimmermann replied to AURktman's topic in The Unrestored Car Appreciation Forum
As you don't know what is under the cover (both regulators are probably not done exactly the same way), I would try to install the new regulator. -
Scale model 1932 Cadillac V-16
Roger Zimmermann replied to Roger Zimmermann's topic in Cadillac & LaSalle
The ordered manual copies arrived yesterday. To me, doing a 1930 frame or a 1932 is not important at all, I'm just thinking at the information which is available. There is a 1930 V-16 in Switzerland; however, the owner is not living near the place the car is garaged. Therefore, I see difficulties to stay a whole day (or more) to measure the frame and the engine. A man in the Netherlands has a photograph file from the '32 & '33 he restored; this is certainly a good source. He sold recently a V-12 engine in Switzerland which will be more accessible. Alex is now restoring a V-12 from 1932 with a promised help. Therefore, I took the decision to do a 1932 frame (143" wheelbase) and engine. I'm now busy with a 1956 transmission and I hope that my '72 Coupe de Ville will be ready soon. The construction will effectively begin in Autumn. -
1952 Cadillac Series 75
Roger Zimmermann replied to Fleetwood Meadow's topic in Our Cars & Restoration Projects
The oil pump is seldom the reason for a low oil pressure. Before undertaking anything, you should let measure the oil pressure when warm. The oil pressure switch is not always a good indicator because they can fail and close the circuit for the lamp too early. However, if you are hearing some unusual noise when the lamp is on, there is some pressure loss. It's hard to tell where without opening the engine. -
1952 Cadillac Series 75
Roger Zimmermann replied to Fleetwood Meadow's topic in Our Cars & Restoration Projects
1957 was the first year for the return line, for cars with A/C. The specific fuel filter body with the return line provision is not easy to find -
Scale model 1932 Cadillac V-16
Roger Zimmermann replied to Roger Zimmermann's topic in Cadillac & LaSalle
Thanks Fabrizio for the kind words! I hope you will still have some pleasure to follow this new project, even if you are not adding any comment! -
Roger's handcrafted 1:12 scale models
Roger Zimmermann replied to Roger Zimmermann's topic in Our Cars & Restoration Projects
Yes, I still have some but I may need them: as I realized that I have almost nothing to do, I will begin a new project: engine and frame from a 1930 to 1933 Cadillac V-16! I'm now trying to gather information; I assume that I will begin in autumn. -
This is also my work pace! We have about the same age...
-
I found my luck (maybe)!
Roger Zimmermann replied to Roger Zimmermann's topic in Our Cars & Restoration Projects
It could be: depending how one is looking at the car, the LH front fender is not quite a match to the door. The seller told me that the hood was repainted once, but he did not say or he was not aware about other repaint. However, you probably know how the cars were constructed: the body alone was painted and the hood and front fenders were separately painted either in the same plant or in another one. -
I found my luck (maybe)!
Roger Zimmermann replied to Roger Zimmermann's topic in Our Cars & Restoration Projects
The last picture exceeded the allowable "quantity"! Another picture at the arrival in Bienne.

-
I found my luck (maybe)!
Roger Zimmermann replied to Roger Zimmermann's topic in Our Cars & Restoration Projects
On July 18, the car arrived at the Swiss customs in Zürich. At about 2 PM, the man who arranged the shipping and me went with a trailer to load the car. If the drive to Zürich went well (less than 2 hours drive), the drive back to Bienne was another matter: when we drove over 60 km/h, (about 38MPH), the trailer began to swing! Due to the shape of the front bumper, the car was not forward enough, plus the trunk was full of material! After a while, we left the freeway to take "normal" roads. We were lucky: a few miles after the freeway exit we used, a small truck went in fire. The delay to cross this incident was 1 1/2 hour! Even with our rather slow pace, we arrived safely in Bienne at the man's shop. Anyway, it was a long day as I got home at 8 PM. And the car? Well, I can say it's in a good shape. Sure, there are here or there some imperfections, but this is an original car not repainted, except for the hood (and it shows it: the color is a tad different…). In other words, I'm happy! Now, the man you see in one of the pictures will let install the new tires which were in the trunk, check for the front end alignement and do what's needed to get the car licensed. Maybe I can drive it at the end of next week!


-
I would rather ask in an English located forum!
-
Roger's handcrafted 1:12 scale models
Roger Zimmermann replied to Roger Zimmermann's topic in Our Cars & Restoration Projects
May 05, 2007 When the front bumper was ready, I began to prepare the blue leather for my needs. I wrote that it was way too thick (between 0.8 to 1.0mm), I could get enough surface to begin the trim. Thanks to the cans, I could color the needed leather and covered the inside quarter panels and began to do the rear seat. When the negative roll will be full, I will publish pictures (at that time, I had not yet a digital camera and it took a long time until the film roll was full). I noticed too that I will not have enough screws and nuts. As I’m lazy, I did not want to go in a store for 1.0 and 1.2 screws they will have to order anyway. A search in Internet gave no result for tiny screws in Switzerland, what a shame! A friend gave me an address in Germany: what a surprise! This store has all what I do need, even screws with an hexagon head which smallest diameter is 0.6mm! Furthermore, the heads have a better proportion compared to the commonly available screws and nuts. I ordered immediately a rather large quantity; I suppose that I will replace some screws and bolts used on the Toronado model with the new ones as they are better looking. -
Roger's handcrafted 1:12 scale models
Roger Zimmermann replied to Roger Zimmermann's topic in Our Cars & Restoration Projects
March 28, 2007 Yesterday, I got both spray cans I ordered in the USA. Of course, I immediately tried to spray some leather: it's fantastic! However, the original leather must have a color near to what is desired. I tried the turquoise paint on the blue leather and the fawn paint on a white leather: a thin coat is sufficient. When I tried to spray the fawn color on a dark brown leather, multiple coats are needed for a good rendering but, when the paint was dry, the touch was not agreeable because the coat was too thick. -
Roger's handcrafted 1:12 scale models
Roger Zimmermann replied to Roger Zimmermann's topic in Our Cars & Restoration Projects
March 15, 2007 It took some time, but I could buy some blue leather (which color would be perfect for the baby blue paint I first did on that model). Unfortunately, that leather is way too thick. By chance, I discovered that I can peel the outer surface (sorry dear animal who gave this leather!). This operation is tricky, the skin can tear easily; the thickness is about 0.2mm. For the correct hue, I ordered vinyl spray cans by Studebaker International. The cans are shipped but, as they are coming via surface mail, it will take some time. Comments from 2019: As most probably know, the surface mail does not exist anymore. It was cancelled shortly after I ordered the paint. I had luck! -
Scale model 1932 Cadillac V-16
Roger Zimmermann replied to Roger Zimmermann's topic in Cadillac & LaSalle
Hi Alex Thanks for your comments. Right now, I'm in touch with two or three people who may help for data. It seems that there are substantial differences between 1930 - 31 frames and 1932 - 33 frames. One of my correspondants has a 1930 car, but I don't know if he can help with dimensions (I have funny experience with American people taking dimensions!) and somebody from Holland who restored 32-33 frames with many pictures he would share. Plus you with a '32 V-12 in a restoration process, which means that almost everything can be reach without too much problem... I'm presently searching the owner from a V-16 located in Switzerland; however, I don't know if the car is still "available". Yesterday, I ordered copies from the 30-31 shop manual as well as the one for 32-33, plus a parts book. It seems that those shop manuals are well detailed; when they are there, I will see what I will need from the "victims" As you saw from the Mark II project, it's not something which will be ready overnight. I'll let gather the information, enjoy summertime and hope to be ready to start later this year. Anyway, thank you for the offer to help. I will let you know how it's going. -
I found my luck (maybe)!
Roger Zimmermann replied to Roger Zimmermann's topic in Our Cars & Restoration Projects
The ship arrived in Bremerhaven (Germany) on July 4th. The car will then be transported by truck (when?) to Zurich (Switzerland). -
Roger's handcrafted 1:12 scale models
Roger Zimmermann replied to Roger Zimmermann's topic in Our Cars & Restoration Projects
The date is still December 29, 2006: I could begin with the surface finishing of the body. The first picture is showing the headlamp bodies; the headlamps will be installed with screws. The open hood is showing the radiator attached to the body structure with screws. The radiator was needed to fabricate the hood: the shroud is the highest point and must not touch the hood when it's closed. At this specific place, the hood has a thickness of less than 1 mm; the space between the hood and shroud is also very tight. Once some surfacer is sprayed, the body is looking a tad better. Finally, a view of one trunk hinge. There are four springs (2 per hinge) to keep the trunk open.


-
Roger's handcrafted 1:12 scale models
Roger Zimmermann replied to Roger Zimmermann's topic in Our Cars & Restoration Projects
We are in December 29, 2006. The said rear shelf cannot be seen on the previous picture; it's time t show it. This picture is also showing the new fuel door. On the same first picture, there are 2 parts which were practically not modified: both outside door handles! December 30,206 On a previous picture, I showed the seats and the parts which will be discarded. In between, the body got some modifications like the new door locks.


