RichBad
-
Posts
740 -
Joined
-
Last visited
-
Days Won
1
Content Type
Forums
Gallery
Events
Everything posted by RichBad
-
1927/28 Dodge Brothers series 128/129 Tourer
RichBad replied to RichBad's topic in Our Cars & Restoration Projects
Oil pump ready to reassemble - any tips/tricks (appart from lots of oil). Finished pump


-
Thanks for your great help today Bob!
-
Awesome, thanks Bob! Even better than having to make something if you have some old ones spare. Will give you a call later if ok with you as I need a few other parts to get me up and running.
-
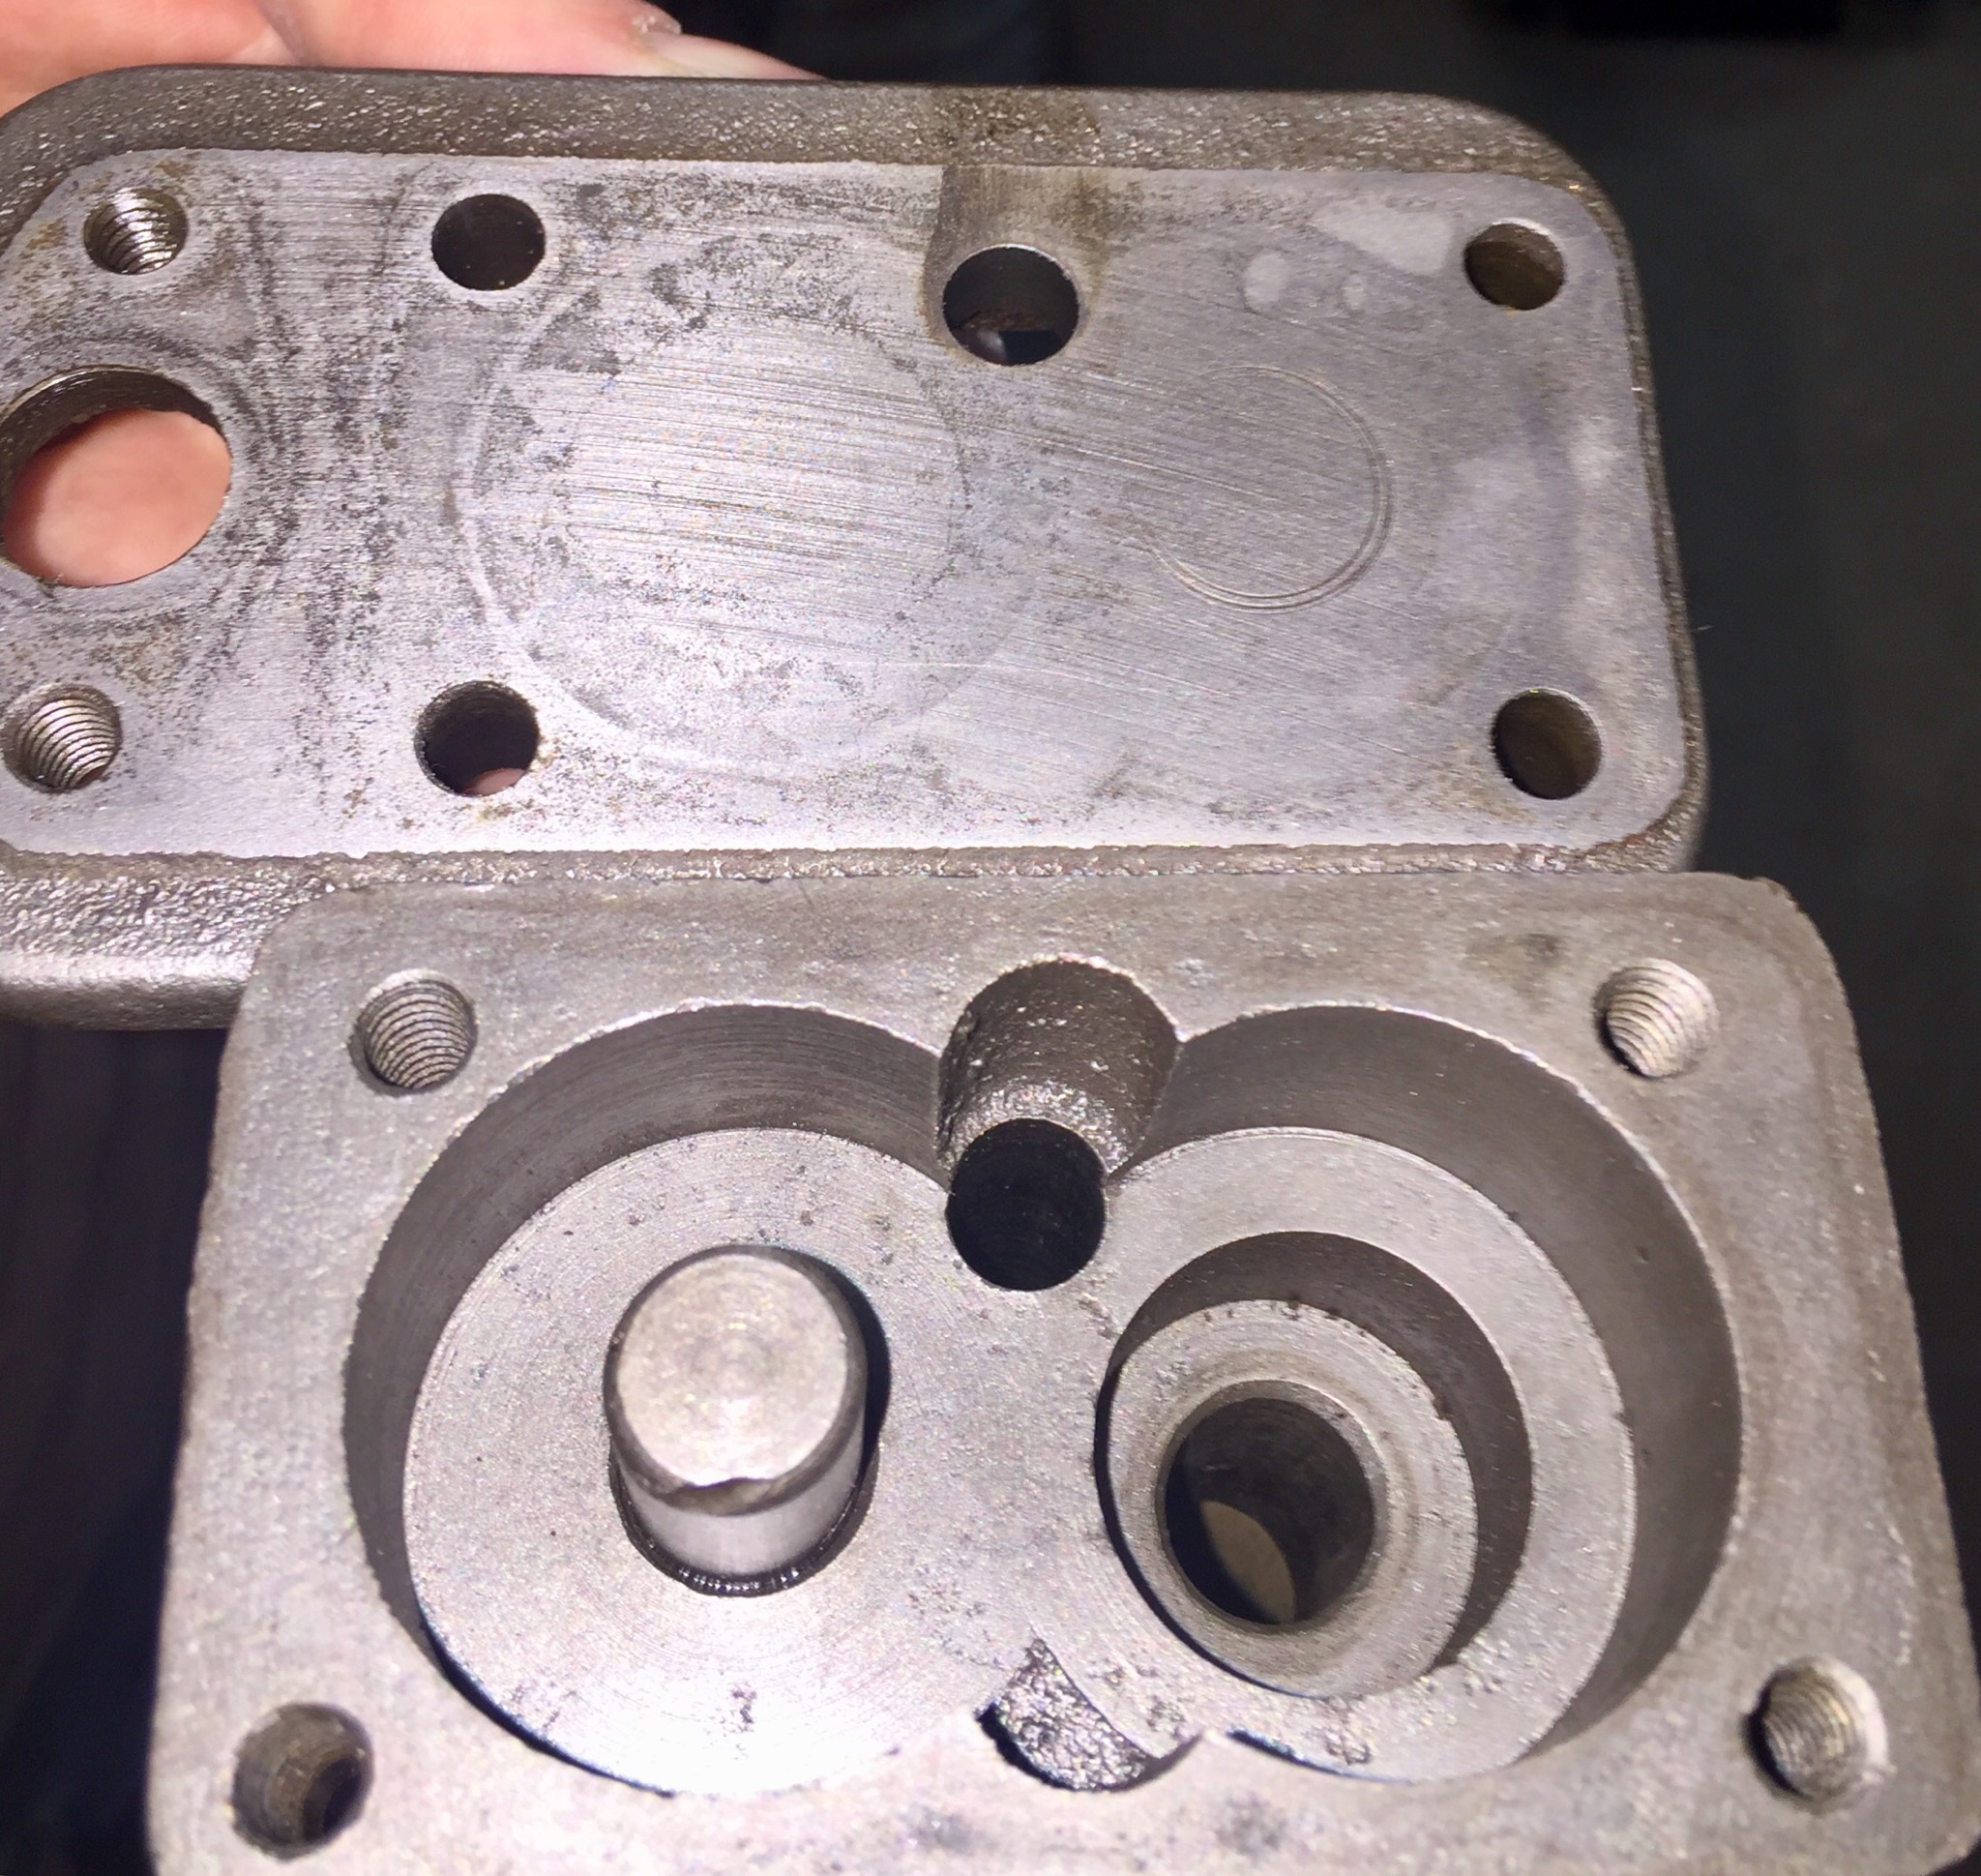
Hi, i just got a reproduction generator endplate from vintage and classic reproductions (pot metal gave up on mine) but the new one is very slightly different from my current one. The new one has a threaded hole in the end for a fuse which my current one doesn’t have. I’m not sure what is correct for my model (I know the fuse moved to the cutout housing at some stage but my cutout doesn’t have a fuse either). Anyway, seems a good idea to have a fuse. Does anyone have a photo showing the fuse holder and how it connect (I may try and make one) Presumably it just grounds the field coil? photo below shows my old and new end covers. Many thanks!

-
1927/28 Dodge Brothers series 128/129 Tourer
RichBad replied to RichBad's topic in Our Cars & Restoration Projects
I would have liked to keep mine original but unfortunately someone had previously replaced the main housing with a flange/bush assembly (which was knackered). I think the original pot metal casting doesn’t always last too well. Did yours have the gear pump at the front? -
1927/28 Dodge Brothers series 128/129 Tourer
RichBad replied to RichBad's topic in Our Cars & Restoration Projects
Boyce motometer - had the rims and dogbone plated but couldn’t remove the thermometer from the body to get it plated (swaged in). I think the body is pot metal so I tried polishing it and it came up pretty well.


-
1927/28 Dodge Brothers series 128/129 Tourer
RichBad replied to RichBad's topic in Our Cars & Restoration Projects
Photo below (not assembled to prop shaft & flange).
-
1927/28 Dodge Brothers series 128/129 Tourer
RichBad replied to RichBad's topic in Our Cars & Restoration Projects
Cool, I’m in Rowville so probably not that far. -
1927/28 Dodge Brothers series 128/129 Tourer
RichBad replied to RichBad's topic in Our Cars & Restoration Projects
Thanks! Melbourne -
1927/28 Dodge Brothers series 128/129 Tourer
RichBad replied to RichBad's topic in Our Cars & Restoration Projects
It’s a type of u joint, different from the typical design. Has a pressed steel outer housing - like a doughnut. More details here http://forums.aaca.org/applications/core/interface/file/attachment.php?id=899052 -
26DB Brakes - This just does't look correct
RichBad replied to Wheelmang's topic in Dodge & Dodge Brothers
Here’s a picture from my 128/129 parts list which shows the split. Different model but the band looks identical. The parts listing also shows the lining quantity as 4 (2 per side).
-
1927/28 Dodge Brothers series 128/129 Tourer
RichBad replied to RichBad's topic in Our Cars & Restoration Projects
Thanks, that's very helpful. I couldn't figure out how it would retain lubricant but from the manual it looks like some cork gaskets will sort that out. From what I can see rebuilding them shouldn't be a problem - the biggest issue I'll have will be if the pins on the main shaft are too worn as they could be very difficult to repair/replace. The other pins should be no problem and for the trunnions I should be able to fit a sleeve where they are worn. Im surprised no one makes replacement parts as the trunnions are quite simple and they would be the most likely parts to wear out. Perhaps they weren't widely used and it's easier to just fit a modern UJ? -
1927/28 Dodge Brothers series 128/129 Tourer
RichBad replied to RichBad's topic in Our Cars & Restoration Projects
Thanks. It's the first time I've come across this type of UJ and haven't been able to find much info on them. One of them is worn quite a lot and I wanted to find some parts but think I may have to make replacement parts or repair with some bushes and replacement shaft. -
1927/28 Dodge Brothers series 128/129 Tourer
RichBad replied to RichBad's topic in Our Cars & Restoration Projects
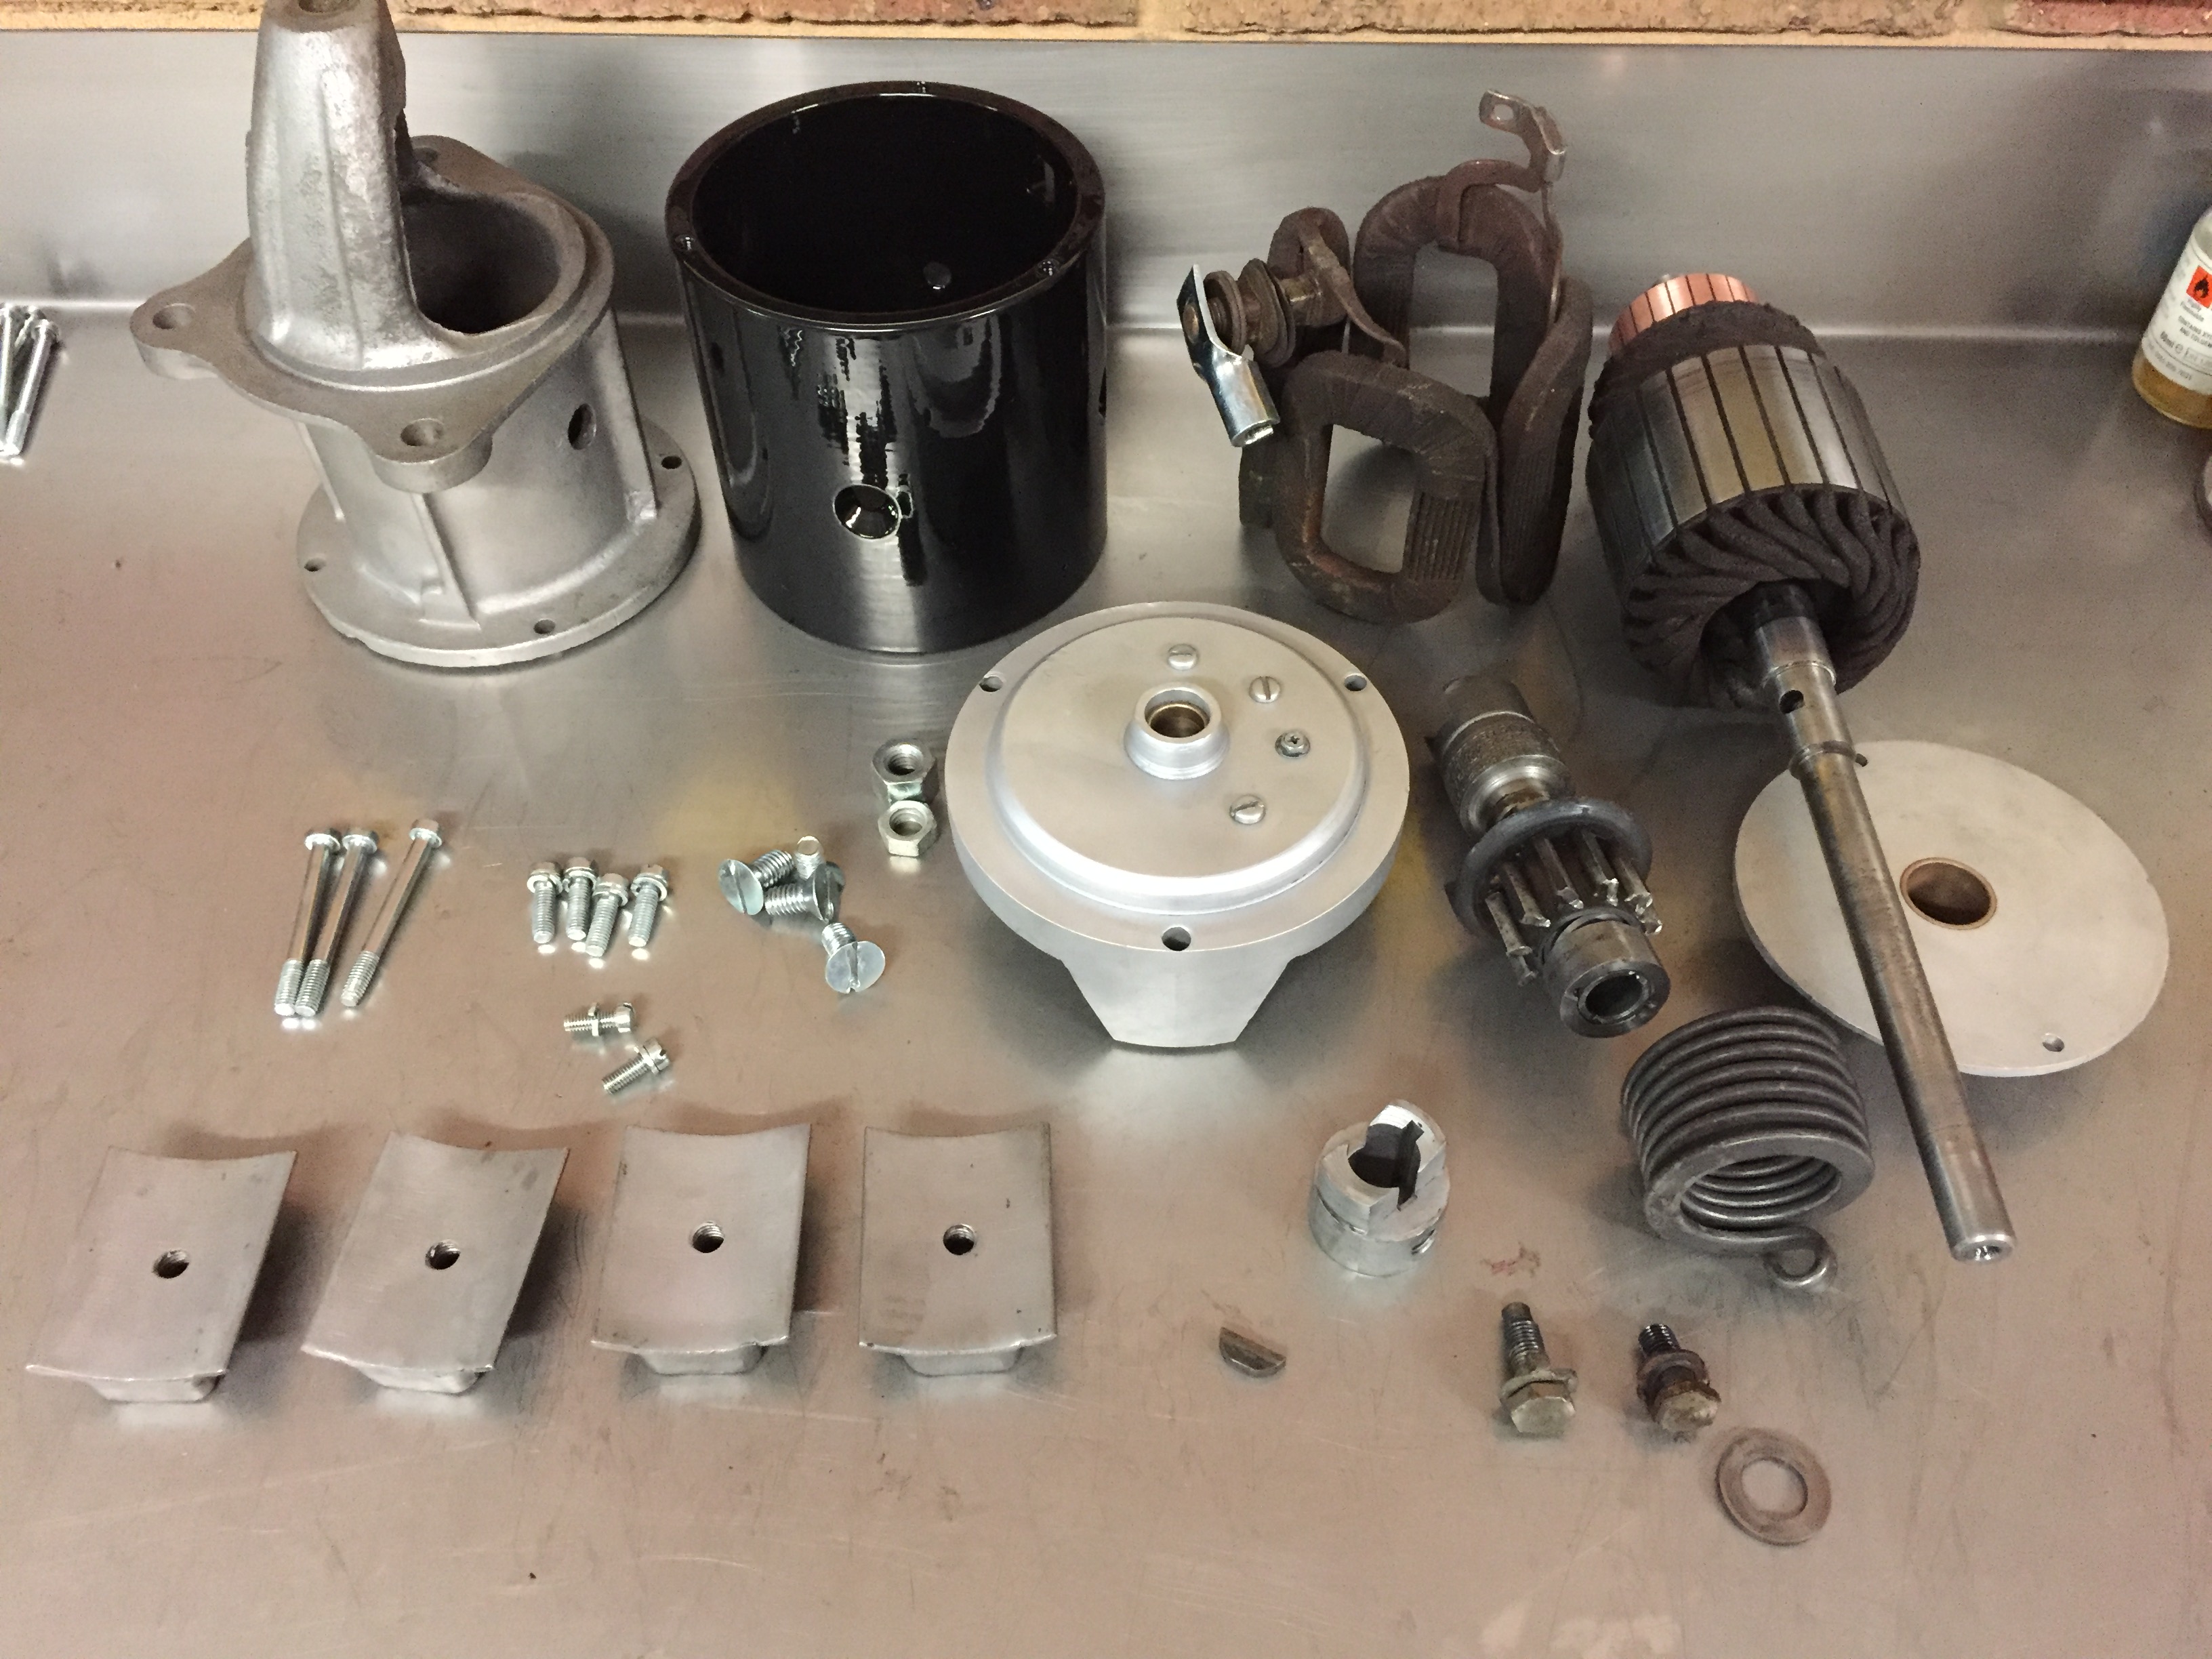
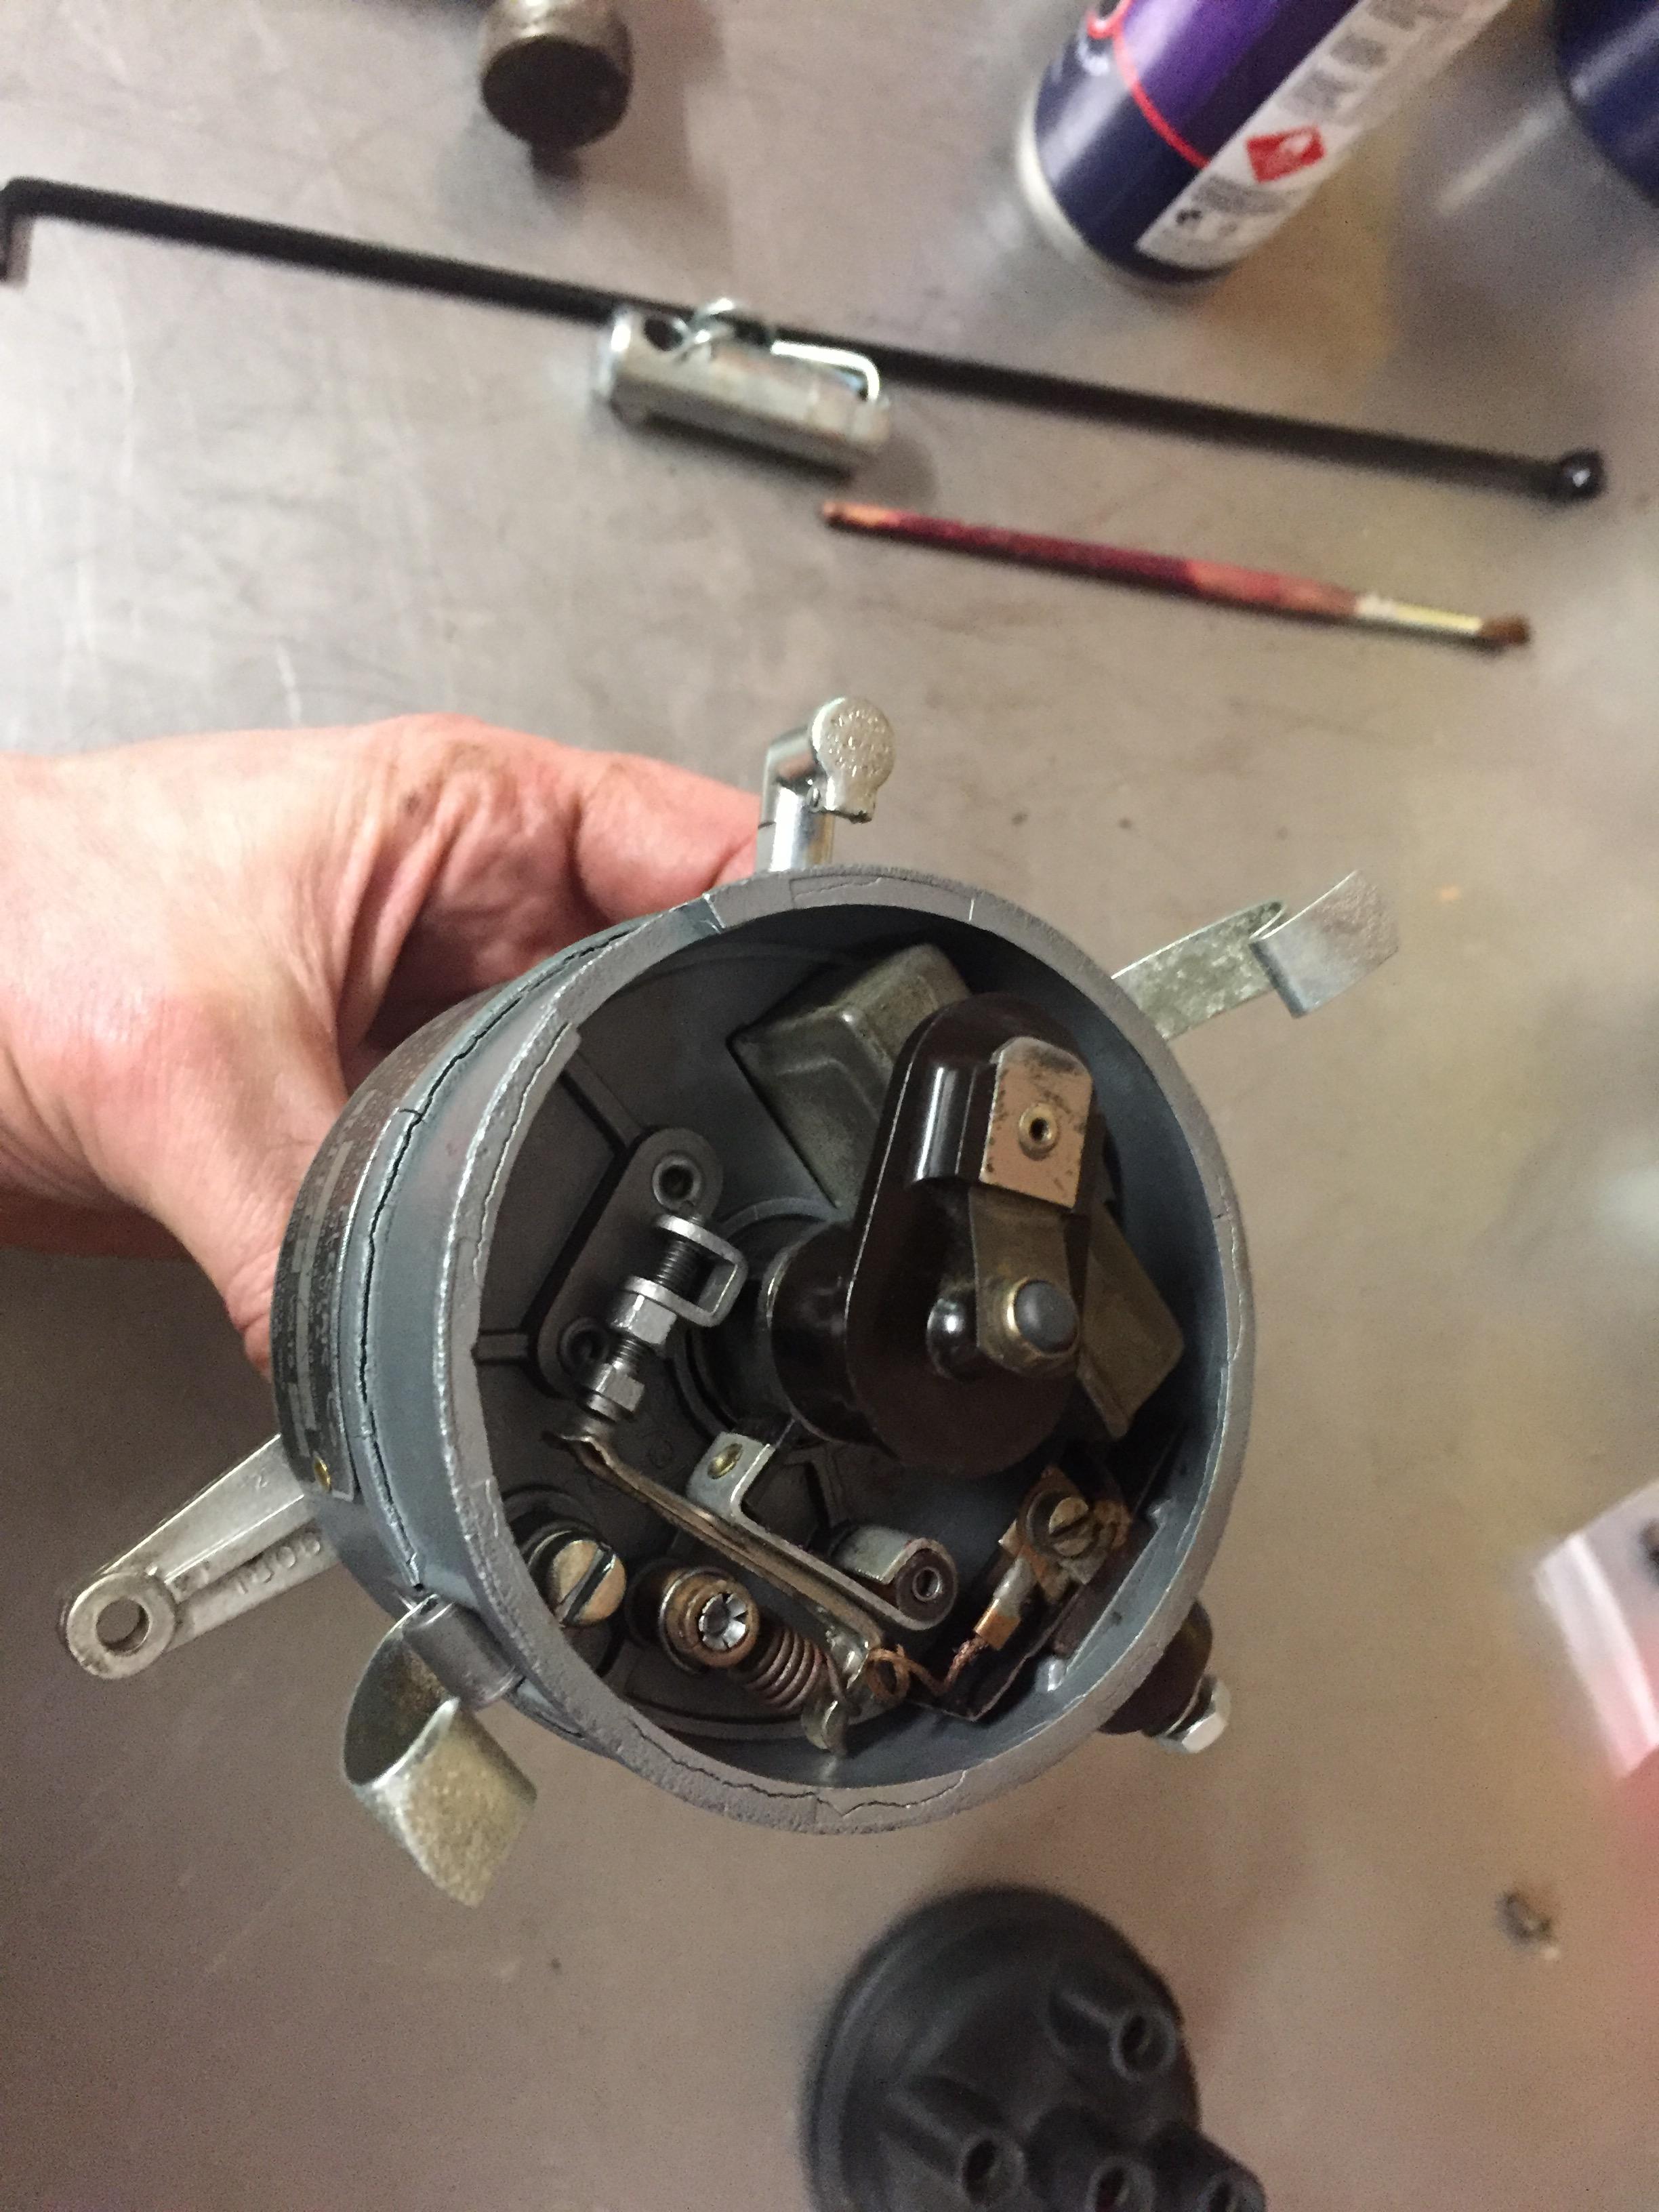
Starting the rebuild Detroit Lubricator Carburettor and spark arrestor/Air 'filter' North East Electric Co Horn - Model 3715C (Yes, I know it's a 12v and should be a 6v) North East Electric Co Starter motor Model 6404 North East Electric Co Distributor TU 10826 (pot metal base just about holding together) Rear tail light Rear brake balance bar assembly Differential pinion assembly - converted to modern oil seal (85x45x10mm) Handbrake - had to make a new spring as the original snapped - not perfect but my first attempt at making a spring Radiator Fan hub - converted to run on sealed ball bearings (5/8" x 1-3/8") with aluminium adapter (retaining original shaft) Original gear knob fell apart when I tried to remove but managed to find a replacement that looks identical Startor motor switch and generator cut out Jack - I think its the correct version for the car? Brake pedal assembly, pivot bored and fitted with a bush. Pedal and lever both keyed and riveted to shaft - belt and braces!


-
1927/28 Dodge Brothers series 128/129 Tourer
RichBad replied to RichBad's topic in Our Cars & Restoration Projects
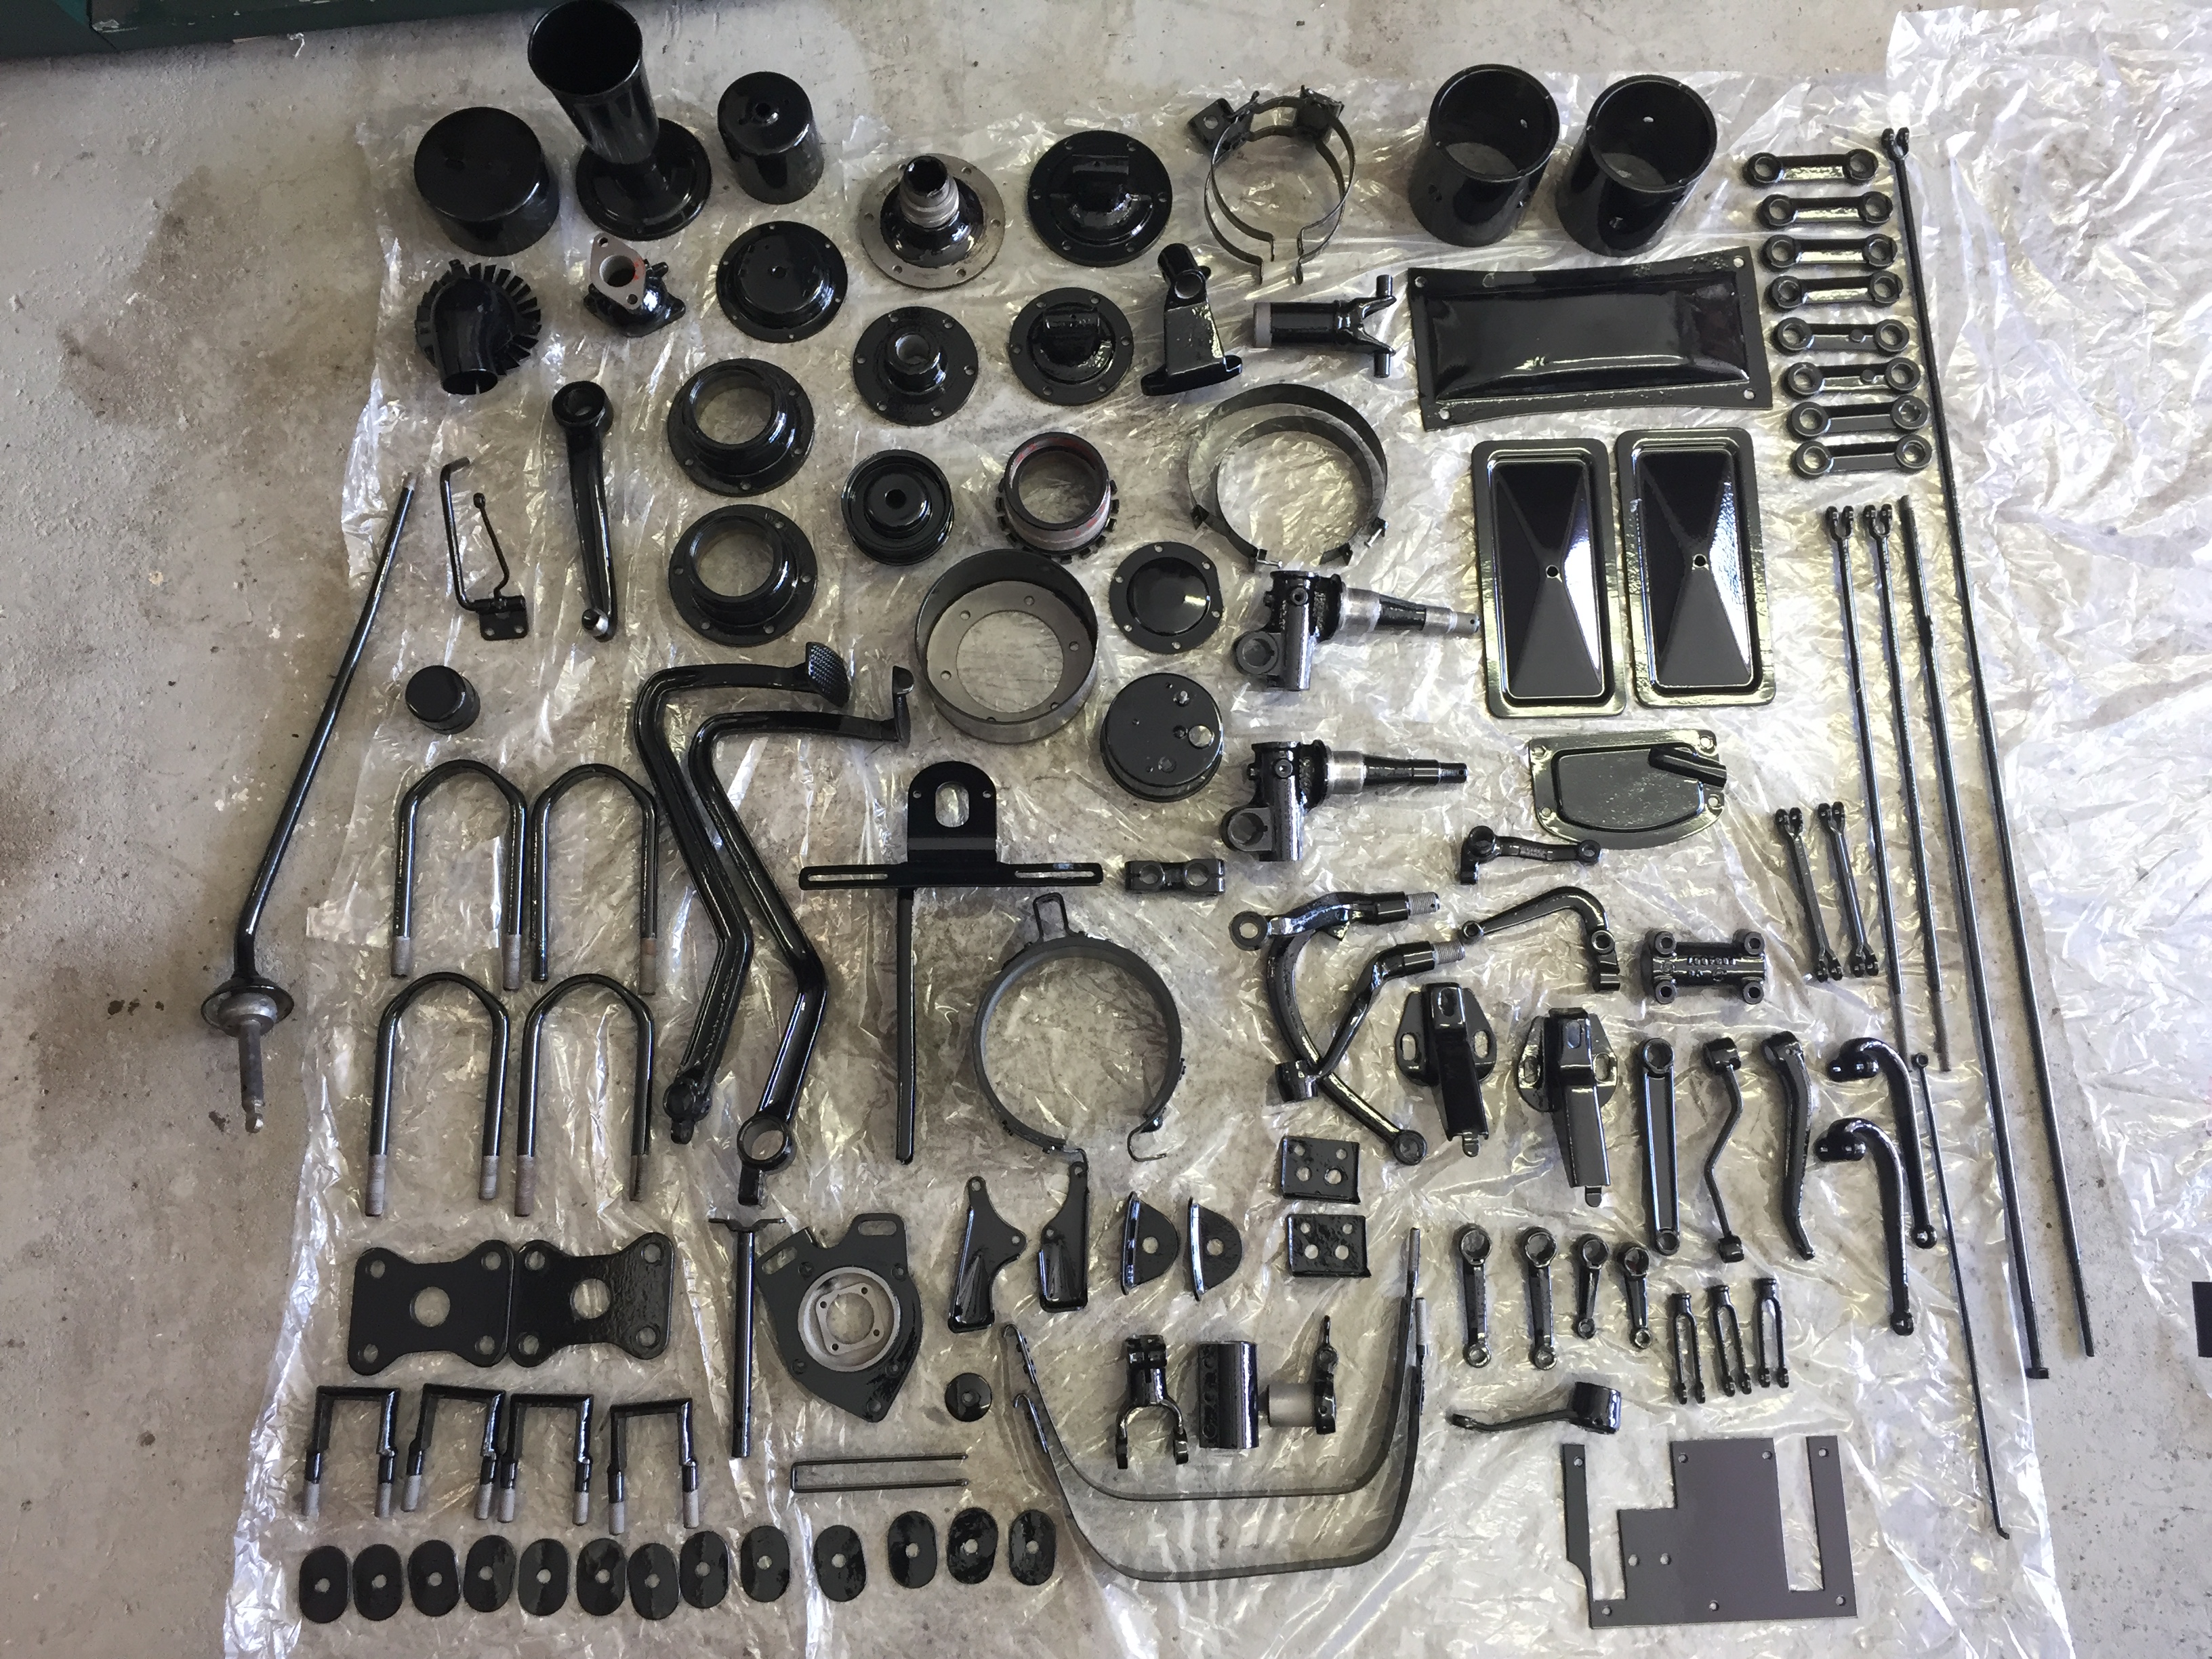
Plating and some of the powder coating finished


-
1927/28 Dodge Brothers series 128/129 Tourer
RichBad replied to RichBad's topic in Our Cars & Restoration Projects
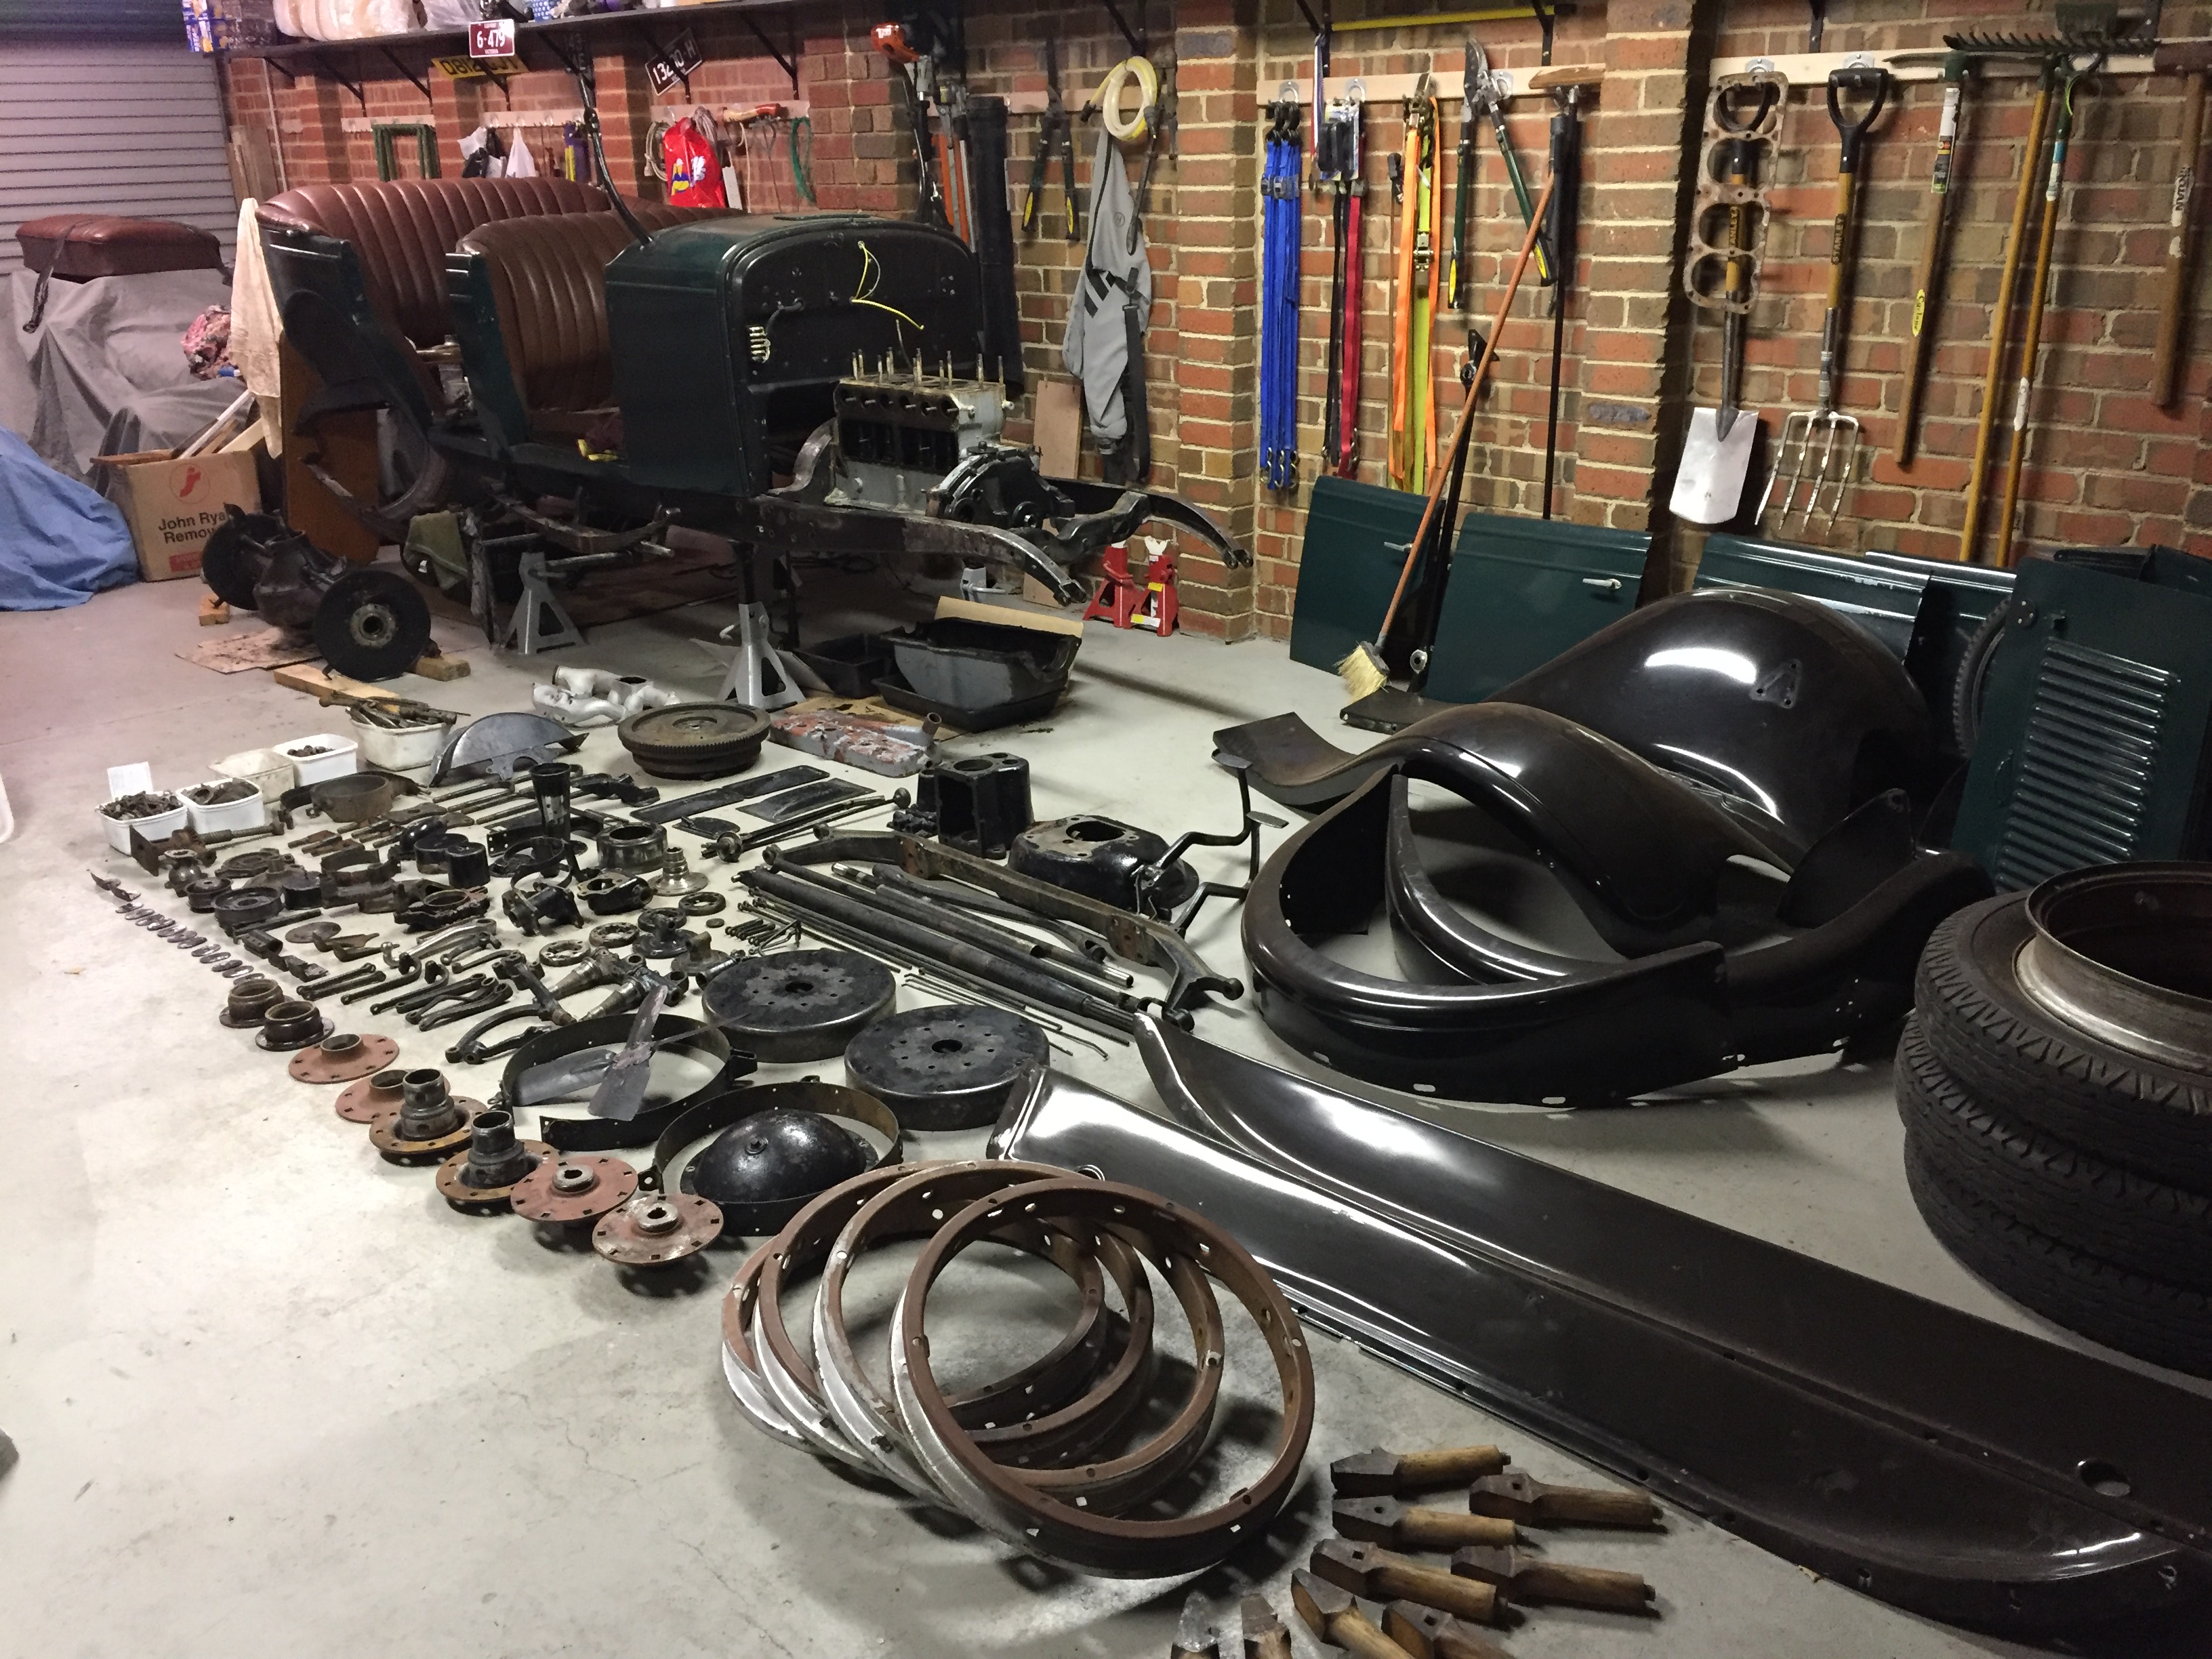
Pulling it apart End of the first day A lot of nuts and bolts to clean up Parts ready for stripping and powder coating Chassis has a few poor repairs that need fixing - looks like cracks just behind the rear engine mounts (seems to be a weak point) and has had a front and rear end smash at some stage. I've fixed up the rear end OK, the section behind the rear engine mounts should be quite straightforward but the front is a bit of a mess (various bends, welds and plates that need to be fixed up) Photos of all the individual parts for cleaning/blasting and powder coating - Dodge parts powder coating_A2.pdf


-
1927/28 Dodge Brothers series 128/129 Tourer
RichBad replied to RichBad's topic in Our Cars & Restoration Projects
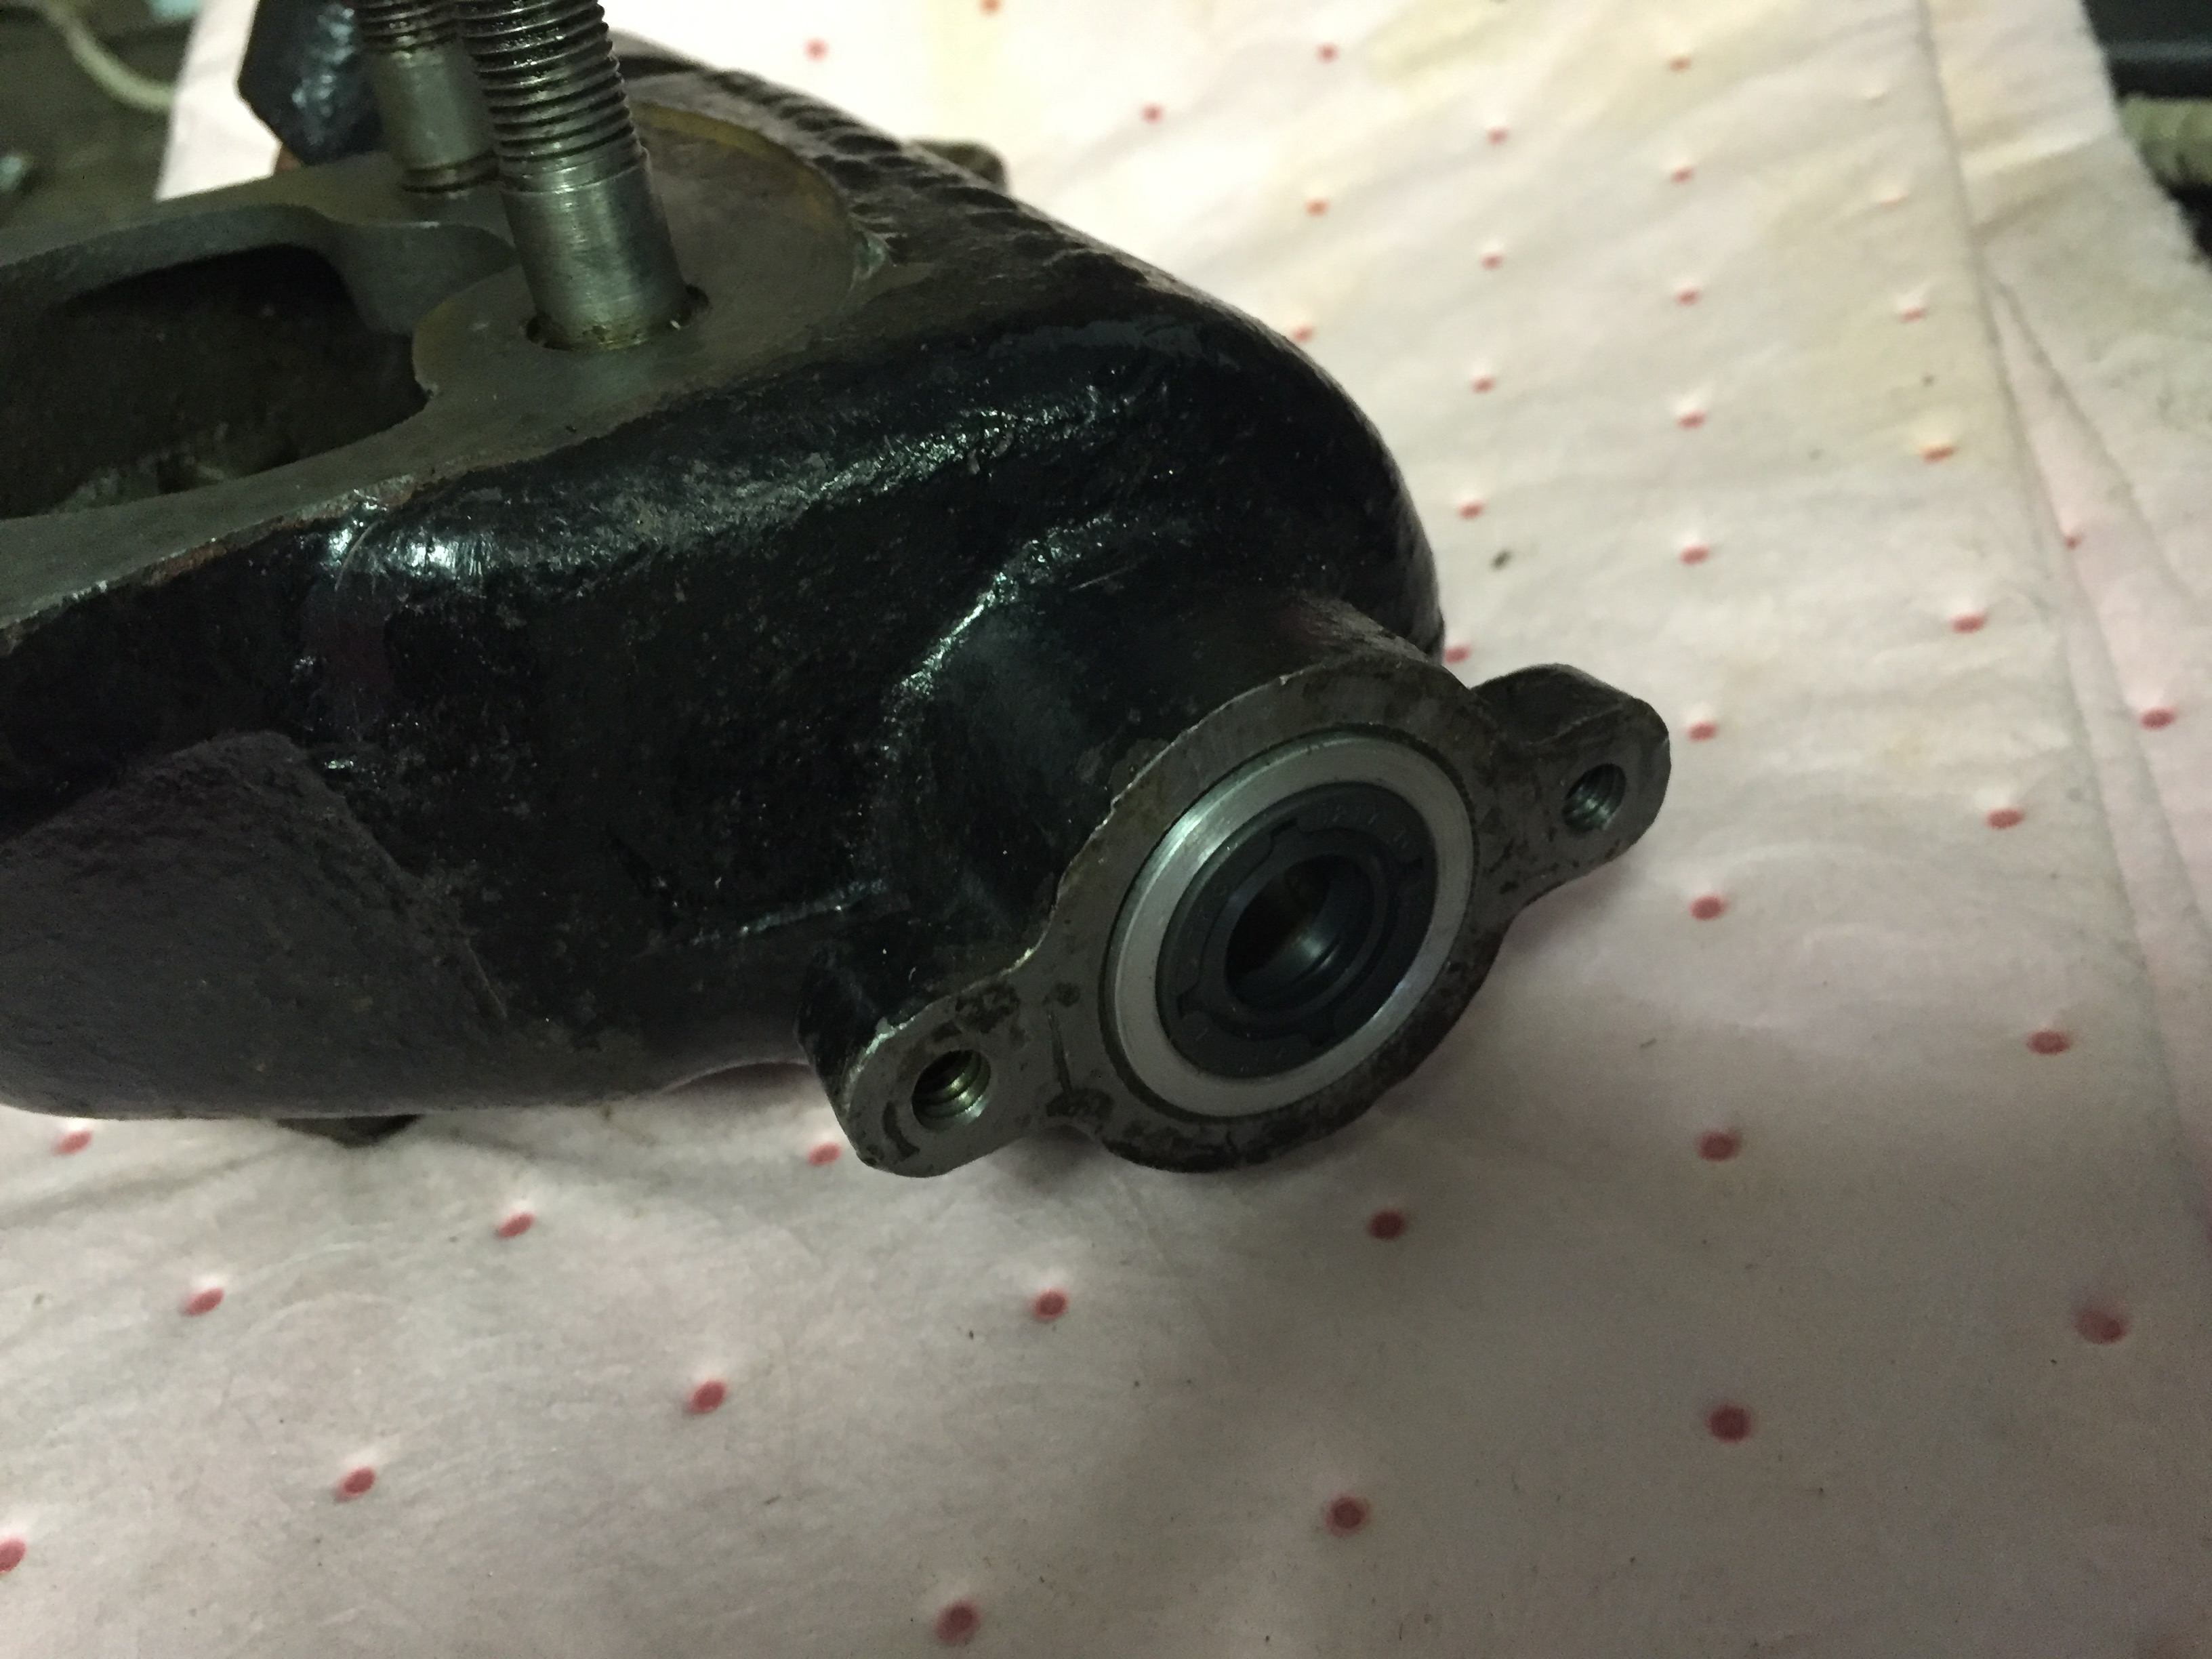
Converting steering box to modern seals and needle roller bearing. Adaptor and seal for Throttle/timing controls Steering input shaft seal (housing machined to suit and new bush fitted). Output shaft ground to suit needle roller bearings and thrust bearing fitted (~3mm left at original diameter to provide better location for thrust bearing). Needle roller bearings fitted to housing (one each end) Oil seal for output shaft Finished box here - http://forums.aaca.org/topic/299339-192728-dodge-brothers-series-128129-tourer/?do=findComment&comment=1680110 Details of the bearing and seals (all from simply bearings Ltd): 2 x Sector shaft needle roller - HK2820-MB Sector shaft thrust assembly - NTA1828 & TRA1828 Sector shaft oil seal - 28x40x8 Main shaft top seal - 25x40x6 Lower oil seal - 12.45x22x7 (needs adaptor to fit). Main shaft upper bush - AI.1418-24.PL Main shaft lower bush - AI.1418-16.PL Sector shaft was ground to suit new bearing but with ~3mm left at original diameter to help locate the thrust bearing.


-
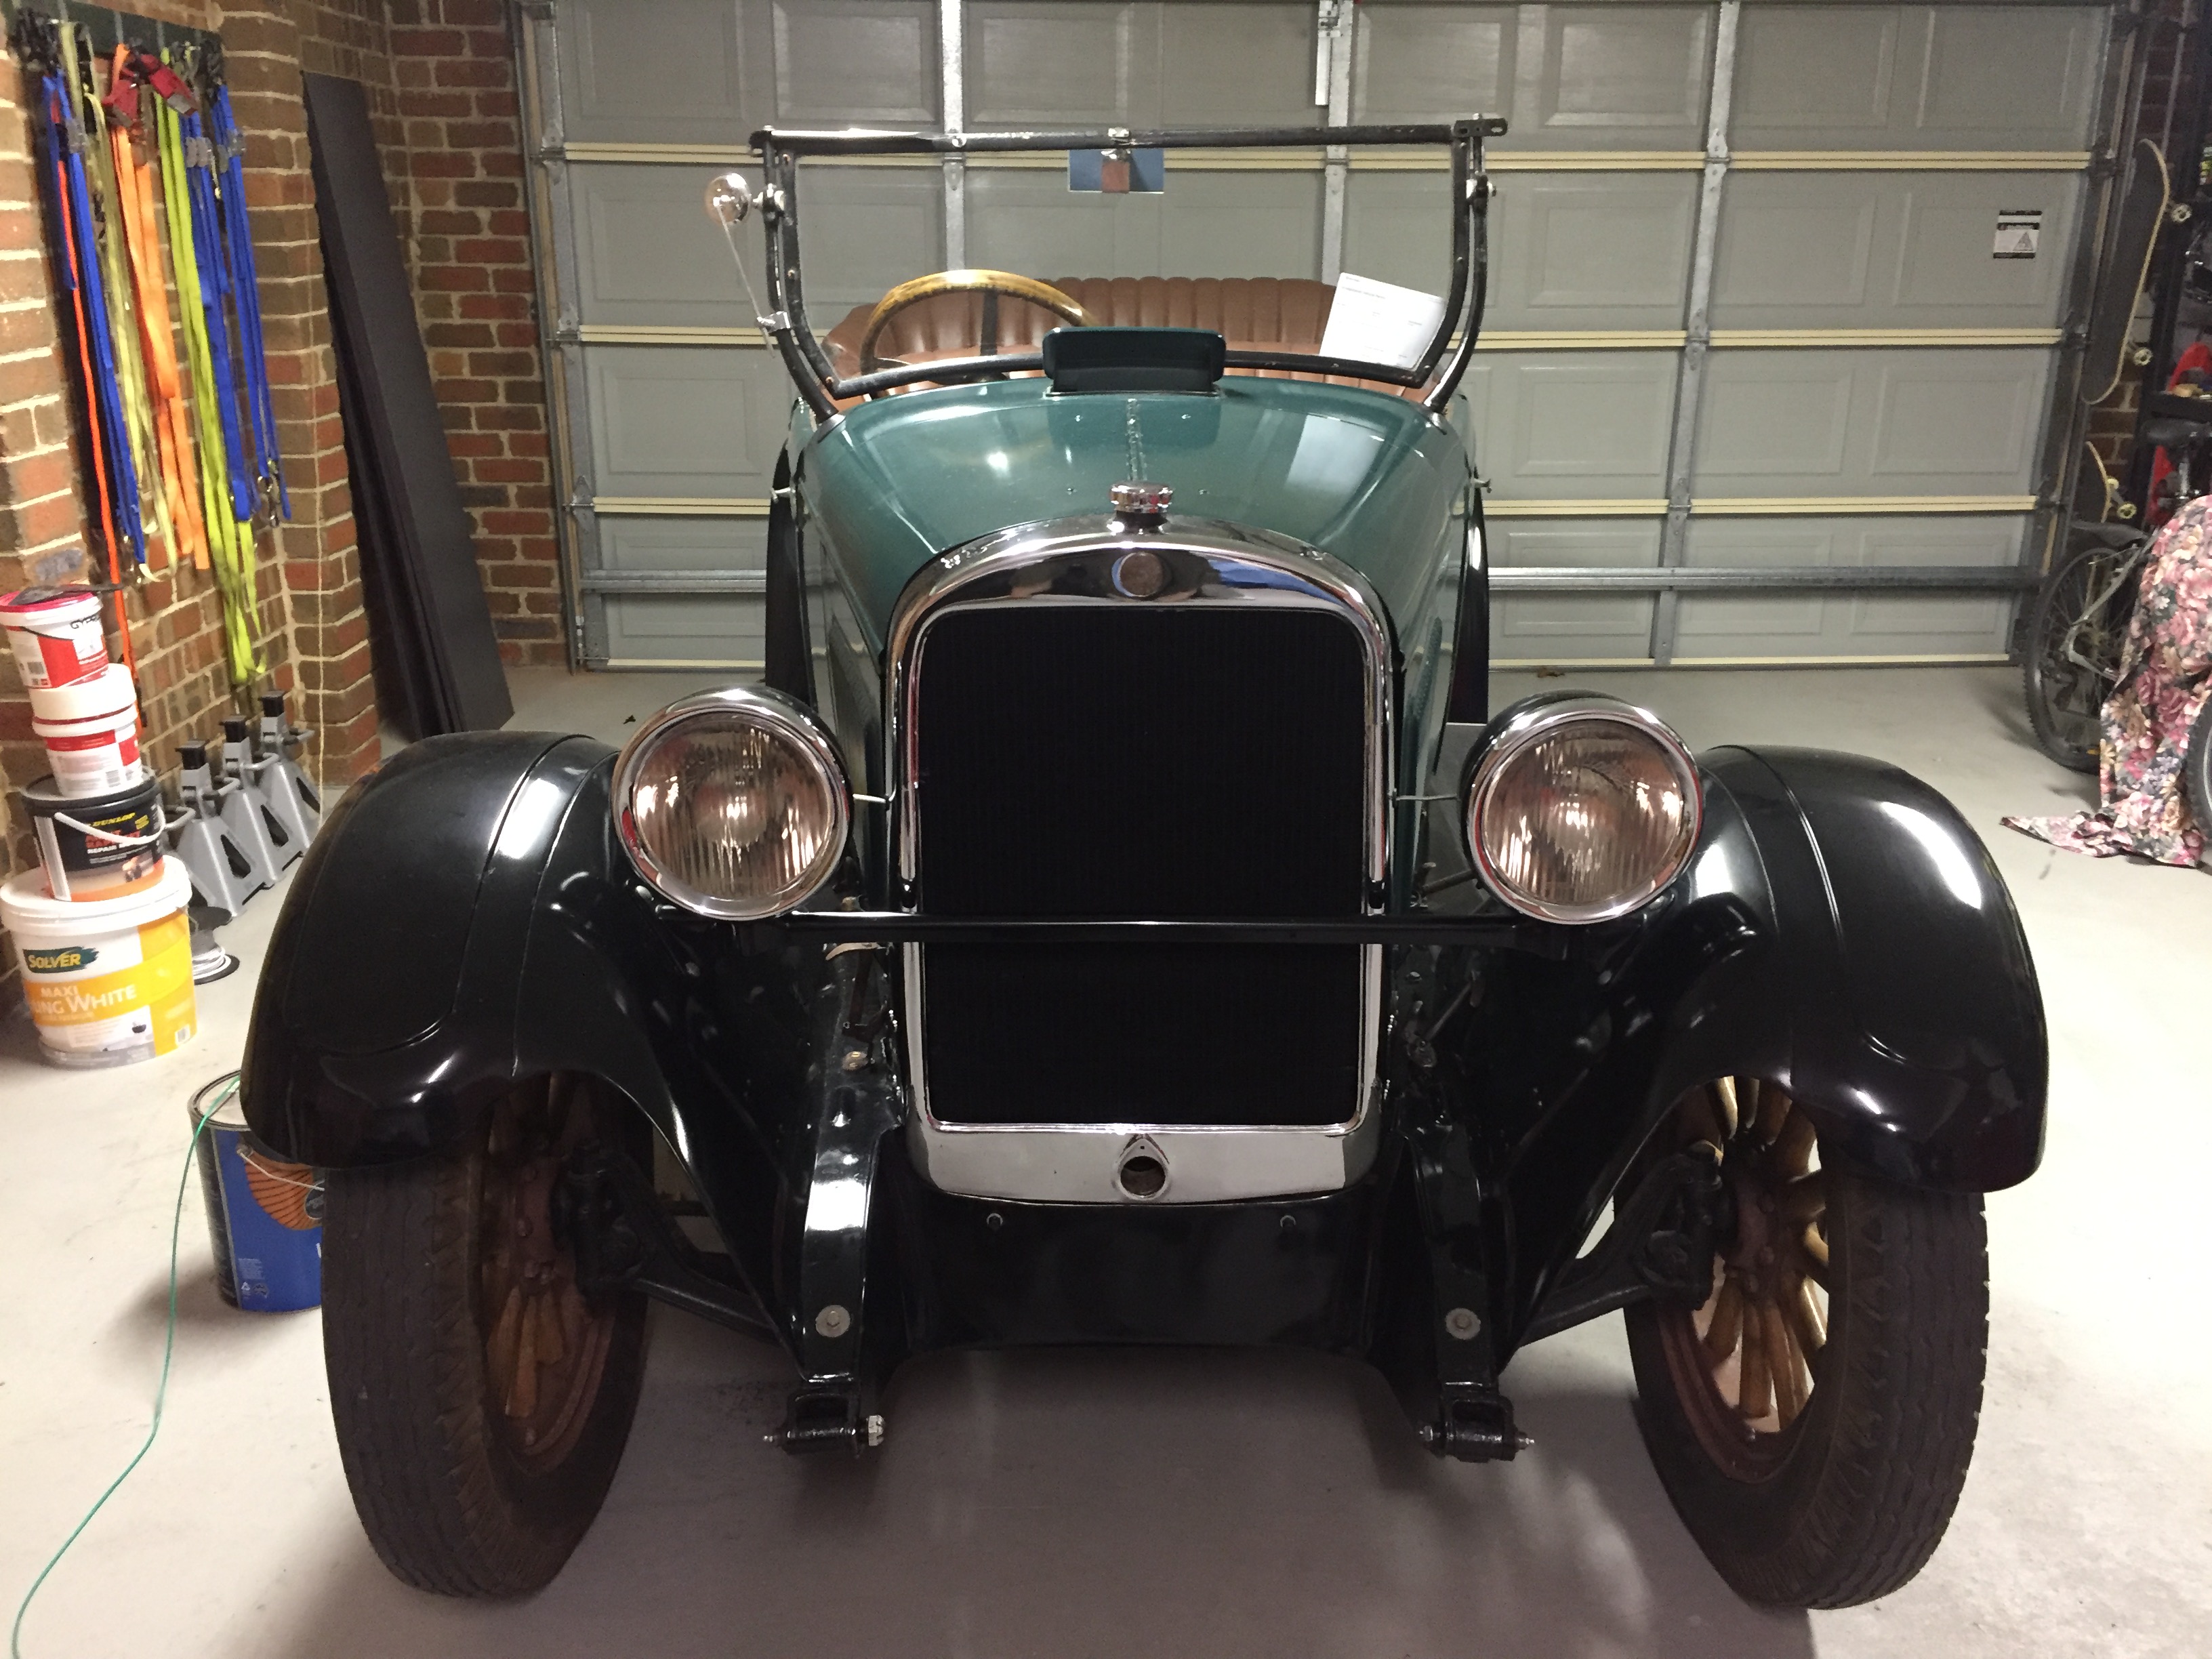
Hi, I thought I'd add some photos showing progress of my Dodge Tourer restoration. When I started the restoration I found that there is plenty of knowledge and helpful people around but not a lot of information on line so I thought that this could help others doing any work on a similar model. I purchased the car in December 2015, it was running (but only just) and over the course of the next year I sorted out some of the basics (brakes, carb, charging etc) so I could get it registered and drive it. Mid 2017 (winter) I got a bit bored one weekend and decided to tear it down and restore it, the plan is to do in two parts. First, the chassis, running gear and engine and then (probably the following winter) the Body.


-
Thanks Bob, I made up some spacers and it's perfect now!
-
1927/28 series 128/129 Fast Four frame/chassis
RichBad replied to RichBad's topic in Dodge & Dodge Brothers
No worries, thanks so much for your help! I also need to get few parts when you're back and get a chance. -
1927/28 series 128/129 Fast Four frame/chassis
RichBad replied to RichBad's topic in Dodge & Dodge Brothers
Thanks Bob, that's very helpful. That's a lot of Dodge parts you have! I can see what's going on with my chassis now. The damage behind my rear engine mount looks almost identical. For the front end I think I may end up cutting off so I can repair it properly. Do do you have any books with some measurements listed? I think when mine was repaired it wasn't aligned first resulting in the front end being higher than it should (may explain why my bonnet had huge gaps to the body at the bottom). some useful ones would be: Width between front spring mounts Distance between front spring mounts (front to back) Height from front engine mount to top of chassis rail at cross member) Height between front engine mount and rear engine mount (or top of main chassis rail). cheers -
I figured out the problem - it had a home made centre bush support. Should be ok with a few spacers - is the end play set between the centre bush support and washers behind the commutator?
-
1927/28 Series 128 129 Parts list book ?
RichBad replied to 30DodgePanel's topic in Dodge & Dodge Brothers
No Problem, Bob B had one which had a few pics that i needed. cheers -
Thanks, I did buy some of the galvanized spray but haven't tried it yet. Perhaps if it looks like the original that may be the best option. I really wanted to keep the original finish and I have someone local who can do it but don't want to risk trashing the pan if the heat does distort it.
-
That's perfect, many thanks Bob!