


Gary W
-
Posts
1,062 -
Joined
-
Last visited
-
Days Won
14
Content Type
Forums
Gallery
Events
Everything posted by Gary W
-

1937 Buick Model 48: RESTORATION HAS BEGUN! (Photo)
Gary W replied to Gary W's topic in Buick - Pre War
Wednesday January 17 2017: Progress on the Trunk Lid and other stuff: This week Bob has been working on the trunk lid. Amazing transformation over the past five days. He stopped by Wednesday afternoon to make a few small adjustments on the hood. It is sitting much better now, but still not 100% I'll get on it little by little. In the meantime, I've been finalizing the wiring under the dash and organizing the trunk parts for the install. TRUNK LID:: 1. Underside The underside of the trunk lid was sanded down to bare metal. Once all the paint was off, any loose edges of the insulation material were tacked down with adhesive. Any rust remaining was removed with a wire wheel on an air driven motor. Self-etching prime first, then two coats of grey build up prime. Bob then masked off one of the openings to show me how the insulation will look once its painted "trim black" All the insulation within the holes will be painted trim black, then covered for the base / clear paint. The contrast will look nice. With the tape removed, it'll look very nice. Underside ready for paint. Upside: After sandblasting. The trunk lid was completely covered by this bonding material. It is completely cracked and alligatored. Using a 24 grit disc on the wheel, Bob starts removing all the plastic. It comes off pretty fast, and it is a dusty mess. He is very careful around the edges and is constantly changing the angle of the wheel to the contour of the lid. Again, like we've found throughout the build, the metal underneath is beautiful. You can see there is some rust under the plastic which is why he is so fussy about getting all the plastic out. I had one dent just to the right of the handle. I missed the tutorial how he pulled the dent out, but here is the tool he used to basically pry the metal back into shape. All the surface rust has been sanded out. Notice how little body plastic is actually being used! The original metal is really in great shape. Those spots you see filled in is where he feels low spots with his hand. The trunk lid gets another sanding, smoothing out the filler before the primer is applied. It got yellow self-etching prime, then two coats of the grey prime. Then the "guide coat" is sprayed in preparation for the final sand. So, it will get sanded out today, and I guess painted, allowed to cure over the weekend and wet sanded and buffed out Monday.. Back at the Ranch........ I've been finishing up some odds and ends I'm using a self-adhesive 1/2" thick "Dyna Liner" under my rear carpet. This will stick directly onto the Dyna Mat i put down first. I used the rear carpet as the template, traced it out. Cut the outline Fit it into the car, making any fine cuts around the seat mechanism, battery box and making releasing cuts so it lays nice over the tunnel and the floor contours. Then, starting at one side, pull the backing off while rolling the liner into the floor contours. It all lays down nicely and fits just inside the door sills. I worked this week finalizing the under dash wiring while the radio was out. I soldered an eye to every end, then covered with shrink wrap. There were a total of six wires that I had to solder the eye to. So, while the radio was out, and I had the extra room under there, I: 1. Finished the vacuum line to the wiper motor and tested them for proper operation. 2. Ran the defroster tubes from the defroster motor and temporarily taped them to the underside of the dash. I can't install the deflectors until the windshield garnish molding is installed. 3. Wired the Trippe Lamps to the switch marked LITE. I took the feed from the unused terminal at the top of the lighting switch. Tested the lamps, all OK. 4. Wired the Heater / Defroster. I think I'm going to wire in a SPDT toggle under the dash so I can have either the heater motor OR the defroster motor running. I fed this from the charge indicator behind the dash. I'll still leave the switch marked HEAT, because it lights up and looks cool, but I'll use it to simply feed the SPDT, where I can direct the current accordingly. When I tested the heater, there were a few blades scraping against the housing somehow. Another half hour of yoga under there and I got them all free and rotating quietly. 5. And finally.... Installed the radio. I fed the radio also from the charge indicator. I had this radio completely restored using all modern guts and bluetooth technology. I don't think it draws nearly the current the old tubes did. The charge indicator deflects, but not much at all. Not like the heater motor or headlamps. I have all the trunk goodies restored and ready, so as soon as the trunk lid comes back from paint, it shouldn't be long until it's installed. Have a great day out there! Gary


-
1937 Buick Model 48: RESTORATION HAS BEGUN! (Photo)
Gary W replied to Gary W's topic in Buick - Pre War
Saturday January 13, 2018: Installation of the Hood This morning Bob came over with his son and a couple friends and the five of us lifted the hood into position. Once the "muscle" was done, Bob stayed for another hour with me to start making the adjustments. I think we have it about 90%, but it still needs some fine tuning. I was getting set up, covering the fenders and making some preliminary measurements. I placed towels over the front and cowl just in case it slipped. We actually had five guys here. One on each corner and Bob at the front. Here we are with the first lift getting the hood up and over the front clip. With five guys, it was much easier getting it lined up before dropping the bolts into the holes. Everyone was watching their corner as we slowly dropped it down. Here I was setting the rear hold-down bolt down into the cowl mounting hole. I used one flat washer here so the sheet metal was at the same level as the cowl. And slowing closing the sides down. Once that part was done, the gang left and Bob and I started making some adjustments. First thing was to tighten down the forward and rear hold down nuts. The hood prop will hold both sides of the hood up so we can tighten up the rods. Bob stayed an extra hour with me, and we got it really close, but it still needs some finessing. I would like to close the rear gap a little. Here's a side view. It looks pretty good so far. Like always, I set in place, made a few minor adjustments and will get to it tomorrow with fresh eyes. The biggest problem is the very front. From this angle it looks OK. But.... You can see up front, there is a 1/16" - 1/8" gap on the passenger's side, and 1/4" on the driver's side. I have all the clip bolts loose, the large nut at the bottom is almost out and the outer fender bolts are loose. I wish there was some way to just shove that clip over 1/8", but I don't know how. Also, the lower bolt is supposed to slide "fore and aft" but how, exactly does one accomplish that? It's buried up inside the front crossmember. Do you think this discrepancy can be remedied by adjusting the rods under the hood? So anyway, here it is all buttoned up. Looks sharp! A better angle of the hood in position. Have a great night! Gary


-
Mechanical brake adjustment front to rear
Gary W replied to sportroadster's topic in Buick - Pre War
I apologize. I thought he was asking about Model "A" Fords mechanical brake system. And to get the mechanical advantage we set the brake actuating lever 15 degrees forward at the front wheels at rest. At full pull, the levers are pretty much at the top of their travel, perpendicular to the brake rod. I thought he was talking about lever position when you set it up, not the position at full brake. My bad.
-
Mechanical brake adjustment front to rear
Gary W replied to sportroadster's topic in Buick - Pre War
There is no "evener" on the Model "A". Brake cross shaft, levers at the ends. The actuating levers at the wheels MUST not be straight up and down. As Grimy said, they should be at least 15 degrees forward so you get the mechanical advantage. In the Model "A" you can add "brake pills" to the bottom of the push rod to effectively move the lever forward. (Front brakes). and yes, no slop anywhere with mechanical brakes. Every small bit of slop multiplies throughout the system. -
1937 Buick Model 48: RESTORATION HAS BEGUN! (Photo)
Gary W replied to Gary W's topic in Buick - Pre War
Thursday January 11, 2018: One Year Ago TODAY this Restoration Began! Today marks the one year anniversary of my restoration. I really thought I would be done by today, but I think I need another six weeks for the remaining parts to come back. All in all, it's been a wonderful learning experience! So, on this day, and as I get ready to install the hood, I took a few minutes to go over my hood related photos from last January 11. It really is an amazing transformation! And, it's incredible what you see in photos a year later. I'm now looking at them with totally different eyes and noticing things I've never noticed before the build. The first thing I noticed here was the gap at the rear of the hood. I thought the hood fit perfect! I hope I can eliminate the large gap and keep them all around 1/8". But this photo demonstrates exactly how I have to "rotate" the front clip a little to close that gap. It is about 1/4 inch off from one side to the other. The hood is resting on the hood prop, but is also riding on the cowl lacing at the rear. Now I see what Matt Mc Hinson was explaining to me. I never noticed it before. It had no rear rubber bumpers. My front hood attachment had four flat washers under it to align the center stainless hinge to the clip center trim. When I test fit the center hinge, it still needs those washers to raise the hood hinge to the correct level. The shroud rod was leaning to the back. Now it stands up straight. Maybe the new body mounts have caused the rods to sit a little higher? Driver's side radiator brace rod. You can see it was cranked down quite a bit. The manual states not to stress these too much so the radiator is not ruined. Passenger's side brace rod. Not nearly adjusted down as much as the other side. The front nose connections BEFORE Here we are today. You can see the rods were not painted over the original threads. I didn't want to lose the original mounting spots, but I have a feeling it's all going to change anyway. Look at the condition of the paint! And today. I want to express my sincerest gratitude to all of you following along throughout the year! The support I've received from this forum is just overwhelming. In a year, I've gone from "newbie" to where I am today. (Whatever that is!!) Thank you! Gary See you Saturday! (10:00 am sharp!)


-
1937 Buick Model 48: RESTORATION HAS BEGUN! (Photo)
Gary W replied to Gary W's topic in Buick - Pre War
Wednesday January 10, 2018: Dressing up the hood for installation I stopped by the shop early this morning and the passenger's side of the hood was wet sanded but not yet buffed out. But I had to take my son to JFK Airport at 10:30 ( If you haven't experienced the Verrazano / Belt Parkway traffic, consider yourself very lucky! ) so the hood pick up had to wait until this afternoon. But... at 3:00 me and my son Kyle ran down to the paint shop to get the passenger's side of the hood and bring it home: Remember yesterday when it was getting wet sanded. This morning the sanding was finished and the machine polishing step was about to begin. I first started by placing six drops of 3-in-one oil in the hinge groove. Spaced the drops out about every three inches. I thought it would help the hinge slide easier. Here the two halves are lined up and both have a few drops of oil in the groove. I installed the rear hold-down into the stainless hinge Then began sliding the hinge from the rear to the front. I got half way and it was just impossible to move. So I withdrew it and used a touch more oil on the hinge, and it started going. Finally it seated flush with the front and that was done. Next I installed the chrome trim piece that fits under the forward lip of the hood and finishes the upper grille. I had the screws chromed along with the trim piece. Pretty easy installation. View from the top with those special nuts in position. Next the hood handles. Just line them up and tighten the handles down. My question was whether a grommet of some kind fits in that recess between the handle and the hood? Then the hood vents. These require a little finesse to get them in without scratching the paint anywhere. A little squeeze here and a slight bend there and boom.... it drops in place. I installed it using eight, #6-32 X 5/8" machine screws. (It had rivets originally) Next, the trim molding that I polished up last night. Slowly get all those clips lined up, again, so careful around the new paint! Bring it close, move the clips a little, pull it back, check again and again. When all the clips and screws are aligned, snap it in and tighten the nuts and it's on! So, the hood is ready for installation! I loosened the large nut under the front clip. Then, I loosened all 10 bolts that hold the front clip to the fenders. I think (hope) that will give me enough wiggle room to get the hood properly aligned. Have a great night! Gary


-
1937 Buick Model 48: RESTORATION HAS BEGUN! (Photo)
Gary W replied to Gary W's topic in Buick - Pre War
Tuesday January 9, 2018: Driver's Side of the Hood done! ........ More prep work to get ready for the hood install. But first.... A few slightly "off topic" things: Mother Nature iced my car this morning! Beautiful, isn't it? Answer to the bench motor: My "Red Wing" brand bench motor. I've had it since 1991 and it runs so smooth and balanced. 1/4 horse, 2-speeds. 1725 RPM and 3450 RPM. I polish at the slow speed. (No rheostat, just two speeds) And yes, that new wheel creates a mess, but I swear that photo was not staged. I just stand to the side and let it belch it's mess onto the wall and floor. I wear a mask, gloves and safety goggles. I usually prefer working outside, but it's just so cold out there, I moved to the basement. BACK TO THE BUICK HOOD: This morning Bob was wet sanding the passenger's side. 1200 grit before machine compound and hand polish. But the great news............. The Driver's side is done! So I loaded it up into the truck, took it home.... I set it on my "hood table". It fit right on there nicely. It pays to measure first. Here you can see the layers under the hood to protect the underside from scratches while I attach all the chrome parts to the upside. I think I'll get the other side tomorrow. First thing I'll do is slide the stainless hinge down the center to lock the two halves together. Hood Related: I gave the "Special" plates another go. I first covered the words with tape. Then I used a sharp pencil to first make a pencil tracing, then I leaned on the point to try to "cut out" the letters with the pencil point. I really was afraid to use an Exacto knife for fear if it slipped a little, it would permanently scratch the chrome and ruin the piece. But, alas, even after all this, the other side that is buffed out almost smooth could not be cut smoothly, and half the letters were still unreadable. So, I've decided to leave well enough alone, and install the plates as they are... just chromed. (Sorry... I tried!) Then I finished these four special nuts that hold the chrome slat to the underside of the hood up front over the grille. Today I started making some preliminary measurements of the hood opening. I know I have the 1/4" gap up top, but by measuring the sides, I found the front clip needs to be "rotated" as it is more "open" on the Left side than the Right. So, I'll loosen the large nut under the front clip down at the frame, and loosen all 10 front clip bolts that bolt the clip to the fenders. I may even have to loosen the fender bolts if I cannot get the "rotation" I need. (Obviously I'm having a little anxiety over this hood thing) I really need to take a minute to address all the complimentary posts and private messages I receive. You guys and gals truly are exceptional and it's such an honor to have my work being followed by members with so much more experience and skill, and graciously sharing their insight. I appreciate all the support and thank you all for following along. Hope you all have a great evening, and the countdown is on for the hood! Gary


-
1937 Buick Model 48: RESTORATION HAS BEGUN! (Photo)
Gary W replied to Gary W's topic in Buick - Pre War
Monday January 8, 2018: Hood Stainless trim polishing I wanted to show some before and after photos of the stainless hinge and the side moldings. I had a few cancellations today, so I took the time to open a new cotton wheel, and using Tripoli, Rouge and finally Simichrome Hand Polish I finished the stainless parts for the hood. It's hard to photograph stainless but here you can see the tip of the one not yet done on the right And there were rust blossoms down the length of the hood side molding. I opened up a brand new cotton wheel. I use a lower speed as I find it much easier to control the work. First step was Tripoli. It removes the surface scratches and begins the polishing process. The next step is Rouge and then I finalize with a hand polish to remove any red residual and give it a final polish, After machine polishing. They didn't come out perfect, but some of the blemishes were really in there good. But I'm happy with the result. Have a great day! Gary (I was doing the cleanup after the plow finished! A little fun with the camera!!)


-
1937 Buick Model 48: RESTORATION HAS BEGUN! (Photo)
Gary W replied to Gary W's topic in Buick - Pre War
Monday January 8, 2018: Hood Update at the Paint Shop I stopped by the paint shop this morning on my way into the office. The hood is painted and here you can see the contrast between the trim black on the underside and the gloss up top. Bob was just starting the 1200 grit wet sanding process. Soapy water and a light touch to smooth out any irregularities in the clear coat. And then squeegee it off to be sure all the imperfections are smooth. I only stayed a few minutes. But I should be taking them home Wednesday. Happy Monday! Gary (Model56s.... Thank you for the kind words. I'm so happy to hear that I am helping boost the hobby. I truly love these old cars. I was born with motor oil in my veins.)


-
1937 Buick Model 48: RESTORATION HAS BEGUN! (Photo)
Gary W replied to Gary W's topic in Buick - Pre War
Sunday January 7, 2018: Getting things ready for the hood install But First: I shoveled. Can you say "backache", boys and girls? Back to the Buick: I installed this welt on the cowl and this leading vertical edge last week. I took Larry's advice and tonight I removed it in favor of a thinner welt. Here you can see the difference in the thickness. I used the one I removed as a template and marked the length and the holes with a gold sharpie marker. From there, it was three punches... Blackened the top edge with another sharpie marker And installed the flat welt using # 8 - 32 X 5/8" stainless steel machine screws and square nuts. Thanks Larry for the "heads-up" appreciate it. Then I sorted through boxes and bags to find and organize the Hood related parts I'll need this week. Any helpful hints on the hood install, please send them along! Have a great night! Gary


-
1937 Buick Model 48: RESTORATION HAS BEGUN! (Photo)
Gary W replied to Gary W's topic in Buick - Pre War
-
1937 Buick Model 48: RESTORATION HAS BEGUN! (Photo)
Gary W replied to Gary W's topic in Buick - Pre War
I actually sent the "Special" plate out for the laser cut process but even they told me the words are not raised enough to get a good digital photo and make the laser cuts. But it was my first idea. The Buick in the hubcaps came out perfect, as did the bumper guard cutouts but they just couldn't grab the "Special" I may just leave them chrome. -
1937 Buick Model 48: RESTORATION HAS BEGUN! (Photo)
Gary W replied to Gary W's topic in Buick - Pre War
Hi Matt... Thanks for the head up. I had Laser Cut-outs made for my hubcaps and for the bumper guards. The polishing left the indents shallow, so I used the vinyl tape instead of paint. ( 2 of the bumper guards have the black accents, two do not.... they were chromed at different times). I'll put the black accent on the two bare ones as soon as I figure out where I put the stuff! My car did not come with a gravel guard, so maybe a call to Bob's is in order. Anyone notice a quality difference between the repro and an original? Just much less body work on the repro if it is made well. Thanks! Gary -
1937 Buick Model 48: RESTORATION HAS BEGUN! (Photo)
Gary W replied to Gary W's topic in Buick - Pre War
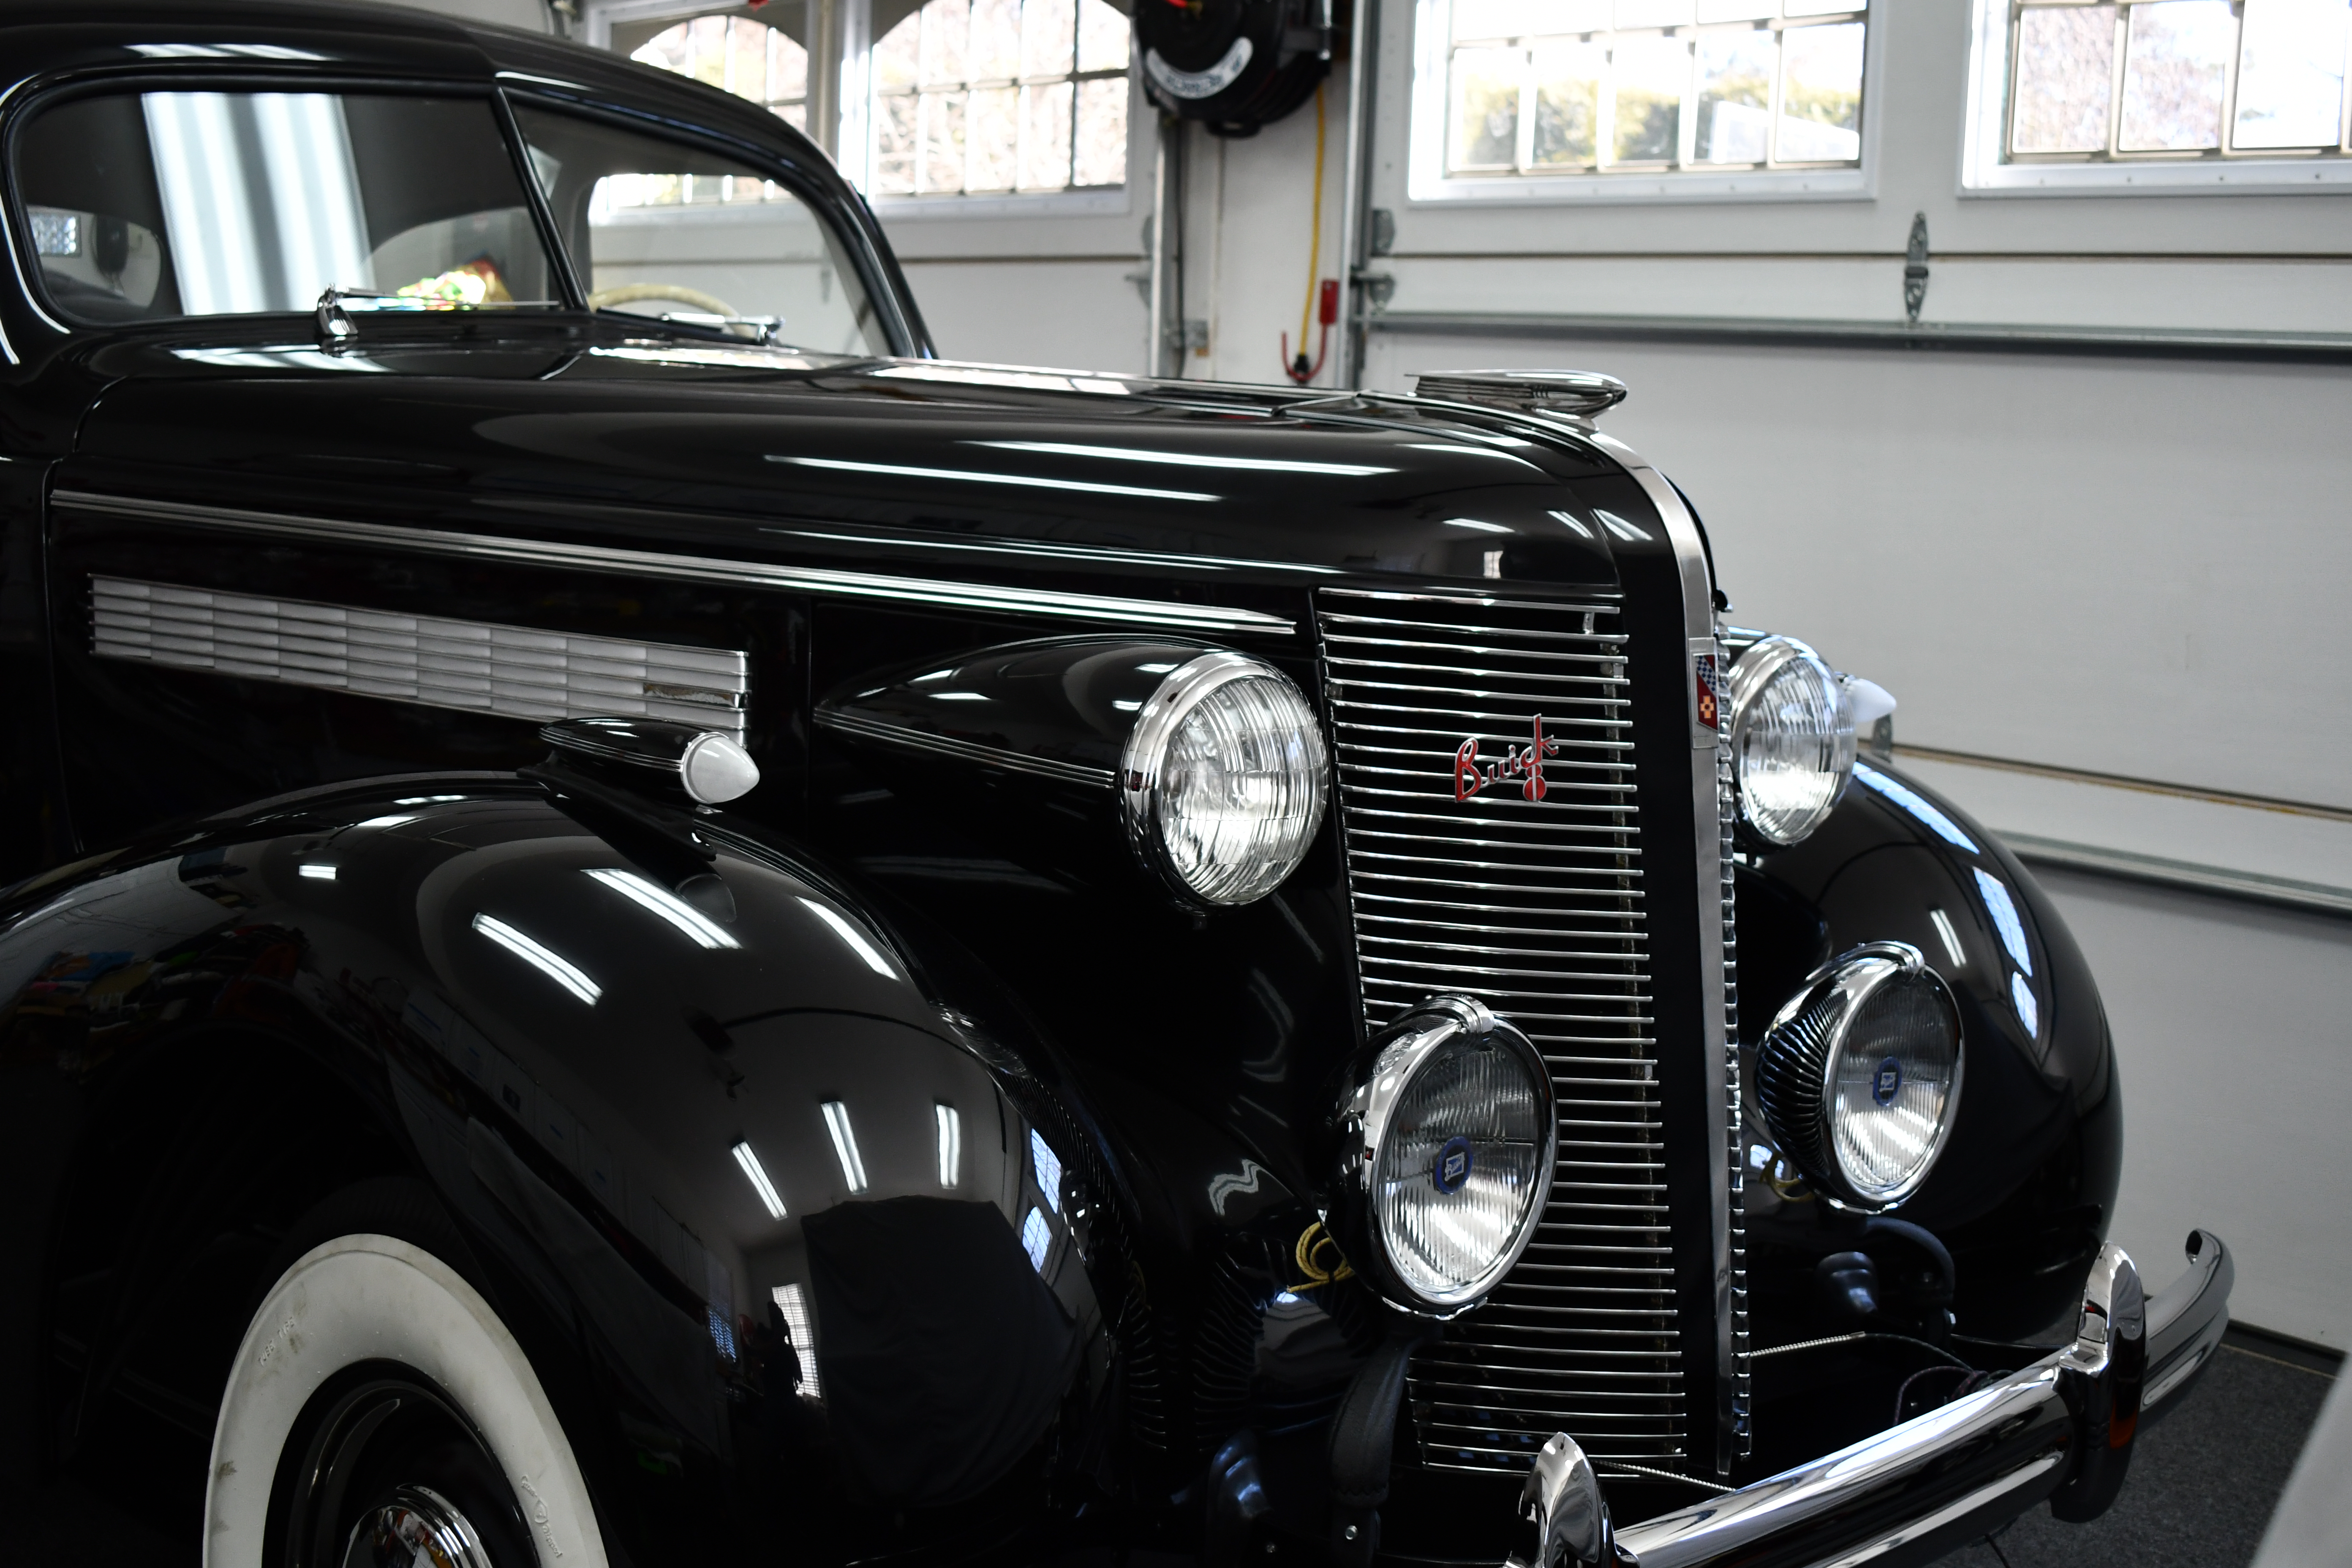
Friday January 5, 2018: Hood Vents, Chrome light switch bezel and Installation of the Front and Rear Bumpers: After some running around today ( S L O W L Y as we are still digging out!) I got around to a couple Buick projects late this afternoon: HOOD VENTS: Here is the underside. You'll only see this when the hood is raised. I've been spraying coats of the Rustoleum Aluminum paint, allowing a full week of dry time between coats. Here's the show side. The masking tape is still on the chrome ribs. Closer view of the up side. The tape still in place but today it's ready for the big reveal! I removed the green tape from the upper and lower chrome strips first. Immediately you can see the contrast. Then I unmasked the inner four ribs. This blue tape has a sort of elastic quality and it really seals nicely. No paint got under there at all! I highly recommend this paint. It went on smooth and the finish is beautiful! Now the chromed ribs really pop! This is the "Special" nameplate being installed. Notice I did not paint the word "Special" because it is barely raised and I think I'll just make a big ol' mess of it. I am very happy with the final results. I took my time and waited for that paint to fully cure before re coating because I didn't want it to peel or react in any way. It was worth waiting. CHROME DELIVERY: My final order arrived at 4:00. Bumpers, bumper medallions and the light switch allen screw and chrome bezel plate. My switch is held in with just an old rusted allen screw. It's the one that came out of the car. My car never had the chrome bezel plate. Just for the ones that haven't done it. You push the spring inside to release the pull knob. Remove the knob and use an allen wrench to free the light switch from the dash panel. The new chromed bezel plate and chromed allen screw going back in to secure the lighting switch to the inside of the dash panel. Slide in your knob, engage the spring clip under there and you are done! Just another nice finishing touch. (You'll notice I've removed the radio to ease the hood installation.) BUMPER INSTALLATION: I laid everything out, opening bags of parts and using new stainless bolts / nuts / lock washers for the outer bumper attachments. I bought these heavy duty stainless nuts, bolts, washers from McMaster Carr. The carriage bolt square fits perfectly inside the bumper support. Being I was working alone, I first set the outer bolts in their holes and ran the nut on a few turns. This allowed me to "hang" one side on the bolt while I got to the other side to secure that bolt in place. I got the outer bolts finger tight at first, just so there was enough "wiggle room" to install the medallions. You will have to push and pull on the brackets a little bit to get it all aligned. Once everything was installed, I tightened up the nuts and secured the bumper. I'm very happy I had them re-chromed. No sense going this far. Rear Bumper installed. Even the back side looks nice! FRONT BUMPER: FLASHBACK to January 11, 2017. The day I started this restoration. The bumpers were the first thing I removed. And tonight. Going back on the car! I did the front exactly the same method as the rear. Here's a shot of the back side of the bumper. Paul's did a really nice job (on everything!) Here's the front bumper installed. Do any of you guys put a rubber pad under the medallion where it touches the bumper so it doesn't scratch it? I think I need to update my "Front End Friday" photo!!! Thanks for all the birthday wishes, thanks for following along and I hope you enjoy your weekend. (P.S. The hood is painted, but the weather prevented Bob from getting to the shop to wet sand and buff it. But it should be done next week.) Gary


-
Really enjoy your workmanship: Is this the photo? It's in a post entitled "WOOD FLOOR BOARD" Just click that arrow on the upper right corner.

-
1937 Buick Model 48: RESTORATION HAS BEGUN! (Photo)
Gary W replied to Gary W's topic in Buick - Pre War
Thursday, 2018: It's my Birthday! 55 Today. And we got HAMMERED with about 18" of snow and blizzard conditions! Here's the latest Buick update: This Hood Prop was on the car when I bought it. So I shined it all up, replaced the nuts and bolts, tightened it up and replaced the worn rubber ends with neoprene tube... And made sure it bent down lower than the hood. I have to be sure it clears under there when the hood is installed. Did the '37 have any sort of Factory hood support? I saw another thread where the '39 prop was discussed..... Any info on the '37? PAINT SHOP UPDATE: The underside of the hood is painted in Trim Black. The top side is all finished with two coats of grey prime, then sanded with a guide coat. This was Tuesday morning (January 2, 2018) when I left the paint shop. The hood was painted shortly after I left. It now has to be wet sanded and buffed out but I couldn't get out today so I'll be picking the hood up early next week. What bumper goes in here? I have the triangle shaped bumpers for the front lower corner, but there wasn't anything here so I'm curious what belongs. Knowing I'll be picking up the hood next week, I got to work getting the car prepped. I sprayed the final coat of the aluminum paint into the hood vents. I attempted to paint the word "SPECIAL", but I think it was polished out too much and the letters are barely raised and I'll make a mess trying to paint it. Then, I removed the radio to get access to the rear hood retainer bolt. I think it'll be much easier to install the hood with the radio out of the way. While the radio was out, I installed a new light switch that Tom graciously sent me. Much better and nothing is on when it should all be off! I finished hooking up the vacuum line from the manifold to the wiper motor And generally tightened up the cluster screws, the welting nuts, cowl vent screws... just got things finalized under there. I measured the hood while I was at Bob's shop and when I got home I fabricated this stand to support the hood so I can pre-install all the hood goodies before lifting it onto the car. I cut this piece of foam board And tacked it to the wood skeleton And finally, wrapped it in four layers of this thick cloth to prevent any scratches under the hood while I work on the top side. I slid the rear hood retainer into the stainless hood hinge. I wanted to do a preliminary measurement. With the rear bolt in the cowl mounting hole, I have about 1/4" opening up front. Should I try to close this down a little prior to installing the hood, or is it easier to install the hood with a little "wiggle room" and bring the front nose into position while the hood is in place? Any suggestions here would be greatly appreciated. Have a great night out there, and to all my friends in the North East... be careful! Gary


-
Question: Being the Special and Century bodies are identical, where did Buick make up the 4" difference in the wheelbase? Is the chassis 4" longer? Curious
-
1937 Buick Model 48: RESTORATION HAS BEGUN! (Photo)
Gary W replied to Gary W's topic in Buick - Pre War
Saturday December 30, 2017: Hood Related Stuff installed onto the car I stopped by the paint shop yesterday ( Friday ) after work and the hood is now painted "trim black" on the underside, and the top sides are in grey build up primer with the guide coat applied. It won't be more than a couple days now, so I have to get the car and the rest of the hood related stuff ready and installed. Driver's side. Two coats of build up prime and the guide coat applied ready for final sanding. Passenger's side awaiting the same final sand, color and clear. I have the stainless hood hinge and the two side moldings all polished up and ready for the install. I'm applying the second coat of the aluminum color paint to the hood vents this week. I have the hood handles back from the Chrome Shop so I think I'm ready to go as far as the parts that go ON the hood prior to installation. So today, I got to the parts that need to be installed on to the body before the hood is installed: FIRST: That nagging water leak. I drained the block from the side drain only. Then I removed the hose. I measured the distance between the thermostat housing and the water inlet neck of the radiator upper tank. There is 6" from edge to edge. So, I'm thinking a 7" hose gives me 1/2" overlap to clamp to. I had a feeling the hose was too long, and it was distorting over the housings preventing the clamps from sealing nice and tight. Here you can see where the hose distorted around the base of the thermostat housing, so I decided to trim it. The hose was 8" long, so I removed 1/2" from each side (trying to get rid of the distorted areas) Clean slice and back on to the car. It fit much better without any pressure pushing up and down on it. And it's holding water just fine now! Installed the Hood Side welting with machine screws and square nuts. When I got the car, it did not have any of this side welting installed, but I think it adds a nice finish and hopefully will let the hood seat properly. In the background you can see the trimmed hose in position. I used the same welting and the same machine screws on the cowl. I put the first two in on the top, then giving the welt a little tug, I used a punch to open the holes and installed as I went. I had to remove the interior kick panels to get the screws in. Next came the hood locking parts. These are the parts I cleaned and painted last week. This is the passenger's side. I left it loose for now because It'll need to be adjusted when the hood is set in position. Does anyone use a paper gasket or rubber pad between this and the fender? Or straight metal to metal? And finally, the upper, rear hood locking parts. Again, left them loose for now. And again, gasket here?? Gas Filler Tube Fender Grommet: I just wanted to share the difference in two parts. The new one from Steele came in (On the Right) It has a very nice shape and a mushroom flange at the bottom. It fit right in perfectly and makes a nice seal to the car. I did not use any adhesive here at all. Maybe down the road if necessary. ONE QUICK "NON-BUICK" PROJECT TODAY: I went over John's house this morning and installed a new wiring harness into a 1968 Mustang he is working on for a friend in town. First of all, I'll NEVER complain of wiring the Buick! The Buick has space to work! These Mustangs are tight, unforgiving, and filled with tons of sharp, unfinished metal parts that cut you up like you can't believe! What a tough job. When I finished at John's house (3 hours), I bought the dash assembly home with me and restored it tonight. I know it's not Buick, but the before and after is nice. I rewired the cluster, swapped all the gauge lenses and installed everything into a new dash cluster. Another couple of hours.... but a nice finish! I truly hope you all had a very Merry Christmas and I wish you a HAPPY AND HEALTHY 2018! Thanks to everyone following all through the year! Gary


-
I think the frame number is simply a sequential number as the cars were being produced. Here are some of my numbers: 1937 Model 48: 2-door "trunkback" sedan: Firewall data tag Body # 6889 Chassis number plate. Frame #3105718 I had to do a pencil tracing for motor vehicles. Engine # 4 3279307 Date of Manufacture: February 16, 1937 So, I guess my car is considered middle of production for 1937? Being the '37 above, titled as a '36, was built in September. Gary
.thumb.JPG.1fd228bd2011be0efe61d63ffd655380.JPG)

.thumb.jpg.cade4ee38ef1088a740a543bf3941e3c.jpg)


-
1937 Buick Model 48: RESTORATION HAS BEGUN! (Photo)
Gary W replied to Gary W's topic in Buick - Pre War
Wednesday, December 20. 2017: Hood Update at Paint shop and at Home I stopped by Bob's shop over the past few days and got some photos of the progress. Then I realized that the hood will be ready for installation next week, so I had to get home to get all the "hood related" parts restored and ready for that day. Tools of the Trade. All the paint / primer / filler was sanded out. There was only one small "bump-out" that required the hammer and dolly. Passenger's side sanded clean. Notice how little filler is actually on the hood panels! The entire top surface is straight and smooth, no pits, no rust. Very Happy! Passenger's side in yellow self-etching prime. It looks better already. Driver's side. Again, the metal is in amazingly good shape and there is only small areas of body filler fore and aft of the hood vent. Top surfaces in yellow self-etch. Today they will get a light sanding and two coats of the grey build up prime. Then it's to the underside to finish sanding smooth and a coat of SEM Trim Black. HOOD VENT: January 11, 2017: You can see the silver color in between the chrome ribs. Close-up The paint has an "aluminum-like" color to it. Hood vent just before restoration began. Here are my hood vents from Paul's Chrome Plating. They stripped off all the residual silver paint prior to chroming the ribs. First, I cut a paint stirring stick so it had a little less than a 1/2" tongue. I wrapped the tongue with a strip of 600 grit to roughen up the surface for paint. The rubber band allowed me to rotate the sand paper around the tongue so I had a nice fresh area at the top. This took a long time getting in and around the bends. Get started, one by one, sand each area smooth. I was careful not to hit the chrome strips so it took quite a while to finish this step. Bob gave me the thicker green tape, and this really cool, thin blue tape that is actually kind of elastic. I had to cover each chromed rib twice as the tape wasn't wide enough to cover the chrome in one sweep. Inch by inch, then roll the tape around the end curve. Pinch it off so the spray paint doesn't get under the tape. So here is a close-up of the masked off ribs. Then I scrubbed each insert with acetone to be sure it was nice and clean. Finally, I used my compressor to dry everything in and around and under. I chose the same color that I used for the door sills (in the photo above) because it is almost a perfect match to the original silver color paint I got the car with. This Rustoleum product is "paint and primer" in one shot. Here is the first coat. I am going to let it dry for a full week before attempting the final coat. Here's a close-up photo of the silver paint in the recesses. What do you think? Will the rustoleum hold up to the engine heat? (I guess I'll find out first!) HOOD HOLD DOWN CLIPS: These have been sitting in their bags since January. Working my way into the bottom of the parts boxes. One bolt was sheared off and completely rusted to the metal support, attachment bar. A hacksaw, PB Blaster, vice and a small hammer. It finally gave up. Off to the bench grinder and my wire wheel. Those other square parts are the hood hold down that slide inside the center stainless hood hinge. The new shiny, stainless bolt is for the rear hold down, as the original was way too short to support the radio installation. The "dome" of the new carriage bolt was a bit too tall, so........ I ground down the head so there was plenty of clearance under the stainless hinge. So now it's ready to go through the heavy metal block and into the cowl of the car. The other bolt is the replacement that replaced the rusted one. I ground the new markings off the head so it looks correct. Here you can see the the parts cleaning up after the wire wheel. After wire-wheeling and an acetone scrub. Sprayed gloss black. Are these hood hold downs metal to metal on the fender, or should I cut a thin paper gasket under them? STAINLESS HOOD HINGE AND STAINLESS HOOD MOLDINGS: Here's the before photo. I removed all the molding clips and scrubbed all three parts in the sink with Bon-Ami 90% of the rust and discoloration came out. Next, I''ll use the cotton wheel with the jewler's rouge and finish with a hand polishing using Wicked Metal Polish or Simichrome. I didn't get to the final finish yet. But the Bon Ami was a great first start. Next, I finished installing the hood bumpers into the front shroud. There are six of these on my car. Requires no tools. Easy enough to bend with your fingers. Here's a close-up shot of the radiator support irons and the shroud bar. I got the shroud bar installed using two spacer washers and these clips. I know it'll need adjusting when the hood goes on to get things lined up so it's tight, but not too tight. All the bars are powder coated "mirror black". The clamp I cleaned with the wire wheel wheel and simply sprayed with self-etch primer and Rustoleum gloss black. Shroud bar in place. (The paper towel is wrapped because I have a nagging slow leak up at the upper hose. No matter how tight I tighten that clamp. it still drips!) Have a great day today! Gary


-
Here's mine.....
.thumb.JPG.fb4ca7b0f5aa7013ebc256162af08a5c.JPG.e879897224bb7307b306f27474609169.JPG)
.thumb.JPG.6d6c22cd80e88ee81d6de51952391705.thumb.JPG.ec6b95daa873c815b7896e0f8f39cb18.JPG)
-
Bob's Speedometer. They repaired mine and did a nice job.

-
Bob's Speedometer repaired my temperature bulb. There is a gas of some sort in the tube so it has to be done by a qualified technician.


.JPG.70fdde3f7437118e7fc77c6a8034e861.JPG)

.jpg.aa0aaf94ec050f2b5206a9e385baff8c.jpg)


.thumb.JPG.fb4ca7b0f5aa7013ebc256162af08a5c.JPG.e879897224bb7307b306f27474609169.JPG)
.thumb.JPG.6d6c22cd80e88ee81d6de51952391705.JPG.f7db24d5081f3e1699e5cc1367be89da.JPG)

.JPG.bc7de3b4bfd54149991d00f2ba20e573.JPG)
