Randiego
-
Posts
309 -
Joined
-
Last visited
Content Type
Forums
Gallery
Events
Everything posted by Randiego
-
Wow, The "country traveler" really filled in the info on the hubcaps. My thinking on your locking hubcap. Was there an application for side mount spares? If so, then the hubcap was a further deterrent for theft. Would the "country traveler" have a good source for restoration of my 36 P2 hubcaps? I am in San Diego and would like to find a plating shop that can do the old fashioned plating with out me going to Tijuana. The hubcaps (I believe) are skinned in a brass cover that can be carefully removed, creases and dents attended to, polished and then plated. The proper way is for copper to be laid on think then polished, nickle applied (again thick) then polished and then chromed. My old chrome shop use to do this method but has since sold out to a new owner who doesn't want to continue with this type of work. SO much for the old world craftsmanship that we once knew. EPA and CARB (California Air Resources Board) have really ruined the plating shops along with the painters here. You cannot even get a lot of products that we had available to us here in la la land. You have to go to Phoenix or Vegas to get products that we once had on the shelf here. So goes the world. Randiego
-
Keiser 31, I would have replaced the harness except for one thing. It is in excellent shape and has not been disturbed previously. I am familiar with individuals who have not respected the "old wiring" and in hast to get their cars running, have used compromised wiring harnesses, ending up with a fire and a melted mass of electrical components and a "fused" bunch of wires. Believe me, I would not want to be in the latter category. My harness is intact with the braiding all in place. Granted, if you move the harness around, you will break the insulation on the wires as I am sure that the insulation is very brittle. After all, it is 81 years old. The car ran beautifully with all gauges, lights and instruments all working. The wires on the back side of the panel are still pliant and believe me, I am extremely careful not to bend or move them any more than necessary. I got my Plymouth shop book and there is a very good schematic of all the wiring and the destination points of where the wires go. My problem is that the "color coding" on the wire is rather faded and it is hard to tell the color. What is simple about the P1 is that most of the power is derived from the hot side of the Ammeter. I just have to find out which wire is going to the fuel gauge and the ammeter. The oil and temp gauge are mechanical and do not have electrical connections. SO.......it shouldn't be that complicated to figure out what goes where. I have made it easy by removing the front seat, the pedals from the clutch and brake and the glove box and ash trays. I have clear access so I will at least get the car running tonight. I will worry about any thing that I cannot figure out tomorrow. Randy
-

Roger's handcrafted 1:12 scale models
Randiego replied to Roger Zimmermann's topic in Our Cars & Restoration Projects
Well Hooray ! Another problem solved. And it was a big one. I am glad that you were able to find a working solution that will not hamper or compromise the operation of the window. The first time that an admirer is looking at the model and you depress the switch and the window rolls up or down, the expression on their face(s) will be....... amazement. Much like the first time that we saw your site and the construction steps of the model. The Continental has come a long way since you were casting the tires. I am still amazed as to how you got the lettering in the molds, finishing up with perfect little 1:12 tires. The detail is phenomenal. And the work on the hubcaps........Truly a work of art. it boggles the mind to see the detail that is added at each step. It is always cool to see you overcome the issues and filling us in on how you accomplished the task. Randy -
Roger's handcrafted 1:12 scale models
Randiego replied to Roger Zimmermann's topic in Our Cars & Restoration Projects
Bravo Roger, Always the engineer with the ability to solve the problem. We will await the pictures to see where the motor will mount and how the "shaft(s)" will function. Randy -
Roger's handcrafted 1:12 scale models
Randiego replied to Roger Zimmermann's topic in Our Cars & Restoration Projects
Roger, I have seen very small universal joints that will suffice without losing the torque of the drive motor. The key is to find the right combination of universal and thrust bearing(s) at the window mechanism. And that is where you will succeed as you have a better "handle" on the issue. We can only speculate what you are up against. It is another to be there in person with the problem at hand, mulling over how you are going to attack the problem. With the micro industries all over the world now, so many options are available compared to 15 years ago. I am sure that the needed parts are out there or..........you will build them yourself ! We will await the end of September to see what you have come up with. Randy -
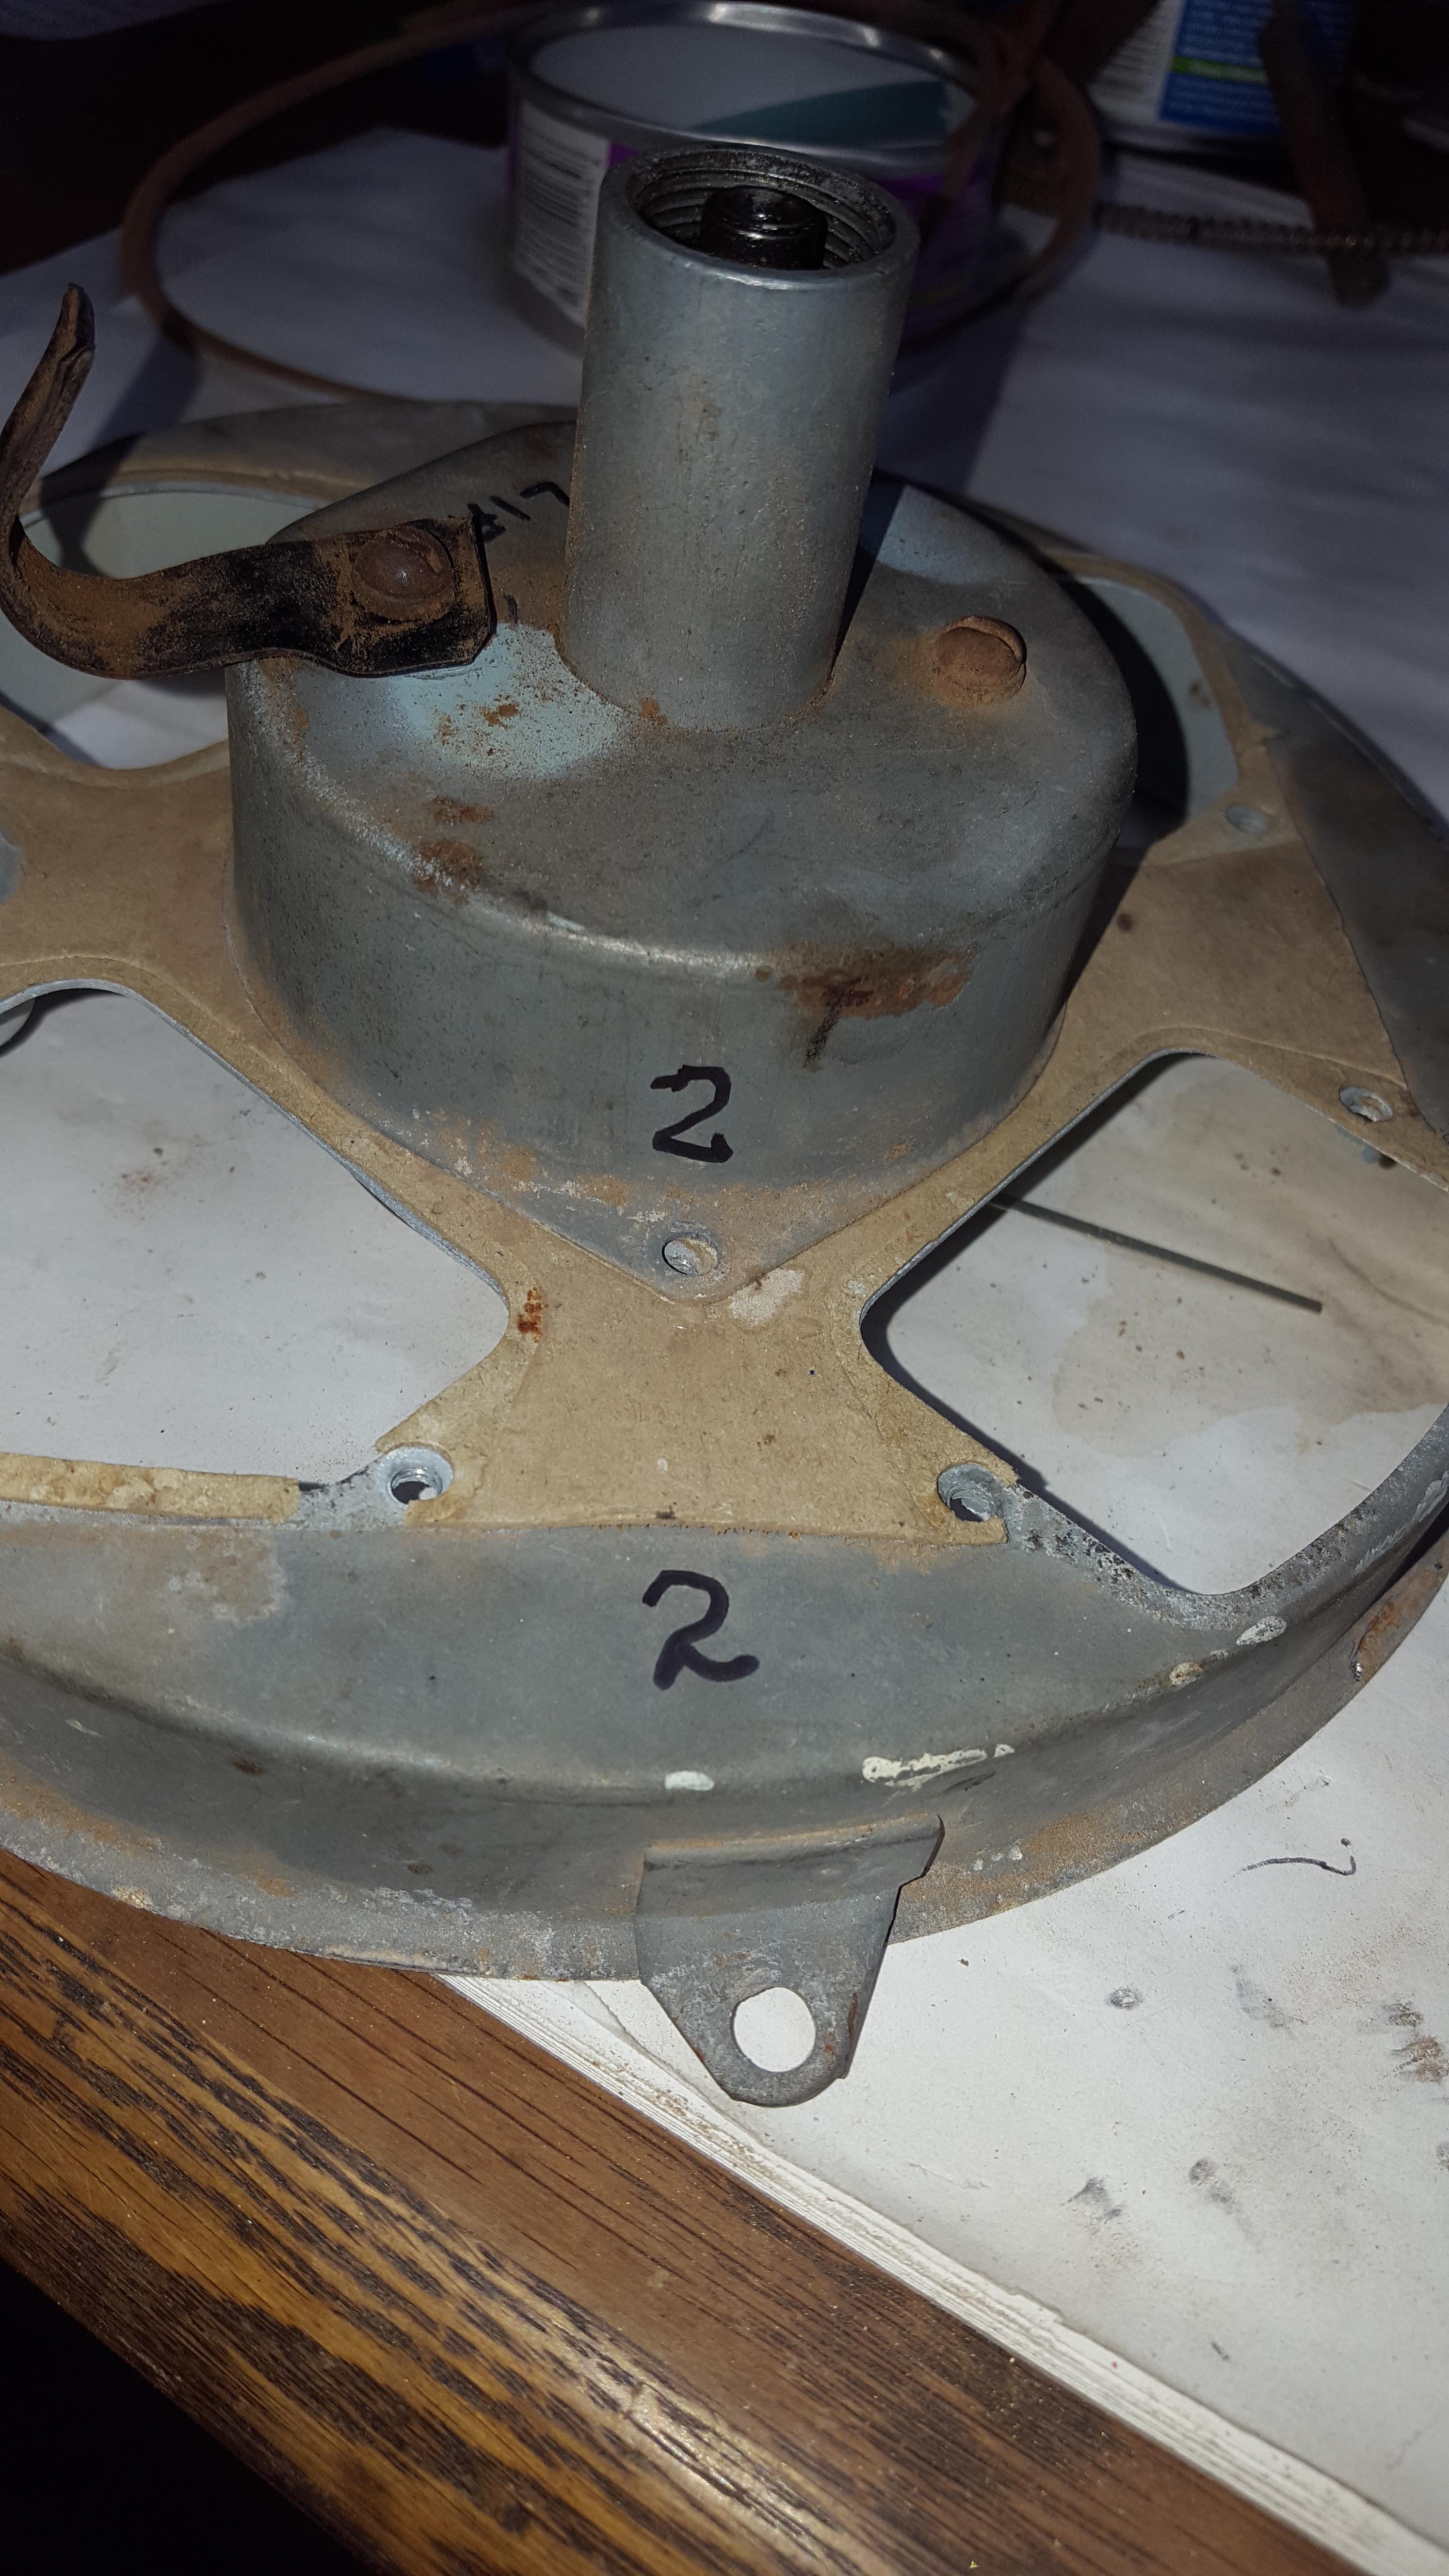
In the pictures here of the speedo, it shows the "white grease" in the gears. After talking to the speedometer shop here in San Diego, I removed the white grease and replaced it with the moly grease. As he stated, white grease with harden over time. Randy
-
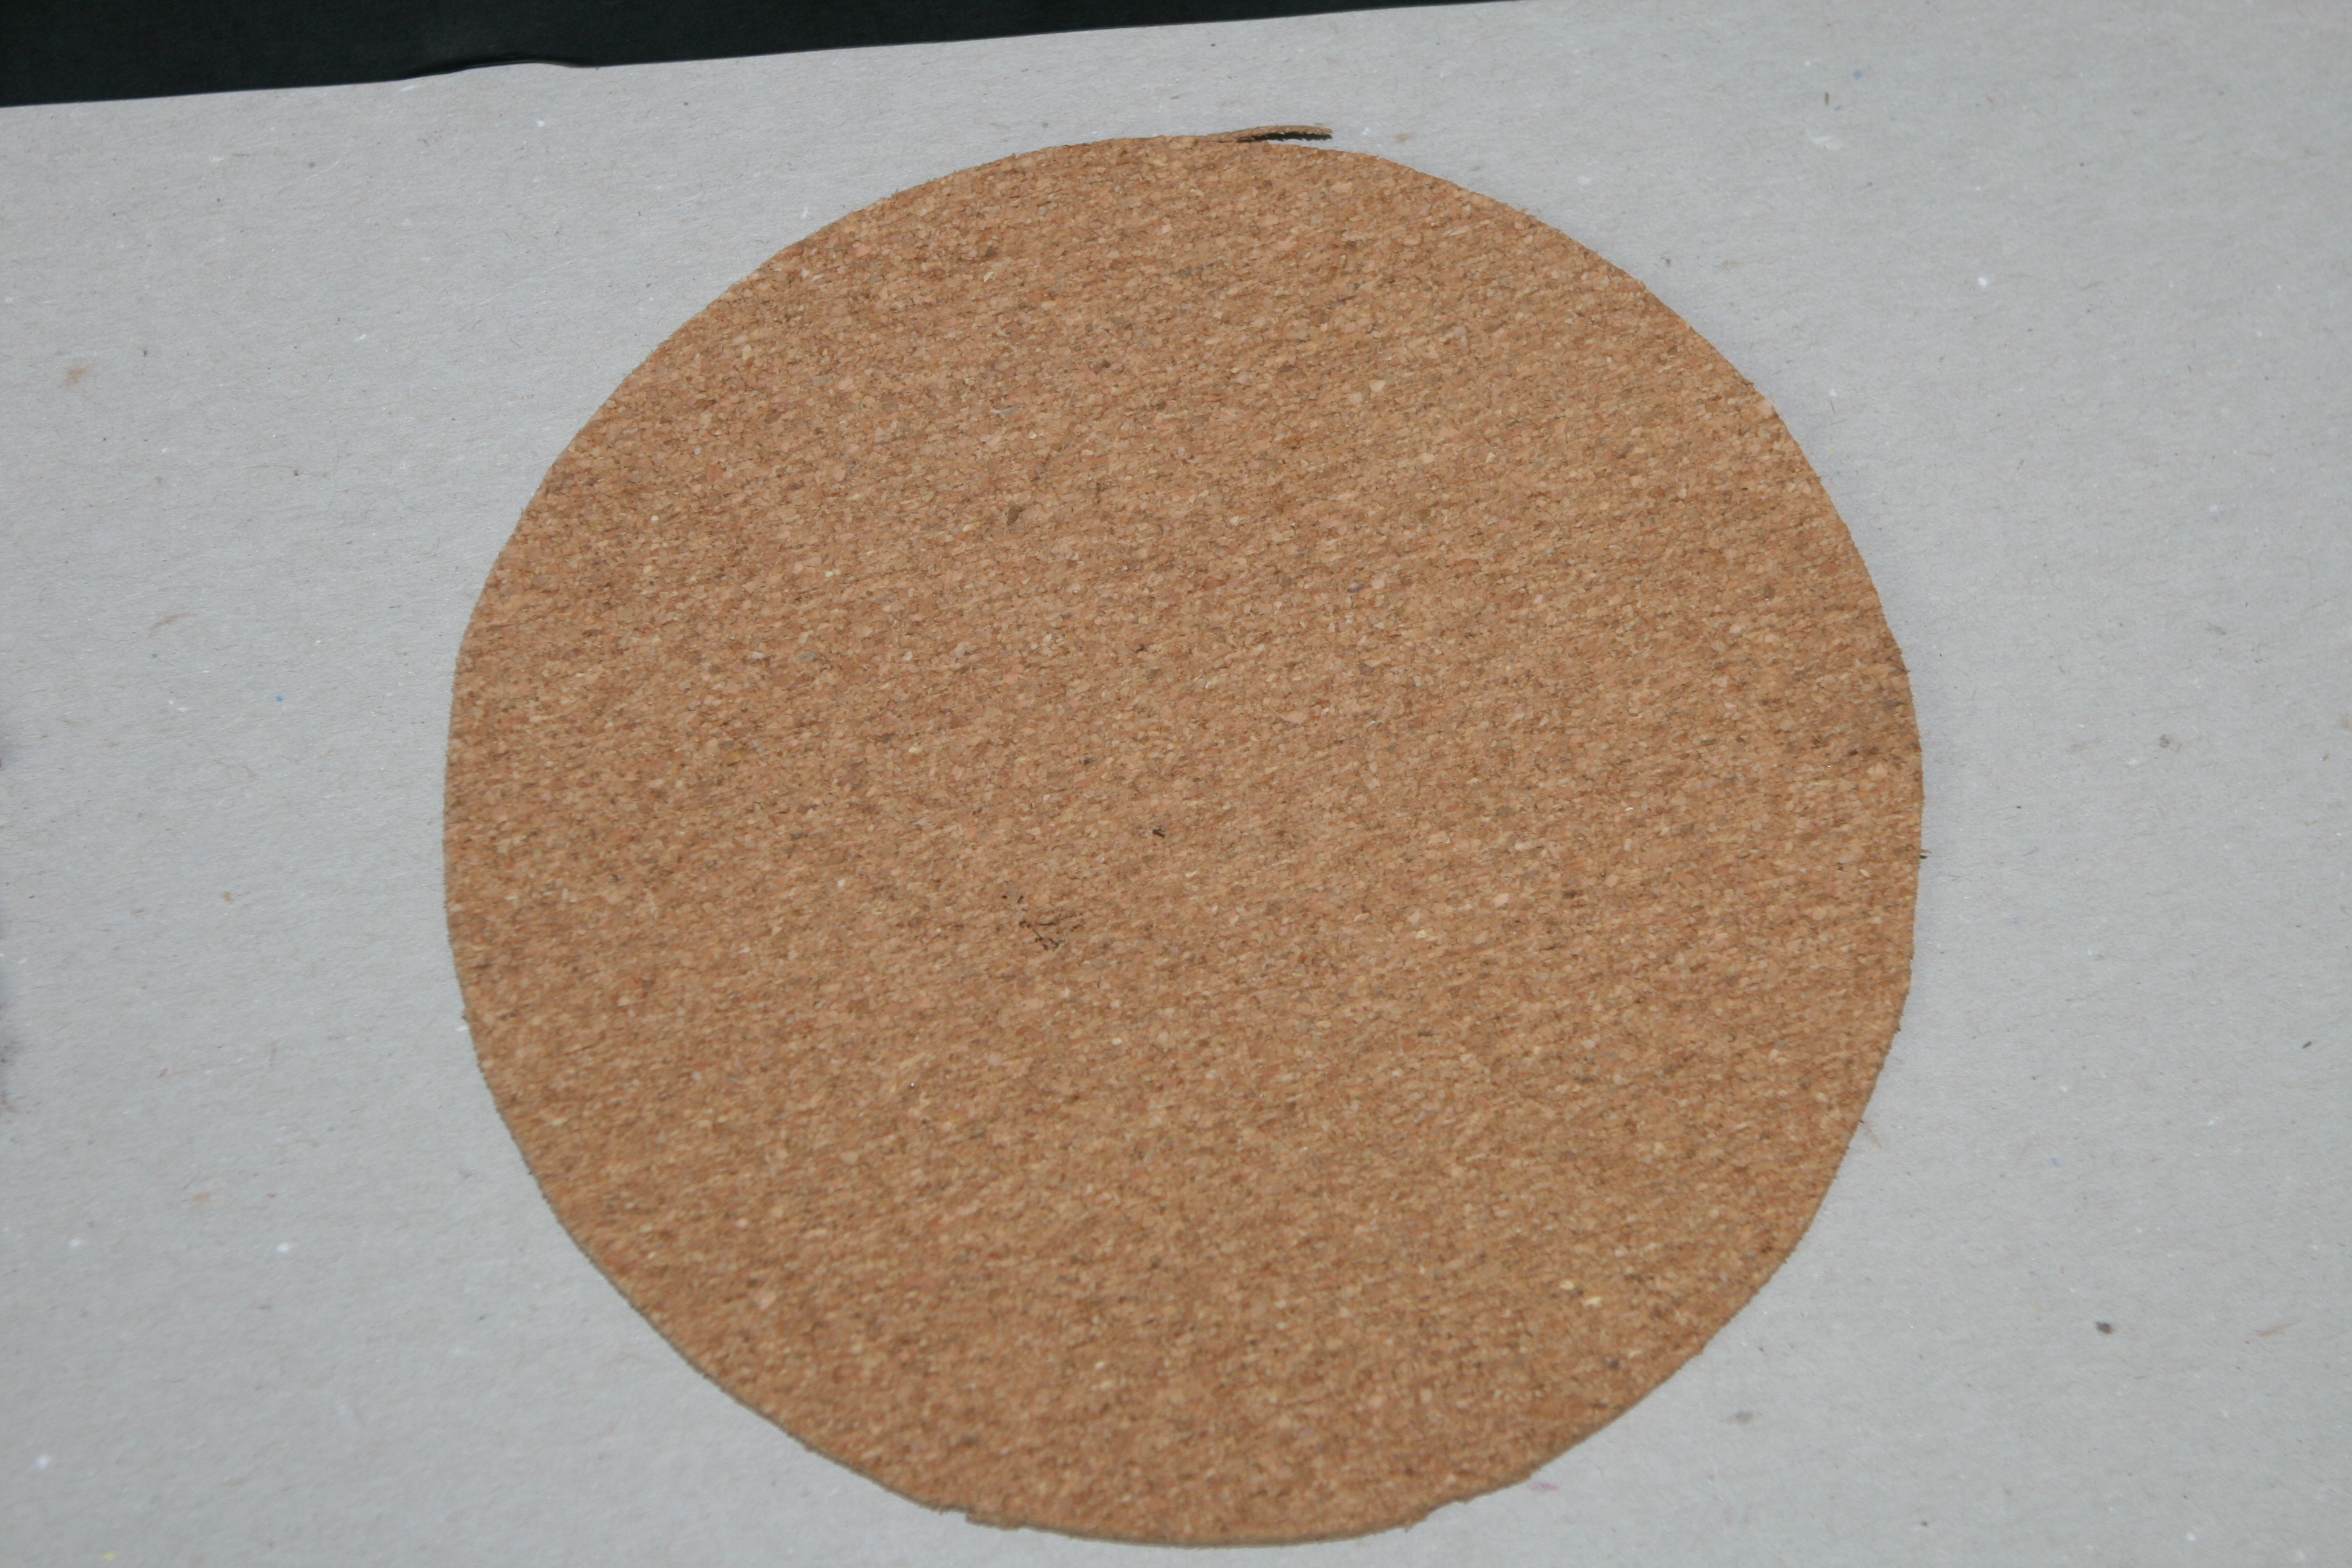
HELP ! Some months back, I took my instrument cluster out of my 36 Touring Sedan. All the gauges, illumination lights and odometer worked but the speedometer was in op. I made the decision to see if I could restore the instrument cluster along with the speedo. I got another instrument cluster from a Plymouth Owners Club member that had been sitting on his shelf in the garage for some time. When I took it apart, all kinds of bugs (dead) and their carcasses and residue had to be cleaned out of the case. I found that the gaskets had shrunk but the facia was in good order. I carefully cleaned up the face plate, chrome trim bezel, made new gaskets and carefully cleaned the gauges. I disassembled the speedometer and found that the needle indicator would not move due to congealed grease. I cleaned all of the old grease out of the head and lubed it up. The local speedometer shop told me NOT to use white grease as it will harden over time. I used the moly grease that he recommended. Attaching a drill motor with a piece of speedo cable to the speedometer, I 'spun:" the instrument and it worked flawlessly. I polished the outer chrome bezel, cleaned the glass lens and re assembled the cluster. I have attached pics below to show the process. I admire the engineers of the day as this speedometer was built for Chrysler Corp by a supplier that really engineered the instrument with quality. Much as everything else Chrysler Corp. designed. If you ever had a fear of doing your own clean up and repairs of a speedometer, this unit is "straight forward" No secret pins or gears that will fall out. But taking out the instrument panel is necessary. One caution; If you have original wiring, be sure not to disturb the wires too much. The insulation is 80 years old and brittle. So far, I have not had any issues with the wires as they are somewhat pliant. I cleaned up the temperature gauge and carefully moved it out of the way as that is the only gauge that has to be re used, unless you are replacing that unit. The rest of the gauges I swapped out from my original instrument cluster as they worked fine. I made new gaskets from manila file material and cork. I got new sheet cork from Bangor Cork and cut the new cork gasket from that. I cleaned the light blue acetate "diffusers" and re attached them to the outer housing. The instrument lights shine through them giving a nice "glow" to the instruments. This was a lot of trouble to go to to get my speedometer working again but being anal about wanting my Touring Sedan in top operation, it was necessary. I also want to point out, it is to your advantage to remove the glove box, cigarette ashtrays and any other items that will impede your access to the instrument cluster. I also removed the front seat and laid a piece of plywood over the seat mounts, laying a moving pad on that. I removed the clutch, brake pedal, and accelerator pedal. If I were a younger man and my body was more limber, I could move around much easier but time has not been too kind to me in doing this kind of work. I am better at vertical tasks. :-) In this job, most of your work will be done on your back with your head resting against the firewall. When I first got the Plymouth, I took the heater out and restored the unit. As I was getting the cooling system in order, I wanted a heater that would give me heat for our cool days here in San Diego. That gave me an idea of what I was up against in the limited area you have to work with in the narrow cabin. Unlike a 40's, 50's or 60's cars, there is a lot less room under the dash. The windshield wiper hose is another issue. Moving it up and out of the way, it broke in two pieces. The hose is hard and needs to be replaced. That is my next job; getting the windshield wipers operational again. Now for the issue at hand. I had labeled all the wires and where they hooked back up to the instrument cluster. Most of the power is supplied from the back of the Ammeter. But what hooks up where is now lost to me due to the sheet that I drew showing what wire hooked up where. I have been looking for that dratted sheet for over a week. It must have been tossed by the cleaning lady who did a nice job in my office. TOO NICE. It was accidentally tossed in the clean up. I went to the Plymouth manual but it doesn't show the color coding of the wires. I guess that you have to trace out the wire to see what it is attached to to know where it goes on the back of the panel. Before I hook up the wrong wire and "fry" this 80 year old harness, I was hoping that one of you would be able to illuminate this issue with a better publication or ? . Some are easy. The instrument lighting is all the same color and the bulbs/sockets are all replaced back in their respective locations to illuminate the cluster. Before I have to take the car to my friend who has an auto electric shop, I would like to try to solve this issue on my own. At worse case, he is a whiz and can discern how to re attach all the wires in their correct location. Also, I recently found a "Firestone" radio, which is period for this car. It is made by Stewart Warner. I took it to the Antique Radio Shop here in San Diego and the guy, Jeff, is a whiz with old radios. He replaced all the old capacitors, and old parts with newer ones. I found a guy on the east coast who had an original antenna mast (it was EXPENSIVE) new in the box. The paper work showed that it was made in 1936. The radio/speaker box mounts on the firewall and the dial with the two knobs and cables mount on the steering column. With the replacement instrument cluster, there was the correct connection and resistor on the unit. Seems that the car that this came out of had a radio in it. What a find! Solved two problems. I realize that this is a long post but I thought that the members who have the 36 models would be interested in seeing what can be accomplished if you take your time and are careful. It is not rocket science (like the new cars of today) and is enjoyable solving problems that are comparatively easy next to a new car. If you have ever done the instrument panel, hopefully, you can shed some light on the issue I am facing here. Or if you have a 36, possibly you could take a picture of the back of your instrument panel showing the wires and where they go. That would be monumental in solving my dilemma. Any help will be deeply appreciated. Respectfully, Randy


-
Roger's handcrafted 1:12 scale models
Randiego replied to Roger Zimmermann's topic in Our Cars & Restoration Projects
Just what you need. Another issue to work out. We will see what you come up with to solve this problem. Randy -
Roger's handcrafted 1:12 scale models
Randiego replied to Roger Zimmermann's topic in Our Cars & Restoration Projects
Roger, Looks like you had to dismantle the car to work on the interior. Will the seats be sprung authenticating the real seats? there are voids in the middle of the seats. With your talent for making springs, I am guessing that the centers of the seat bottoms and seat backs will be "wired" for spring action giving the feel of the real seats. I am just guessing as we will have to wait and see what you do here with the forms. We can only contemplate what you are going to do. Looking forward to the next post showing us what is next. Randy -
Roger's handcrafted 1:12 scale models
Randiego replied to Roger Zimmermann's topic in Our Cars & Restoration Projects
Roger, If you cannot find anyone in your area, there are plenty of guys that can make the decals. If you have the 1:1 decals, they can scale them down to 1:12 and print them off on decal material. Here in San Diego, I know of an individual who can assist you if needed. Randy -
Roger's handcrafted 1:12 scale models
Randiego replied to Roger Zimmermann's topic in Our Cars & Restoration Projects
Beautiful work Roger. Fantastic. The engine shows so much detail. Do you make the decals too? I know that there is a program (in photo shop?) that is for the modelers to make them but I never have. What are you using for the ignition wires? Will they have "boots" or metal clips? Randy -
Roger's handcrafted 1:12 scale models
Randiego replied to Roger Zimmermann's topic in Our Cars & Restoration Projects
Bonjour Roger, Glad you made it home o k. Hotter n' HELL here. What makes it bad is the humidity. We get more than illegal immigrants here in San Diego. A tropical storm is in the Gulf of Tehuantepec off the coast of Acapulco Mexico. It is pushing North and all the humidity has settled in on us making it so very miserable. Don't want to work, don't want to move around as it is extremely uncomfortable. We are used to dry desert air and this is the pits. Enough about me. I hope that your stay in France was good and that you got to spend time visiting and enjoying the food and wine. How does the small parts in the basket get coated evenly. Do they agitate it to ensure that all sides of the parts get exposed to the electrolyte bath or ? Amazing that this process works for you as those are extremely small parts, especially the letters. Randy -
Roger's handcrafted 1:12 scale models
Randiego replied to Roger Zimmermann's topic in Our Cars & Restoration Projects
IT has been very hot here also. IT hit 115 degrees Fahrenheit in Phoenix, the next state over and hit 110 degrees in Anza Borrego (our desert not 70 miles from the coast). A friend has an apple orchard up in Julian, Ca., which is only 40 miles from here and it has been hoovering around 93 to 95 degrees for the last week. He is working in his orchard and starts at 5:30 AM and quits when he cannot stand it any longer (around 11:30 AM). He is drinking around a gallon of liquids every two hours. Me I am staying by the beach. Believe it or not, it has been staying very comfortable (in the high 70's, low 80's) all week. If we get a Santa Ana (a westward wind blowing off of the desert) that will change VERY QUICKLY. Right now, we have been given a reprieve and are keeping our fingers crossed. Stay cool and we will hear from you in the near future. Right now, I think I will go make another pitcher of Ice tea.......................or something stronger. :-) Randy -
Roger's handcrafted 1:12 scale models
Randiego replied to Roger Zimmermann's topic in Our Cars & Restoration Projects
Roger, When are you getting back from France? -
Roger's handcrafted 1:12 scale models
Randiego replied to Roger Zimmermann's topic in Our Cars & Restoration Projects
VOILA ! ! I found that new colors seldom are generated. A lot of manufacturers "re cycle" older colors with just a minor change. Let us hope that the colors that you get there will answer your needs. Are these urethane paints or just enamels? June in France must be very nice. What part of France are you staying in? Enjoy your vacation. Randy -
Roger's handcrafted 1:12 scale models
Randiego replied to Roger Zimmermann's topic in Our Cars & Restoration Projects
Roger, When you move .002 to the next dot, how do you measure that . Is your wheel graduated in thousands? How many dots are in a row? That must be a time consuming chore. Any way, We will be awaiting the final results. Randy -
Roger's handcrafted 1:12 scale models
Randiego replied to Roger Zimmermann's topic in Our Cars & Restoration Projects
Roger, Seeing the parts "materialize" before our very eyes is always a source of enjoyment. Probably not for you as it is a lot of labor, but when you are done, it is another milestone finished. The sill plates, with their compound bends and curves exemplifies the amount of work that goes into just one part. AND multiply that by the whole car ! I am for the Canon camera. Without flash, you get ALL the detail of the car or part without the "burnout" of the flash. These new digital cameras are able to take very detailed pictures with a lot less light. I delete my flash in a lot of pictures for that very reason. And the pictures come out (for the most part) excellent to satisfactory. As you use your new camera, you will find it much more versatile. As technology advances, our photography improves with leaps and bounds. I do not envy you for the labor in getting the dots in the sill plates. Getting all those impressions pressed into them takes me back to the plate on the dash that took a lot of time to get all the detail in that part. In "dimpling" the sill plates, will you use a jig for alignment? I guess that we will see what and how you do that job. Excellent work ! Randy -
Roger's handcrafted 1:12 scale models
Randiego replied to Roger Zimmermann's topic in Our Cars & Restoration Projects
Roger, Looking at the window molding, it looks perfect. The compound curves look like they would have been a real challenge. But it came out excellent ! I have a Paschal and a top of the line Badger air brush set. It took me some time before I was proficient in using the air brush but once I got the hang of it and practiced, the results were fantastic. It allows you to apply a much finer finish and, unlike a rattle can, you have control as to how much paint comes out and you can control the pattern. Either a fine line or a wide swath. If you have not used an air brush before, it is a departure from a rattle can. With practice it produces great results. On a higher end, model, such as the Continental, I am sure that there is a procedure that you do that gets you the results that are satisfactory for you. Products have changed a lot in the last 10 years. They have developed paint technology and now have some amazing products. Whether you are painting a 1:1 car or a 1:12 car, it is all about technique. Roger, I am sure that you have your own system for the final finish. A lot of the painters that I know out here in So Cal. are stingy with their techniques and systems. They are too busy to try and teach or share what they do. Maybe they feel that you might become their competition? I have one good body shop that I can lean on for expert advice. The owner just built the most beautiful coupe and the paint, fit and finish is flawless. He tells me it is not rocket science, just a lot of practice and diligence. AND a deft eye for detail. Like you, they are meticulous with the small details. He will help me with any issue that arises. I am sure that after you paint your Continental, color sand and polish the finish, it will look amazing. Your advantage as an engineer is that you are able to dissect and analyze the issue at hand and are able to arrive at the answer that is fitting for the problem. We are watching the Continental take shape and it is a wonder to watch it develop. Great work, Roger. Can't wait for the next post. Randy -
Roger's handcrafted 1:12 scale models
Randiego replied to Roger Zimmermann's topic in Our Cars & Restoration Projects
Roger, Finally my question is answered regarding how you made the front and rear "glass" for the model. I have never had to make a windshield and was wondering how you accomplished that step. I thought that there was heat involved. And they look amazing, Roger. Again, I reiterate, you must think each step through many times in your mind before you sit down to accomplish the task. No different than Charles Duryea, Henry Ford, The Dodge brothers, etc., etc. If we had an X Ray of your cranium, we may see a well oiled Swiss machine with intricate gears, pinions, cogs, bearings, shafts, cams all running so smoothly. Again, few are blessed with the tools to be such an artist. All of us out here really enjoy seeing not only your progress but how you arrived at the solutions to the questions and problems of making such small, intricate parts. That is what makes following this thread so enjoyable. Each time I come here, there is a new item to savor. And to echo the others, Fantastic work. Randy -
Roger's handcrafted 1:12 scale models
Randiego replied to Roger Zimmermann's topic in Our Cars & Restoration Projects
Roger, Since you do not drive your cars that often, what do you do in Switzerland to keep them in storage without too much problems with gaskets drying out, fuel changing composition, transmissions leaking, etc., etc. Good thing that you do not have to deal with California fuel, which is a methanol blend, causing us so many issues with fuel pumps and carburetors. Now we have to rebuild our fuel pumps and carbs with the newer neoprene composition parts to stand up to the "gasahol". This mixture not only attacks the soft parts but can also "eat" away at the carb hard parts. Does the gas in Europe have any emission standards similar to the USA? Hopefully, not. Randy -
Roger's handcrafted 1:12 scale models
Randiego replied to Roger Zimmermann's topic in Our Cars & Restoration Projects
Is that an older hydramatic? As a young lad, I worked in a transmission shop, as a R & R tech. (remove and replace). My first Dyna Flo was almost my last. I usually did not take the time to get a transmission jack as they were not that heavy and it was quicker to retrieve them this way. I was used to going under a Plymouth or a Chevy or Ford and dropping the transmission on my chest and rolling out from under the car with it. (at 19 years of age, you are invincible and much stronger than when you are older). .Well, I had not been told that the Dyna Flo was composed of a CAST IRON case and a hell of a lot heavier. I slipped the transmission off of the bell housing and WHUMP ! on to my chest immediately expelling all of the air in my lungs. I could not call out to anyone for help. All I could do was flail my legs and finally one of my fellow workers saw me, grabbed my legs and pulled me out from under that Buick with the tranny still sitting on my chest. I was blue in the face by the time that they lifted the trans off of me. An important life lesson I learned that day. Anyway, I just thought that I would share that story with you for a good chuckle. Hope that your vacation was nice and relaxing. We await to see some more magic, Roger. Randy -
Roger's handcrafted 1:12 scale models
Randiego replied to Roger Zimmermann's topic in Our Cars & Restoration Projects
Roger must be busy. I am awaiting the transformation of the wood parts into the bench seats for the Continental. I am wondering how he is going to get the little "springs" to fit in the frames. :-) Of course, there will not be any such items. It will be interesting to see how he attaches the leather and if there is an under-lament before the leather is attached. Roger, are you going to sew into the leather the patterns of the seats like the 1:1 Continental? Or how are you going to simulate the stitching? We are awaiting your magic. Randy -
Roger's handcrafted 1:12 scale models
Randiego replied to Roger Zimmermann's topic in Our Cars & Restoration Projects
Roger, Silicons hit on something that I was pondering after seeing several Continentals show up at our car club meeting here in Rancho Santa Fe, CA. One was a light blue with white interior, another was black with a black interior (both original and very well preserved). The third was a copper metallic with a copper/white interior. VERY STRIKING. IT was completely restored and was perfect. I do not know if it (the copper) was an original color selection for the mid 50's offered to the buyer. The owner of the car had stepped away and I did not get a chance to ask him. I had a 1965 Lincoln Continental 2 dr. Sedan back in the 70's that was a trade in at the local Lincoln/Mercury dealership. It had 38,000 miles on it and I paid $800.00 for the car. It was in perfect condition with the paint starting to fade. But after I buffed it out, it looked great. It was a copper/bronze metallic color with the same color scheme for the interior. No contrast so I got tired of it and sold it. Used cars were very inexpensive back then. If I had just hung onto a few of the cars that I owned...................................................:-( With a 1:12 scale, the color is a tough choice. I keep harking back to the time that I was in Jr. High. Our local doctor had purchased the Continental for his "Sunday" car for the family outings. It was a light, sky blue with a white interior. Extremely striking. Even though it was 10 years old, it still had more class going down the road that any newer car. It was timeless in design and sophistication. The light sky blue stuck in my memory to this day. Roger, I do not know if it is a tough decision for you. One that you have been pondering for quite some time, after spending 7-8 years on the car, paint it the color that YOU like. What ever color you choose, I am sure that you will get it right. It is nice of you to ask our opinions for feed back. I had one heck of a time picking the color for my Spider till I saw a car zzooooming by me on the freeway. I sped up and saw the Toyota badge on the trunk. Right then and there, I drove to the dealership and pinned down the color. Nautical Metallic Blue. Not an original FIAT color but striking. Now I have the car painted and with a bone colored leather interior, it is very nice. This car is a class act 1:1 or 1:12th scale. It must be very hard for you to select the color and the feedback may help. If I had to opt for a color, I would go with the grey but not so dark. Maybe a little lighter shade of Metallic Grey. And coupled with the burgundy leather interior. STRIKING ! I hope that you are able to find the metalic paint with a smaller metal flake. Do you have Testors or Tamaya available? I am sure that they are available in the hobby stores. With the hobby paint, I am sure that they have the metallic with the smaller flake in the paint for a more scale application. And a local auto paint store can take the paint and put it in an aerosol "shaker" can for you. That way, you have the comfort level of using a spray can. Just a thought. It is exciting to know that you are at this stage. The completion is just around the corner.........................................WOW. Randy -
Roger's handcrafted 1:12 scale models
Randiego replied to Roger Zimmermann's topic in Our Cars & Restoration Projects
Roger, I would love to see you installing the interior components once the car is painted. Please post pictures of the step by step of the re installation of the interior parts so we can get an idea as to how you re assemble the car. Man o man, that will be one intricate process with all the little screws holding the parts together. You MUST have a "shrinking" machine where you step in and step out 1:12 scale to do that job. :-) I realize that the windows and doors are not installed but still.............what a job to put all the parts in the car with the roof on. AND not to scratch the exterior finish while doing so. This we have got to see............. Randy -
Roger's handcrafted 1:12 scale models
Randiego replied to Roger Zimmermann's topic in Our Cars & Restoration Projects
Roger, WOW ! I hope that you can get all the interior parts in without too much difficulty. It sure is easier when you have full access. But you know what you are doing. It baffles the mind to know that this car is only 1:12. From the pictures, if the car was sitting on jack stands and posed in a garage with proper perspective, now way would anyone be the wiser to the actual size of the car due to the intricate detail. Simply amazing. How did the headliner come out. The last pic of the headliner looked pretty good. Is that the final? Guess so as the roof is now attached to the body. My nightmare would be getting over spray on the inside of the headliner. :-( I am quite sure that you are very careful with the painting. You say that you are using "rattle can" paint? No air brush? (just kidding). At our local automotive paint store, they can put your special color mix in an aerosol can. That was not available too long ago. Now for small jobs, I can get the paint in an aerosol can as it is a pain to clean up my spray gun. I have to take it all apart and clean it thoroughly or the next time I use it...................... :-( Nothing like hard encrusted paint to clog a small orifice and stop the function of an expensive gun. Roger, I am going to attempt to do the body and paint on my 36 Plymouth fenders. The body shops here are sooooo damn expensive. I decided to bite the bullet and attempt to do my fenders. The body of the car is fine. I just need to do the fenders and the bullet headlight shells. There is no rust on them but I have to strip off two bad paint jobs. The last guy didn't do that and the finish is all crazed and unsightly. Plus he didn't put the welting between the fender and the body. The headlight "bullet" shells have scratches from previous owners or mechanics that were not deft in proper opening and closing of the hoods on both sides and have scratched and dented (one shell) the shells. I think that I can do them in place with just removing the lense one the one that I have to knock out the dent and then finish sand and prep them for paint. They would be a pain to remove from the fender mounts. Those and the fenders. Probably will take me as much time to do as you have invested in the Continental. :-) Kidding. I just have a few bumps to knock out and the alignment is fine. I have a brand new high end spray gun that I bought just for this. Have you ever done any body and paint on your cars? Wish me luck Randy