


Daves1940Buick56S
-
Posts
1,365 -
Joined
-
Last visited
-
Days Won
4
Content Type
Forums
Gallery
Events
Everything posted by Daves1940Buick56S
-
 This will be an ongoing blog about a trip that I am taking going from Rockville MD to Charlotte NC and return. Leaving on 6 July. Likely return 10 July. I decided since that National got cancelled I would make to trip anyway! There are some car museums there, but I really wanted to see how the car will do on a long distance run. I will post comments and pics, hopefully near real time. First post will be on 5 July about the prep for the trip. Cheers, Dave
- 49 replies
-
- 11
-

-

-
Favorite Pictures of My Pre War Buick
Daves1940Buick56S replied to MrEarl's topic in Buick - Pre War
I finally got the wheels repainted in the Dante Red with the correct silver pinstripes! This is a 1938 66S.

- 467 replies
-
- 12
-
-
-
Terry: The short answer is the capacitor (automobile folk still call them condensors) should have a value of about 0.22 microfarad with a breakdown voltage rating of at least 250 volts DC. This is for use with the standard ignition coils we use with the primary inductance of about 5 millihenries (unloaded). This provides a "tank" circuit that oscillates at about 2 to 5 kHz (considering that the inductance changes as it is loaded) after the initial voltage surge right after the points open and facilitates the "burn" of about 1 millisecond (if I remember the figures right). Look at the 4 videos I made in the link, it explains it all. I was going to go on and cover CD systems but life got in the way. Hope to finish them this year. https://www.youtube.com/channel/UCMAnMHk844kgKmSlM226DYQ Cheers, Dave
-
Couple of other quick ideas. With the vac tank at proper level, unhook connx to carb and see how fast it drains. Time it and measure the amount so we can get a rate. Also, if you can, repeat with vac hooked up (maybe use a vac pump? Mine does 85 cfm, might be enuf). Or use a fuel flow meter hooked up temporarily. https://www.amazon.com/Digital-Turbine-Flowmeter-Kerosene-Gasoline/dp/B082P32RC7/ref=sr_1_1_sspa?dchild=1&keywords=fuel+flow+meter&qid=1623650191&sr=8-1-spons&psc=1&spLa=ZW5jcnlwdGVkUXVhbGlmaWVyPUFTTktLNE9VTDJKODYmZW5jcnlwdGVkSWQ9QTAyMDE4MzgyRFM2SEM3QUZKMFNTJmVuY3J5cHRlZEFkSWQ9QTAwNDEyMjMzQVNGS0M2NkVITk5SJndpZGdldE5hbWU9c3BfYXRmJmFjdGlvbj1jbGlja1JlZGlyZWN0JmRvTm90TG9nQ2xpY2s9dHJ1ZQ== Cheers, Dave
-
Larry: It seems to me your engine vacuum profile is normal. As you may remember, I have a vac gauge permanently installed in my 1940, and used them in all of the cars of my wild youth, so I know what normal behavior is, to some tolerance anyhow. As you go up the hill and put pedal to it, the vac will drop, to 5 inches or even lower, especially with our relatively underpowered engines. Try a vac snap test. With the engine idling in neutral, quickly floor it then fully release. The vac should quickly drop to zero and then snap back to 25 inches plus if everything is to snuff. The vac tank holds a reserve for these situations, right? Is it filling properly when you are cruising at 12 to 16 inches? Or maybe the level is ok but you are pulling in more gas than the system was designed for. Is this the rebuilt engine? You could do the old inline elec pump thing and just use it on the grades. Cheers, Dave
-
Tires sidewalls splitting?
Daves1940Buick56S replied to Daves1940Buick56S's topic in Buick - Pre War
Thanks for the replies! Apparently the splits are on the blackwall side as well. I called the vendor and it turns out that the manufacturer's warranty is still in force and they are going to honor it. So I will have to pay some for 4 replacement tires but not full freight. So now I am going to get the tires demounted again and take them to the vendor for the swapout. I can drive there and back in a day so I can save on the shipping. Then pay (again!) for remounting and balancing. Should be wrapped up and back on the car next week. It never ends, does it? But that's the price we pay to keep these great old cars going! It will look really good with the wide whites and Dante red wheels (properly striped!). Cheers, Dave -
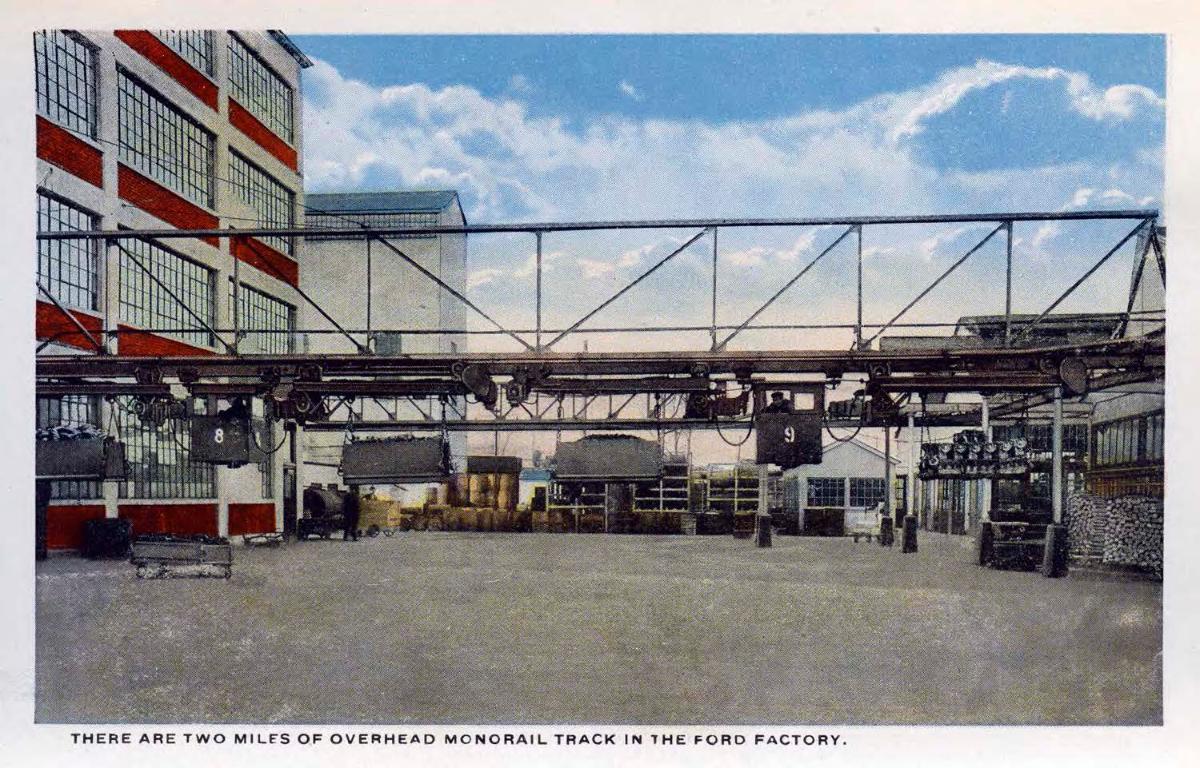
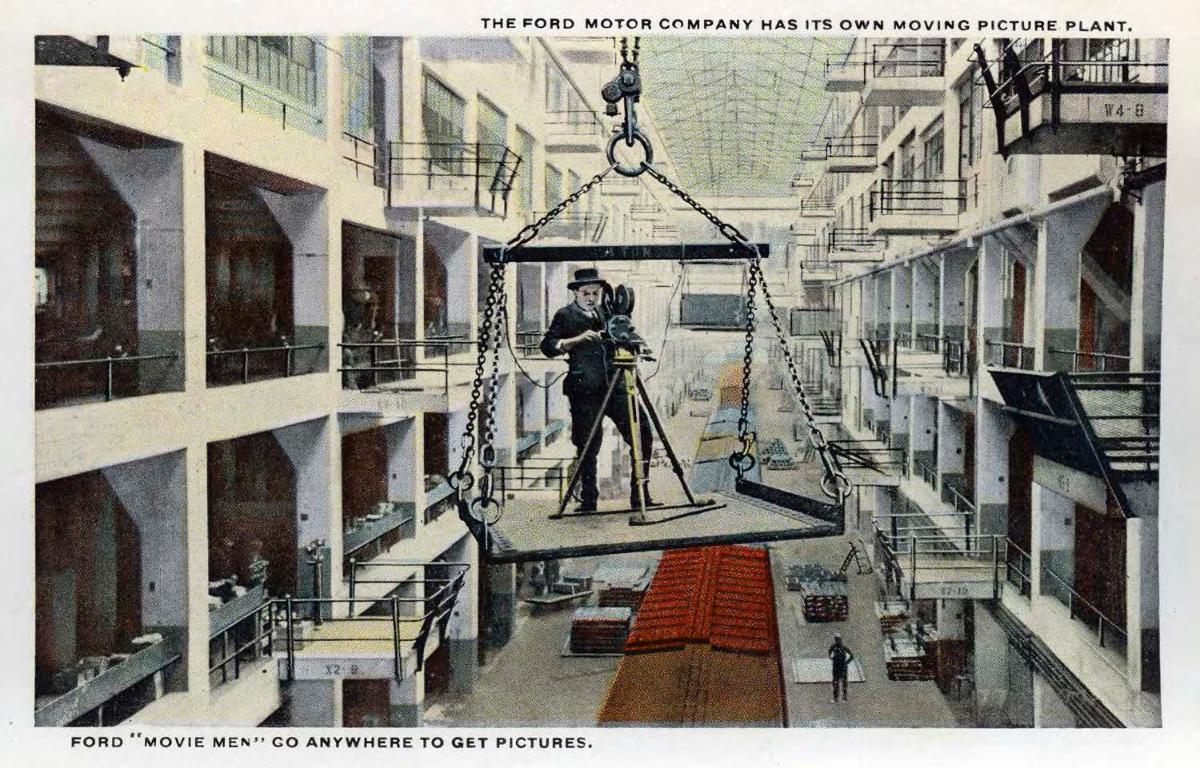
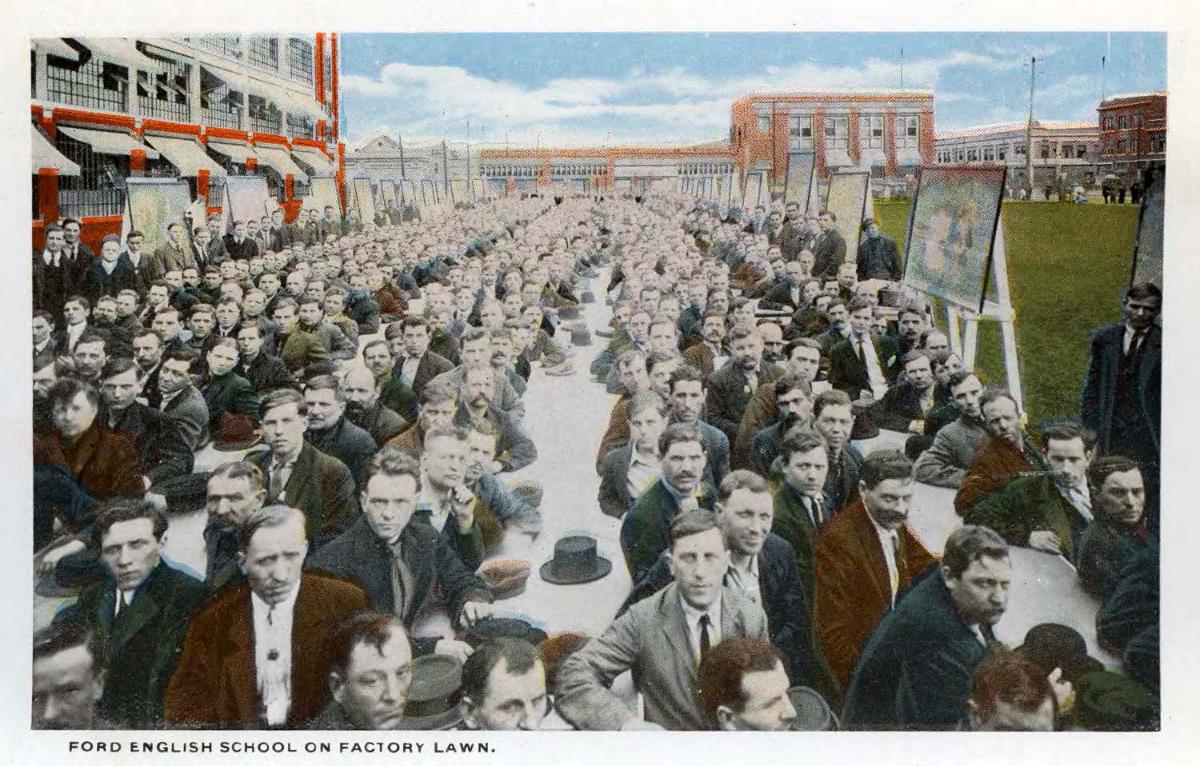
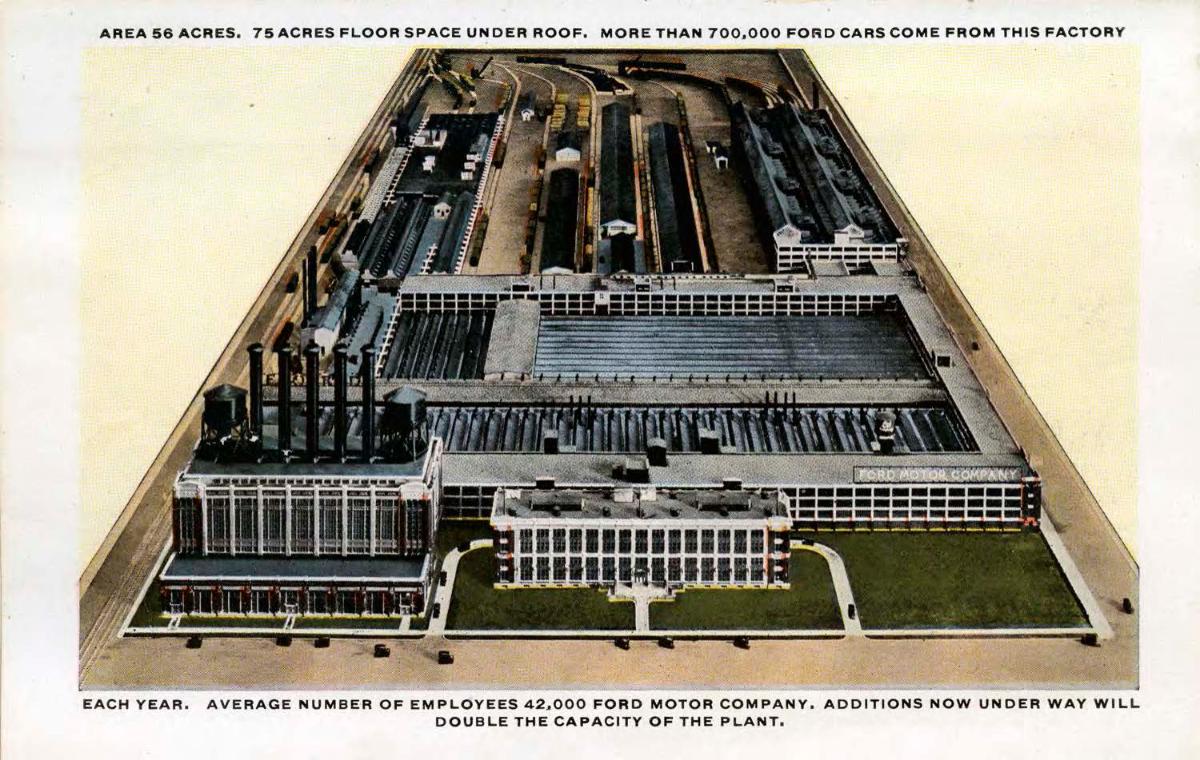
Ford Factory 1917 Postcard Series
Daves1940Buick56S replied to Daves1940Buick56S's topic in Period Photos - Pre WWII
The remainder...


-
Apologies if this has been posted before. I did a quick search but didn't see it. Cheers, Dave


-
After storing my Lester bias ply tires for a year, I finally went to mount them on my newly repainted wheels. But...there are some splits showing in the whitewalls. I haven't looked on the blackwall side but my tire guy says they are there too. These tires probably only have a few thousand miles but are 5 years old. I was advised that the clock is ticking on an eventual catastrophic failure. I tend to trust him as the tire guy knows if I get new tires it won't be from him since he just does commercial tire purchases. Is he correct? Any opinions? Cheers, Dave


-
Two questions on my 1938 66S
Daves1940Buick56S replied to Daves1940Buick56S's topic in Buick - Pre War
Thanks for the replies! I do have StaLube 140 but it is GL-4. I have it in my 1940 with no issues, but that trans was completely overhauled with mostly new gears. I did find one example of 140 weight GL-1 that isn't only sold in 5 gal pails: https://www.amazon.com/Millers-Oils-Green-non-additive-bottle/dp/B06ZYGFXF4 So I will order this and try it out. On the not-so-good news front, I drove the 38 about 60 miles on Sat. It drove really well, but I do have an exhaust leak that got somewhat worse, as I expected. It almost sounds now like it may be under the hood, which would mean either donut or manifold gasket. 😬😬 More exploratory work to do, but my next task is to have the wheels stripped and redone. I am going to do them in Dante red and have the 3 silver stripes done. Should look awesome with the black car! Also I will put on the wider whitewall Lesters that I took off of the 40 last year. Wheels coming off tomorrow. -
I finally got the interior finished and have been driving it more. Now some of the more minor issues can be handled. 2 things I noticed: 1. After the trans is warm, I am getting "biting" on the 2nd and 3rd syncros as I shift in (especially on 3rd). Quiet when cold. Do I need heavier oil? I think I have 85W-90 in it now. 2. Sometimes when I let my foot off the gas I get soft popping out the exhaust. It did this on the old carb as well. Ideas? Cheers, Dave
-
Very nice and welcome!
-
I have taken apart 3 speedo heads from this era. It's a bit daunting but I also work on clocks, so some similarities. But I would look at the speed head *last.* If it were me doing this: 1. Inspect and lube inner cable. If any rough spots, replace. Sounds like you have done this. 2. Try and straighten out the kink. Using the unconnected trans end, put a variable electric drill on the cable and spin up and down in speed while "massaging" the kink and see if any difference. If so that is your issue and you may have to replace the outer cable housing if you can't straighten the kink. Don't know where to find these, maybe Dave Tachney? 3. If no joy then try to put the lube farther up the cable housing to see if the issue is there. You may be able to feel where the problem is in the cable while running your hand along it while the drill turns the inner cable. 4. If all looks good at this point but the issue remains, then you are into the speedo head. The speed cup is aluminum and is closely set to the the spinning magnet. The cup pivots are very small as are the bushings. The cup should move smoothly as you turn it by hand but be careful, you don't want to stress the hairspring. After you pull the speedo, you can use an electric drill with a square bit to turn the magnets and see what you have. No point in going into more detail until you get to this point. Cheers, Dave
-
Dyna Flyte model 880 distributor plate. NOS
Daves1940Buick56S replied to Roadsterguy's topic in Parts For Sale
PM sent -
Peter: First....BWAH-HAHAHA! You are in for some fun! Second. Neil is right on. And I can tell you that seat is *heavy,* I did it this summer with myself and one other person, but 3 people might be better. I did my panel without removing the seat, but probably will not do it that way if I have to go in there again. One additional suggestion: pull the steering wheel, it gets in the way. And cover up the steering column or it'll get marked up. And yes, that top left stud is a witch! Since I was repairing/rebuilding my wiring anyway I added extensions on all appropriate wires to make panel remove/install *much* easier. If you want to keep original you will just have to grin and bear it, although when you are trying to put it back in and the lights pop out of one side while you are installing on the other side you may question this decision! All gauges are easy to remove once the panel is loose, but I did not remove the temp gauge from the car since I didn't want to chance damaging the tube. You may want to remove and lube the speedo cable "while you are in there" (the five most costly words in the old car game). Give me a call when you are ready to proceed, maybe I can help. Cheers, Dave
-
My Retro 1930's BUICK SALES and SERVICE GARAGE
Daves1940Buick56S replied to MrEarl's topic in Buick - Garages and Memorabilia
Cool. And with your open plan, you could easily add later if you want. Cheers, Dave -
My Retro 1930's BUICK SALES and SERVICE GARAGE
Daves1940Buick56S replied to MrEarl's topic in Buick - Garages and Memorabilia
Earl: Since the ceiling is open, how about a sprinkler system? That would answer the fire issue. Or did I miss that and you already put it in or are planning to? Cheers, Dave -
Well I just got a flag about political posts. Let me be clear: this is not political, I don't care about how this is implemented, or not. What I am talking about is physics and engineering. Period.
-
Understand. First, I was talking about power required on fast charge. Spreading it out does mitigate that like I pointed out. And as far as the transpo of fuel, of course, but I was focusing on the increased load on the grid. Most of what you mentioned doesn't impact that. Shifting to EV will reduce the energy required but a lot of that is off-grid. At least some refineries generate their own power, for example.
-
Good question. The issue is that suddenly you are adding a 1 MW load. And then in 20 min it goes away. The housing developments etc have the same energy requirement but spread out in time. It's the instantaneous power not the energy.
-
All good points, but most people don't understand anything about electrical power generation beyond the sockets in their walls. For those that deal with these issues, some of the numbers you quoted should cause concern. A 250kW additional power load, even if for only 15 or 20 mins, will be noticed back at the gen plant directly on that branch. And plug in 4 vehicles at once and you will really create a bump! Consider that our nearest plant here in DC is at Dickerson and is currently totals a little over 300 MW when adding in the adjacent cogeneration facility. A sudden load of 1/300 of the total, while it may not seem like much, could be problematic in the summer peak hrs. And that is just 4 cars. When EVs get more numerous you will likely have a lot more than 4 vehicles using the FastCharge at once. Plug in 40 at once and you could create a brownout in the summer. So the short term answer would obviously be limits on fast charging in times of heavy load. But if people are expecting this capability and they still end up having to wait a couple of hrs for a full charge they will be frustrated. Longer term, more generating facilities will be needed along with upgraded energy transmission infrastructure to support a greater number of EVs. It will be expensive and controversial as most folk don't want new plants nearby or overhead HV transmission lines. (No, you cannot bury them either. Besides the astronomical cost, Maxwell's Equations still apply and the max distance before bringing back to the surface to a substation is abt 30 miles.) The additional amount of energy required for even 50% of all light vehicle-miles being by EV would be abt 3.7 x 10¹¹ kWh, or about 10% of the total of the current-year 4.1 x 10¹² kWh. That is a lot. (For the pedantic, I got the total vehicle-miles from the NTHSA and divided by 2 for 50% and divided again by 3 as that seems to be an accepted mi/kWh under avg driving.) Current renewable is about 7 x 10¹¹ with growth about 10%/yr. Since the duty cycle of wind and solar is not 100% this will mean more generating plants will be needed, probably natural gas fired. I'm not arguing against any of this, just saying we should go in with our eyes open and understand what will need to be undertaken.
-
1938 66S Interior Questions
Daves1940Buick56S replied to Daves1940Buick56S's topic in Buick - Pre War
Interesting. Lou Wildt, quoted in the article, was one of the owners of my '38! Perhaps he redid the dash woodgraining and got rid of the chevron. My interior was originally tan mohair and when the interior was redone it was changed to gray Bedford cord. Perhaps he redid the dash then although it was pretty difficult to get it out which made me think it had not been removed since the car was built. -
1938 66S Interior Questions
Daves1940Buick56S replied to Daves1940Buick56S's topic in Buick - Pre War
Ok, I do remember seeing pics of this before. I am kinda, no actually very glad mine wasn't like that, I like the Butt Walnut in which I redid mine. Original panel was like Matt's, kind of straight grain. I also have an extra dash with a amateur-applied straight grain, not real good. I finished installing the clock today. All done but the rear view mirror. Cheers, Dave
-
1938 66S Interior Questions
Daves1940Buick56S replied to Daves1940Buick56S's topic in Buick - Pre War
Do you have any pics of the chevron pattern? Thanks -
1938 66S Interior Questions
Daves1940Buick56S replied to Daves1940Buick56S's topic in Buick - Pre War
Thanks all! After installing the garnish moldings and the lock buttons I can see no room for any kind of grommet. Don't know what the material was that crumbled off the hole edges. After relooking at the mirror it is metal - magnets don't stick to plastic! The color looks to closely match the gauge panel color. The is no other paint underneath so it was either painted this color originally or the woodgrain was stripped off at some point. So I went ahead and filled the cracks with JB Weld and will sand and repaint. At some point I will call Dave T for the proper replacement.


