


Bullfrog_eng
-
Posts
329 -
Joined
-
Last visited
Content Type
Forums
Gallery
Events
Posts posted by Bullfrog_eng
-
-
Can't agree more.
-
 1
1
-
-
No problem, will let you know.
-
John, many thanks for that.
Please PM me with what I owe you and how to pay.
Will let you know when it arrives. In view of the time I have been working on this car, a couple of weeks is insignificant.
John
-
1
-
-
Thanks for your kind offer.
Have PMed
John
-
That makes sense. It has just occurred to me that I have never seen a Budd bodied DD, only Richards Bodied. I am pretty sure the windshield wound up, but being a Richards body, I presume the door handles/window cranks would be different (they are with DAs). I certainly did not notice them at the time.
-
Thanks, will send some measurements and see how I go.
I too have some glass lens from Ollies, I am not aware that they have any of the License plate lens, but I probably should ask.
-
Thanks for those replies. As Keiser says, the rear quarter window cranks are T-handles. Windscreen cranks sounded a good but the 29 DAs that I have and seen have push out windscreens. I had not considered the DDs. I had assumed that they had a different pattern to DAs.
-
Just bought a DA window crank but find it is smaller than I was expecting. Another learning experience! But I am now curious as to why there is a difference. I have only ever been aware of the longer ones (as used in my DA Sedan). Anyone know why there is a difference or what the short one was used for? The both have the same pattern, just different lengths.
Thanks,
John

-
I THINK the DA is same as DC, but don't know for sure. It is certainly brass and a FILITE.
Measuring straight across the gap in the body, the wide side is 3-1/8 inches, narrow is 2-7/8 inches.
My lens is some sort of plastic, cracked and distorted from heat. Why I have not realised its condition years ago and waited till now to look for a replacement is beyond me but not the first time I have been that silly! Probably thought I would make one but now realise that the raised section ads considerably to the rigidity of the body and a proper one would be better. I have a nice NOS red lens ready to go for the main lens.

-
Just getting some parts ready for plating and decided to include the tail lamp. In doing so, have come to realise that the license plate lamp lens is pretty ordinary (cracked). Can anyone advise if there are repo ones available for the DA? Another option may be to buy old stock, in that case, can anyone advise how to identify the correct one for the DA? I see a number available online, but not sure if they are correct, some listed as "truck".
Thanks, John
-
Man, that is looking nice!!
-
2
-
-
In theory, drum brakes stop much better and more efficiently than discs because they have a larger contact area. They fall down because they cannot dissipate the heat quickly enough. Where discs prove MUCH better is in multiple stops and frequent use, or stops from very high speed. Many years ago, the drum brakes on my 57 Customline were absolutely brilliant for average use, but I distinctly remember trying to stop quickly from 100 MPH once. 100 to 40 MPH was fine but by then they were so hot that nothing else happened and it seemed to take forever to stop completely.
-
I'm working on it!
-
Thanks Fellas.
I have been collecting photos as well, and between these and the lot I have, I now have a pretty good idea how they are made. There is a very good metal fabrication place locally that I am sure that would be able to do the job, they have done things for me in the past that others have been unable to do. I just need accurate measurements and thought that someone on this forum may have already had them on hand.
No problem, I know of a very original DA about 50 miles away and I am sure that I can get them myself, I just need to get there to do it. The owner is a great bloke and I always enjoy a visit anyway.
I have had offers from the US to have some made, but as you say, the shipping costs, not to mention the currency exchange rates, make this a very expensive exercise for me.
I will see how I go getting the measurements myself.
Thanks again,
John
-
Well, I think I have a solution.
The problem was that I could not hold the spring in such a way that it exerted any pressure on the pawl, it just flopped around in the hollow centre of the shaft. I could find no way that it had been held originally. It may be that there is something missing, I wont argue if you say I lost that piece during dismantling!
Anyway, I cut a piece of rod that was a snug fit in the hollow centre, cut a slot in one end to hold the spring, cut the rod to correct length and assembled it all (not easy). It seems to work well, when you unlock the handle (which is still freewheeling) then turn the handle to its normal horizontal position, the pawl snaps back in position and the handle turns the shaft.
Not sure how it should be done, but this will do me. Thanks for all comments.
-
Gunsmoke, I recon you are right. I just can't seem to make it do that at the moment. Will keep fiddling.
Spinneyhill, yes, handy things these die-cast bits. Not sure if mine was stuck with swelling or corrosion, probably both. But I could not shift it without applying heat. The trick is to apply enough to do the job but not enough to create a little silver puddle. I surprised myself in being able to do that, but was getting increasingly desperate .
-
As they say, there is some good news and some bad news.
With a lot of gentle persuasion and patience (not something I am normally associated with), not to mention heating and chilling, I have managed to completely disassemble the handle and lock without destroying anything. The sleeve on the handle has been broken, but that was already like that. I have included a photo in case anyone else needs to know. That is the good news.
The bad news is that I cannot get it to unlock. When you move the tumbler to the lock position, turning the tumbler drives the U shaped pawl out of the slot in the handle so it now freewheels . However, turning the tumbler to the unlock position does not drive the pawl into the slot so that the handle can now drive the shaft to open the door. The only way that I can see this happening is for the flat spring (top of photo) to push it into position. Not what I was expecting, and I cannot see how it actually does this. If anyone has an idea of how this should work, I would appreciate hearing. Otherwise I will just go back and have another fiddle.

-
Thanks to both of you for that.
It is the conclusion that I had come to as the only option, unless I was missing something.
This has provided the confirmation I needed to hopefully avoid breaking something.
Now, back to attacking it again (gently!!), it is stuck solid at the moment.
-
Working on my door handles, getting them ready for chroming.
But the locking handle has me confused. I am still trying to dismantle the lock itself (My local locksmith does not want to know) as it is badly corroded, but I can not see how it should operate. What does the lock do, what moves, what does not.
If anyone had any pictures that would be great, or a description. I have removed the escutcheon and "collar" from the handle.
Any help much appreciated.
John
-
This site lists metric and imperial. Would be surprised if they were not available in US.
Probably like a lot of things, the hardest part of the puzzle is finding "where".
http://www.sealingaustralia.com.au/bonded-washers/
Happy to follow up further if you are in trouble.
John
-
Man, don't we learn some stuff here.
Thanks Ray. Having had a look around, I now not only know about Bonded Washers but also Self Centering Bonded Washers, neither of which I had heard of before.
But will I remember next time I need them???????
-
Thanks for the comments, fellas.
Stakeside, I can't really say what the colour is. I had it mixed some time ago. The story is that the DA should be painted in two shades of blue, but the darker shade was so close to black that I decided to actually paint that (upper) section black. The blue was supposed to be the lighter of the two blues. It was a close match to a colour that a mate used on his '39 Buick, which I really liked, so I ordered the same. It was a Volvo colour from memory, but the paint company failed and what I got was not what I ordered. They re-tinted it free of charge to a sample that I supplied and I was happy with that. But sorry, I can't put a name to it. I think your blue looks great too. It is difficult to get a true reproduction in a shed, but it looks similar to mine.
John
-
1
-
-
I do not have any running boards that I can use or copy for my DA. Presumably the originals rusted away and fell off. They were replaced with wooden ones, which are rotted and had virtually fallen off also. I thought I had seen some measurements on this forum, but I can not seem to find them now, so I may be mistaken. Does anyone have some accurate measurements so I can make some?
Thanks, John.
-
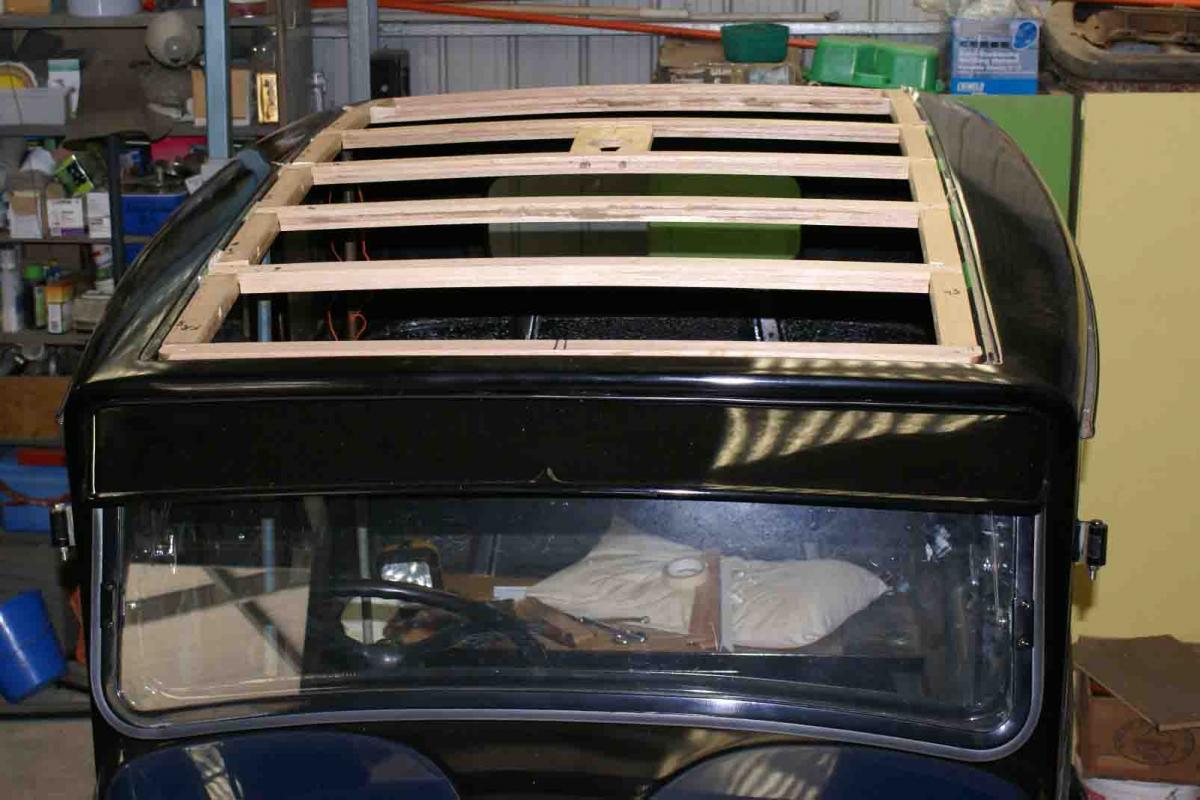
Just finished installing my roof in the DA, so thought would add some comments to this thread for anyone else doing so. As I said previously, I had the remains of my old roof on hand for comparison. I found Bob’s drawings and measurements extremely helpful and mostly the same as mine, but there were a few differences, so I will mention these as I go along.
The timber I used is Australian Oak (or Tasmanian Oak), which is not really Oak but a very strong eucalypt hardwood. I used 9mm thick strips, 40mm wide and laminated 3 of them together to for the perimeter and bows. This gave a total thickness of 27mm (near enough to 1 inch, as per my original roof timbers).
I had originally planned to use the steel surround of the roof to clamp and form the perimeter pieces, but found this did not work for two reasons. The first is that the roof surround is not strong enough to do this and can distort. The second is that my roof was different profile from left hand side to right hand side. More on this later. So for the perimeter, I used Bob’s measurements to form the laminations.
Now, the original bows connected to the perimeter timbers by a 45degree joint (I have no idea what that is called), but I used what I believe are called housing joints, because they are simple and so am I when it comes to woodworking!
So I marked out where the bows were to go (bearing in mind that they are not at right angles, as the side perimeter pieces taper in towards the front) and then routed them out to suit. This is where the first difference with my roof comes in. Where on Bob’s drawing, all the bows are spaced 1ft. apart, on mine only the front 5 were, the remainder were different. I went with my measurements.
Now, because I had routed out the perimeter pieces, they had lost some strength till it was all screwed and glued together. I actually screwed the perimeter pieces to the roof surrounds, so it was all built in situ. But remember I said that there was a difference in profile left to right? Well, when screwed into position, the routed perimeter pieces followed the incorrect profile on one side, meaning that the roof would have a noticeable lean left to right. So I made a couple of adjustable props out of some tubing, to push the RHS up to the same profile as the LHS (see photo). I then screwed and glued all the bows in place. So far so good.
In a previous post in this thread, I commented on the position of the interior light, in the end I sought advice from a mate with a similar DA and shifted the light forward to where I decided would suit me, as well as turning it around, so that the light switch was closer to the driver, instead of the rear passengers. I mention this because if you look at the pictures and think it is wrong compared to yours, it will be!
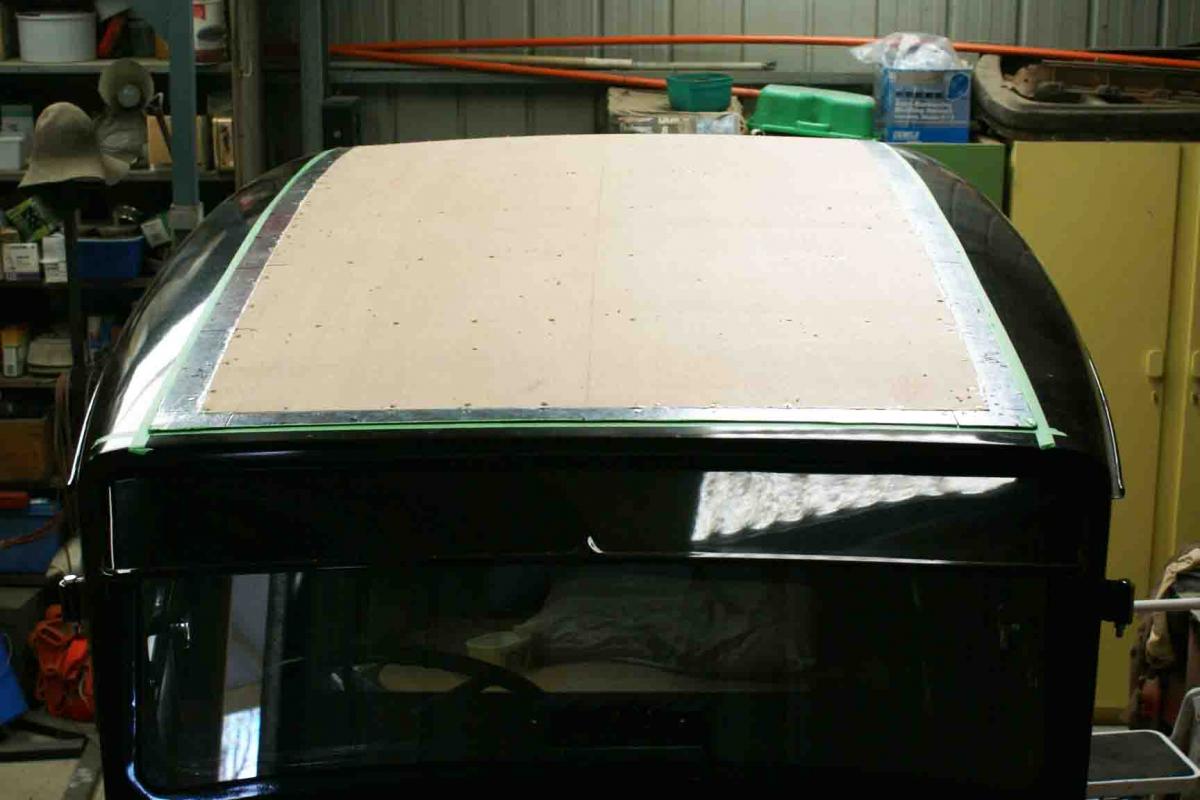
I then screwed the metal flat pieces around the perimeter, as per Bob’s photos. I checked my old roof, and Bob is quite correct, the roof does not drop into the recess, but overlaps by about ¼”. See my drawing below.
I then again differed from the accepted method and used Luan Ply instead of the chicken wire. I did this because I had been told that the flow of air could cause the vinyl top to balloon up using chicken wire, but I am really not convinced of this. In the end I was just more comfortable doing it that way. It is glued and screwed all round, and to all bows, and sits inside the metal perimeter pieces, only slightly proud of them. The vinyl and padding easily covers this and it finishes up smooth. I used a quality tonneau cover material that my motor trimmer recommended, one that will not stretch too much in the heat of a sunny day.
I had the motor trimmer fit this, particularly to get good flat corners where there are multiple layers of material.
I had taken great care to pre drill all screw holes and particularly the horizontal metal thread screw holes, so that they all lined up, and this paid off, it all went together well.
I took great notice of Ian Greenlaw’s roof fitment in his thread “Slow progress but getting there” page 18, and sought his advice on a few things, thanks Ian. I basically did as he described and really without too much mess. That really surprised me. I screwed everything down and it all sat down well. Because there is really only a small bead of mastic visible, it cleaned up much easier than Ian’s. One thing that I did do, though, was to use a margarine tub lid as a spool to wind up the used tape (covered with sticky mastic) so as to minimise the possibility of it going everywhere. As I was doing this by myself, I needed to make sure that I could put this roll of very messy tape on a piece of newspaper on the roof, as I worked my way round the car.
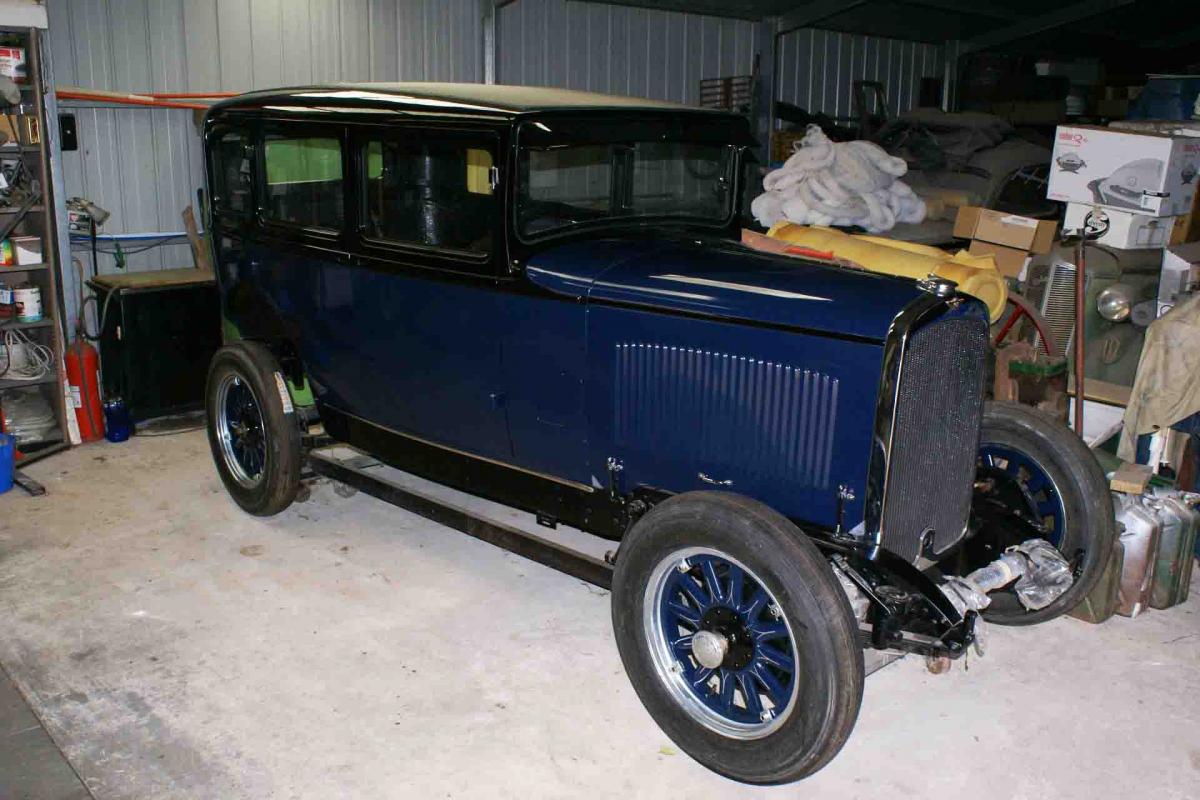
So that was it. I had not been looking forward to that job, but the whole thing went better than expected and I am very happy with the result. I am sure glad it is finished though.
John


-
2
-


New spoke wheels on victory 6
in Dodge & Dodge Brothers
Posted
Couldn't have put it better myself