


Gunsmoke
-
Posts
2,598 -
Joined
-
Last visited
-
Days Won
1
Content Type
Forums
Gallery
Events
Posts posted by Gunsmoke
-
-
Thanks K31, I've been following that topic, will have to search thru for the part on cowl pad.
-
Wow Mr. Johnson, that's what I call research, well done. And welcome to the What is it, lots of interesting stuff makes this site.
-
 4
4
-
-
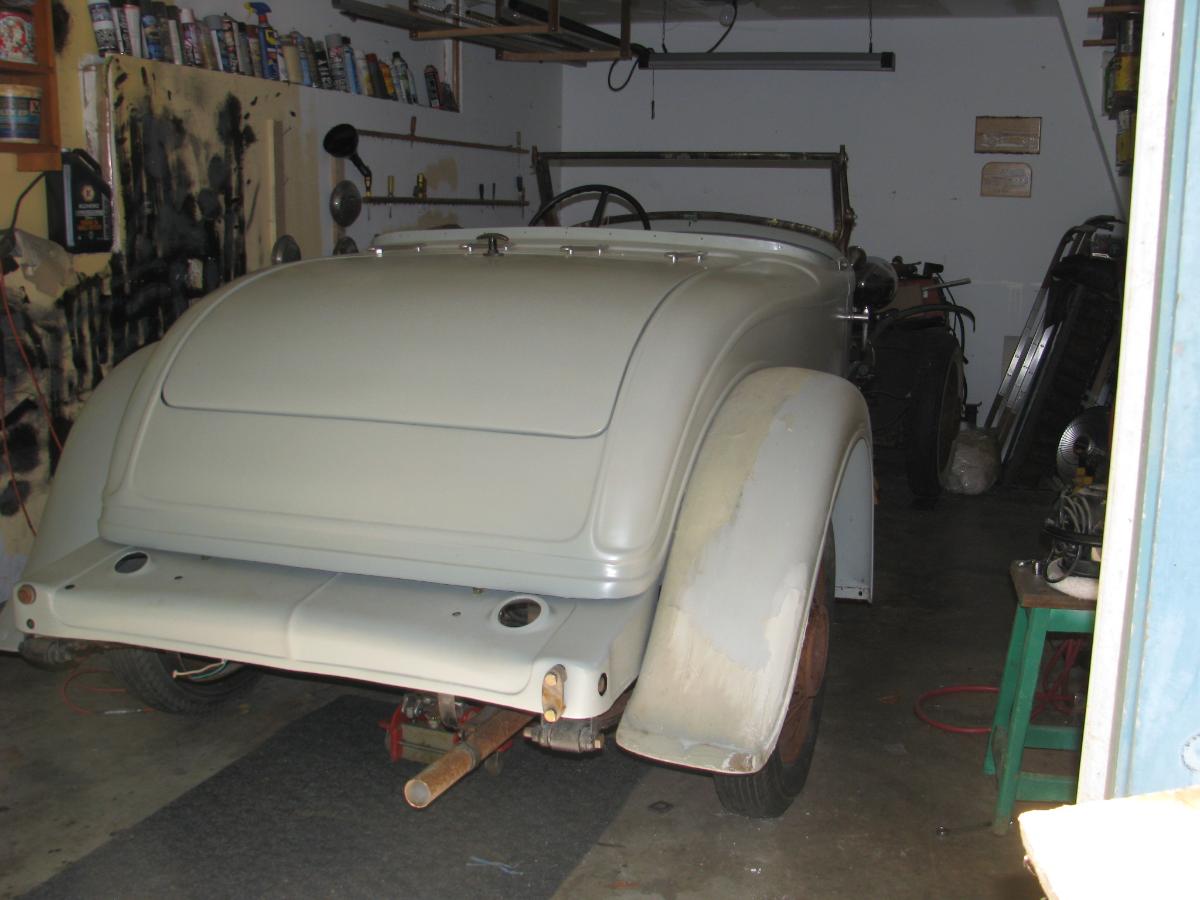
Spent past few days on the Roadster. First had to raise body from chassis to fit the rear apron. For what it's worth, re-securing the rear mounting bolts is a nightmare, they are in blind spots and would be impossible if gas tank was on. I think I counted a total of 27 bolts securing body to chassis on these cars. If I recall, my 1931 Chevy had 8 mounting points. With apron in place I could now finally fully bolt body down, lots of shimming etc to get door gaps right.
I then tackled the toe board area. All of these pieces were missing from the Roadster but were on the sedan donor car, so this is first time in perhaps 70 years that cowl has had correct parts. Everything went together well, had to make some gaskets to help eliminate fumes from engine bay. Still have to make a couple to go around steering column.
While at it, decided to fit the rear fenders to see what I'm dealing with. As I may have posted earlier, these fenders came from the sedan and were narrower on top than needed for roadsters. 2 yrs ago I added about 3" of material from the original roadster fenders which were in much worse condition. They still need work, but finding decent original ones is impossible. With rear fenders on, the big butt of this car becomes obvious, 72" fender edge to fender edge.
I also have some fitting work to do with Rumble Seat lid. A nearly 80 year old friend made the rear body panel, and it is very well done, but overall opening for lid is about 1/4" too large. Gaps are too wide at bottom and top. Will likely make top gap correct by loosening the hinge bracket bolts and sliding lid forward about 1/8". Then will have to deal with gap at bottom/back end, perhaps have a body man add 1/4" to rear panel.
Finally I pulled out the firewall pad that came on the sedan. It is in so-so shape, but not something that can be easily found or made. So I plan to spend some time on it in next few days, repairing a couple of cracks, etc. The sedan had double paddi9ng, a layer of homosote type product, 2 layers of insulation and this pad. Nor sure how much I'm going to put back. Cheers.
Never a dull moment around here!


-
5
-
-
On the subject of teachers and their cars, in the late 50's my Dad (a mechanic) drove a black 1955 4 door Mercury. My older brother had heard my Dad's praise for the quality of these cars, and in spring 1963, our final year of high school (we graduated together but that's another story!), he spotted and fell in love with a black 1956 Mercury Hardtop in the teachers parking lot. It was owned by Mr Kennedy our popular history teacher.
I headed off to university that fall and he went to work at the local Steel Company, earning a paycheck. Unbeknownst to me, during the winter he had been in touch with Mr Kennedy about buying the Mercury, and in the spring of 1964 bought the car. In our small town it was by far the nicest thing on wheels, and I recall him washing and polishing it all the time. This photo off internet is identical to his car.
, and a good one. After gr,

-
1
-
-
Now some of you will not believe this but here goes. Our rural school pictured in opening post was about 3.5 miles from the nearest small down. I lived along that route, 2 miles from the school. For 2 years around 1953/54, our teacher was from that small town and on many days, she walked to the school as well, covering 3.5 miles. She was in her late 40's/early 50's and in bad weather her husband or father might drive her. We would wait at the end of our driveway and walk the last 2 miles with her. I never heard anyone complain the way pampered students today do.
-
5
-
-
Thanks for tips. I have to make a pair for my '31 CD8 Roadster, plan to paint car black and that will help make the rubber pads less obvious. I roughed these out from firm 1/4" rubber, first by tapering to fit under stanchion evenly, and then by creating outside shape by simply extending the curvature of the stanchion. I'll probably do the final ones with a softer rubber to ensure a decent seal when stanchion gets firmly bolted down. I don't like look of factory ones (see green car). They were quite large and obvious, and have a recess for stanchion to fit into with a 3/8" surrounding. I prefer the flush look. Getting the windshield wiper vacuum tube up driver side is also a challenge with the pad. I note the green car is missing the weatherstrip on bottom of window, I plan to delete this as well as car will be a "fine weather" ride!
.JPG.b74466d61b151154b7fd3f941b81ad12.JPG)
.jpg.389f722d265d9beced047b2c4514c259.jpg)
-
1
-
 1
1
-
-
Car does not appear to be new at the time, appears one bumper guard is missing. Do you know when picture was taken? perhaps post WWII? Your Dad looks very happy.
-
In the 1920's and 1930's while the big cities and large towns were having their car shows and salons that Walt G and others speak so wonderfully about, bustling with business and entertainment and engaging in the "rat race", growing up in very rural areas was such a serene and some might say idyllic life. I recently found this exquisite set of high quality photos of a day in the life of my local rural one room P-10 school in 1936. (I believe these were taken by my Uncle (b1919), who would have graduated from this school a couple of years earlier).Since school transport was unheard of in these days, at least in our area where many families did not have cars, everyone walked to school (usually about 2-3 miles up hill both ways!), and occasionally some older kids (14 or 15 years old) brought the family horse and wagon, picking up their chums along the way. This was Homeville Rural School in Nova Scotia, which operated from about 1900-1955. My Mom (b1921) was oldest student at this time, in grade 10, shown here in bowtie. As might be expected, large families in the day meant as many as 4 or 5 students from the same family often attended (a local Turner family has 5 students in these photos). I attended here up to grade 4 after which the school closed. It is wonderful to see the students got their physical education in spite of the limitations, on the main gravel road in front of the school. While I recognize this topic is not antique auto specific, I post it to remind everyone of the environment which many Americans (USA and Canada) enjoyed in the mid-'30's post depression. 3 square meals and a warm bed meant a lot. Perhaps others have similar photos of a time long passed.


.jpg.069740818450fe58dcf81c3b4a901142.jpg)
-
5
-
-
Do I recall someone telling me that the Canadian assembled Dodges had the arrow thru the 8?
-
The unique Chrysler blue/green/grey engine color was easy to replicate. When I removed the transmission tunnel cover on the Sedan donor car including the thick insulating pad on top of trans cover plate, the cover shown here (held on with 4 bolts)
 was in mint condition (after I carefully removed 90 years of grime), it had likely never seen daylight from time of manufacture. Took it to a local paint supplier who was able to scan it and reproduce exact color. Although there is a lot of it showing here, once installed in car, with all the attachments and accessories, very little of it is seen. The head is silver/grey, not entirely sure just what sheen they used in the day.

-
2
-
-
Hudsy Wudsy, this is one of your photos, seems about same color as your original post. Maybe the red wheels change the look?

-
2
-
-
Enjoyed Wayne's monolog and his note that yellow is indeed a primary color, i.e. along with the two other primary colors red and blue it is not a mix of anything. However, one can take blue and yellow to make green. Or red and yellow to make orange, or red and blue to make purple. For ease of brain comfort I will not get into what black and white are! The OP Ford has an interesting shade of orangey/brownish yellow, like a cigarette cream common of the late 30's. I don't mind the color at all, looks very nice with the brown upholstery and tan top. All in the eye(or mind Wayne) of the beholder.
-
Appears to me to be a 1930 Chrysler 77 chassis including rad shell and hood with the triangular vents, but with a custom body from cowl back. Vent window in door might suggest a re-body of British manufacture in mid-thirties, maybe using some Chrysler components such as doors. Nothing similar in the 43 photos of 1930 Chryslers in George Dammann's book.
-
1
-
-
Thanks Walt G for the reminiscing. That 1920's era was a unique period for people with big money. Their choices for cars, houses and other symbols of wealth left us with some superb mansions, yachts and cars such as these. 100 years from now I suppose that 2120 generation driving around in their 1000 pound EV pods will look back on the Supercars of today and think about how wealthy and extravagant their owners must have been.
-
1
-
-
I'm with John 348 and felt the OP suggested celebrating Independence and that it resulted in Freedom. While Independence Day celebrates being freed from British rule among the original 13 colonies, as far as I know it does not represent anything else. As we all know, the 2 terms Independence and Freedom are far from synonyms. Freedom is becoming more and more in the eye of the beholder.
-
1
-
-
Hard to believe an organization as big as Hemmings/Haggerty et al can mess up where 2023 GR starts and finishes, and both on same poster! Red faces somewhere!! Maybe if Ed chimes in they will checker flag it in Fl.
-
Is either end threaded for something. A couple photos of open ends might help, one end appears to have an inner piece?. Pretty heavy casting, must have held some thing substantial. Sol meaning sun might suggest perhaps an awning bracket?
-
I have watched eBay and other sources for good Buick/Nash and other large round similar taillights with chrome buckets, and typically a very good one sells for about $500-$700USD delivered (nearly $1000 here in Canada). Not interested in paying that for a non-correct light. I bought the 2 LaSalle's for $100 total locally. Rob down in Maryland provided these photos of the mounting brackets/plate holder stanchions (L&R) he has ready for his '31 Chrysler CD8 Victoria. Not an easy make, but can be copied.


-
What a wonderful story Dave, and with a storybook ending to this chapter. Wishing you and the Mrs many more chapters full of the same excitement as the first many. I'm sure there is a "made for TV" movie in here somewhere, and I'm sure all your friends here on AACA would gladly donate their cars for period authenticity, starting with Model T's back when you were a kid!!
-
1
-
-
As noted at outset, this car was in very rough shape when I found it. I made the decision to rebuild it to a near 1931 Chrysler level where reasonable, while recognizing it will never be pure because of what I had to start with, including shortened windshield and stanchions, altered top irons, and badly repaired tub/cowl. So plan is still to use cycle style front fenders if I can find suitable fenders to work with. I may simply buy a set of 4 new rear fenders for something close to same dimensions and have body man adapt to suit proposed design. I placed a rear one on front in this photo so I could get a sense of what it might look like. I have a rough pair of original large clamshell style ones, but they need thousands of dollar work to be usable.
I also cannot find any Chrysler CD8 taillights despite 7 years of looking. I show here a car off internet with a nice pair. These models only came with a single taillight and production was limited, so the use of 2 for many restorations probably contributes to their rarity. I'm told a god Chrysler unit will sell for $2000! I recently found a pair of nice 1929 LaSalle lights that can be modified as shown to fit, and with a Chrysler Script film over top lens would do in a pinch while I continue search for something better.
Final decisions on these 2 items are months away.

.JPG.754db1875425717baf9b6060bf93c1cc.JPG)


.JPG.b2ce4bec6710b2f8b01ce1101c021f76.JPG)

-
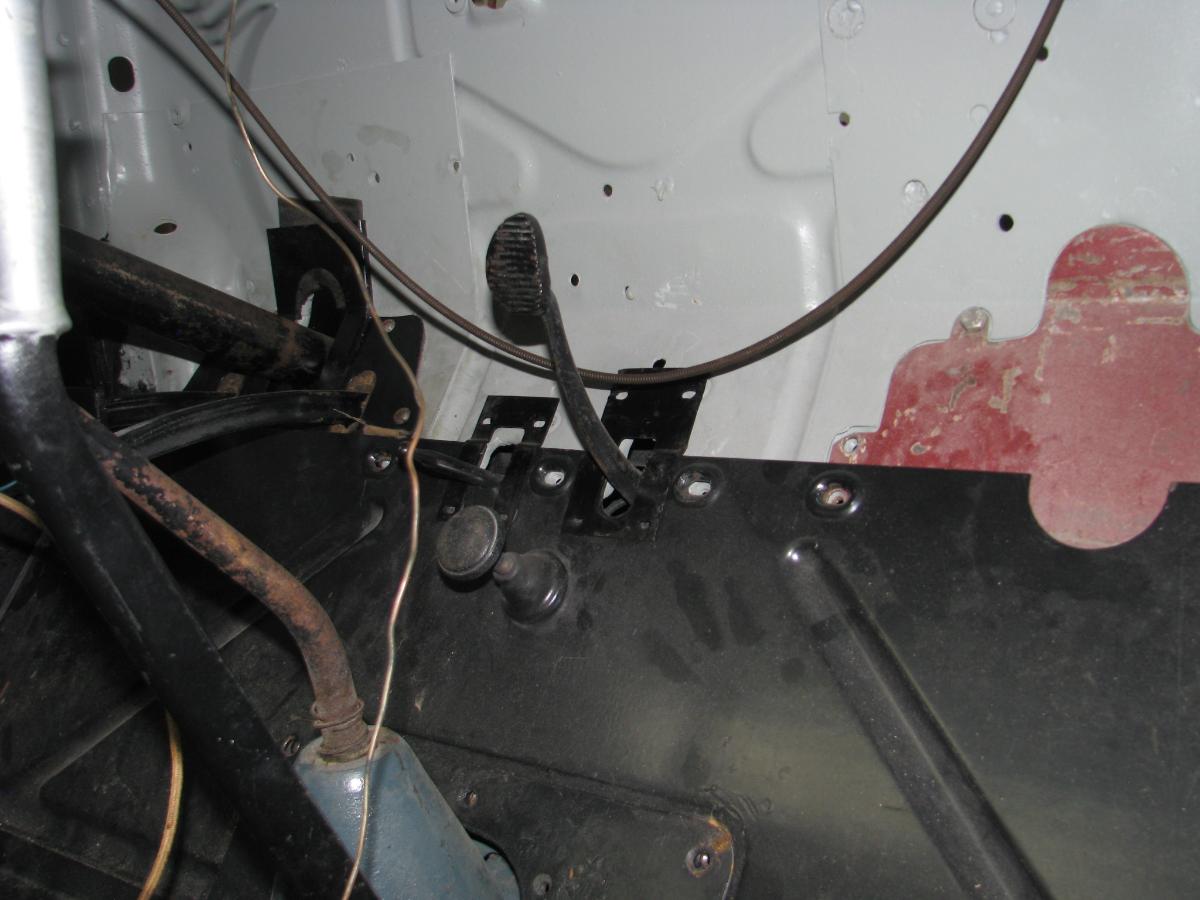
As mentioned, I got the steering shaft back from the machine shop, spliced as planned. I assembled the shaft in box (fitting thrust and top bearings)and had to sort out how to seal it as both original felt washers top and bottom of worm gear were shot. I used some heavy (5/16" dia) graphite "packing" to make lower seal, and some plumber's packing for upper seal once bearing retainer nut was in place. I've installed assembly back in car for further stages. First thing that showed up was nut that secures pitman arm. The sector shaft is threaded for 7/8-16 thin nut shown and heavy lock washer. Nut that came with donor chassis would not go on more than 1/2 turn. On examination, it is a 7/8-14 nut. As background, this chassis had been in a left front accident many many years ago and came to me with a badly crushed fender, fender bracket, and bent steering shaft. It now appears while temporarily putting car back together a PO used an incorrect pitman arm nut (it was barely on when I disassembled the car). Have not been able to find a similar nut in 7/8-16, so am using a 7/8-16 pinion jam nut for now (from a late 60's GM).
When I disassembled the headlight/throttle levers at steering wheel, I see the light lever is broken from its base. White metal of course, so will have to do some thinking on how to make it usable. Current thinking is to make a thin steel backing piece and affix to rest of assembly with 2 original screws, and a 3rd screw and adhesive into the broken piece. before doing do, will check if there is a reliable way to weld/fuse the old pieces.
.JPG.65008d2fbb10468805fda8e2b9421a3f.JPG)

.JPG.6ffc0329a90186d5df46cbd092b68245.JPG)

-
I had been searching for 7 years for a decent 1931 Chrysler CD8 taillight and stanchion with no luck. While looking, I came across this decent pair of 1929 LaSalle lights, one complete including stanchion, the second missing stanchion, license plate lens and with a cracked upper lens. This week (Sept 20 2022) I found the taillight I need (see added photo), so am now selling these LaSalle lights, asking $350 for the pair. One is complete including wire, mounting post, plate holder, perfect lens etc. Second needs a couple of parts. Send me a PM if you are in need of these. Update: Partial light has been taken, only complete one now available, asking $300.


-
I noted on ebay yesterday a "lot of
 taillights" for sale ($69) which appeared to include an after market light identical to the one above with the roundhead non-recessed screws in case you decide you want a matching pair. I've been looking for 7 years for tail/stop light for my Chrysler CD8 Roadster project, a pretty rare item. I show a photo here, and it stands just above bumper on a stanchion that also acts as the clamp to hold bumper to chassis. As you may realize, one of the reasons these taillights are so hard to find is that many restorers over the years added a second taillight to their cars (such as on this Roadster). I have a friend who is restoring a CD8 and has a nice pair of taillights he plans to use. I'm told a very good one can cost $2000+. They are quite large as seen, about 5.5" diameter, and could probably be replaced by a bullet type fog/driving light with suitable red lens etc.
While searching for one, I did come across this pair of equally rare 1929 LaSalle taillights, one very good and complete, and a 2nd with a cracked main lens and missing the license plate lens. These would work on my car, would require a 1.25" hole on side of rear apron and a home made bracket to secure to underside of frame rail. Some might argue sacrilege, but this approach will let me have a period look, and not preclude changing to correct light if one ever shows up. I plan to post these in the LaSalle forum and seek a trade for a good correct CD8 light, I'm sure someone must have one.


.JPG.2fdb114eae23e4f93fb511f631cf3322.JPG)

-
Looking at this car with a friend, my friend has been offered it my a mutual friend. Starts and runs well, excellent paint, chrome like new, very good tires, excellent interior, can be used for years like it sits. PO has passed away, had car for 40 years and kept it A-1. Seller received it as part of estate. Motor was upgraded from original 216CI with splash lubrication to a later 235CI with pressure lubrication, and electronic ignition. Minor paint damage to pass rear fender caused by a grommet on car cover over the years. Anyone have a thought on what the market value is for one of these in tthis condition.
.JPG.525b7a722bdccf19eb975ccff9cb68ba.JPG)


.JPG.b74466d61b151154b7fd3f941b81ad12.JPG)
.jpg.389f722d265d9beced047b2c4514c259.jpg)


.jpg.069740818450fe58dcf81c3b4a901142.jpg)
 was in mint condition (after I carefully removed 90 years of grime), it had likely never seen daylight from time of manufacture. Took it to a local paint supplier who was able to scan it and reproduce exact color. Although there is a lot of it showing here, once installed in car, with all the attachments and accessories, very little of it is seen. The head is silver/grey, not entirely sure just what sheen they used in the day.


.JPG.754db1875425717baf9b6060bf93c1cc.JPG)


.JPG.b2ce4bec6710b2f8b01ce1101c021f76.JPG)

.JPG.65008d2fbb10468805fda8e2b9421a3f.JPG)

.JPG.6ffc0329a90186d5df46cbd092b68245.JPG)


 taillights" for sale ($69) which appeared to include an after market light identical to the one above with the roundhead non-recessed screws in case you decide you want a matching pair. I've been looking for 7 years for tail/stop light for my Chrysler CD8 Roadster project, a pretty rare item. I show a photo here, and it stands just above bumper on a stanchion that also acts as the clamp to hold bumper to chassis. As you may realize, one of the reasons these taillights are so hard to find is that many restorers over the years added a second taillight to their cars (such as on this Roadster). I have a friend who is restoring a CD8 and has a nice pair of taillights he plans to use. I'm told a very good one can cost $2000+. They are quite large as seen, about 5.5" diameter, and could probably be replaced by a bullet type fog/driving light with suitable red lens etc.


.JPG.2fdb114eae23e4f93fb511f631cf3322.JPG)

.JPG.525b7a722bdccf19eb975ccff9cb68ba.JPG)


1931 Chrysler CD8 Roadster Rebuild Diary
in Chrysler Products - General
Posted
I had a good look at Taylormade's work on his cowl pad. It appears his was completely flat which would make reproduction easier. As shown in photo, my top layer is heavily molded, all around top and both sides. The backing piece of homosote is smaller and flat, but jute is also molded to match facing. I have the old homosote in 2 or 3 pieces as it came from car, pretty fragile and will use it as pattern to make a similar piece. Will plan to glue the 3 layers together and use existing molded pad.