


Gunsmoke
-
Posts
2,598 -
Joined
-
Last visited
-
Days Won
1
Content Type
Forums
Gallery
Events
Posts posted by Gunsmoke
-
-
Nice "universal" rear fender, meaning it's full nature makes it usable on sedan, roadster, truck etc for what ever make it is for (I'm thinking Dodge/Chrysler ), and has extra flange to secure to gas tank apron. I'd be interested if you had a pair.
-
Likely a full set (it says complete set) for 6 cyl car, and .020 oversize would likely not suggest there is more than one set in there, likely each wrapped in protective wax type paper, but who knows. Does can rattle? It would be interesting to see if they have remained in perfect condition in what may not be a perfectly sealed container.
-
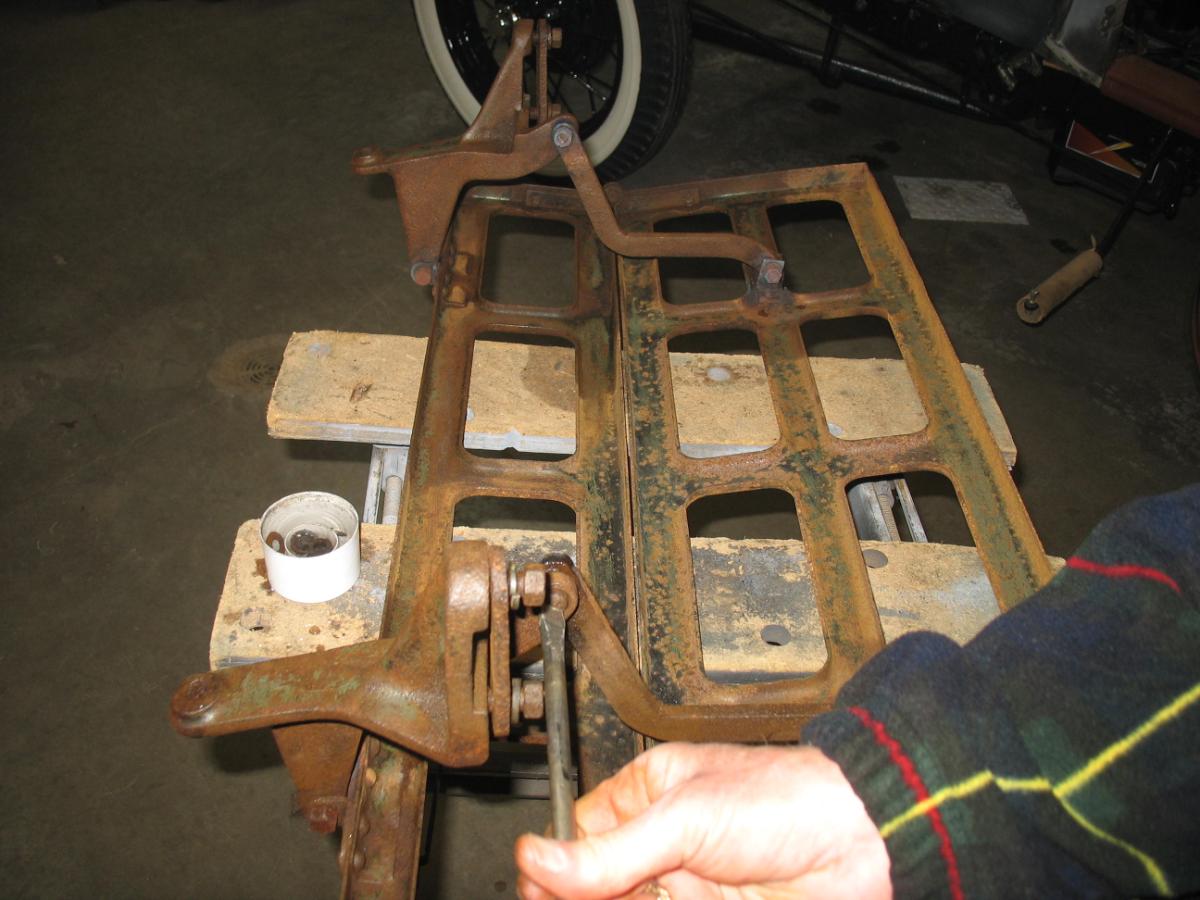
Always interested in finding old cars seemingly left to nature. This set I took in 2017 I believe are of a teens era Studebaker, chassis was relatively complete, no body. Likely a gold mine of parts for someone who needs them, I was taken by how substantial some of the cast pieces were. It may still be there. I figure someone on here can pin down year/make/model.


-
 5
5
-
-
Olds, Pontiac and LaSalle used a cowl sweep like shown, but all had 3 hinge back doors, and Pontiac an oval rear window. Looking closely at photo, I'm beginning to think the curved cowl molding is in fact a cable housing for one of the accessory lights/sirens, and is not a car feature. If so, then car identification should be a lot easier. including a 1930 or 1931 something.
-
A member asked if I would post some photos of the restoration of my 1931 Chevrolet Deluxe Coach, work I carried out largely between 2008 and 2013, and which included replacing about 30% of the original wood carcass with DIY effort. Like many "as found" cars, this one looked pretty complete, solid and in need to minor work to have as a good driver. It had last been on the road in 1967. However, once home I tackled the most obvious issue, the sagging front doors. Once the interior trim (black and white naugahyde!) was removed, it was clear there was a lot of wood carcass damage. In short, both front door posts had been previously replaced with very rough and off pattern spruce or some other soft wood, the hinge screws would not hold. The windshield header was 50% rotted as well as the front 12" of each side roof rail. The rear roof wood crossmember was rotted as well as about 12"-18" of the roof side rail at rear. Finally the main carcass sills for the forward 3 feet had been replaced by a PO with non matching pieces from an earlier model (about 1/4" thinner stock), and were simply butted against the rear wooden sills and "toenailed"!
As you know, restoring/rebuilding a common car like these only makes financial sense if you can do your own work whenever possible. Having built my own house (including cabinets and all trim work), I was more comfortable doing woodwork than anything else on this old car. So over several months I slowly removed any old pieces where rotted, using scarf joints where possible to mate old to new. The front posts were very difficult to reproduce because originals were gone and the PO replacements were not close to correct. However, using the metal skins as a guide and patience, I assembled solid posts from ash. Likewise for front area over windshield and front of door openings, the sheet metal pieces gave a good guide for what was needed to allow eventual nailing of roof metal and various interior metal trim pieces.
For the floor sills, I made the proper pieces (including allowing for install of a tool tray I found on internet), and spliced them to the back portions of the sill with 1/8" steel plates top and bottom, secured with carriage bolts. Final woodwork was on rear roof area. This presented some special challenges as I did not want to disassemble the various rear metal corner brackets. I developed a 3 piece rear cross member using a main member and 2 wedges. everything was predrilled and T-nuts as shown were fited. Then the 3 pieces were carefully set in place (wedges first) and glued together and bolted to brackets. Finally the roof side rail partial pieces were scarf bolted to old rails, and last rear roof cross piece installed and original cedar slats re-nailed. Final work was to carefully re-nail steel roof to the new wood and get it ready for eventual padding, wire mesh and vinyl top.
Body was sent off to body man after I roughed in new cowl patch panels and lower door patch panels purchased thru the Filling Station.
While body was off, I cleaned and repainted the chassis, it was in excellent condition, about 90% of the original black paint under 80 years of grime. Also refurbished engine, rear end and transmission as well as brakes and any other remaining mechanicals, like steering box.
After body came back from the shop, placed in on chassis, fit the doors and ensured everything lined up close. Then was able to fit fenders, front rear and side aprons rad shell and hood, running boards, and re-do the top.
When doing the top, originally planned to use 'hidem strip" around edges, but result did not look good. So I made a pattern and had a local metal shop laser cut the edge pieces from 1/8" aluminum x3/4" wide. This was then drilled and counter sunk every 8" or so and brass screws set into woodwork. Body putty filled the screw holes flush and a few coats of black paint left a perfect roof edge (unfortunately seem to have lost photos of this stage).
Final major task was installing a new wiring harness also from Filling Station, it was a perfect match for original with one exception, they did not allow for wiring for the dome light (an easy fix). At this stage I also restored the trunk rack and trunk. The wheels and tires were left as is, wheels were in great painted condition and tires were 45 year NOS, had never been on the road. About this time in fall of 2014, I unearthed a 1931 Chrysler CD8 Roadster in a barn down home and decided that would be my main squeeze for next 5-10 years! (see final pic taken this week). So I sold Chevrolet last summer and new owner has painted it and cruises regularly (newly posted photo of car in 2023).
This is a short summary of 5 years of work and does not include hundreds of small tasks and some larger ones. If you have a question about a specific phase, I'll try to answer.


-
6
-
 2
2
-
-
Typically, tires in this era were recommended to have 35-40 lbs pressure, that prevented overheating, and excessive wear. The bias ply tires were less tolerant to flexing than modern day radials which typically run at 30lbs. My 1931 Chrysler CD8 manual says "exactly 40 lbs and measured weekly". Check your manual.
-
1
-
-
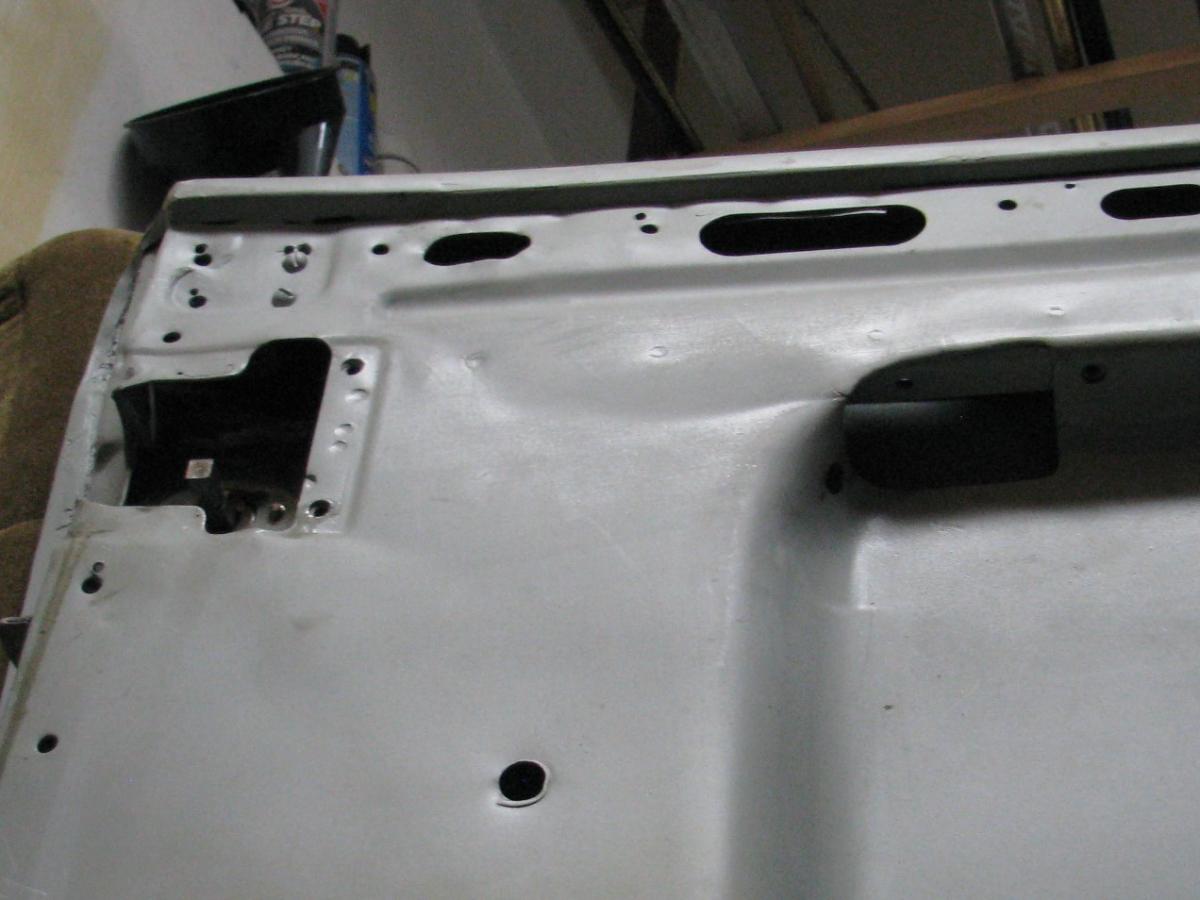
I get a kick out of all the concern about some non-structural poplar. The car was 80 years old when I had to replace the wood, much of which was poplar. It is much easier to shape than oak, ash and other "hard woods". Regardless, when restoration was finished and new top put in place, everything was sealed up much better than factory, but I suppose 80 years from now someone may have to do it again. For what it's worth, most of the wood that needed replacement was ash, as roof leaks over the years drifted down both door posts to front floor side rails and all. I had to make front door posts, full windshield header assembly and front sills (spliced to back parts which were fine)(pic shows driver side sill/door post bracket). As some may know, the 1931 Chevrolet had a full wood carcass covered in sheet metal while Fords only had wood in roof opening area. BTW, these photos were taken while body was still on chassis and doing wooddwork. Eventually lifted body off for bodywork priming and restored chassis.

-
Good work and good luck, I made quite a few pieces for the roof area of my 1931 Chevrolet restoration, need a lot of patience and time to get them molded to fit the sheet metal properly. Used ash for structural stuff, poplar for non-structural. Then fitting them in place is also FUN!


-
7
-
-
IMHO, neither option will work well. In space terms, restoring a car will require at least 400-500 square feet of space, typically including an 11x22 space (230 ft sq) for the chassis to sit with room to work on it, at least a 8x15 (120 ft sq) workshop space for refurbishing parts, tools, machinery etc, and another 100-150 sq feet for storing parts removed from the car as well as any duplicate parts. Ideally all the space should be connected and heated year round, but the parts storage can in some cases be unheated and remote if space is dry and secure. I currently am restoring a Roadster using my 1 bay garage (11x20) and adjacent 14x20 workshop. There is no room for large parts, like fenders, bumpers, engine hoists etc, so I store those in a temporary car tent structure. These tents are fine in summer, but sweat like the devil in cold winters. As someone mentioned, you need close to a 3 car garage to comfortably restore a car. BTW, it also will take you 2-3 times longer than you think!
-
1
-
-
Today I tackled the exterior door handles. As mentioned earlier, they were purchased 4/5 years ago because of great original condition and with escutcheons that suited. I don't know what model they were for. But shafts were 5/8" short (black line marks original length). So cut some 5/16" woodruff key stock 5/8" long, beveled mating edges for a good fillet weld and MIG welded them this afternoon. To prevent damage to handles and the possible "sweat fitted" shaft into white metal handle, we kept the handle cool wrapping them in a generously wetted rag. A bit of grinding/filing and they fit perfectly. Now I need to find some proper oval head slotted #12 screws, I have Phillips head for now. I also assume they did not use a rubber pad on these? BTW, because I used stiff rods for connection from latch to inner handle, inner handle opens when exterior handle is turned. I suspect Chrysler originally used a cable and yoke system instead of a stiff rod, and if so, interior handle would not move when exterior handle is used. Lesson learned, I think I'll leave it as is.


-
4
-
-
Insurers do not want unhappy clients. This topic was the subject of a 1 hour discussion at a car club event 3/4 years ago as a rep from the local Hagerty Silver Wheels program made a presentation. They were wanting all members with insured cars to be aware of some recent history. As an example I recall they made reference to a garage roof collapse on 2 antique cars, the owner had insured them for $10K each based on an appraisal he got, and photos which had been sent to the insurer. After the roof collapse, the insurer concluded they were both a write-off, the insurer concluding they could not get them restored for less than $20K each. The owner wanted to keep one of the cars which created a dilemma for the insurer. Ordinarily they payout the $10K coverage (less any deductible)and possess the car to sell as salvage. Of course the owner wanted to keep the damaged car and also get the $10K insurance. For the second car he was satisfied to let them take the car and pay him the 10K. The insurance person explained that they were OK with the owner assessing the car value, but not with "after the fact" "deals" such as paying full coverage and allowing owner to keep car.
This example demonstrates the need for clear thinking of what the owner wants his car insured for. If it is a car he really loves and values and cannot imagine parting with, then insure it accordingly, i.e. at potential cost of full restoration. If just a car, worth 12K and lots of them around, insure for replacement value of 12K. If a run of the mill car worth 10K and not too concerned about replacement at all, insure for $10K. The key is to decide what you have, what it is worth to you, and insure accordingly. From my perspective, Hagerty's does not want unhappy customers, and encourages clients to over-insure if in doubt as premium extra is usually small. Finally, over time values can change significantly, up or down, so keep an eye on your policy annually and keep insured amount up to date.
-
2
-
-
Vintageben, interesting picture of the 1929 Series 75 from Dammann book. There are other photos in his great resource of custom bodied Chryslers in the era by European coachbuilders, including a 1932's with sloped windshield. I'm guessing these were one-offs, so pinning down provenance might be a challenge. The 1932 has a body by Albert D'ieteren. Dammann's notes indicate in 1932 Chrysler sold 80 CI chassis to custom coachbuilders throughout the world, and likely each resulted in a car with differences in style. They probably sold chassis as well in 1929 and 1930, as Chrysler had been entering some cars in racing events in Europe.
-
2
-
-
Usually Walt asks this! Dimensions please LWH! Since trunks were usually mated to a complimentary rack, dimensions of trunk base will suggest rack and therefore make it may have been on if someone has a rack of same dimensions. Clearly this trunk is for a sedan, due to it's curved back and overall height. Potter made trunks for Chevrolet beginning n 1932.
-
E-116-YH may be right and I have assumed all along that this car is most likely the only Canadian made CD8 Roadster in existence. When I first bought it I figured it was likely rare, I had never seen or heard of one and I later learned that Chrysler Canada only produced about 380 CD8's in all models in 1931. A 7% survival rate for all models suggests perhaps 25 Canadian built CD8's survive of all models. With our cold climate and the depression in full swing, I'm told the Roadster production in Canada was likely fewer than 10, (perhaps 4-6) and who knows who would have made the decision to toss them into the production lineup. This car showed up in a scrap yard in the early 50's in Sydney Cape Breton, a relatively small town of 30K people, and it remains a mystery to me how it came so far from Windsor Ontario where it would have been built. While I have a trail of ownership back to early 1950's, getting anything further back has been crickets so far. The car has a serial number putting it in the first 1/3rd of production in Canada for all models, but a Budd body number 1457, and since only about 1700 CD8 Roadster bodies were made, the body is either the 457th, or 1,457th. As mentioned detailed production records for Canada are lost to time. It is possible the production of the CD8's in Canada started late in the model year, and this body may have been left over from the first run of CD8 bodies, and when the USA production shifted to the CD8 Deluxe model, left over bodies sent to Canada.. Someone told me the car was built in May of 1931, but I have not been able to confirm that. Thanks for your interest, it is the rarity of the car that makes my interest in working on it worthwhile.
-
Swinging around from driver to passenger side today, I decided to test fit the rear bumper and trunk rack, both factory items which came off the Sedan donor car. They were both heavily rusted, and bumper was bent and missing a brace. Anyway, I sorted that stuff 2 years ago and had them blasted and epoxied. They fit on perfectly. Cars always look more complete when accessories are on. Need a trunk, base needs to be 16x36, height 11"-14" ideally. Note I also have correct gas cap and fuel gauge sender unit access cover. Some of these rack had springs to hold them folded, I cannot remember if this one came with any.


-
3
-
-
.."you probably only need one rod on each door". You are likely right viv w, but my Architectural/Engineering background did not like the eccentric loading, likely to cause the pull handle to want to tilt. My understanding is the cars originally may have used a cable instead of a rod, and it had a yoke on both ends. I've never seen the actual setup.
-
2
-
-
Thanks XW for attending, recording, and presenting. I'm always attracted to the 50's-70's era British sports cars, lots of them to marvel at here.
-
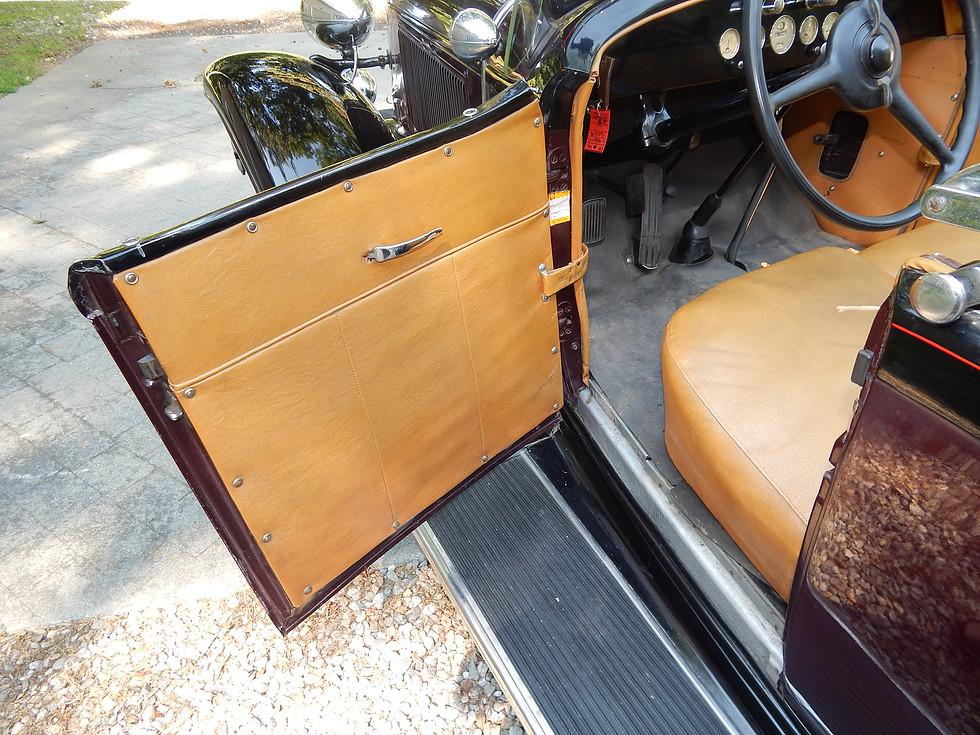
Yesterday and today I decided to tackle the inside door handle mechanism. All I had to start with is this photo of a handle and it's bracket, and the original latch. I made a mounting bracket similar to one in photo, and then made a pair of 18 gauge x3/8" by 8.75" long rods to connect pull handle to latch mechanism. Note rods had to be twisted 90 degrees to suit the ends. Original stuff was likely "loose riveted", but I am using #12 bolts and modern lock nuts, which can be tightened just enough to allow movement. Quite an interesting challenge to get it in place, had to completely assemble the pull handle and rods and feed thru door and pull handle a couple of inches into the closed area in order to have room to affix the rods to latch and secure with a small pin and cotter. Works very nicely. I still have to put a small stop on pull handle bracket so it will always stop in same position. Tomorrow I will make second one for passenger side,. As seen in one photo, the square shank for the outside handle is about 5/8" too short. I bought the handles and escutcheons 5 years ago because escutcheons were proper spaced screws and flat (many are curved as they about door. I knew I would have to extend them eventually. All the new mechanism will hide behind interior door panel. Original cars had an interior escutcheon affixed to panel, not sure how they mounted but I assume they were affixed to the panel with split rivets, then panel carefully placed over pull handle and attached to door with blind fasteners.

.JPG.56043a146d05436168bb1d01440d3ecc.JPG)
.JPG.a210356af2cda0188bc0aca15e8bedde.JPG)


-
3
-
-
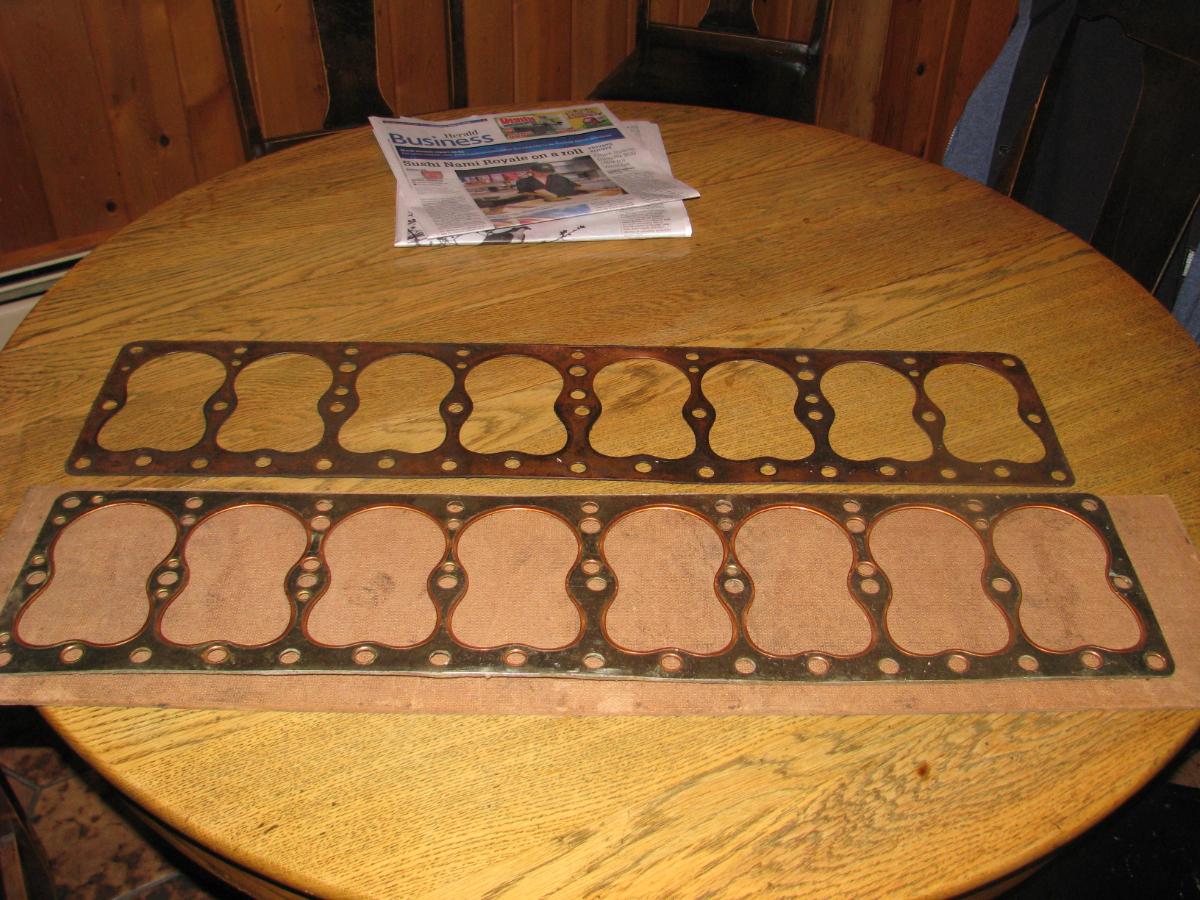
Not much information to go on. If head and block contact surfaces are good (clean, flat, and match (same engine parts)) and head gasket is new (or at least in good condition), and head bolts are torqued down correctly (in sequence and to correct torque spec), then water should never escape cooling channels in the first place. If water is coming up around a couple of bolts, my first question is where is water coming from? Sounds to me like gasket is not doing it's job. My first effort would be to check torque on those bolts/nuts. Consult manual/recommendations, bring engine to operating temp, shut off and re-torque (careful not to over-torque). Since OP does not mention engine being worked on, make, flathead of OHV, 6 or 8 cyl etc, advice is limited to generic stuff. When I first reassembled my '31 Chrysler 8 cyl engine, I had several leaks up thru bolts. When I disassembled for a close look, I realized the new head gasket I bought was for 1931 Chrysler, but not correct for my engine. Chrysler had changed cooling hole pattern early in the production when they went from 3" to 3.125" and later 3.25" pistons, and as a result I had the early engine and a later gasket. Gasket fit bolt pattern, piston openings and valve pattern perfectly, but holes in gasket did not align with holes in block/head near 7/8 pistons. I relate this story just to demonstrate leaking problem can be due to many issues. I ordered a proper gasket from Olsens (they up to that point were not aware of the variations but luckily I had correct part# and they had a NOS one to match after I sent them this photo) (note many extra coolant holes at left end of lower gasket).(I understand the early engines had over-heating problems as coolant had trouble getting all the way from radiator to and around 6/7/8 pistons).
 .
.
-
1
-
-
Good offer for someone close by, is it 600W cylinder oil, or actual 600 Weight. The 600W (W did not stand for weight) was recommended for transmissions, steering boxes and differentials in 1931 Chevs, Fords and perhaps some other cars. It's heavy viscosity helped prevent leaks past bushings etc. When you say "barrel" do you mean 45 gallon drum, or 5 gallon pail?
-
The operating manual for '31 Chrysler CD8's calls for "high grade fluid gear lubricant" in transmission and differential, but offers no weight suggestion, other than "for proper grade consult the nearest Chrysler distributor or dealer"! Any suggestions on what weight they meant or used? I used 600W cylinder oil in my '31 Chevrolet as that is what GM specified, but it is quite a heavy oil, equivalent to about modern 300 weight. I drained the old transmission oil out and it appears to be perhaps 90-140 weight. Car will only be summer/warm weather driven so oil should not be a cold weather driving issue. Thanks for any advice.
-
Back 10 years ago, I called the local Imperial Oil (ESSO/EXXON)oil company distributor here in Halifax Nova Scotia and asked in they knew of an oil product called 600W. They said they sold a product "Mobil 600W Cylinder Oil", and the 5 gallon jug I still have says product code 98K814, followed by 601260. Anyway, you might try googling that product code. BTW, the jug says "Official Lubricant of NASCAR"!
-
1
-
-
My 1931 Chevrolet called for 600W (W does not stand for weight but is just a code) oil in steering box, transmission and differential. I bought a 5 gallon pail from ESSO about 10 years ago for $110Can at the time., referred to as a cylinder oil. I suspect it would work great in any of these cars, a good heavy cylinder oil, with the modern equivalent of about a 300 weight. The thickness helps prevent it from seeping past lightly worn bushings, seals etc. Since most cars are not cold weather driven, it should not be a problem.
-
If you have a place to store it for the time being, I'd buy it. at $4K-$5K. It could likely be made into a decent driver for little extra, perhaps 10K total, and it will be the only one around. Down the road you might then find a buyer interested in the full restoration deal. Be a shaME TO SEE IT GO TO RODDER JUST FOR A chopped body!
-
3
-
1
-


.JPG.56043a146d05436168bb1d01440d3ecc.JPG)
.JPG.a210356af2cda0188bc0aca15e8bedde.JPG)


 .
.
Genuine Chevrolet piston rings-how many
in What is it?
Posted
I think oil rings came in a couple of different styles, grooved and "wrinkly" (my word not theirs!). Lack of rattle suggests they are likely wrapped for protection. amazing the things that show up on here. Hard to say how far back the package dates, GM was likely selling these into the 50's/60's