Luv2Wrench
-
Posts
1,967 -
Joined
-
Last visited
-
Days Won
3
Content Type
Forums
Gallery
Events
Everything posted by Luv2Wrench
-

My 1910 Mitchell "parts car" project
Luv2Wrench replied to JV Puleo's topic in Our Cars & Restoration Projects
Fantastic, very interesting to see all the little pieces and fixtures required and then see it start to come together on the engine. Job very well done! -
Now I want a Land Rover
-
Yep, the parts diagram is key and the way to go. I have two different exploded parts diagram but they (I assume) were originally hand drawn and the detail isn't the greatest. I think they made some changes as they went and the drawings likely didn't get updated. I try to go through the parts diagram and arrange the parts before I start assembly. I haven't had much issue with that technique until the gearbox. The drawings are quite vague and there are enough parts that it overflows my brain. I do a pretty good job taking pictures and putting items in marked zip-loc bags as well. In the case of this latest screw-up, the bearing and bushing where zip tied together but I ignored that because it didn't look like a bushing. In hindsight that should have been my signal to stop and get that resolved. But hey... now I know that gearbox backwards and forwards
-
My 1910 Mitchell "parts car" project
Luv2Wrench replied to JV Puleo's topic in Our Cars & Restoration Projects
wow... nice job! -
Measured the end float with a dial indicator and found a smidgen over 70 thou. I went to the only local hardware store that actually has hardware and, much to my surprise, they had a 14 gauge bushing with the correct ID. Hoping to get lucky again, I ran the dummy shaft in, heard the satisfying drop of the layshaft, tapped out the first motion bearing, then the main bearing and pulled the two pieces out. Added the bushing and reassembled. Less than 30 minutes start to finish. That gave me a good feeling about getting the rest of the gearbox assembled. Unfortunately that was the last of the things that went right. It took another 3 hours get to get the tail shaft casting in place and the selector rods installed. Those three hours would have been comical to someone watching but I didn't have the most fun. At one point I was close to having everything together only to discover the woodruff key for the speedo gear amongst some other parts. How it got out from between the shaft and gear and onto the far side of the workbench is a mystery. I was having a devil of a time doing things in the correct order so I must have taken the speedo gear off at some point and forgotten about the woodruff key. At another point I finally got the tail shaft casting in place and was trying to tighten the nuts inside when I realized it was impossible with the selector rods installed. While removing the selector rods I managed to drop a piece down in the bottom. While dumping that out I managed to lose one of the ball bearings. After checking the floor a dozen times I found it in the gearbox stuck in a nook in the casting. Fun stuff. I did finally get the casting on and the rods in place. I wore out my patience so I'll finish up the rest tomorrow. Here you can see the bump on the washer that slides in the boss in the casting. Fortunately you can access this with a small screwdriver to make sure it is oriented correctly. I found wrapping the wire (I'm using 14 gauge solid electrical wire) around the studs on one end, then lifting on the other, then wrapping and switching to the other side is an effective way of getting the layshaft into position. Don't forget to wiggle the main shaft a little as you need to get the gears to mesh with the layshaft. Here you can see the bushing I found. It fits perfectly between the circlip on the shaft and the main bearing (it is the newer looking bushing next to the ball bearing on the upper right). I did find the other bushing and the reason I missed it was because it had "spun" itself into a semi-bowl shape and I thought it went under the spring on the end of the tail shaft!!! Even if I did understand where it went and flattened it out, it wasn't even 40 thou thick. And finally... I touched up the paint on the tail shaft casting and it looks pretty similar to how it came from the factory.


-
1961 Mercury Meteor 800 restore
Luv2Wrench replied to Laughing Coyote's topic in Our Cars & Restoration Projects
^^^ this -
The parts I was expecting Monday came today!! I tackled the biggest issue first which meant taking the clutch and brake pedal out, inserting them into the "fume excluder" and putting them back in along with the spring for the brake pedal. Only took 3 hours during which time I seriously considered the task impossible and contemplated a change of hobbies. I continued putting the gearbox together and noticed that the first/second gear selector shaft was pretty worn near the detents. It was probably OK but I'm not really shooting for "probably OK" for this restoration. Before placing another order and waiting another 5 days, I checked the parts car gearbox and was very pleased to see the shaft looked great. I decided it was a good time to go through the rest of the gearbox from the parts car and get an idea of what it would need to be refurbished. I plan on refurbishing both the engine and gearbox from the parts car after I'm done with the main restoration and put those up for sale. Anyway.. got the shaft switched and everything buttoned up. Decided to run through the gears before adding the safety wire, gaskets and closing up the box. Noticed that the gear cluster had some pretty serious end float and noticed that I forgotten the last washer before the main bearing. Oops... glad I checked though wish I just hadn't forgotten it. Anyway... checked the amount of end float I had and compared that to the washer and yeah, going to need a thicker washer. I'll locate that, take everything back apart, add the new washer and put it back together. Hopefully it goes as smoothly as it did the first time.
-
1961 Mercury Meteor 800 restore
Luv2Wrench replied to Laughing Coyote's topic in Our Cars & Restoration Projects
Nice progress as always. That's some hefty hail there. Love the socket punch... I guess you tapered the edges? -
Roger's handcrafted 1:12 scale models
Luv2Wrench replied to Roger Zimmermann's topic in Our Cars & Restoration Projects
Even after all this time and becoming desensitized, seeing it together like that it is just as overwhelming as the day I saw him make that first tire. Which reminds me... those tires are nearly 8 years old so I think Roger should be mindful when cruising at high speeds. -
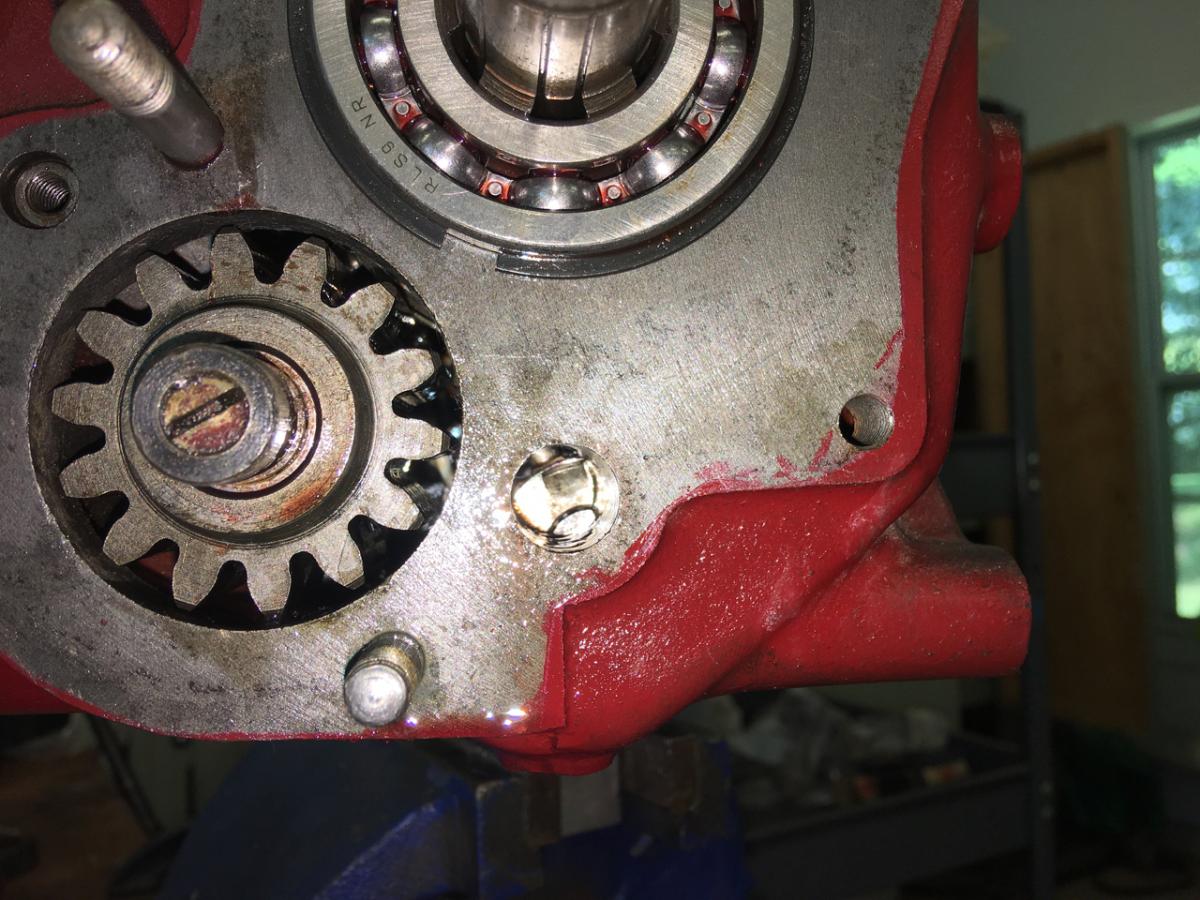
Thanks guys! I was sorting dreading the whole dummy shaft procedure but it turned out to be really easy. The original layshaft and bearings were fine so I turned a 3/4" shaft down for the dummy shaft and managed to get it the right length. The assembly lube is very tacky and it did a great job of holding everything in place. I don't think it took 15-30 minutes once I got started. The layshaft is chamfered on the end so that helps a lot and the holes in the casting are shallow enough that you can see in there and judge how close it is. The only tricky part ended up being getting the special washers (bent top to funnel oil onto the shaft) to slide down into there slots and then slide back up in the slot. Fortunately the hole in the casting is shallow enough that you can stick screwdriver in there and rotate the washer a bit such that it slides into place. r1lark, the hexagon shaped object on the right side of the block is the engine ID tag. Here's a shot I have of it from when I originally went to look at the car.

-
Yep, that's a typo. Thanks for pointing that out!
-
Moving along... got the sump installed and other bits finished on the engine. We're now waiting on the core plug for the camshaft, rubber bushing for the stabilizer bar and various copper washers. Those should be here Monday and I'll be able to button the engine up. I have two sets of the SU H2 carbs (the other set is from the parts car) and I'm currently evaluating which one is the least bad. My mountain of parts came with two carb rebuild kits but unfortunately they're probably 40 years old and some of the cork pieces are unusable.. as such... another order placed, another wait for parts. Started putting the gearbox together. The gear box for the TD has some extra fun for assembly. It uses the old style loose needle roller bearings. The layshaft (which runs along the bottom of the gearbox) has a set at each end. To get them in you have to have the shaft in place. But... the layshaft can't be in place before assembly because it gets in the way of the first motion shaft. The first motion shaft has to connect to the rest of the gears with, you guessed, more needle roller bearings. You stick those in place with assembly lube and the hope for the best as you join the shafts together. To make room for those the layshaft has to lay at the bottom of the gearbox and to do so you have to make a dummy shaft. This way you can install the bearings and all the gears on the dummy shaft (which is the exact length of the inside of the gearbox) and lay this on the bottom. Once the first motion shaft and main gears are joined you lift the layshaft up into position and slide the real shaft in and push the dummy shaft out. It sounds impossible but it is actually pretty easy to do. I should be able to finish up the gearbox tomorrow but, of course, I forgot to order a part or two so I'll be waiting on those.


-
More stuff bolted on. Water pump, timing gears, chain, tensioner, etc. Just about ready to put the sump on along with generator and starter. I'll rebuild the carbs next. Still need to assemble the gearbox and add that along with bell housing, pressure plate and clutch to the engine. Can't put the engine in the car without all of that as the back "mount" is on the gearbox! As such, the likely hood of it running this weekend is pretty much nil... along with the fact that my "core plug set" that I ordered doesn't come with the one for the camshaft. Like... why not??? I've ordered those items and some other things that I need but those will not be here before next week. However... the piles of parts is rapidly dwindling and thus easier to find things. I took some time to separate out all the parts that were not going to be used as they were extras, original but too worn out or for a different car/engine. I would have done this earlier but, quite frankly, I really didn't know what was what.


-
Wow, that's a great idea, thanks for the tip!!
-
Thanks r1lark! The engine is attached to the frame in two spots, the front and by the back of the gearbox. The weight of the engine/gearbox is resting on rubber blocks (both front and rear). Any side to side movement is resisted by the two bolts in the front engine mount and a stabilizer arrangement just above that. Vertical movement is also resisted by those two bolts in the front. The gearbox mount (where the clevis attaches) is a little different. It needs to allow a little more movement... certainly a little more rotational movement. What it doesn't want to do is let the gearbox lift up. This is where the clevis comes in. It will allow the gearbox to rotate but not move up. It was common for these mounts to break because the desire to lift in the lower gears is prevalent. The fix that is recommend (with the bolt) should still allow the rotational movement but hopefully resist the vertical movement. I'm hoping the bolt (grade 5 not grade 8 ) will also have a little give... at least more than the casting did. Knowing my luck it'll probably break on the first drive
-
Really looking good but you sure are scaring me with your issues so far. I think it is safe to assume I'll have the same issues. I think I have two or three sets of carbs so maybe I'll be able to scrape up enough parts to get one get set. The air filter up in post 235 is just amazing. Maybe you should be rebuilding my carbs!!!
-
Somewhat better progress today but I've come to the conclusion that I'm just slow. I'm slow getting out to the shop in the morning, slow getting started, slow getting back after lunch, slow, slow, slow. I've probably always been a little slow but now that I'm older, I've really gotten slow. It helps that I don't make as many mistakes as I used to and I enjoy the relaxed pace but I do get frustrated when installing the 10 cylinder head studs takes over an hour. Anyway... got the oil pump on, cylinder head and mostly assembled the rockers. I still need to tighten the bolts on the rockers as well as torque them down and bend up the tabs. A good bit of my "slowness" is I'm having a hard time finding things. Baggies that I carefully labeled have, apparently, been able to grow feet/wings and move themselves about the shop. I do think.... that the more I get put together, the less stuff I'll have to dig through and thus the faster things will get.


-
Still holding to the couple of hours a day routine though it is sometimes hard to see the progress. I got two of the MGA tires mounted on the newly restored wheels and put those on the rear so the car is back off the jack stands! These are just for rolling the car around and I'll be replacing all the tires with new tires when I'm done. There were several miscellaneous pieces that didn't get painted that I now need, mainly the radiator. I got those painted and started getting those items on the car. I got the crankshaft back and have started assembling the engine. I turned a 2 hour job into 6 hours but the end results was it was done correctly. I had to make some little fixtures to hold the grudgeon pin in a vise (while in the piston) so I could tighten the bolt on the rod without bending the rod (or scratching the piston). My ring compressor tool was just a little too big so I had to run out and get a smaller one. Once I finally got the pistons and rods in and connected to the crankshaft it proved difficult to turn over. I was worried about that so I tore it all back apart and measured all the bearings again one by one. As physics would have it... they all still measured 0.001" like they did when I checked them before I put it together. I think the issue was a combination of the assembly lube I'm using, very thick and tacky, and the 0.001" fit on the connecting rods. So with the thicker lubricant, 1 thou bearing clearance and new rings it was just a little tighter than I'm used to feeling. I'll get the cotter pins in, wire the nuts on the main bearings and then start on the rest of the engine. I've laid everything out and I should be able to make some better progress tomorrow.

-
My 1910 Mitchell "parts car" project
Luv2Wrench replied to JV Puleo's topic in Our Cars & Restoration Projects
Wow that looks great!! Too bad about the part, but yeah, you're right, finding a competent welder is worth more than what you paid him. BTW, I LOVE that Starrett hacksaw. -
Had a great day today. I have two nice wheels and three not as nice wheels. I media blasted those (twice) and straightened the rims using my Craftsman MG TD Wheel Rim Straightener™ Managed to dodge the rain showers and got three nice coats of primer on the wheels and other items like the driveshaft. One issue I've had is the tail casting of the gear box is broken where the clevis attaches it to the gearbox mount. This is a common issue with the MG TD. I've seen various fixes with the common theme of running a bolt through to either fix the broken area or for the clevis to attach to. I drilled a hole straight through and then tapped one side. I ran a bolt through with Loctite red and cut the head flush. It needs to be flush on each side as that is where the rubber sits in the mount. I'm pleased with how it turned out. I'll fill in the area with JB Weld and finish it off with a little red paint. Should be stronger than the original and look at least similar.


-
My 1910 Mitchell "parts car" project
Luv2Wrench replied to JV Puleo's topic in Our Cars & Restoration Projects
I'm starting to think you didn't need the parts car, you could've just started with some pictures. I feel guilty now for ordering parts for the MG online. -
1961 Mercury Meteor 800 restore
Luv2Wrench replied to Laughing Coyote's topic in Our Cars & Restoration Projects
Wish I had my treasure box from back then... I loved finding something that would be worthy of putting in there. Brings back a lot of fun memories!! -
Yes, I took 3 readings on each with Plastigage red.
-
Hope everyone is having (or had) a great 4th!! I had a little extra time today and was hoping to make a lot of progress on the engine. After getting everything setup and verifying I had everything I needed, I decided to check the clearances on the main bearings. Unfortunately that's pretty much where things ended for the day. I had the crank ground .020 under and while that was correct, there was a problem with the middle bearing. The middle main bearing is flanged and thus has a thrust surface as well. Since the bearings are .020 over, the width is also .020 over. I asked my machinists to check this but I guess he missed it. As such, the crank wouldn't fit in the middle bearing. I was pretty disappointed and frustrated as I really hadn't even gotten started and it was already over. I decided to take the middle bearing out and test the clearance on the front and rear bearings. The desired clearance here is 2 to 3 thousandths and it measured out at 2.5 so I was pretty happy with that. I checked the connecting rod bearings as well. The desired clearance there is .5 to 1.5 thousandths and it measured right at 1.0 thousandths. Having those measurements dead nuts on pretty much made up for the earlier issue with the middle bearing. Hopefully my machinists can get the middle of the crank ground down to fit the bearing without much issue. I did get the cam installed and that worked out well. I managed to get some other stuff done on the car so the day wasn't wasted. I spent forever installing the pedals only to realize they're probably going to have to come back out. They have a boot that goes over them and I think the only way the boot goes on is with the two pedals loose of the shaft... otherwise the tops of the pedals are too far apart. Oh well...

-
Looking great! I feel your pain with Moss parts needing adjustment. Just about everything needs some adjustment. I also think that artwork not being a perfect duplicate might very well be for fear of copyright violation. I'm a little concerned to see those air filters because I have the same thing and it makes me wonder if they are not for the TD. I've been disappointed several times to find out my best parts are actually for an MGA. Hopefully they were used on both.